

Divination Wizard Controller - Baldur's Gate 3 (BG3)
Contents
Divination School
The Divination subclass of wizard offers a very interesting setup, which turns the pure wizard caster into a battle manipulator.
The main highlight is  Portent ability, which can have great potential. We get two Portent Dice after each Long Rest, the score of those dice ranges from 1 to 20. Each Portent Die can only be used once; unused Portent Dice are lost at the end of the day and can only change a die in the favour of the caster and their allies.
This gives us an advantage of turning a devastating attack from an enemy into a miss or if they succeed a saving throw against one of your Crowd Control spells like  Hold Person; you simply can make it succeed.
Another part of good Divination features is the  Expert Divination which gives us another Portent Die and a way to restore them easier. Level 10 feature isn't that much of a great upgrade as we gain
 Third Eye: Darkvision and
 Third Eye: See Invisibility which at this level don't do much for us, so I won't be focusing on those. I'll focus on an 8 Divination 4 Sorcerer split. In this particular build I'll be going Draconic Sorcerer with
 Draconic Ancestry: White (Cold) for the
 Armour of Agathys.
Let's get straight into the breakdown.
[Video in progression]
Class Contribution
8 Divination Wizard
- Spell Scribing is the main highlight of Wizards, allowing them to learn any spell from scrolls and put it into their spellbook. Later, it can be assigned to Prepared spells and used during exploration or combat.
 Arcane Recovery - a special feature that allows restoring spell slots, and prolongs your combat potential until long rest.
- Portent - which gives us Portent Die as a way to control the battlefield.
- Expert Divination - giving us another Portent Die and prophecies that can help restore our Dice, more on that later.
4 Sorcerer
- Constitution Saving Throws proficiency meaning an easier way to succeed
 Concentration Saving Throws.
- Various Metamagic options that will help in and outside combat.
- Helpful Subclass features like
 Draconic Resilience for free
 Mage Armour effect and bonus HP,
 Tempestuous Magic for mobility after casting a spell,
 Strength of the Grave for survivability or
 Wild Magic just for fun.
- Easy way to restore spell slots and gain more Sorcery Points for Metamagic.
Build Variations
| Setup | Description |
|---|---|
| We'll lose a feat but will gain a lot of useful proficiencies like Heavy Armor and Shield and |
| Hexblade Warlock gives us |


Synergy with other builds
As the Divination is a great controller meaning it will mostly serve as a support and completionist to other builds, there's no specific builds it will combine well as it's extremely versatile.
Grouping
As you're going to have high spell DC and various Crowd Control spells some grouping will help you to achieve the best possible way to disable your enemies.
| Synergetic Builds | Enabler | Description |
|---|---|---|
| Warlock builds |  Eldritch Blast +  Repelling Blast | The Repelling Blast allows you to control the positions of the enemies and push them together. This makes Eldritch Blast a perfect tool for that |
Caster Builds like: |  Thunderwave | Using Thunderwave is a cheap and easy way to push enemies together. For example, you have two groups of two. So getting them together, and then letting you hit with a strong AOE attack, technically doubles total damage. |
| - |  Void Bulb | These consumables are plentiful from  Omeluum in Act 1. They can be either thrown or destroyed with an archer or another AOE attack to pull enemies together. |
 Minor Illusion | One of the most accessible cantrips in the game. You can use it to pull enemies together before combat. Once they are in place, use an attack to hit them all, or engage in combat so that they don't run away. | |
| - |  Black Hole | Accessible in Act 3, once you unlock Astral-Touched Tadpole. Black Hole is one of the strongest grouping tools once you have it. It is simple to use, has a wide area of effect, and does not affect allies. |
Build Overview
Here is a table with all the main picks during your leveling progression. For more detailed reasoning, I go further in the article. Also, do not forget to check the recommended gear as it is crucial.
| Level | Class | Selection |
|---|---|---|
| 1 | Wizard 1 | Cantrips:  Booming Blade,  Ray of Frost, Minor Illusion |
Spells: Mage Armour,  Longstrider,  Shield,  Magic Missile,  Chromatic Orb,  Enhance Leap. | ||
| Skills: Arcana, History, Investigation | ||
| 2 | Wizard 2 | Subclass: Divination School |
Spells:  Grease, Thunderwave | ||
| 3 | Wizard 3 | Spells: Hold Person,  Cloud of Daggers |
| 4 | Wizard 4 | Cantrips:  Mage Hand |
Spells:  Scorching Ray ,  Misty Step | ||
Feat: Ability Improvement -  Dual Wielder or +2 Intelligence | ||
| 5 | Wizard 5 | Spells:  Counterspell,  Lightning Bolt |
| 6 | Wizard 6 | Spells:  Sleet Storm,  Glyph of Warding |
| 7 | Lv 1 Sorcerer Lv 2-7 - 6 Wizard | Cantrips:  Blade Ward,  Light |
Spells:  Disguise Self,  Feather Fall,  Fog Cloud,  Expeditious Retreat | ||
| Subclass: Draconic Sorcerer - Draconic Ancestry: White (Cold) | ||
| 8 | Sorcerer 2 | Spells:  Sleep |
Metamagic:  Metamagic: Twinned Spell,  Metamagic: Extended Spell | ||
| 9 | Sorcerer 3 | Spells: |
Metamagic: | ||
| 10 | Sorcerer 4 | Cantrips:  Friends |
Spells:  Invisibility or  Darkness | ||
| Feat: - +2 Intelligence or Dual Wielder | ||
| 11 | Wizard 7 | Spells:  Evard's Black Tentacles,  Wall of Fire |
Replace spell: Mage Armour for  Hypnotic Pattern | ||
| 12 | Wizard 8 | Spells:  Greater Invisibility,  Magic Weapon, Any |
Feat:  Alert or +2 Intelligence |
Starting the Game - Level 1
This section covers the creation screen and what would go into the best Races, Abilities, and Skills for the Divination Wizard. Some of these choices are impactful as you cannot respec them.
Races
Picking a race provides various benefits - abilities, dialogue options, looks, etc.
| Race | Features | Description |
|---|---|---|
 Dwarf Duergar |
| One of the best race picks overall. The Invisibility action allows you to enter combat with the best possible position and toss a huge Crowd Control spell. Keep in mind you'll have slightly lower mobility as it is a shorter race. |
 Wood Half-Elf |
| The main focus is the  Civil Militia which grants us proficiency with Shield and Light Armour which can prove useful, bonus movement speed is also cool. |
 Githyanki |
| The race comes with all weapon proficiencies and early Medium Armor proficiency. Moreover, it gets some good actions like Misty Step and  Astral Knowledge. |
| High Half-Elf |
| The main focus is the Civil Militia which grants us proficiency with Shield and Light Armour which can prove useful. Bonus Cantrip for something like  Fire Bolt may also be useful. |
 Lightfoot Halfling |
|  Halfling Luck is an excellent helper, for casters. They also give a stealth  Advantage as a niche help. |
 Human |
| Humans come with additional proficiencies and higher carry weight, otherwise nothing special. |


Origins and Characters
Here are the Origin and character picks that have a slight advantage with this build:
| Origin | Features | Description |
|---|---|---|
 Astarion |
|  Happy from  Bite abilty which is an an extremely useful ability especially for casters. |
 Shadowheart |
| As mentioned above, those beautiful ladies comes with a free Shield and Light Armor proficiencies. |
 Jaheira |
| |
 Gale |
| Already fitting as a Wizard, origin Gale in the mid part of Act 2, can obtain a free level 3 spell slot, which would be used to cast some more spells. He also comes with free Shield proficiencies. |


Class
| Overview | |
|---|---|
 Wizard | |
| Features | |
 Arcane Recovery | Provides a way to restore spell slots with Arcane Recovery Charges. |
 Spell Slots | These can be used to cast spells and are restored each long rest. |
Cantrips
| Cantrip | Description |
|---|---|
 Booming Blade | For now, it will only deal damage when the enemy moves. However, after level 5, it will add 1d8 damage rider for free. Why this on a caster build ? We can always dish some free damage but the main focus is the  Hat of Storm Scion's Power with Metamagic: Extended Spell which can give us a lot of  Arcane Acuity later on in the game. |
 Ray of Frost | Great damage cantrip that can get easily buffed by  Wet from  Create Water or throwing  Water bottles doubling it's damage, it also slows enemies. |
 Minor Illusion | Stupendous cantrip that allows for incredible setups before fights, sneaking, stealing and many more. |
There are other good choices here - Mage Hand, Friends, etc. But I would prioritize the ones mentioned above, at least for the early game.
Using Minor Illusion
On the other hand, you can also use something like Minor Illusion to pull enemies together, changing their vision cones, and attacking with the same spell but hitting all of them. This is a very powerful cantrip that can be overlooked.
First, it does not break Invisibility or stealth (unless you get seen). Second, enemies, when not in combat, will chase it, meaning they will change their vision direction. Third, on most occasions, they will come closer to investigate the illusion.
Spells
For Wizards, picking spells is not that important, because they can scribe and learn any of them via scrolls. Still, some good early choices will go a long way. I would prioritize utility, exploration, and maybe a few damage ones:
| Spell | Description |
|---|---|
 Mage Armour | Great spell, especially as you will wear Cloth for a long part of the game. This will set your Armour Class to 13 before any item, dexterity, or other bonuses apply. |
 Longstrider | Very important spell to have in the party. It can be cast on all members to improve their mobility. |
 Shield | Big survivability spell, that improves Armour Class for a single turn via reaction. This allows avoiding enemy attacks, greatly improving survivability, and only costs a level 1 spell slot. |
 Magic Missile | It has a 100% hit chance, improving your success in clearing enemies. Later, its scaling is not as good, and you will have better spell choices. |
 Chromatic Orb | Great versatility and damage spell that allows you to adapt to the game environment. |
 Enhance Leap | Mandatory utility spell, helping with exploration. |
Background
Backgrounds are mostly for role-playing and you can pick whatever you prefer
| Background | Skills | Description |
|---|---|---|
| Acolyte | Insight Religion | These are all great, they give 1 intelligence-based skill, and others, either charisma or wisdom-related. I would give priority to Charisma ones, as they will help with dialogue rolls. |
| Guild Artisan | Insight Persuasion | |
| Noble | History Persuasion | |
| Sage | Arcana History | The most recommended pick as it comes with 2 intelligence-based skills. |
Abilities
Ability scores for this build: starting values, bonuses and the changes to make while leveling.
Skills and Expertise
Overall, the skills should be impacted by your roleplaying and background decisions. However, you would still want those that will give you the best benefits. My recommendations are to pick those at which you have a high ability modifier or are useful in general:
- Arcana
- History
- Investigation
- Religion
Wizard mechanics
One important aspect is that any spell scrolls you find can be learned. This consumes a scroll and some additional gold. As a result, the spell is added to the spellbook:
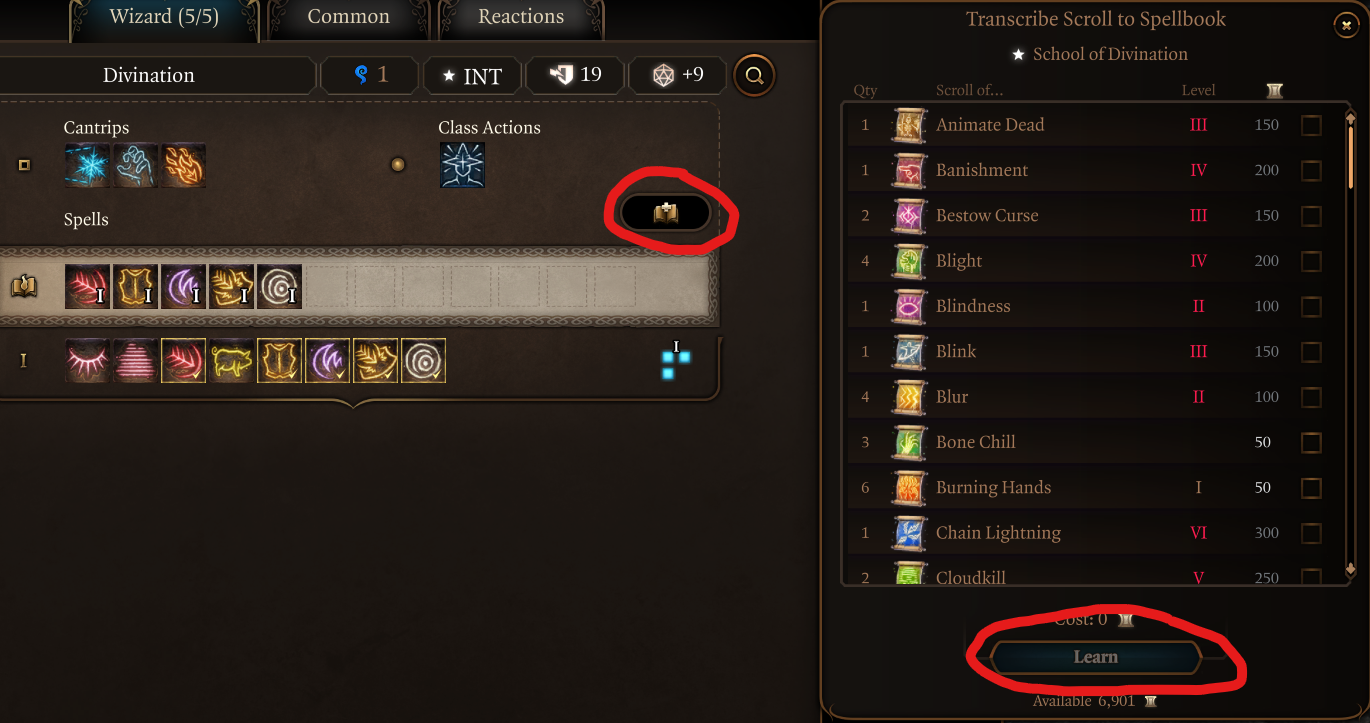
This means that you get those spells that you do not learn by leveling. We're able to learn spells according to the highest level of spell slot we have. This means that even when multiclassing we can still have higher level spells in our arsenal. Just wanted to tell you so that you would not be surprised in case the spells are talked about, and I did not suggest taking it.
Preparing Spells
The second stage, after you learn or scribe spells, is that you can then "prepare" them. This means that you have a limited number of spells active at a time.
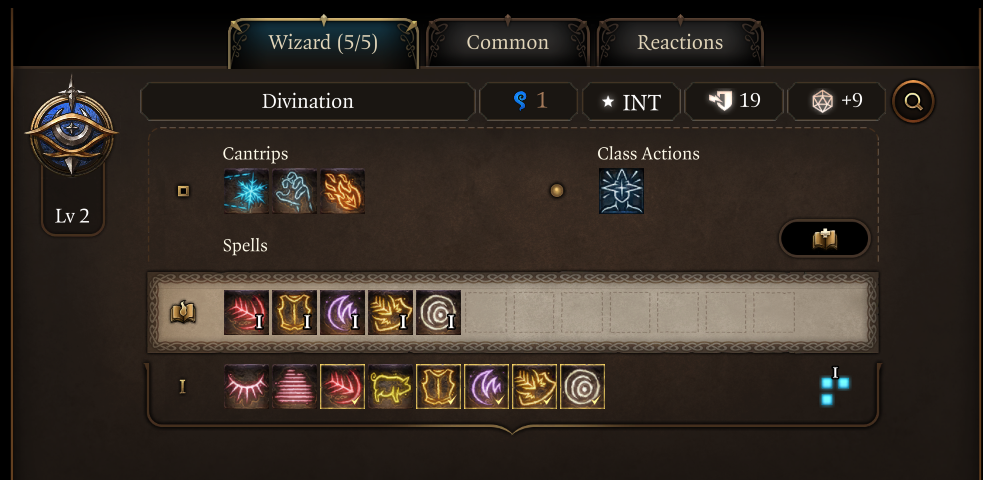
This is a good thing as you can change them based on the situation outside of combat. For example, you will be fighting enemies that are weak to Fire. Just add  Fireball or Wall of Fire. Fighting a large group of enemies, maybe include Glyph of Warding or
 Confusion to disable them.
Leveling Progression 2-12
Here is the detailed progression for the Divination Wizard to get you started. You can use it as a guideline because early games can be daunting and overwhelming. Later on, once you get a feel for the class, you can start picking your options
Levels 2-6
By this time, you should have landed on the Ravaged beach already and started exploring the initial area. You might need 1 additional encounter if you did not obtain enough XP in the Nautiloid.
This part of the progression covers 3 main areas. They are important both from an exploration and experience perspective. This is a huge swath of content, so missing any of the regions can negatively impact the game experience if you especially enjoy finding all the places
- Wilderness that encompasses - Druid's Grove, Goblin Camp, Sunlit Wetlands and The Risen Road
- Underdark - covering Ebonlake Grotto, Arcane Tower, Selûnite Outpost
- Grymforge - Underdark - Duergar Encampment and Adamantite Forge
Again, exploring them will give both awesome gear and a lot of experience, and of course, content with interesting quests.
For most of the builds, early levels are pretty simple, as there are minimal features that you can use. However, there are notable spikes at levels 5-6:
- Major class and subclass features
- Unlocking level 3 Spells and spell slots
With these, you will feel how the game combat opens up, and with correct preparations, you can start eliminating foes with minimal preparations.
Subclass
| Overview | |
|---|---|
Divination | |
| Features | |
 Portent | This core ability of this build is what gives the ability to manipulate combat with Portent Dice |

Spells
| Spells | Description |
|---|---|
 Grease | Great control spell that scales with your spell save DC, early game it won't be much but still will be useful. |
 Thunderwave | Great spell to push enemies off the ledges or push them into your control zones, great to use with Minor Illusion. |
Level 3
The first level 2 spells are unlocked. You also gain some nice features that will be useful later on.
Level 2 Spells Recommendations
As a Wizard, you can obtain spells in a few ways, so it is hard to recommend the progression:
- Picking them in the leveling screen
- Scribing from the scrolls that you find or buy in the game.
Core spells:
| Spell | Description |
|---|---|
 Cloud of Daggers | A solid spell for early game encounters. It can shred up grouped enemies and hit them twice - their turn, and yours. After level 5, it loses its potential, as the scaling and area effect are limited. |
 Hold Person | One of the greatest spells in the whole game, for now it may seem like a gamble but with proper buffs you'll start hitting it in no time. |
Additional options:
| Spell | Description |
|---|---|
 Web | Excellent early game control spell that can give an easy Advantage for you and allies. |
 Blindness | The  Blinded enemies are perfect targets for your allies as you get an easy Advantage against them. |
 Mirror Image | Excellent survivability spell that does not use Concentration, and allows you to avoid multiple hits. |
Level 4
The 4th level unlocks the first feat for the build. This is generally a big improvement as it helps by providing stat improvement or unique effects.
Cantrips
| Cantrip | Description |
|---|---|
 Mage Hand | It is my go-to recommendation. This cantrip can be extremely useful and deadly as it can open doors, throw grenades or even enemies. |
Spells
| Spell | Description |
|---|---|
 Scorching Ray | Great damage spell that can get boosted by a lot of items and it's crucial if we want to use another Arcane Acuity item. Think of it as more damage potential Magic Missile as it can crit. |
 Misty Step | Great escape and utility tool as it has huge range and you can cast it with a bonus action |
Additional options:
| Spell | Description |
|---|---|
| Web | Excellent early game control spell that can give an easy Advantage for you and allies. |
| Blindness | The Blinded enemies are perfect targets for your allies as you get an easy Advantage against them. |
| Mirror Image | Excellent survivability spell that does not use Concentration, and allows you to avoid multiple hits. |
Feat
Here you have a few options to choose from:
| Feat | Description |
|---|---|
| Ability Improvement - +2 Intelligence | Our favourite stat boost as it boosts our spell DC, attack rolls and potential damage capabilities |
 Dual Wielder | Great feat that on top of allowing us to wield Versatile weapons in each hand - meaning we can wield two staves with their benefits, it also gives us bonus +1 AC if we dual wield. |
Level 5
Level 5 plays a pivotal role in most of the builds. You will get access to level 3 spells, which are very powerful and start unlocking the class's potential.
Level 3 Spells Recommendations
So, these spells I would say are game changers in terms of power play. Some of them can single-handedly change the encounter to your side, disable a group of foes, or instantly delete them.
Core Spells:
| Spell | Description |
|---|---|
 Counterspell | Good spell which allows to negate some dangerous spells and gives more room for error. I understand the appeal for it but my personal choice would be something else from the list below. |
 Lightning Bolt | The lightning element spells are always mandatory in my spell arsenal. If enemies align perfectly and you have Wet applied on them, this will deal double damage. More or less, most of the non-boss enemies will be evaporated instantly. |
Additional options:
| Spell | Description |
|---|---|
| This spell can be extremely useful in some boss fights later down the road. It lowers their number of actions, reduces AC giving, so needed bonuses for longer fights. |
| Another powerful control spell that is especially effective against foes that use weapons. This leaves them outright defenseless and makes them flee. |
| The spell is generally overlooked cause it doesn't deal any damage. But do not be fooled, it instantly |
| This can disable a large group of foes, forcing them to do nothing and opening enemies to be dealt with instantly by your party members. |


Level 6
The level gives a big improvement that is needed to empower the Divination build:
| Feature | Description |
|---|---|
 Expert Divination | You gain another Portent Dice do use and upon taking a Short Rest you receive a list of prophecies to complete that can regain your Dice. |
Spells
Take any of the recommended spells that were suggested at level 5. My personal choice is Sleet Storm and Glyph of Warding.
Prophecies - what are they?
After short resting, wizards with Expert Divination will receive a randomly selected prophecy; when fulfilled, they will replenish a spent Portent Die with a new random value. Short resting with unfulfilled prophecies will not replace them with new prophecies
These prophecies range from:
- dealing a certain type of damage like Force (e.g Magic Missile), Bludgeoning (e.g using a
 Main Hand Attack with your stave like
 The Spellsparkler) and many more.
- casting a spell of a certain wizardry school like Divination (e.g
 Detect Thoughts), Evocation (e.g Fireball) and many more.
- learning or using a scroll
- using
 Help on a
 Downed ally
- killing a hostile unit
Levels 7-10
Generally, this covers the Act 2 part of the game. This unlocks items that give a slight boost to a few builds, and you uncover a really interesting part of the story.
Level 7 - 6 Wizard 1 Sorcerer multiclass
As mentioned in the introduction, Sorcerer plays a pivotal role as they give us lots of benefits we want like; Concentration boost, subclass features but most notably - Metamagic and easy way to have "infinite" spell slots and Sorcery Points.
Put the first level into Sorcerer and then follow up with 6 Divination Wizard; we're doing that because if we go first level Wizard we don't get the Constitution Saving throws which are vital for the Concentration upgrade and when we second level into Sorcerer our spellcasting modifiers when using scrolls will use Charisma.
To multiclass follow these steps:
Class
| Overview | |
|---|---|
 Sorcerer | |
| Features | |
| Spell Slots | These can be used to cast spells and are restored each long rest. |
Cantrips
| Cantrips | Description |
|---|---|
 Blade Ward | This allows to effectively negate 50% of physical damge for free. With our Metamagic like Metamagic: Extended Spell we can have free 4 turn resistance for physical damage just like that. |
 Light | Can help in dark areas but can also setup help with some items like  Callous Glow Ring to effectively apply it's damage passive. |
Spells
| Spell | Description |
|---|---|
 Disguise Self | Can help with stealing and special interactions with npcs or items like  Mutilated Carapace and such. |
 Feather Fall | Helpful utility spell that can help with traversing through the world. |
 Fog Cloud | Can Blind enemies or setup stealth for your party members. |
 Expeditious Retreat | Grants you the ability to  Dash on bonus action although it's using Concentration so use it wise. |
Subclass
| Overview | |
|---|---|
 Draconic Bloodline | |
| Features | |
 Draconic Resilience | This negates the need for Mage Armour. |
 Draconic Resilience: Hit Points | Just a bonus 1 HP for this build, so nothing fancy. |
Dragon Ancestor
Only interested in Cold Ancestry.
| Ancestor | Description |
|---|---|
 Draconic Ancestry: White (Cold) | Get Armour of Agathys is a useful spell, but overall I think it does not serve that big of a purpose here. |
Level 8 - Sorcerer 2
The second level gives more spells and unlocks metamagic.
| Actions | Description |
|---|---|
 Create Sorcery Points | Spend Spell Slots to gain Sorcery Points. Once you get some more metamagic options, you could sacrifice spell slots, to cast two spells in one turn or increase your range |
 Create Spell Slot | Spend Sorcery Points to unlock a Spell Slot. You could create a higher tier spell slot, to increase the damage over what you can at the current level |
Utilize Sorcery Points
This is a unique consumable resource for Sorcerers. These can be used for multiple use cases, that improve what the spellcaster can do:
- Use those points to activate Metamagic like -
 Metamagic: Quickened Spell or Metamagic: Extended Spell to improve spell effects or cast with bonus action.
- Create spell slots, in case an emergency arises from the available pool of Sorcery Points.
- Create Sorcery points from spell slots to fuel your use of metamagic, for the most important spells. In the late game, you can easily sacrifice level 2 spell slots, as you will not be using them much.
Spells
| Spells | Description |
|---|---|
| Any that doesn't use an attack roll or spell save DC, like Sleep | Reasoning being that we won't have great Charisma scaling and without forcing spell DC or Arcane Acuity early we won't be doing much work with those kind of spells. |
Class Passives
| Passives | Description |
|---|---|
 Metamagic: Twinned Spell | Spells that only target 1 creature can target an additional creature. |
 Metamagic: Extended Spell | Can make your crowd control effects or utility last twice as long, great survivability boost for Blade Ward and boost for stuff like Confusion. |
Utilize Metamagic
This is another powerful tool in Sorcerer's arsenal. It needs Sorcery points to work and consumes them for unique effects:
- Use Metamagic: Twinned Spell to target or release two spells that have single targets. This works well with spells like Chromatic Orb and later
 Chain Lightning.
- Metamagic: Quickened Spell allows casting with a bonus action, allowing you to cast two times without needing
 Hastened. This is perfect for setting up combos or removing foes with two strong spells.
Level 9 - Sorcerer 3
Spells:
| Spells | Description |
|---|---|
Any that doesn't use an attack roll or spell save DC, like  Mirror Image or Misty Step | Reasoning being that we won't have great Charisma scaling and without forcing spell DC or Arcane Acuity early we won't be doing much work with those kind of spells. |
Class Passives
| Passives | Description |
|---|---|
 Metamagic: Quickened Spell | The best choice by far. It will allow casting with Bonus Action, and double the number of spells you can use per turn. |
The main highlight of this level is a new Feat. Otherwise, you get more spells and cantrips
Feat
Here you have a few options to choose from:
| Feat | Description |
|---|---|
| Ability Improvement - +2 Intelligence | Our favourite stat boost as it boosts our spell DC, attack rolls and potential damage capabilities |
| Dual Wielder | Great feat that on top of allowing us to wield Versatile weapons in each hand - meaning we can wield two staves with their benefits, it also gives us bonus +1 AC if we dual wield. |
Cantrips
Here feel free to pick anything. Here are two I recommend, so pick one:
| Cantrips | Description |
|---|---|
 Friends | Even though you're not Charisma based, if you're the party face or somehow get into Charisma dialogue it may help. At higher difficulties like Tactician or Honor be careful as this may aggro NPCS. |
Spells
| Spells | Description |
|---|---|
| Any that doesn't use an attack roll or spell save DC, like Darkness or Misty Step | Reasoning being that we won't have great Charisma scaling and without forcing spell DC or Arcane Acuity early we won't be doing much work with those kind of spells. |
Levels 11-12
This is where you will spend most of the time in Act 3. There will be an immense amount of content, and you can finish your builds and unlock extremely powerful gear.
Level 11 - 7 Wizard
The new level unlocks level 4 spells to learn for the Wizard.
Level 4 Spells for Leveling and Scribing
These spells are a good upgrade, but not as significant as level 3 ones. You will get some situationally good, but nothing that will be a game-changer. Learn these either through leveling or by obtaining scrolls.
Core Spells:
| Spell | Description |
|---|---|
 Wall of Fire | A good spell that can hit multiple times per turn, if enemies are forced to pass through it. |
 Evard's Black Tentacles | An absolute BEAST of a spell. Pairing it with your high spell save DC, control and other spells you can cast on your enemies, you will dominate the battlefield. |
Additional Spells:
| Spell | Description |
|---|---|
 Dimension Door | A very valuable spell to have on hand. It can help you and a companion move a long distance and reach targets or escape them. |
 Greater Invisibility | Mainly mentioning it here, as I don't think it is valuable alone. However, if you have something like a Gloomstalker Assassin build it can allow it to kill enemies even without entering combat. |
 Confusion | It can disable large groups of enemies, does not target allies and may cause a little chaos. |
Replace spell
| Spell | Reasoning |
|---|---|
Mage Armour ->  Hypnotic Pattern | Due to draconic sorcerer we don't need Mage Armour effect anymore and Hypnotic Pattern can provide a great control, if you need a different spell, feel free to pick different one. |
Level 12 - Wizard 8
The Third feat of the build is unlocked, and additional spells to be added.
| Feat | Description |
|---|---|
| Ability Score Improvement - +2 Intelligence | If you haven't reached 20 intelligence, you might as well do it now |
 Alert | If you're a sucker for initiative and anti-surprise utility, pick this one. |
| Anything else | This leaves you an option to pick whatever else you want, for example  Lucky. |
Spells
| Spell | Description |
|---|---|
| Greater Invisibility | Can be set up as a great out of combat starter with your Dex based character, don't forget you can support too |
 Magic Weapon | With a level 6 spell slot it can provide a meaningful +3 to hit and damage. |
| Any | This leaves you freedom of choice. |
Equipment Recommendations
Here are some recommendations on how to follow the gear picks:
- I recommend checking the Item Checklists or Interactive Map, depending on which is easier to use for you. This will help you track which items and when you should pick them.
- I mention Stat Sticks. These are items that you do not use directly (like
 Club of Hill Giant Strength,
 Knife of the Undermountain King,
 The Dead Shot, etc.), but their bonuses still apply to other weapon attacks or actions.
- If an item is taken by another character, use the one with lower priority or even those from previous acts. If you want to have the best items for all builds, this will require planning, which is not for everyone.
 Plan the rest of your party around this gear in the Party Gear Planner
 Main HandThe Spellsparkler
You can generate multiple
 Lightning Charges and drastically improve the damage output of your spells. It also has multiple combos with items.
- Off HandMelf's First Staff
Gives +1 to spell attack rolls or DC. Good stat stick.
Alternatives
- Phalar Aluve
It can be used to apply damage and attack roll buffs in various combat encounters. Wearing it together with other staves will require
Dual Wielder feat. - Mourning Frost
Good melee boosting staff that combined with
Booming Blade can deal respectable damage. - Adamantine Shield
It provides a substantial defensive boost by disabling critical hits.
 Ranged Main HandBow of Awareness
The higher initiative bonus will allow you to start your turn earlier.
Alternatives
- Bow of the Banshee
Okay stat stick if you're going to use attack rolls either with spells or melees for
Booming Blade. The 1d4 bonus applies to every  Frightened target even if not applied by the bow.
 HelmetThe Shadespell Circlet
One of the only options for the early game that gives Spell Save DC boost.
Alternatives
- The Lifebringer
The best defensive option in Act 1. Works well with
The Spellsparkler. Without it, the item loses its purpose.
 ChestThe Protecty Sparkswall
The best spellcaster robe in Act 1. Works well with
The Spellsparkler for additional bonuses to Armour Class and Saving Throws with Lightning Charges.Alternatives
- Robe of Summer
Simple specific element defence boosting option.
 GlovesBracers of Defence
Pretty solid gloves especially if you are not able to wear shield for that early game +2 Armour Class boost.
Alternatives
- Gloves of Missile Snaring
Defensive gloves that allow you to negate enemy ranged attacks.
 BootsBoots of Stormy Clamour
Excellent shoes for applying
 Reverberation and possibly making your enemies
 Prone
Alternatives
- Boots of Striding
Great boots for maintaining
Concentration on your spells. You can also equip the boots, cast a Concentration spell, unequip the boots, and then break Concentration to keep their effect. - Disintegrating Night Walkers
One of the best boots, giving a total advantage for movement on difficult surfaces. It also gives
Misty Step to increase that mobility.
 AmuletPsychic Spark
Excellent amulet which improves
Magic Missile effectiveness, making it one of the better spells in the early game.Alternatives
- The Blast Pendant
Combined with
Lightning Charges it may provide a significant damage boost. - Amulet of Misty Step
Gives a free
Misty Step mobility option, simple.
 RingRing of Protection
Gives defensive bonuses to Armour Class and Saving Throws.
- Ring 2Crusher's Ring
Simple mobility option, good for everyone.
Alternatives
- Ring of Absolute Force
The effect works without the brand giving you a small yet effective damage boost.


Build Mechanics
In this section, I would like to dive deep into how to play the Divination Wizard. This will help you utilize it to the fullest and correctly use various actions and spells throughout the game.
Important Mechanics and Combos
Let's go through key mechanics and tips on how to effectively use the build.
Portent dice
Each Portent Die can only be used once; unused Portent Dice are lost at the end of the day.
Portent can only change a die in the favour of the caster and their allies. Attack rolls can only be changed from a miss to a hit for allies, and from a hit to a miss for enemies. Saving throws can only be changed from a fail to a success on allies, and from a success to a fail on enemies.
Portent ccounts creatures marked yellow/neutral as allies. This means if the user initiates combat by attacking an enemy marked as yellow, the user can't change the target's saving throw from succeeding to failing, only the opposite. Be careful, as the game may prompt for this.
Portent only needs either the target or source of the roll to be within range (18 m / 60 ft) and doesn't need line of sight. The Portent Die also don't spend reactions even though it's shown as so.
Full caster progression
Even though you multiclass - you still may learn level 4 spells if you have level 4 spell slots unlocked. This allows you to have spells like Confusion without taking them from leveling up. Same works for level 5 and 6 spells. Due to both Wizard and Sorcerer you will still end up with a level 6 spell slot in the end.
Spell Slot Restoration
As a wizard, you get a neat mechanic that is generally forgotten or overlooked. It's nothing overpowered, but it can help maintain spell slots. This is Arcane Recovery, which allows you to restore spell slots.
Same thing can be done once you reach Sorcerer;
Convert lvl 1-2 spell slots or sorcery points into either depending what you want -> repeat until you run out of spell slots/sorcery points -> drink  Potion of Angelic Reprieve as it as short rest pot which restores your lvl 1-2 spell slots and sorcery points,
 Potion of Angelic Slumber would refresh whole progress -> enjoy your infinite spell slots/sorcery points
Cold/Lightning with Wet ultimate combo
One setup to not overlook, and which I emphasize throughout the progression, is Wet + lightning/cold spells. Wizard does not get Create Water, which is, in one sense, problematic, as you have to use other means to do that.
One of the popular options is to drop  Water from your inventory (which doesn't consume an action) close to the enemies. Then attack it with
 Off-Hand Attack (Melee). This applies Wet and opens up option to attack them with spells.
However, my sensible recommendation is to have either a Cleric, Druid, or any multiclass of these that can cast Create Water. This simplifies things exponentially and makes the whole combo feel more natural.
Arcane acuity
So the core aspect is being able to build your Arcane Acuity both during your turn and outside of it. It will greatly increase your spell potency which is crucial for this build.
Quickly stacking Arcane Acuity will make your spells almost inescapable and almost guaranteed to hit.
Battle Acuity also triggers on dealing weapon damage to objects as well as creatures so  Helmet of Arcane Acuity with attacking furniture or stuff like torches can easily stack it, firing
 Arrow of Many Targets can also stack easy 6-8 Arcane Acuity charges.
Using Hat of Storm Scion's Power with Booming Blade and Sorcerer's Metamagic: Extended Spell can generate you an easy 8 Arcane Acuity stacks although you have to be in melee range. You may also enchant a weapon either through  Elemental Weapon or by
 Drakethroat Glaive and won't need the Booming Blade to gain Arcane Acuity
Using Hat of Fire Acuity with level 3 Scorching Ray will give the same effect or using continuous damage spells like Wall of Fire can quickly stack and maintain Arcane Acuity.
The effect of up to +10 to spell DC and attack rolls is monstrous.
Maximise the amount of the level 5/6 spell slots.
In the late game, you have multiple sources of level 6 spells, thankfully, you do have various ways to get plenty of level 6 spellslots:
 Arcane Battery from either
 Markoheshkir or
 Staff of Spell Power
 Spellcrux Amulet to restore a level 6 spell slot
 Consume Life Essence from the
 Staff of Cherished Necromancy for a free level 6 spell
Combat tactics and rotation
- Due to Portent you may start using your spells like Hold Person very early due to easily negating enemy saving throws.
- For very early Magic Missile is your go-to option, 100% hit chance makes it easy to eliminate beginning enemies.
- Use Mage Hand to pull doors, throw potions or even give it
 Elixir of Hill Giant Strength or
 Elixir of Cloud Giant Strength to throw enemies around.
- Use stuff like Minor Illusion to easily setup kills or CC spells.
- Use Longstrider, Mage Armour, and such spell after every long rest.
- Use Arcane Recovery to recover spell slots that you use on prebuffing
- Booming Blade is best used on the initial attack and may provide some unexpected damage results.
- Cloud of Daggers is a perfect spell to hit enemies that are stacked close together.
- At level 5, once you get Lightning Bolt, try to combo it on Wet enemies for maximum damage.
- Thanks to Expert Divination you may now use more Portent Dice as it can easily refresh them thanks to the prophecies.
- Due to many Arcane Acuity items we may quickly boost our combat potency, make up your combination as this build is extremely versatile. For example attack with Booming Blade + Metamagic: Extended Spell + Hat of Storm Scion's Power +
 Gloves of Battlemage's Power for almost instant 10 stacks.
- Remember to use your Metamagic wise. Metamagic: Quickened Spell requires bonus action, Metamagic: Extended Spell may lead to more survivability, quicker Arcane Acuity or longer CC duration, Metamagic: Twinned Spell may elevate your Chromatic Orb damage further and many more.
- Use stuff like Minor Illusion to easily setup kills or CC spells especially since now you have a bigger variety and possibility due to metamagic
- The points can be pretty limited if you heavily utilize them. We can work around this by using
 Create Sorcery Points and consuming spell slots. They are important for spellcasting, so using all of them is quite expensive for Sorcery Points. Items like Spellcrux Amulet,
 Pearl of Power Amulet,
 Shield of Devotion and Potion of Angelic Reprieve may help.
- Don't sleep on scrolls as you're one of the best classes to utilize them.
- Your combat loop ain't much different from lvl 6-10.
- Due to you being a controller - you having high initiative is crucial; having ~10 initiative will make you almost always guaranteed to go first in combat to dictate how it will play out.
- Get your Arcane Acuity stacked, clump a big number of enemies together either by Minor Illusion or Black Hole, cast a big crowd control spell and use your Portent Dice against enemies who will somehow win the saves.
- Thanks to high-end gear that has Arcane Battery don't sleep on casting huge spells.
- Due to your high variety of spells, don't be afraid to take high damage spells like
 Cloudkill or Chain Lightning, even though you're a control caster - you're still a great damage dealer.
Maximizing the Build - Abilities, Illithid, Consumables
In this section, I would like to dedicate to various optimizations that you can do to further empower your build. Various things like Illithid Powers and consumables can make the build from powerful to totally overpowered, trivializing the hardest game encounters
Maximizing Ability Scores
Ability Scores play an important role both in terms of how your attacks land. Moreover, these can help to also reach extremely high skill rolls needed for a few checks.
- Act 1 -
 Auntie Ethel's Hair - you will want to get +1 Intelligence if you pick this choice.
- Feat - Ability Improvement - + 2 Intelligence
- Act 3 - Mirror of Loss - +2 Intelligence
This will allow you to reach 22 Intelligence score for a modifier of +6.
Illithid Powers
This special mechanic in Baldur's Gate 3 allows you to consume tadpoles and unlock special Illithid Powers.
At first, you can only use the base powers. As you move to Act 3, you will be able to unlock the outer ring powers.
| Illithid Power | Type | Description |
|---|---|---|
 Favourable Beginnings | Base | Beneficial power to take as it does not have any costs and provides only benefits on the first hits. |
 Luck of the Far Realms | Base | Guarantees a critical hit, use it on important targets that you want to make sure are killed. |
 Psionic Backlash | Base | A decent use for reaction to deal some bonus psychic damage. |
 Cull the Weak | Base | Can help to kill an enemy faster if it is left with a few HP. |
 Illithid Expertise | Elite | As you are not a charisma-based character, these proficiencies help with dialogue checks. |
 Psionic Dominance | Elite | Can be used to save yourself from a deadly spell. This is especially relevant as you will have a  Disadvantage on mental saving throws. |
 Black Hole | Elite | Absolutely devastating spell that will be perfect with our high spell save DC allowing for some crazy plays, it also applies  Slowed effect. |
 Freecast | Elite | Remove the cost of spell slots or charges. |
 Mind Sanctuary | Elite | You can now use action and bonus action interchangeably, giving two full spell casts each turn. It will also help other casters in the group. |
 Fracture Psyche | Elite | Weakens enemies by reducing their Armour Class. Now it's easier to hit them. |
Potions, Elixirs and Consumables
Let's take a look at what consumables you can use to further empower the build.
Potions
These are general consumables, and most of them are activated for a few turns. Potions are separate from Elixirs and can be active together.
| Consumable | Description |
|---|---|
 Potion of Speed | You can chug this potion before combat, or during combat using a bonus action. It gives another action point that gives an additional attack or one more spell cast. Sadly, its duration is only 3 turns. |
 Potion of Animal Speaking | Although not something powerful, it is worth stocking up and saving a spell slot. |
 Potion of Invisibility | Can be used to get a perfect position before the encounter starts. It can also help trigger  Surprised rounds. |
 Terazul | Gives Hastened and stacks with other sources of it. This is a late-game consumable. |
 Potion of Angelic Reprieve | Great utility potions which can restore your spell slots, hp and valuable class mechanics. Potion of Angelic Reprieve may also provide you with "unlimited" spell slots or sorcerery points. |
 Potion of Angelic Slumber |
Elixirs
Unfortunately, only one Elixir can be active at a time. However, the good thing is that they last until a long rest, making them very useful and economical.
Be sure to activate them before combat, as otherwise, you will need to use a Bonus Action.
| Consumable | Description |
|---|---|
 Elixir of Hill Giant Strength | Use them ONLY if you have to  Shove an enemy or use Booming Blade with Hat of Storm Scion's Power if you struggle with hit chance. |
 Elixir of Cloud Giant Strength | |
 Elixir of Bloodlust | The elixir gives an easy option to get an additional action point - just kill a foe. This can then be used to attack one more time or cast a full spell. |
 Elixir of Battlemage's Power | Improves Spell Save DC, making it easier to land spells. |
 Elixir of Peerless Focus | Makes it easier to maintain spell Concentration. |
 Elixir of Vigilance | For some encounters, you will want to go first. This elixir will ensure that it overcomes even Surprised mechanics. |
Scrolls
This is one of the most overpowered mechanics in the game. At first, it might seem that you earn those old, boring spells that you can learn yourself. However, as you play more and more, and get higher-level spells, you can save your valuable spell slots. During the whole playthrough, you will probably collect a lot of these, so I recommend using them whenever you can.
Conclusion and Credits
Thank you for reading the Divination build for Baldur's Gate 3. Its high control capabilties and manipulating dices will definitely be useful as a support. I urge to ask questions and I'll respond to them ASAP.
Your turn: Like, Dislike, comment, or share!


Join the Discussion