
Sword and Shield Arna Build - The Gladiator - Stoneshard
Introduction
Contents
Overview
This is a light armour build with a sword and light shield, that focuses on stacking block and dodge chance to become untouchable while dealing damage through counters. This is achieved by acquiring a balanced mix of Strength and Agility as well as a dose of Vitality to enhance survivability.
This build is designed around, and requires the use of a Light shield, due to the mechanics of Raise shield, when equipped with a light shield. It does not work with any other shield type.
Character Choice
This build does not rely on any particular character trait, meaning it could be done with any character. That being said, 2 candidates stand out clearly from the rest.
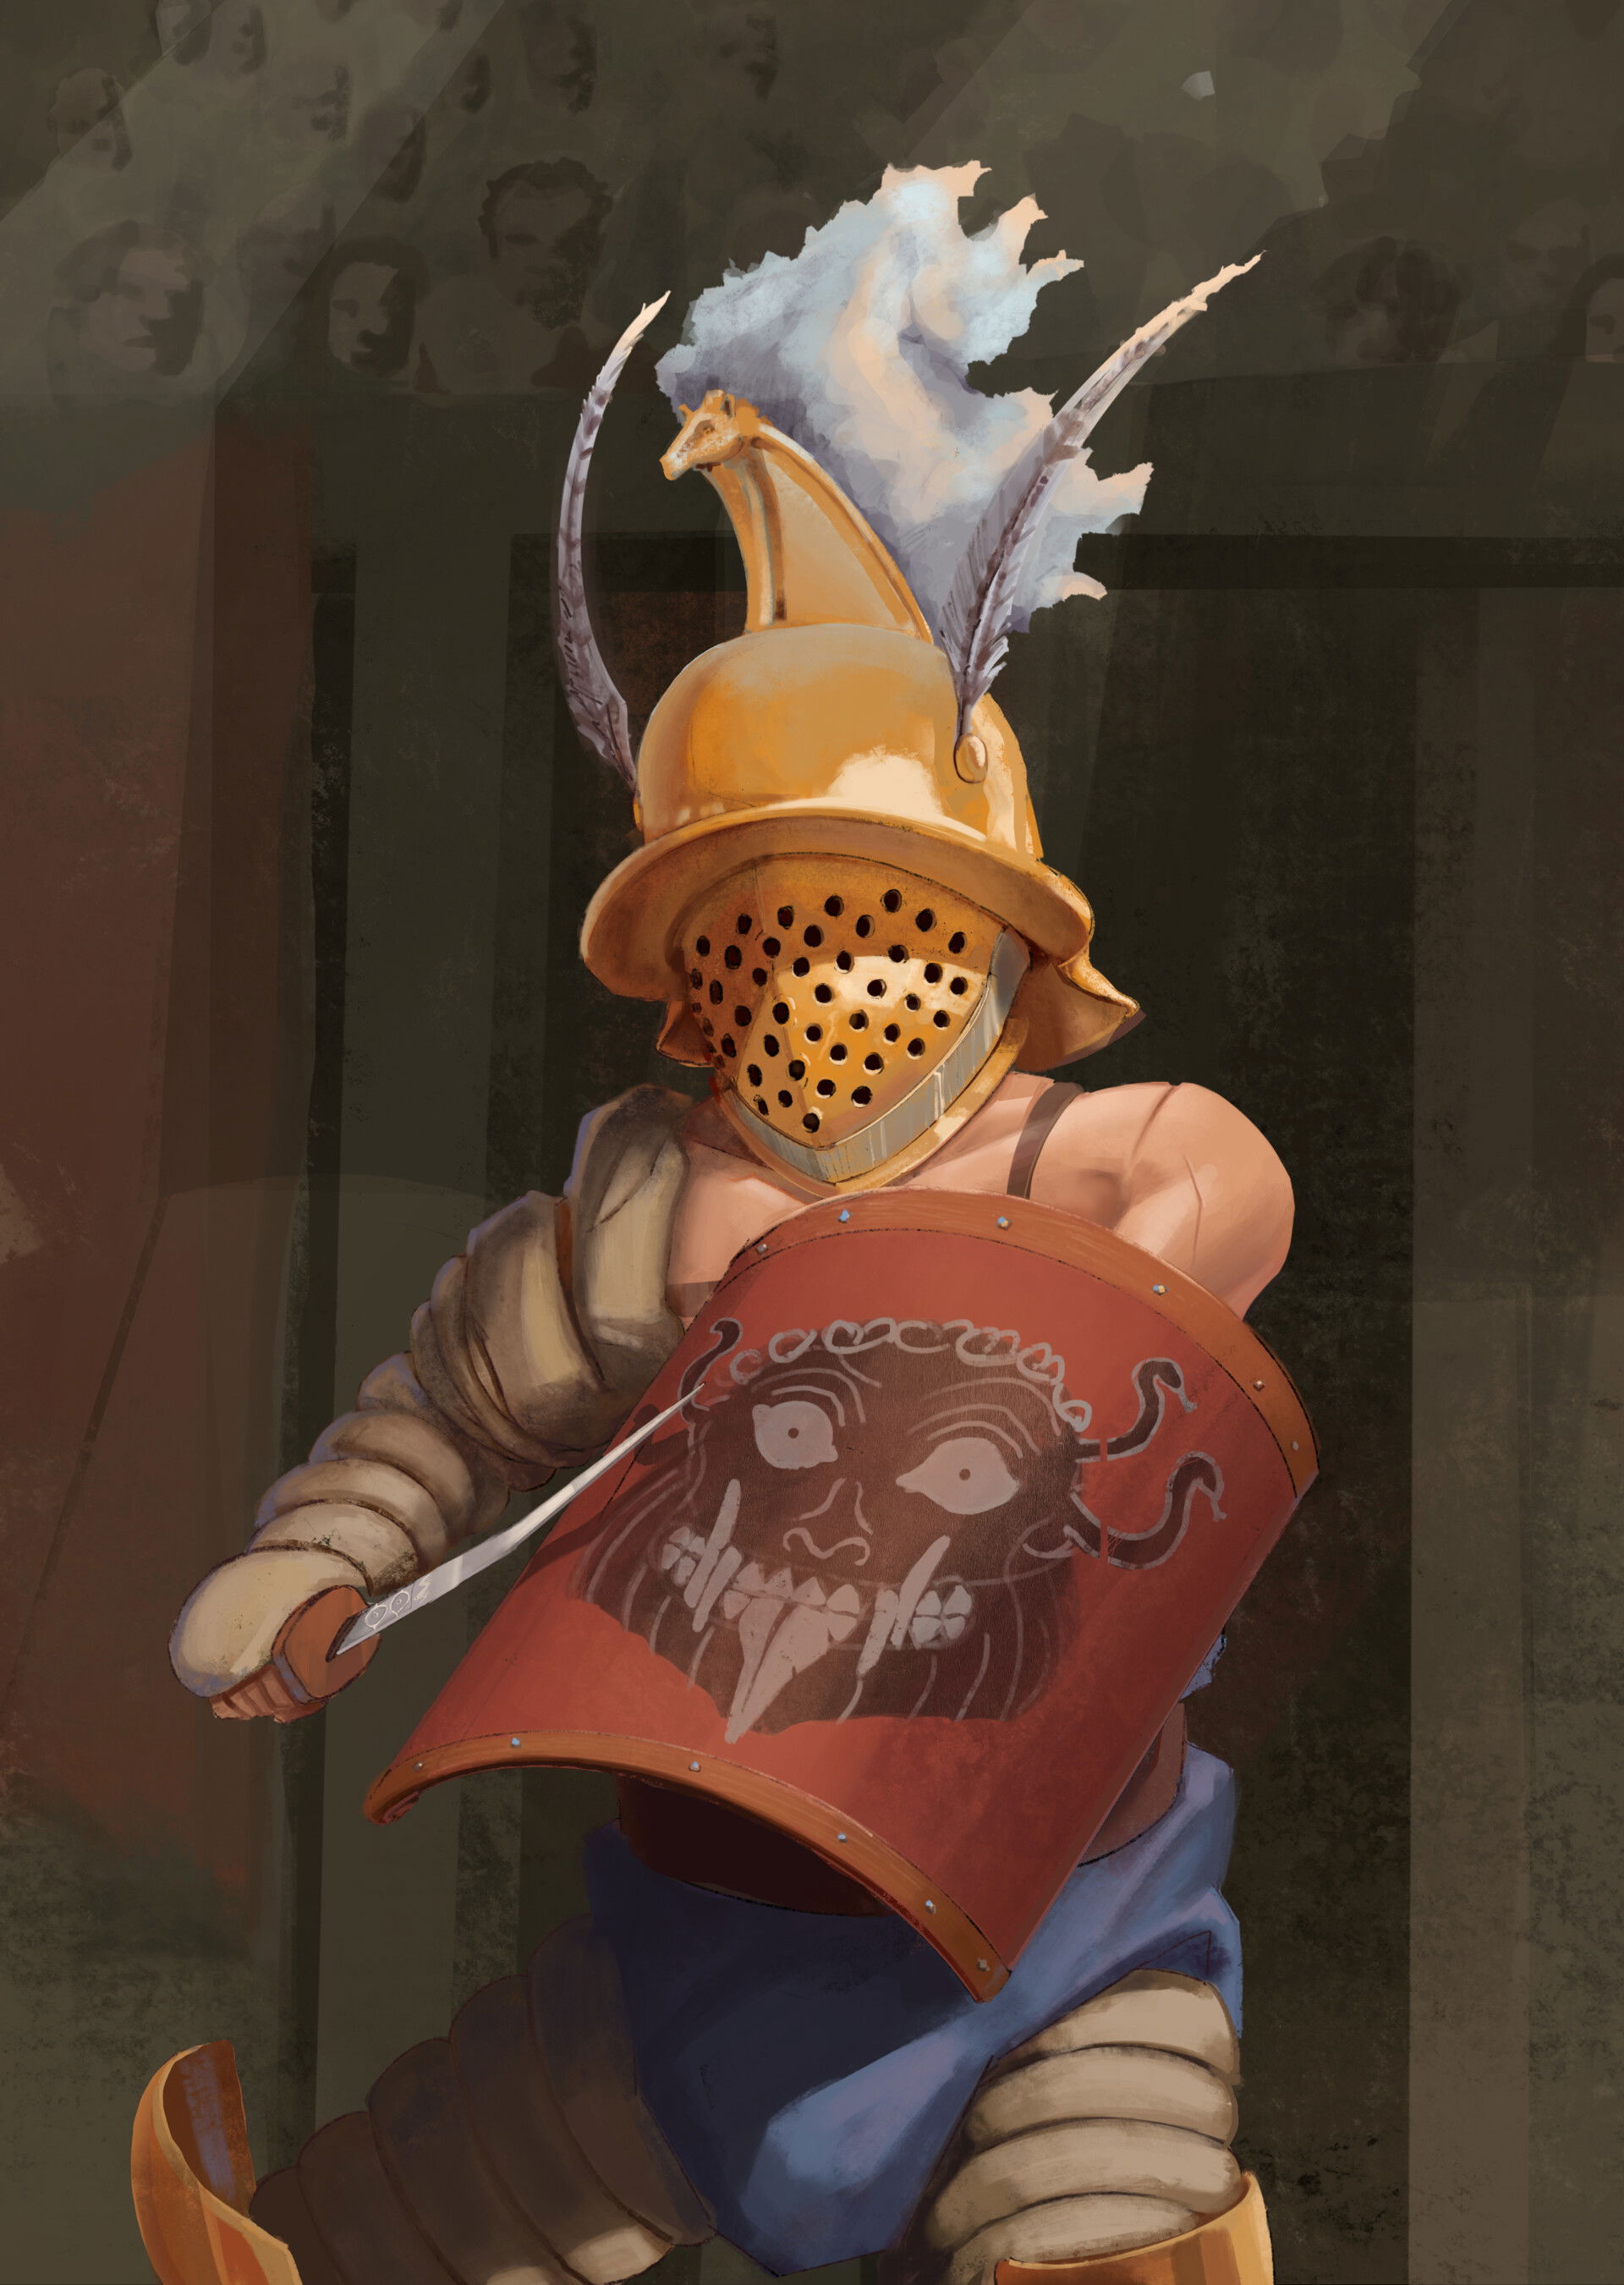
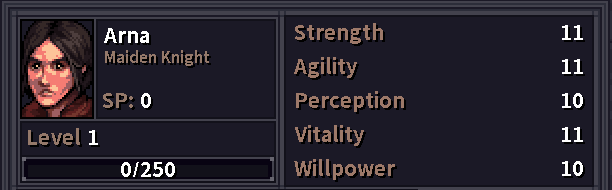
Arna the Maiden Knight
Arna offers 11s in all of the most desired stats for this build (Strength, Agility, Vitality) as well as providing the best starting equipment. Her starting weapon, while tier 2 though only in name, is adequate for the early portion of the game, until we acquire our first major upgrade after arriving in Brynn from Osbrook. I played her when writing this guide.
Her trait, "Vow of the Feat" also offers the most late-game potential:
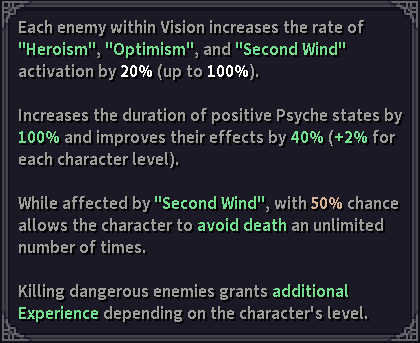
While the wording may not immediately make it clear how exactly this trait benefits you, looking closely at the Heroism and Second Wind psyche states clarifies the matter.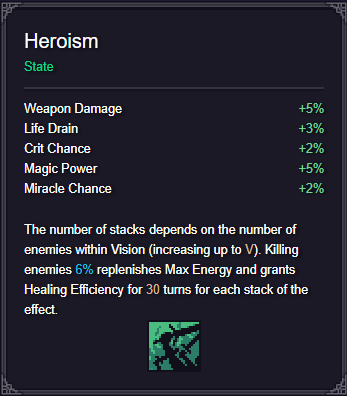
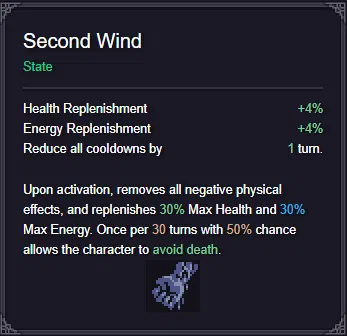
By increasing the rate of activation of positive psyche states, it enables them to activate more often, with shorter periods of cooldown, ultimately activating whenever there are 5 or more enemies within vision and your Sanity and morale are both in the green.
Furthermore, these effects gradually become more powerful as you level, capping out at level 20 with a 40% increase in all of the numbers provided by these psyche states. The cherry on top is the Second Wind's ability to allow the character to avoid death, losing its cooldown, meaning that you could survive on 1 hp even when surrounded by multiple enemies.
Both of these effects are very noticeable when comparing her to other characters in gameplay.
These effects can only activate when both Morale and Sanity values are above 50% making maintaining them especially important on Arna. Luckily, the improved and more frequent Optimism psyche state will make that easier to achieve.
For safety, it is recommended to bring some form of morale-uplifting alcohol with you into late-game dungeons.
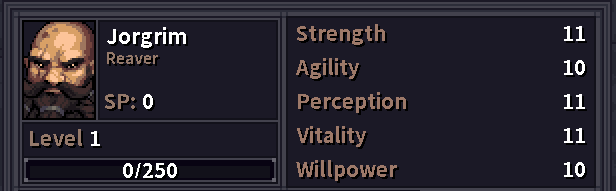
Jorgrim the Reaver
Jorgrim is a powerful character in his own right, offering a less streamlined but nonetheless useful array of stats. His starting gear includes a sword, but is otherwise less protective than Arna's. His amulet and belt, however, will serve you throughout the early to mid-game.
His trait, "Gore and Glory" is what sets him apart from the other characters, when considering this build.
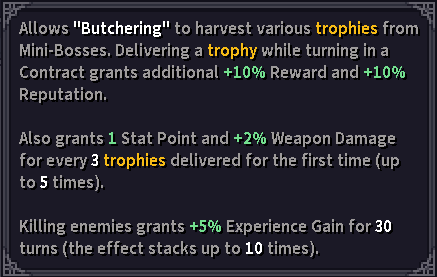
This trait introduces a unique mechanic to his gameplay - skinning dungeon bosses for trophies.
It offers much more tangible bonuses than Arna's and allows him to follow the same build plan despite having less ideal stats. 10% increased gold rewards allow Jorgrim to scrape together the coin needed for late-game gear that much faster, while the 10% increased reputation rewards allow him to unlock the elite vendors in Brynn sooner than other characters.
Furthermore, every time you hand in the 3rd boss trophy that you have not handed in previously, you will gain 1 stat point and 2% weapon damage. This effect stacks 5 times. Previously delivered trophies are remembered forever and may not be delivered again to upgrade the trait's second effect, though they still will award bonus gold and reputation.
Lastly, by taking many fights in rapid succession, Jorgrim can level up significantly faster than other characters.
Overall, Jorgrim has a slightly faster rate of progression, being weaker in the early game and stronger in the midgame thanks to the extra stat points. Furthermore, since I played this build on Arna, there might be certain discrepancies regarding skill order when playing it with Jorgrim. I will attempt to address them when they arise.
Endgame Stat Spread
| Stat | Score |
| Strength | 27 |
| Agility | 20 |
| Perception | 10 (15 on Jorgrim) |
| Vitality | 15 |
| Willpower | 11 |
After achieving this stat spread, the 4 remaining stat points from Jorgrim's passive can be distributed however you like, though increasing Perception to 15 is recommended.
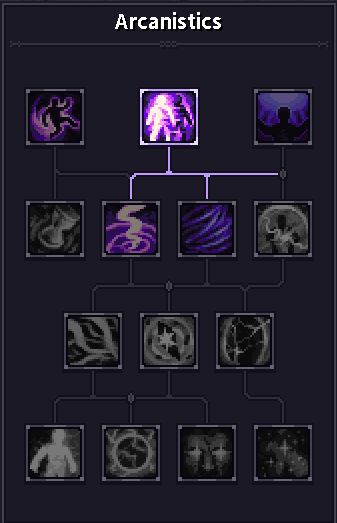
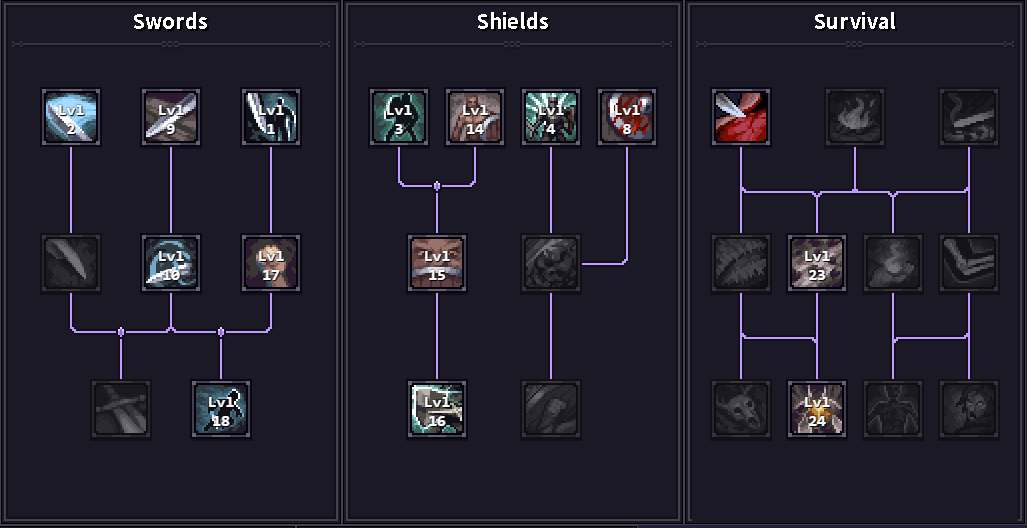
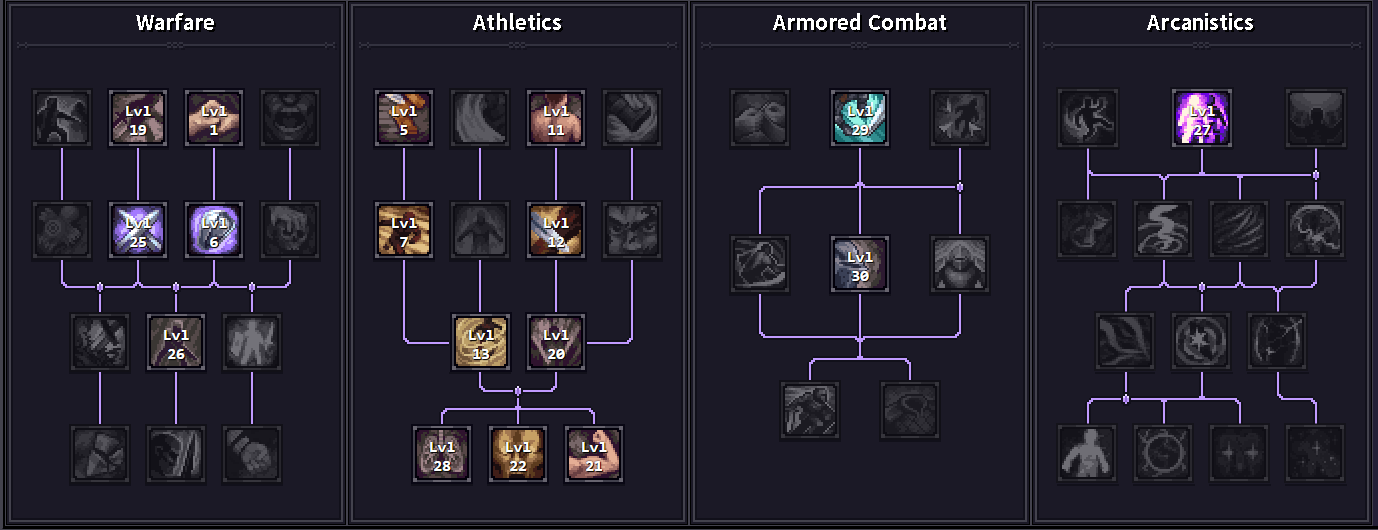
Final Skills
 |
 |
 |
 |
 |
 |
 |
Final Gear
This build uses light armour to maximize its Dodge, Block, and Counter stats, while the jewellery compensates for its lack of accuracy. The reduced armour purchasing costs also allow stronger gear to be purchased sooner, allowing the build to push endgame content at an earlier level.
Reminder that this build requires a light shield to function.
| Item | Stats | Contribution |
|
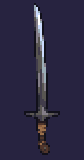
Knight Blade |
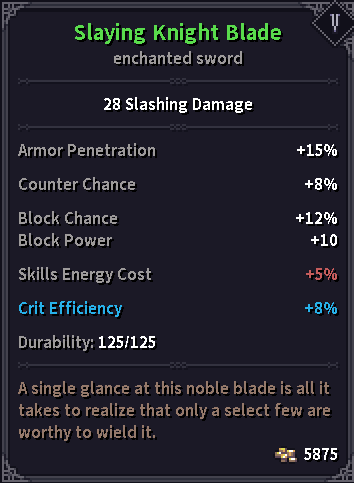 |
BIS sword, offering strong counter and block stats. |
|
Maaf Shield |
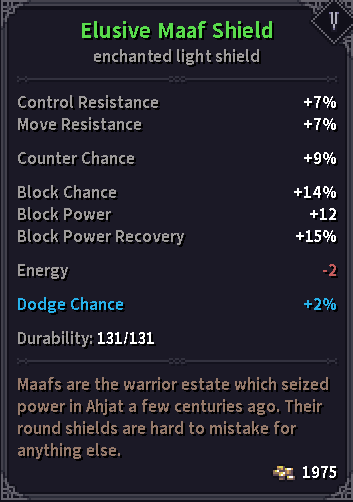 |
Excellent light shield, acquired from an elven vendor. Very cheap for a tier 5 shield, and does not require unlocking the carpentry bailiff in Brynn. Offers lower counter and block stats compared to the Aristocrat shield. Offers strong Movement and Control resists as compensation. |
|
Blademaster Doublet |
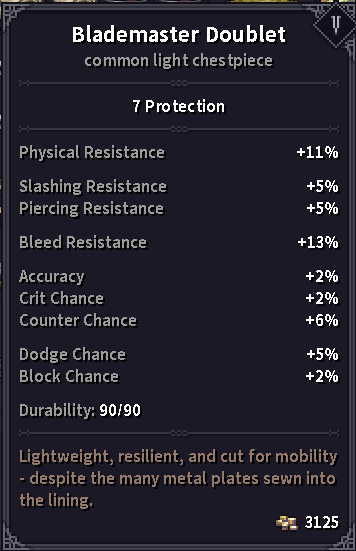 |
Offence-oriented chest piece. offers less dodge and block chance than other options. Provides useful boonuses to accuracy, crit and counter chances. |
|
Blademaster Gloves |
 |
BIS gloves. These gloves provide all of the offensive stats that the build desires. |
|
Jibean Cape |
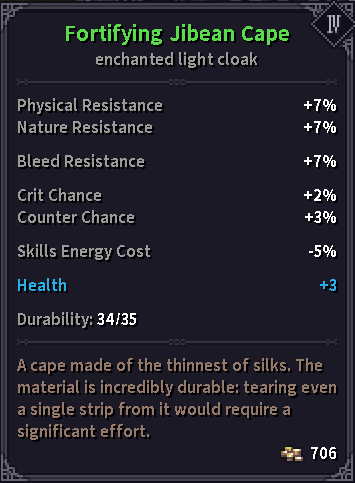 |
BIS cape. It offers very convenient 5% skills energy costs, as well as bonus Crit and Counter chance. Bleed resist is also very desirable. |
|
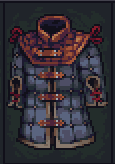
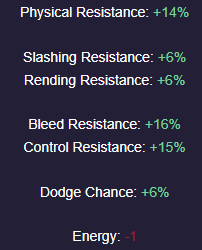
Berserker Bear Cowl |
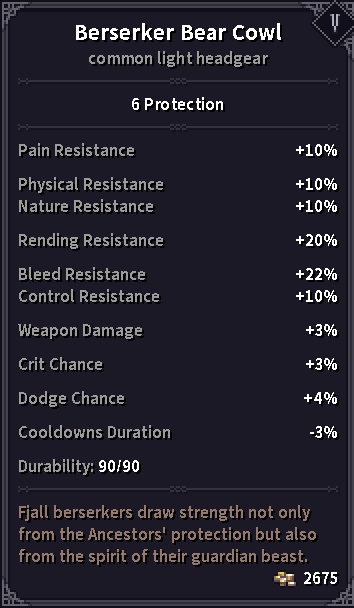 |
Thematically appropriate helmet offering a wide range of helpful stats. Acquired from the dwarven merchant in Brynn Port. |
|
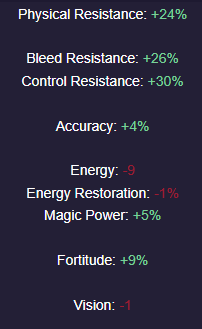
Knight Belt |
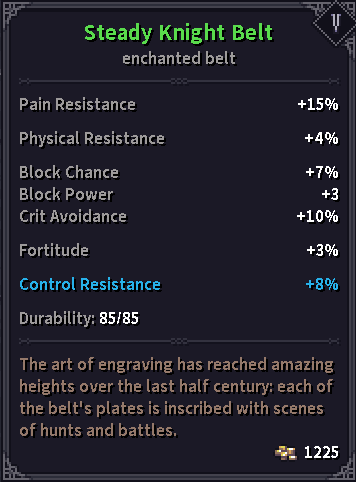 |
The superior belt choice in the mid-late game, while the strength stat is not yet maximised. Offers very strong block chance, and power onuses, in addition to enormous pain resistance and crit avoidance buffs. |
|
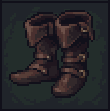
Magehunter Boots |
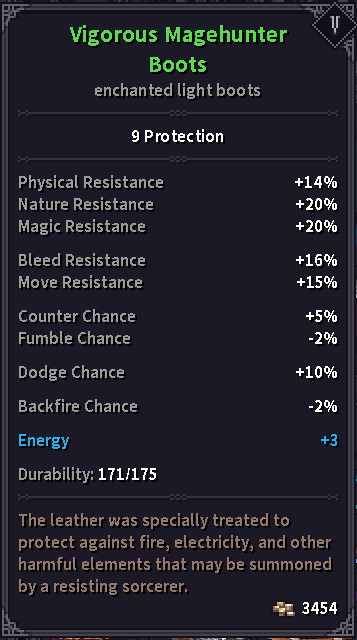 |
The only melee combat tier 5 Light boots. Automatic BIS. |
|
Silver Ruby Rings |
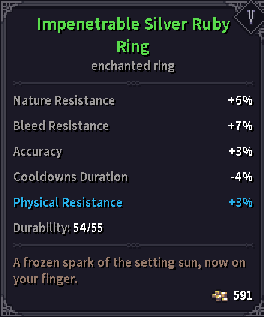 |
Build defining rings. The build relies on them to fix accuracy. Also, they pprovide invaluable Bleed resist and CDR. |
|
Silver Ruby Pendadnt |
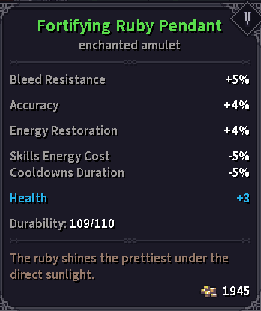 |
Likewise BIS pendant. Provides more of what is offered by the rings, in addition to a -5% skill energy cost. |


Notable Alternatives
The following items are considered acceptable alternatives to the items featured in the final setup, offering notable advantages that make them comparable to the items used by my version of the build.
| Item | Stats | Contribution |
|
Magehunter's Gambeson |
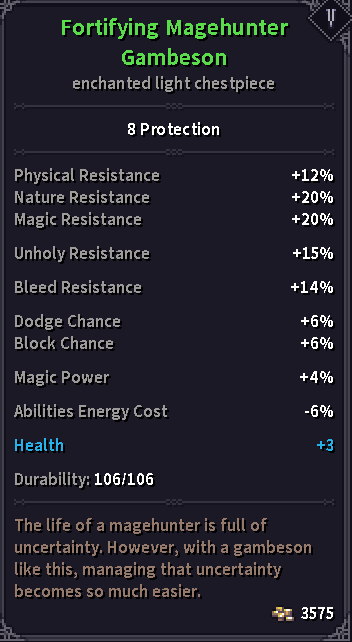 |
Superior chestpiece choice in the mid-late game, offering a wide range of defensive stats. Best balance between Block and Dodge chance. |
|
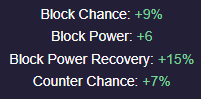
Aristocrat Belt |
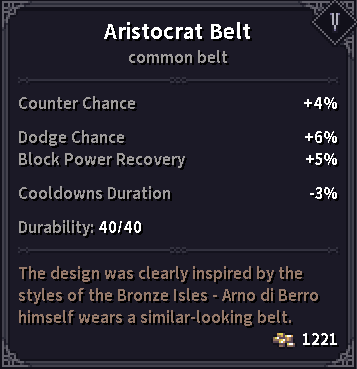 |
Superior Belt choice in the very lategame, once block chance is near maxed thanks to strenght investment. Offers many hard-to-get stats such as block power recovery, and CDR. |
|
Aristocrat Shield |
 |
More focused late-game shield option. higher block and counter stats at the cost of reduced CC resists. |
|
Knight Coif |
9 protection |
Solid defensive helmet option, offering the highest protection value of all light armor helmets. |
|
Ornate Barbute |
18 protection
|
This is our BIS late-game helmet, and the most thematic option for this build. It is unique, meaning it can only be found randomly in late-game dungeons. It offers the very valuable +4% accuracy, while not penalizing dodge chance. |


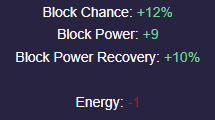
Our armour is focused on providing defensive stats in the form of dodge and block chance, while some of the auxiliary pieces supplement the build with offensive stats, such as accuracy and crit chance. The berserker cowl additionally offers additional CDR and weapon damage. The knight blade is our BIS weapon and cannot be replaced. The shield must be light and offer counter chance in addition to block stats.
The Ornate Barbute is our BIS late-game helmet. However, since it is unique, it may take some time to find. It is not necessary to clear the game.
Enchantments
This build greatly benefits from increases to block power and block chance. While this build can achieve 100% block chance, doing so requires heavy investment into strength, and until that is achieved, any added black chance is beneficial. On armour, dodge chance is also an acceptable alternative. On jewelry, bonus health and energy are never bad to have.
Progression
This part of the guide will focus on how to recreate this build in your own game.
Stat Allocation Order
A defining feature of this build is the hyper-optimised skill order, which is closely linked with the stat allocation order. As such, there can be no deviations in stat allocation until the second half of the levelling curve.
- 1. Vitality 15
- 2. Agility 20
- 3. Strength 20
- 4. Willpower 11
- 5. Strength 27
- 6. (Jorgim) Perception 15
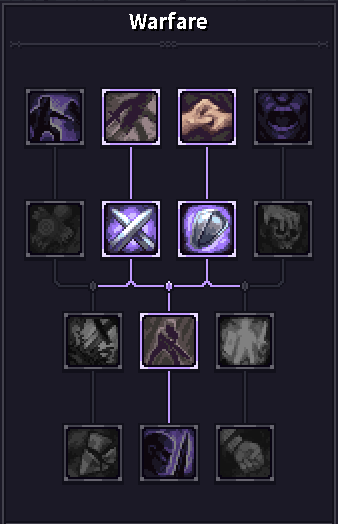
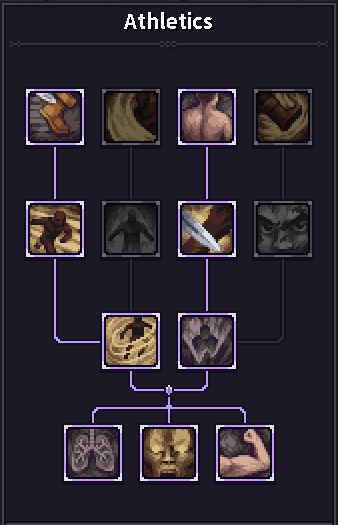
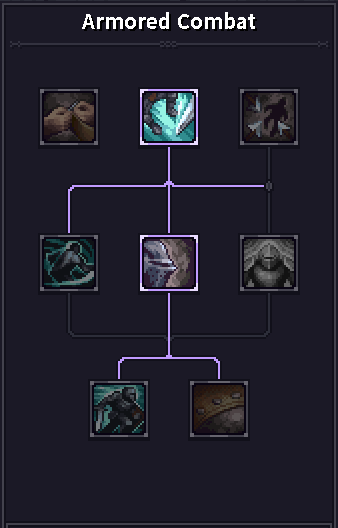
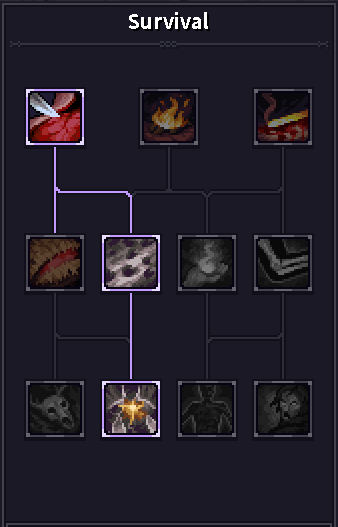
Skill Order
The order of skill selection in this build is carefully optimized such that this build unlocks all of its most important skills as early as possible. These skills either form the core of the build or are very powerful abilities that will help the build progress through the game.
Another reminder to use a light shield when running this build. Yes, it is that important.
Collective
Sequential
| Level | Skill | Contribution |
|
1 |
Setup |
The build relies on it to fix accuracy throughout the game. Read the dedicated section in Gameplay |
| 1 |
Keeping Distance |
Maneuver. A very versatile skill that activates Setup. Wins early level 1v1 fights, and offers critical late-game mobility. |
| 2 |
Cleaving Strike |
Attack. Offensive aoe and counter chance buff. Early on, great follow up to Keeping Distance. |
| 3 |
Raise Shield |
Maneuver. Core skill, which requires a light shield on this build. Early game press after KD + CS. Late game, press on cooldown for permanent activation. |
| 4 |
Breakthrough |
Maneuver. Charges Setup and reduces Cooldown on Raise Shield. Relevant late game by giving bonus Block Power recovery. |
| 5 |
Disengage |
Passive defensive buff, stepping stone toward dash and Elusiveness. |
| 6 | Save the skill point | None of the skills we can take at this level are of critical importance, and choosing something unimportant will delay all the other, more important skills we unlock later by a level. |
| 7 |
Dash |
Core offensive and defensive skill. Helps in the Troll fight. In the Mid-late game often used as an engagement tool to maximize Buff skill utility. |
| 7 |
Defensive Tactic |
Maneuver. Core skill. Grants an enormous quantity of upfront stats that decay over time. Carries through Tier 2. Relevant late-game as a second layer of defence, used when primary buffs are close to running out. |
| 8 |
Moment of Retribution |
Passive offensive buff, further justifying the use of sheild skills. |
| 9 |
Blade Maintenence |
Passive offensive buff, rewarding keeping the sword in high durability. |
| 10 |
Fencer Stance |
Stance. Core skill. Grants block, dodge and counter chance. Starts slow, but generates stacks by use of sword skills. Primary pre-fight buff. |
| 11 |
Not This Time |
Passive defensive buff. protects from CC. Stepping stone toward Sudden Lunge. |
| 12 |
Sudden Lunge |
Attack. Places all enemy skills on a 2-turn cooldown, and reduces yours by 2. Key tool in tier 3. Disable mages by ambushing from behind a corner, and prevent shielded enemies from raising shield. |
| 13 |
Elusiveness |
Maneuver. High-tempo skill. grants bonus dodge chance and reduces damage taken. Very strong in tier 3-4. Starts strong, but decays over time. Second line of defence. |
| 14 |
Embodiment of Relience |
Passive support buff. Full blocks recover energy, and reduce raise shield cooldown by 2. Partial blocks reduce damage taken. |
| 15 |
Last Bastion |
Passive defensive buff. Grants block power recovery, and energy restoration. Stronger when surrounded. |
| 16 |
Hold the Line |
Maneuver. Core defensive buff. Grants block power recovery, loads of counter chance, and reduces incoming damage. Used alongside Fencer Stance. Shield skills give 2 stacks. Primary line of defence. |
| 17 |
Steady Tempo |
Passive offensive buff. Grants bonus energy restoration and reduces sword skill cooldowns when using sword skills |
| 18 |
Onrush |
Attack / Charge. Offensive engagement tool. Deals bonus damage and debuffs the target's defences. Core skill when fighting Manticore. |
| 19 |
Opportune Moment |
Powerful support passive. Recovers energy with every countered strike, meaning constantly. Enables permanent uptime on Peak Performance. |
| 20 |
No Time to Linger |
Passive offensive buff. Stepping Stone toward Peak Performance. |
| 21 |
Peak Performance |
Powerful passive buff. Grants massive dodge chance and damage buffs, while also reducing cooldowns when energy is above 50%. |
| 22 |
Adrenaline Rush |
Maneuver. Defensive buff. Emergency panic button, to be used sparingly. Causes a lot of noise. |
| 23 |
Pathfinder |
Passive utility / QoL buff. Allows to know enemy positions without seeing them. Offers diverse tactical utility. Strongly recommended before tier 5. |
| 24 |
Ever Vigilant |
Passive support and defensive buff. Grants +5% dodge when under the effects of vigor, and extends the duration of Vigor with every kill. Synergy with Elven Mud consumable. |
| 25 |
Offensive Tactic |
Maneuver. Powerful Offensive buff to be used sparingly, after Defensive Tactic loses the bulk of its effect. Does not require a turn when switching from one tactic to another. |
| 26 |
Tactical Advantage |
Powerful support passive. Core late-game buff, reducing energy consumption and cooldowns of core skills, allowing to chain and extend fights, to play more aggressively. |
| 27 |
Dimensional Shift |
Spell. Lategame positional utility. Enables you to swap the position of creatures within range. Allows you to escape when surrounded, or to snipe a vulnerable enemy backliner while delaying the arrival of a melee tank. |
| 28 |
Sprint Training |
Passive support skill. Reduces energy cost and cooldown of Dash and Onrush, while also reducing their cooldowns. Also grants them +1 tile distance. |
| 29 |
Brace for Impact |
Maneuver. Late-game emergency defensive button. Greatly buffs your defences while debuffing the enemy's offence for a short duration. Best used before a powerful enemy attack or charge. |
| 30 |
Battleforged |
Passive defensive buff. Activating Maneuvers grants -10% damage taken until next turn. Using Dash and Onrush grants dodge and counter chance for every tile travelled. |


When playing this Build on Jorgrim, you will unlock Elusiveness at level 12 instead of 13, assuming you've completed every contract in Osbrook and Mannshire, and collected every trophy.
If that is the case, I advise flipping the order between Sudden Lunge and Elusiveness, moving Sudden Lunge to level 13.
Early & Budget Gear Options
This section is dedicated to noteworthy early-midgame items that are useful for this build. Note that this build uses medium throughout the early-mid game, upgrading to Light armor just before Manticore and Tier 4 contracts.
Check out my Early Game Guide for many useful tips to help you make the most of Osbrook,
| Item | Image | Contribution |
|
Nomad Sabre |
22 slashing damage
|
Can be acquired on your first trip to Brynn, from the elven vendor found in the Brynn port. It is strongly recommended to save 1900 gold for this purchase before visiting Brynn for the first time.
|
|
Soldier's Cuirass |
12 protection
|
Light armour is quite weak before tier 4. This Chespiece offers very solid defensive stats, at a negligible Dodge chance and energy penalty |
|
Cervelliere with Ear Guards |
9 protection
|
Acquired by defeating the Ancient Troll. Offers a wide range of beneficial stats, and can be used until the late game, when you purchase your lategame light helmet. |
|
Oaken Shield |
 |
It can be stolen from the Roadside Tower near Osbrook at night. This shield will be sufficient for all the Osbrook dungeons. |
|
Buckler |
 |
Very strong light shield, strongly recommended before entering tier 3. Can be purchased from the Mannshire carpenter after 4000 rep. |


Gameplay
This section will discuss gameplay and how to use this build to maximum success.
Light Shield - Why is it important?
This build is designed around the Raise Shield skill, which does different things depending on which type of shield you are equipped with.
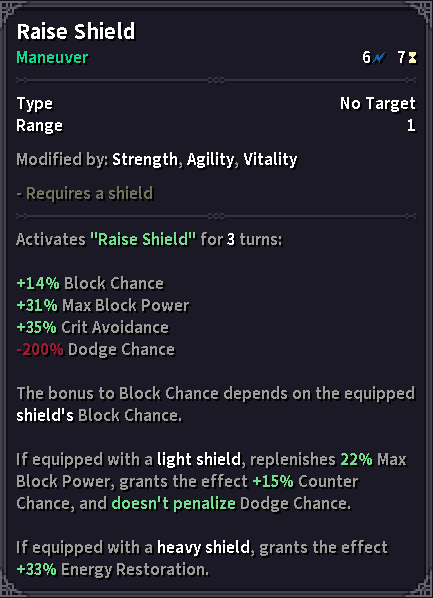
Under normal circumstances, Raise Shield would give you bonus block chance while reducing your dodge by -200%. This means that, in addition to being unable to dodge, every enemy attack is guaranteed to hit you. When using a light shield, not only is this penalty removed, but the skill also replenishes a lot of your block power, while granting bonus counter chance for its duration.
Having high Dodge and Block chance is important for this build because of how the game engine processes attacks. Here is a comprehensive flowchart.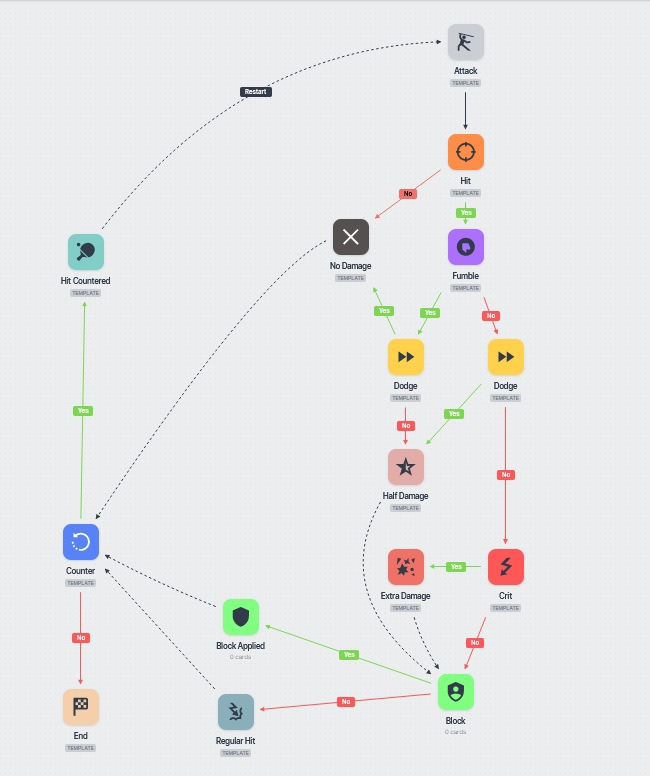
Essentially, Dodges turn normal hits into fumbles, and fumbles into misses. Fumbled strikes deal half damage and cannot crit, or apply negative effects like bleed, daze, or stagger. Since blocks are processed after dodges, having a high block AND dodge chance means the majority of blocked strikes will be fumbles. This means they consume much less block power than a full hit, allowing this build to block many hits in a row despite using a light shield.
By sticking to light shields, this build can artificially double its block power, while remaining well protected from CC, crits, and bleeding.
Utilising Setup
This build uses the skill Setup to fix its accuracy problem for the first half of the levelling. Understanding how this skill works and making the most of it is, therefore, critically important to effectively play this build.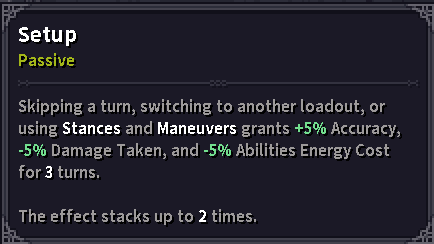 The wording of this skill is a little unclear, and poorly communicates it's actual effect. Every turn you wait [press Spacebar], or use a skill with the "Stance" or "Maneuver" keyword, you gain a stack of the lifted effects. At any given point, you can have no more than 2 stacks of the effect. The effect lasts for 3 turns, and this is the misleading part.
This 3-turn timer applies to the entire effect, and NOT the individual stacks. This means that once you have those 2 stacks, you will keep them indefinitely so long as you reset that 3-turn timer, at least once every 3 turns, by using an action that would have generated another stack.
This means you can make normal weapon attacks and use "Attack" skills, so long as you weave Maneuvers such as "Raise Shield", "Breakthrough" and "Keeping Distance" in between, at least once every 3 turns.
Ancient Troll
This build can comfortably kill the Ancient Troll once it unlocks Dash, using the intended kiting method. Be sure to bring a Smoke bomb to throw 2 tiles in front of you at the start of the battle to block the troll's line of sight, preventing the Troll from roaring or throwing a boulder at you.
Additionally, bring a couple of splints and a handful of healing salves to fix a potential injury from a claw strike taken by mistake, or in case you get stuck behind a tree. Use Keeping Distance when retreating from the troll, waiting for the cooldown on his Ground Slam attack to squeeze out extra damage. Meanwhile, Cleaving Strike can be useful once the Troll's armour is depleted by applying bleeding, which could greatly accelerate the fight.
Entering Tier 3
It is strongly recommended to acquire the tier 3 soldier's cuirass medium body armour and the unique medium helmet acquired by fighting the Troll, before heading to the Rotten Willow Tavern and entering tier 3. Having a tier 3 metal buckler will benefit you greatly, though a Leather Targe is good enough. For arms and feet, any tier 2 or 3 light leather gloves and boots are sufficient.
Unlocking the Fencer Stance at level 10 is mandatory before taking on a Tier 3 dungeon, while unlocking Elusiveness will greatly increase your margin for error, increasing your overall safety.
The roads surrounding the Tavern are equally, if not more, dangerous than the tier 3 dungeons themselves. It is strongly recommended to stock up on healing salves (8-10), splints and bandages in Mannshire before heading off to the RWT, as Mannshire has the lowest medicine prices, while the stock in RWT is relatively small.
It is recommended to clear out the roads leading to all 3 of the Tavern's dungeons before taking on any of the quests. This will give you a couple of levels' worth of experience, while reducing travel times to and from the dungeons. This is helpful if haggling for contract prices forces you to complete them in a single day.
It is strongly recommended to acquire the praying altar/offering spot caravan upgrade prior to going to the RWT, as that location does not have its own prayer shrine.
Manticore
This build can comfortably take down the manticoore at level 18, after unlocking the Onrush sword skill, which allows you to reliably deal damage to the loathsome beast. It can comfortably brawl with the manticore in short bursts of melee while having at least 2/3 of the stacks on all of your buffs.
It is strongly recommended to have the surgeon's toolkit (ideally 2), and be under the effect of the Paregoric drug to help deal with the pain of surgery. Additionally, I recommend breaking 4-5 smokebombs and throwing them on the ground when you are close to the manticore in order to brawl with it within the smoke. This is because, as one of its effects, Paregoric halves the fumble and accuracy penalties from coughing caused by inhaling smoke.
This can be further complemented by asking Leif for Precision training, which boosts your accuracy and crit chance, allowing this strategy to be more effective. The build's high agility already compensates for the added fumble.
Typical Combat Skill Rotation
This build feels the most comfortable when all skills except dash are on cooldown. By leveraging the CDR from Sudden Lunge, we can cycle through the skills very quickly, perpetually maintaining the stacks on our various buffs. Fencer Stance and Hold the Line are the primary buffs, used before engaging the enemy. Meanwhile, Defensive Tactic and Elusiveness are used preemptively, in response to a large threat, or to pad our defensive stats once the primary buffs start expiring.
Raise Shield should be reactivated as soon as it returns from cooldown, unless one more strike will finish the enemy and the fight.
You always want to start with Fencer Stance and Hold the Line, followed by Raise Shield timed such that the enemy enters your range as soon as these skills are active. Once you have Onrush, you can start this combination a turn earlier, so that you can use Onrush to engage the enemy on your terms.
When faced with a large group of enemies, it is often better to stand in the open. By allowing yourself to be surrounded by 2-3 enemies, we make the most of skills like Defensive Tactic, Cleaving Strike and Breakthrough, as well as maximizing the effect of the character trait, if you are playing Arna.
When faced with a large group of enemies, it is best to delay the use of Defensive Tactic for as long as possible. This is because at later levels, using Defensive Tactic while Fencer Stance and Hold the Line are active with many stacks can overcap some of our core stats, leading to wasted potential of the skill. This can be dangerous as it will lead to the build becoming vulnerable within several turns, after Defensive Tactic loses the majority of its stacks.
Even at higher levels, it is important to make good use of Setup by regularly weaving maneuvers in between regular attacks and Attack skills.
Like, Dislike, comment, or share!
Join the Discussion
0 commentsNo comments yet.
Be the first one to leave a comment!