

The Great Old One Warlock Build - Baldur's Gate 3 (BG3)
Contents
The Great Old One Warlock build
This build is perfect for those that want a ranged warlock using spells as the main driving force. We will be taking some unique spells the Great Old One gets - Telekinesis, Evard's Black Tentacles, etc. We will also go heavily in spellcasting and taking Eldritch Incantations to boost it. And don't forget, you have the strongest cantrip in the game Eldritch Blast which should be used as a normal attack

The build does not perform well in close combat as it does target medium armor usage (however, you can wear it with Githyanki). Of course, it is recommended to use a shield as this will raise Armor Class without any penalties. Generally at the higher levels, the build starts becoming very powerful
However, the guide does not cover multiclassing a Warlock. It can be beneficial but in this particular case, I concentrated just on one.
Starting the Game
Let's start with the early game. I would go into what are the best Races, Abilities, and Skills for Great Old One. Some of these choices are very impactful as you cannot respec them.
Races
Picking a race is a very important decision in the game. Not only it changes how people react to you but also gives you unique abilities. The Old One Build has a wide array of options which I listed from best to worst in my opinion.
| Race | Features | Description |
|---|---|---|
 Githyanki Githyanki |
|
What makes this race special are their ability to instantly wield Medium Armor. This will greatly boost your survivability. moreover, at level 5, you will obtain Mist Step that can be used once per Long Rest. Moreover, they can increase their jumping distance which is useful for exploring. |
 Drow Half-Elf Drow Half-Elf |
|
Half-Elves come with one big advantage over others - Shield proficiency. This gives you +2 AC, which can make avoiding enemy hits much more manageable. Other benefits are Faerie Fire and Darkness as spells in later levels from the Drow part. |
 Drow Drow |
|
Drows get Superior Darkvision which saves you one Eldritch Invocation. Moreover, at level 5 they gain Darkness, saving you a Warlock spell slot. |
 Mephistopheles Tiefling Mephistopheles Tiefling |
|
Mephistopheles Tieflings get good spells at levels 3 and 5 - Hellish Rebuke and Darkness. They can be cast once per long rest and will save some spell slots for Warlock. |
Class
| Overview | |
|---|---|
 Warlock Warlock |
|
| Features | |
 Warlock Spell Slots Warlock Spell Slots |
These spell slots can be used to cast spells and refill each Short Rest. |
Cantrips
The Warlock class has one of the most iconic and strongest cantrips in the game - Eldritch Blast. In addition, we can select a few more and use them based on the situation.
| Cantrip | Description |
|---|---|
 Eldritch Blast Eldritch Blast |
Mandatory cantrip. At first, it may not seem super strong, but this will change at higher levels. It can increase its damage with Charisma and knockback enemies. From level 5 you can release two of them |
 Friends Friends |
If you are the main character and do most of the dialogues, this is also a good choice as it gives an  Advantage during rolls. Advantage during rolls. |
 Bone Chill Bone Chill |
Can be useful in some encounters as you can disable enemy healing and greatly weaken undead enemies. |
Subclass
Warlocks can pick their subclass at level 1. This is much earlier compared to some other classes which get it at level 3. Each subclass differs in the features they provide that resulting in unique effects. Moreover, although the spell pool is similar each Subclass have its unique additions.
| Overview | |
|---|---|
 The Great Old One The Great Old One |
|
| Features | |
 Mortal Reminder Mortal Reminder |
When you land a Critical Hit against a creature, that creature and any nearby enemies are Frightened until the end of their next turn. |
Spells
The Warlock Class also comes with spells and some of them are specific to The Great Old One subclass. Unfortunately, at first, we will only have 1 spell slot, which can be used once per short rest. The situation will get a bit better in the later levels.
| Spell | Description |
|---|---|
 Dissonant Whispers Dissonant Whispers |
Makes the enemy Frightened, which results in their attacks being weakened due to the  Disadvantage Disadvantage |
 Tasha's Hideous Laughter Tasha's Hideous Laughter |
The spell can be used to disable an enemy if they have intelligence above 5. The one downside is that this is a  Concentration spell and can be avoided if the enemy succeeds in Saving Throw each turn. Concentration spell and can be avoided if the enemy succeeds in Saving Throw each turn. |
 Hellish Rebuke Hellish Rebuke |
This spell would deal the most damage from the current arsenal. However, it requires that somebody would attack you and you could react to it. |
 Hex Hex |
Another spell that can be good early on. Use it to weaken an enemy and increase the damage that you do. I recommend using this especially if you are fighting from range. |
Abilities
Now let's take a look at the abilities of the Great Old One Warlock build. Correct allocation will allow us to maximize the early gameplay and get good modifier bonuses. It is important to maximize (put 16-17 points) the characters' main ability that is marked by a star. It determines their damage and many other aspects
| Ability | Value | Description |
|---|---|---|
 Strength Strength |
8 | Strength is not as important for our build as we neither use it for damage or other aspects. |
 Dexterity Dexterity |
14 | It will help us with Dexterity Saving Throws, increase initiative and provide bonus Armor Class. This is also perfect if you decide to take Githyanki with Medium ARmor proficiency. |
 Constitution Constitution |
15 (14 + 1) | Increases the amount of HP we have. however, I also take it to 15 so that with the Ability Improvement feat we would get 16. A high Constitution will decrease the chances of Concentration spells breaking, and we will have many of them. |
 Intelligence Intelligence |
10 | Not important for us, just enough to not get a penalty from Intelligence Saving Throws. |
 Wisdom Wisdom |
10 | Not important for us, just enough to not get a penalty from Wisdom Saving Throws. |
  Charisma Charisma |
17 (15 + 2) | The main ability of Warlock. It will determine how much damage we do and will empower Eldritch Blast cantrip at level 2. |
Skills and Expertise
Overall, the skills should be impacted by your roleplaying and background decisions. However, you would still probably want those that will give you the best benefits. Overall I would recommend those that fall under these categories - Charisma and Dexterity. So with this in mind, you could pick:
Dexterity based:
- Acrobatics - to resist being shoved
Charisma based:
- Deception - Lie and manipulate the truth
- Intimidation- use of threats in speech, forcing others to break under your will.
- Performance - the ability to act, play instruments, and otherwise entertain audiences of all sizes.
- Persuasion - the art of convincing others to do your bidding and securing favors.
With Warlock due to high Charisma, you will have no problems talking your way out of various situations or persuading someone to do your bidding. It is a perfect class to see what the game dialogues have to offer
Leveling Progression
Here is the detailed progression for the build to get you started. You can use it as a guideline because early games can be daunting and overwhelming. Later on, once you get the feel for the class you can start picking your own options
Level 2
The first level up! This is great as we get a second spell slot. Sadly we will have to live with it till level 11.
Spells
We can also unlock another spell to increase the arsenal. It is the same list of level 1 spells that we had before, so you can pick the one that you did not take. In my case it was Hex
| Spell | Description |
|---|---|
| Hex |
Another spell that can be good early on. Use it to weaken an enemy and increase the damage that you do. I recommend using this especially if you are fighting from range. |
Eldritch Invocations
And now we get to the sweet stuff of level 2 and generally warlocks. You can choose your first two Eldritch Invocations. Here are my recommendations:
| Invocation | Description |
|---|---|
 Agonizing Blast Agonizing Blast |
Improves Eldritch Blast damage by including your Charisma ability modifier in the damage calculation |
 Devil's Sight (optional) Devil's Sight (optional) |
Only take this one if your race doesn't have Darksight. Get it as early as you can. Otherwise, skip it |
 Repelling Blast Repelling Blast |
Eldritch Blast now knocks back. This is very powerful as you can throw enemies from ledges. |
Level 3
Level 3 of Warlock gives a unique boon that can drastically change how you play.
Spells
Now you get level two spells which greatly improves your combat prowess. I recommend choosing on of those. Remember if you will not use them, you can always respec.

| Spell | Description |
|---|---|
 Darkness Darkness |
With it, you can cover an area and use it as a defensive ground to attack enemies who can barely see you. However, as you only have 2 spell slots for most of the game this is better cast by someone else in your party. If you are a Drow don't take it |
 Shatter Shatter |
Deals 3d8 thunder damage and creatures made of stone get additional Disadvantage. This is a decent non-Concentration spell |
 Cloud of Daggers Cloud of Daggers |
The spell allows you to summon daggers that damage multiple enemies in a medium area. This is perfect to cover a choke point or force enemies to take damage in order to reach you. They take damage two times - when it's cast and when their turn starts. |
Pact Boon
A gift from your patron that will give unique actions and effects to The Old One build. Below are the choices which I recommend for this setup. I personally would take Pact of the Tome as it starts shining from level 5
| Pact Boon | Description |
|---|---|
 Pact of the Chain Pact of the Chain |
Gain a familiar that can be summoned every short rest. They have unique effects that can damage and debilitate enemies. Moreover, they can tank a few hits and scout areas. |
 Pact of the Tome Pact of the Tome |
This option gives additional cantrips, which may not be useful at first. However, once you reach level 5 you gain Deepened Pact feature. It allows casting three additional spells without spell slot usage. |
Replace Spell
Now we can switch one of the spells that we have for level 2 spells. If you wanted to take two spells from the level 2 list now is your chance. For example, I removed Hex and took Cloud of Daggers. My main reasoning is that we already have multiple concentration spells and generally you can only use one.
Level 4 - new Feat, Cantrip, and Spell
Cantrips
You can now get a third cantrip. Take one of the three that you have forgone when starting the build. In my case, I went for Bone Chill
| Cantrip | Description |
|---|---|
| Friends |
If you are the main character and do most of the dialogues, this is also a good choice as it gives an Advantage during rolls. |
| Bone Chill |
Can be useful in some encounters as you can disable enemy healing and greatly weaken undead enemies. |
 Mage Hand Mage Hand |
Can be used to solve some puzzles and shove enemies from the ledges. However, I only recommend it if it's summoned before combat. |
Spells
Even though you have a unique Great Old One spell - Phantasmal Force, it is not worth it. You are better off picking Darkness or Hold Person (one that you have forgone). On rare occasions, you may go with Misty Step, but it may have too much of a cost for 50% of spell slots.
| Spell | Description |
|---|---|
 Misty Step Misty Step |
Allows moving to a location that you can see, without activating opportunity attacks. Although it is a good spell I recommend evaluating if you need it. You can also get this spell from equipment |
Replace Spell
I think we already got all the spells we need for Level 2. If you see something that you want to try it is a perfect chance. The next level will bring more to the table by unlocking Level 3 Slots which will drastically improve the build.
Feat
Finally, we reach our first Feat. There are multiple choices that you can take. However, I first recommend getting your ability score pumped up to gain bonus modifiers for higher damage and Saving Throws
| Feat | Description |
|---|---|
 Ability Improvement Ability Improvement |
Take +1 Charisma and +1 Constitution. This will increase damage, spell success and decrease the chance that your concentration spells are canceled. |
Level 5
Level 5 will unlock some good things. First, you get the additional spell. Next, you unlock level 3 spell slots, so all your spells will now be upcast. And last but not least you unlock another Eldritch Invocation. Oh and I almost forgot the biggest thing - Deepened Pact
| Feature | Description |
|---|---|
 Deepened Pact Deepened Pact |
Pact of the Tome warlocks can cast Animate Dead, Haste, and Call Lightning once per long rest. And this does not use any spell slot |
Spells
So the first level 3 spells are here, and they are powerful. You can get better Crowd Control and more damage. There are multiple good spells, but I would recommend first taking Hunger of Hadar
| Spell | Description |
|---|---|
 Hunger of Hadar Hunger of Hadar |
The scariest spell you can use at this time. Use it to cover enemies and force them to move out of the fog. This will damage them, and you can wait for them outside to hit with melee weapons or use Eldritch Blast to bash them while they are blind. |
 Counterspell Counterspell |
Another powerful spell that can counter almost any spell that foe casts. Even if you don't use it often, it is good to have it as it will notify you of what enemies are casting and let you decide the next steps |
Eldritch Invocations
We unlock another Eldritch Invocation. Moreover, a few new ones appear. Here are my picks:
| Invocation | Description |
|---|---|
| Repelling Blast |
If you did not take this before, it's a good time to take it. it will knock back enemies if Eldritch Blast hits the enemy (no Saving Throw roll) |
 Fiendish Vigour Fiendish Vigour |
Get additional temporary hit points. The spell can be cast without using spell slots. |
Replace Spell
I recommend switching out one of the spells that you do not use from your current list and ensure you obtain the one below.
| Spell | Description |
|---|---|
 Hypnotic Pattern Hypnotic Pattern |
Very deadly against low Wisdom enemies. However, if you are fighting someone who has 14+, I would suggest using Hunger of Haddar instead. The spell is wonderful as it has a huge Area of Effect. The only downside would be that it only works for two turns, but this should be enough to take out a few foes. |
Level 6
We get to pick a new spell and our Patron gives a subclass-related feature:
| Feature | Description |
|---|---|
 Entropic Ward Entropic Ward |
As a reaction, you can impose Disadvantage on an Attack Roll against you. If the attack misses, you gain Advantage on your next attack roll against your attacker for 1 turn. |
Spells and Replace Spell
Another spell can be taken. However, we already have most of the aspects covered at this stage. So if you did not take Counterspell now is a good chance.
Level 7 - level 4 spells unlocked
A new spell level is introduced, which hit harder and provides new effects.
Spells
Here are my recommendations for The Great Old One spells. You can pick one, and later you can replace the other at Replace Spell screen if you wish
| Spell | Description |
|---|---|
 Dominate Beast Dominate Beast |
This ability can prove extremely useful. Check if an enemy has a low Wisdom score. Then they will join your side and can wreck their allies for a few turns and draw attention from you. |
 Blight Blight |
A very strong single-target spell, it has 8d8 rolls and can one-shot most medium enemies. It is also one of the rare Warlock spells that doesn't require concentration |
Eldritch Invocations
Because we are concentrating on being a caster I think there is only one and the most obvious/best choice - Book of Ancient Secrets
| Invocation | Description |
|---|---|
 Book of Ancient Secrets Book of Ancient Secrets |
Gives 3 spells to the Warlock arsenal that can be cast once per Long Rest. They do not use any spell slots, so fit the build theme perfectly. |
Replace Spell
You can take an additional level 4 slot that you missed from the above spell list. Otherwise, if you do not see using any others, feel free to skip it. I switched Hellish Rebuke for Blight.
Level 8
We get another choice to add a spell to our spellbook and a new Feat choice.
Spells and Replace Spell
We do not get a new tier of spells, so feel free to check what you think is valuable for you. Any spell works, as I think we already have the most important ones. For Replace Spell you can definitely skip it. I picked Banishment as it targets enemy Charisma, and not many spells do that:
| Spell | Description |
|---|---|
 Banishment Banishment |
Remove the target from the battlefield. This can be perfect for making the encounter easier and even disabling enemy buffs temporarily - like auras. The most important thing is that it does Charisma Saving Throw which is very rare and good to have |
Feat
Finally, we obtain the second feat for Warlock. There are a few good choices that you can do, however, I would personally recommend increasing your spell-critical chance and trying to get the Mortal Reminder to activate as often as possible
| Feat | Description |
|---|---|
 Spell Sniper Spell Sniper |
The Mortal Reminder effect only activates when you make a critical hit. This feat is the only one that increases your spell-critical chance |
Level 9
We finally unlock Level 5 spell slots and can take one spell and another one via Replacement. Moreover, another option for Eldritch Invocations is added. Let's go through them
Spells

I think all of these spells are a good option, however, my personal favorite would be Telekinesis:
| Spell | Description |
|---|---|
 Telekinesis Telekinesis |
I love this spell. First thing it allows you to play with enemies and throw them around the battlefield. Second, it can be recast without using a spell slot, which is another huge benefit. |
Replace Spell
You can take any of the spells from the list above and remove the ones you do not use. I did not take any, because I already have Wisdom Saving Throw spells.
| Spell | Description |
|---|---|
 Dominate Person Dominate Person |
This has its uses. You see a warrior enemy that has low Wisdom. This is a perfect target for the spell as they use multiple attacks and can decimate the back row of your foes without you doing much. |
Eldritch Invocations
For Eldritch Invocations I don't think there is anything very powerful just some quality-of-life options. I recommend taking those that don't require warlock spell slot usage. So pick one:
| Invocation | Description |
|---|---|
 Otherworldly Leap Otherworldly Leap |
You can cast the Enhance Leap spell. Can be useful for exploration, but at this stage in the game you probably have another source for this spell. |
 Whispers of the Grave Whispers of the Grave |
You can cast Speak with Dead without expending a Spell Slot. |
 Beguiling Influence Beguiling Influence |
You invoke your patron's bewitching charm. You gain proficiency in Deception and Persuasion Skills. |
| Fiendish Vigour |
Get additional temporary hit points. The spell can be cast without using spell slots. |
Level 10
Unfortunately, level 10 does not bring much to the table. Mainly we get a new cantrip slot and spell slot, which is still level 5. Moreover, we unlock new subclass features:
| Features | Description |
|---|---|
 Thought Shield: Psychic Resistance Thought Shield: Psychic Resistance |
An elder brain shields your brain. You gain Resistance to Psychic damage |
 Thought Shield: Psychic Reflection Thought Shield: Psychic Reflection |
Your patron doesn't appreciate attempts to attack your mind. When you take Psychic damage, your attacker takes the same damage. |
Cantrips
We can pick the fourth Cantrip for Warlock. Here are my recommendations which you can pick:
| Cantrip | Description |
|---|---|
| Mage Hand |
Can be used to solve some puzzles and shove enemies from the ledges. However, I only recommend it if it's summoned before combat. |
 Minor Illusion Minor Illusion |
You can use it to distract enemies and move them to a specific position before the combat even starts. Then cast an AOE spell and deal huge damage. |
Spells
We gain another slot for a spell. Pick whatever you want to try out or test. We are still limited to a maximum of level 5 spells.
Level 11
And we reach a huge milestone for Warlock. We finally unlock the third spell slot! Although it's late you will be even more powerful in combat. Another thing, we get Mystic Arcanum. A level 6 spell! You will start to enjoy your warlock even more from now on.
Mystic Arcanum
You get a single level 6 spell that can be cast without expending a spell slot. It can be used once per long rest, so evaluate what you want. I would recommend saving and doing some testing on which spell you would like to go with. Also, if later on you don't like it - just respec. Also, you will already have tons of Concentration spells, so picking Circle of Death is the best choice in my opinion
| Spell | Description |
|---|---|
 Circle of Death Circle of Death |
A very powerful AOE spell that deals necrotic damage. The big caveat is that it also hits allies, so its best used early in combat, while no one has mixed in between |
 Arcane Gate Arcane Gate |
This spell is useful in some circumstances where there are special mechanics. So if you are content with your damage output, you can get this one and be ready to use it when you see a need (and there will be a need for it in the story) |
Spells and Replace Spell
Here you can pick any spell that you want to try, or think will help Great Old One build. For replacing I skipped it, as there was nothing else of interest.
Level 12 - the last hurrah!
And we reach the final level. There are some bad and good things. First you get new Eldritch Invocation, Spell, and Feat slots. This is great. However, there is a problem with the Invocation:
Eldritch Invocation
You gain additional an slot. However, only a new type appears - Lifedrinker. Although it is good, we do not deal any melee damage so it is redundant. Due to this, feel free to pick any choice that you think is useful for your play style.
Feat
And here is our third and final Feat for the Old One build.
| Feat | Description |
|---|---|
| Ability Improvement |
Take +2 Charisma. It will increase spell damage, success, and other related Charisma rolls. This will allow you to reach the maximum of 20. |
Spells and Replace Spell
Here you can pick any spell that you want to try, or think will help Great Old One build. For replacing I skipped it, as there was nothing else of interest.
General Tips
Now I would like to cover some general tips on how to play The Great Old One Warlock build.
Taking Concentration Spells
The build and particularly Warlock can get tons of Concentration spells. However, I suggest thinking clearly about which ones you take. Try to have different ones against different Saving Throws. For example:
- Hypnotic Pattern - good against low WIsdom enemies
- Hunger of Hadar - perfect for Dexterity-weak enemies
- Evard's Black Tentacles - perfect for strength weak enemies
With these in mind, you will not take any overlapping spells and can deal with any enemy type you encounter.
Eldritch Blast - as normal Warlock attack
Just wanted to emphasize how important Eldritch Blast is. It is one of the most powerful cantrips in the game:
- Via Eldritch Invocations you get a boost to damage based on the Charisma modifier
- Via Eldritch Invocations you can knock back enemies.
- At level 5 you gain two shots
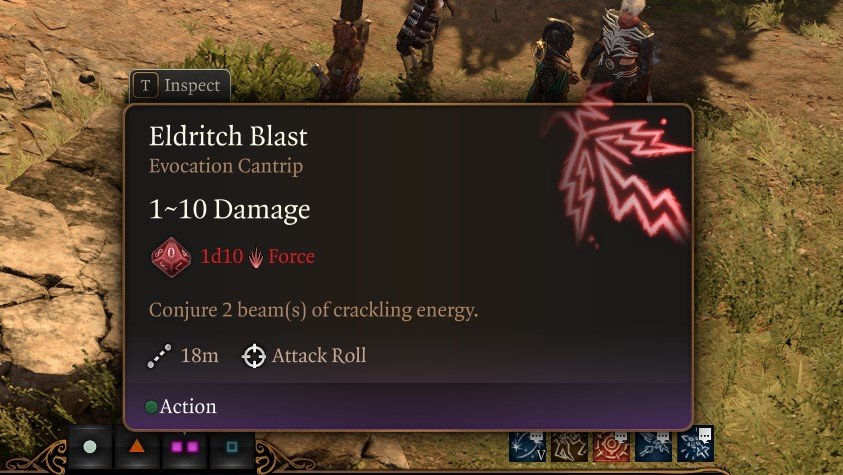
So you should always be using it as normal attack with Warlock, unless you are doing melee build
Area of Effect Concentration spells
You have a few main areas of effect concentration spells. They can prove useful in different types of encounters. For example, the Hunger of Hadar makes enemies blind, deals damage, and slows them down.
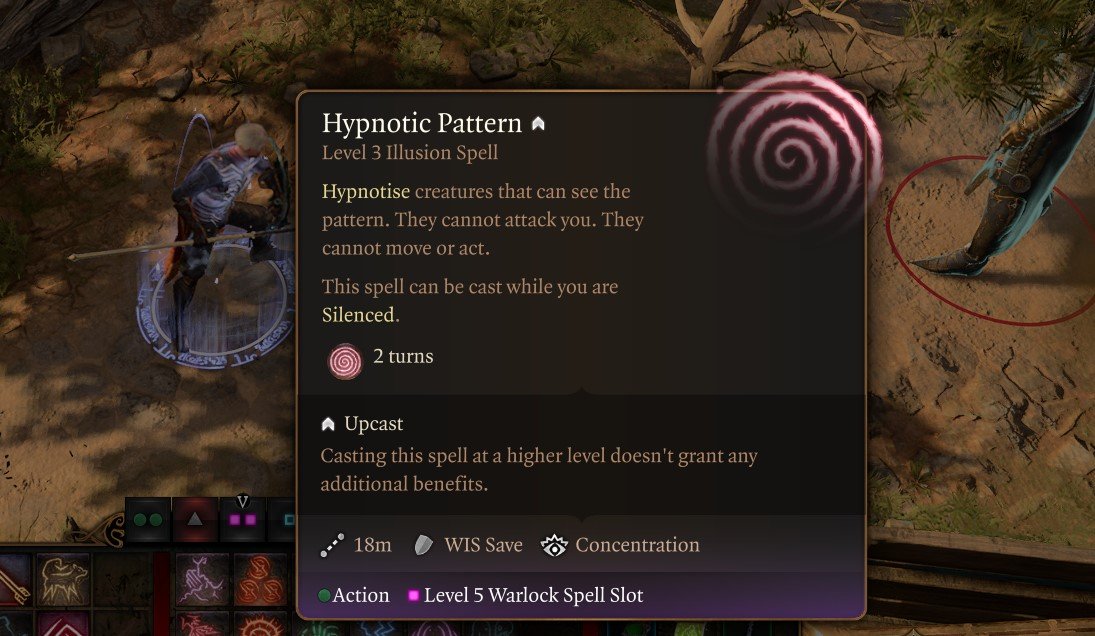
Hypnotic Pattern - is perfect when fighting low Wisdom enemies. You can then take them out one by one
Darkness - shroud yourself and make it impossible for ranged attacks to hit you. On the other hand, you will have Dark Vision allowing you to use this to your advantage.
And so on, so be sure to evaluate how you want to affect the battlefield.
Take at least one non-concentration spell from each spell level
The Great Old One subclass has a small problem - it has a ton of concentration spells. And the problem with these is that you can cast only one. To counter this, I would recommend taking a few damage spells like Shatter, Blight, etc. They will deal more damage than Eldritch Blast and also apply status effects.
Wearing a Shield
This is a mandatory thing to equip (if your proficiencies allow). By default, it gives +2 Armor Class, and wearing it has no downsides. More or less it's free 2 AC.
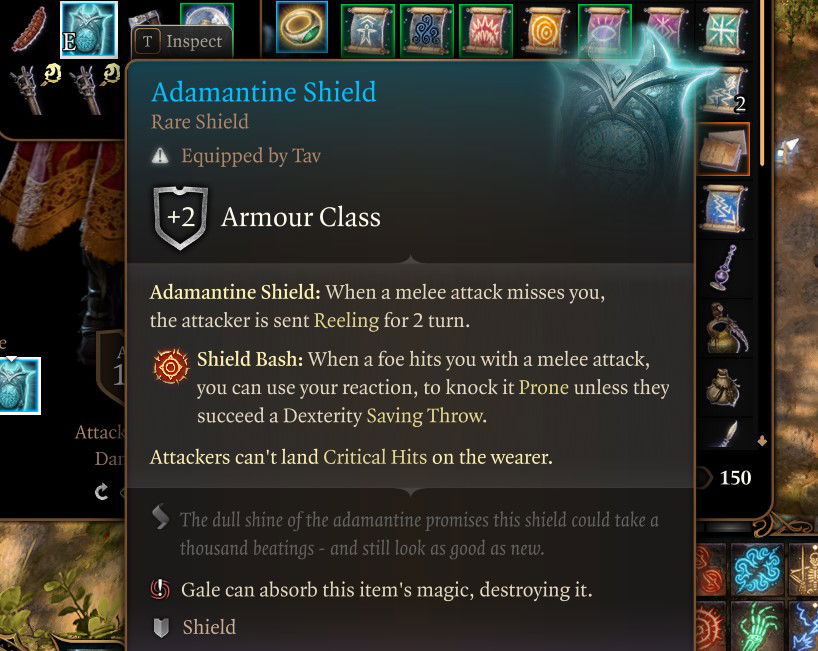
They can also come with unique effects, for example, the above Adamantine Shield can do a reaction and shield bass a melee opponent
Multiclassing for the last levels
The last two levels may not be as impactful as one would expect, especially level 12. For example, the Mystic Arcanum spells may be disappointing as you are already full of Concentration spells. But, the 3 level 5 spell slots are definitely worth it.
Another aspect is that level 12 gives Lifedrinker which we don't really need. So getting another class with level 1 may bring huge benefits.
Here are a few options:
| Multiclass | Description |
|---|---|
 Tempest Domain Cleric Lv 1 Tempest Domain Cleric Lv 1 |
You get heavy armor proficiency and additional spells that you can cast using level 5 Warlock spell slots. The result is higher damage and increased Armor Class. Moreover, you deal bonus lightning damage when hit |
 Light Domain Cleric Lv 1 Light Domain Cleric Lv 1 |
Gives Medium Armour proficiency and good spells. Moreover, you can use unique reactions to give enemies a Disadvantage when attacking you. |
 Wizard Level 1 Wizard Level 1 |
Unlock some cool spells that deal a decent amount of damage like Thunderwave |
 Sorcerer Wild Magic Level 1 Sorcerer Wild Magic Level 1 |
Gain a unique Wild Magic effect. but more importantly, Tides of Chaos which gives an Advantage on the next attack Ability or Saving Throw roll. |
 Sorcerer Storm Sorcery lv 1 Sorcerer Storm Sorcery lv 1 |
Gives a unique effect that allows you to fly away with bonus action after casting a level 1 or higher spell. |
Conclusion
Thank you for reading The Great Old One Warlock build for Baldur's Gate 3. I hope you enjoyed it and found all the information that is needed. You should have no problems picking the correct spells and invocations to maximize what your Warlock can do
Like, Dislike, comment, or share!


Join the Discussion
0 commentsNo comments yet.
Be the first one to leave a comment!