
Oath of Devotion Paladin Build - Baldur's Gate 3 (BG3)
Contents
Oath of Devotion Paladin Build
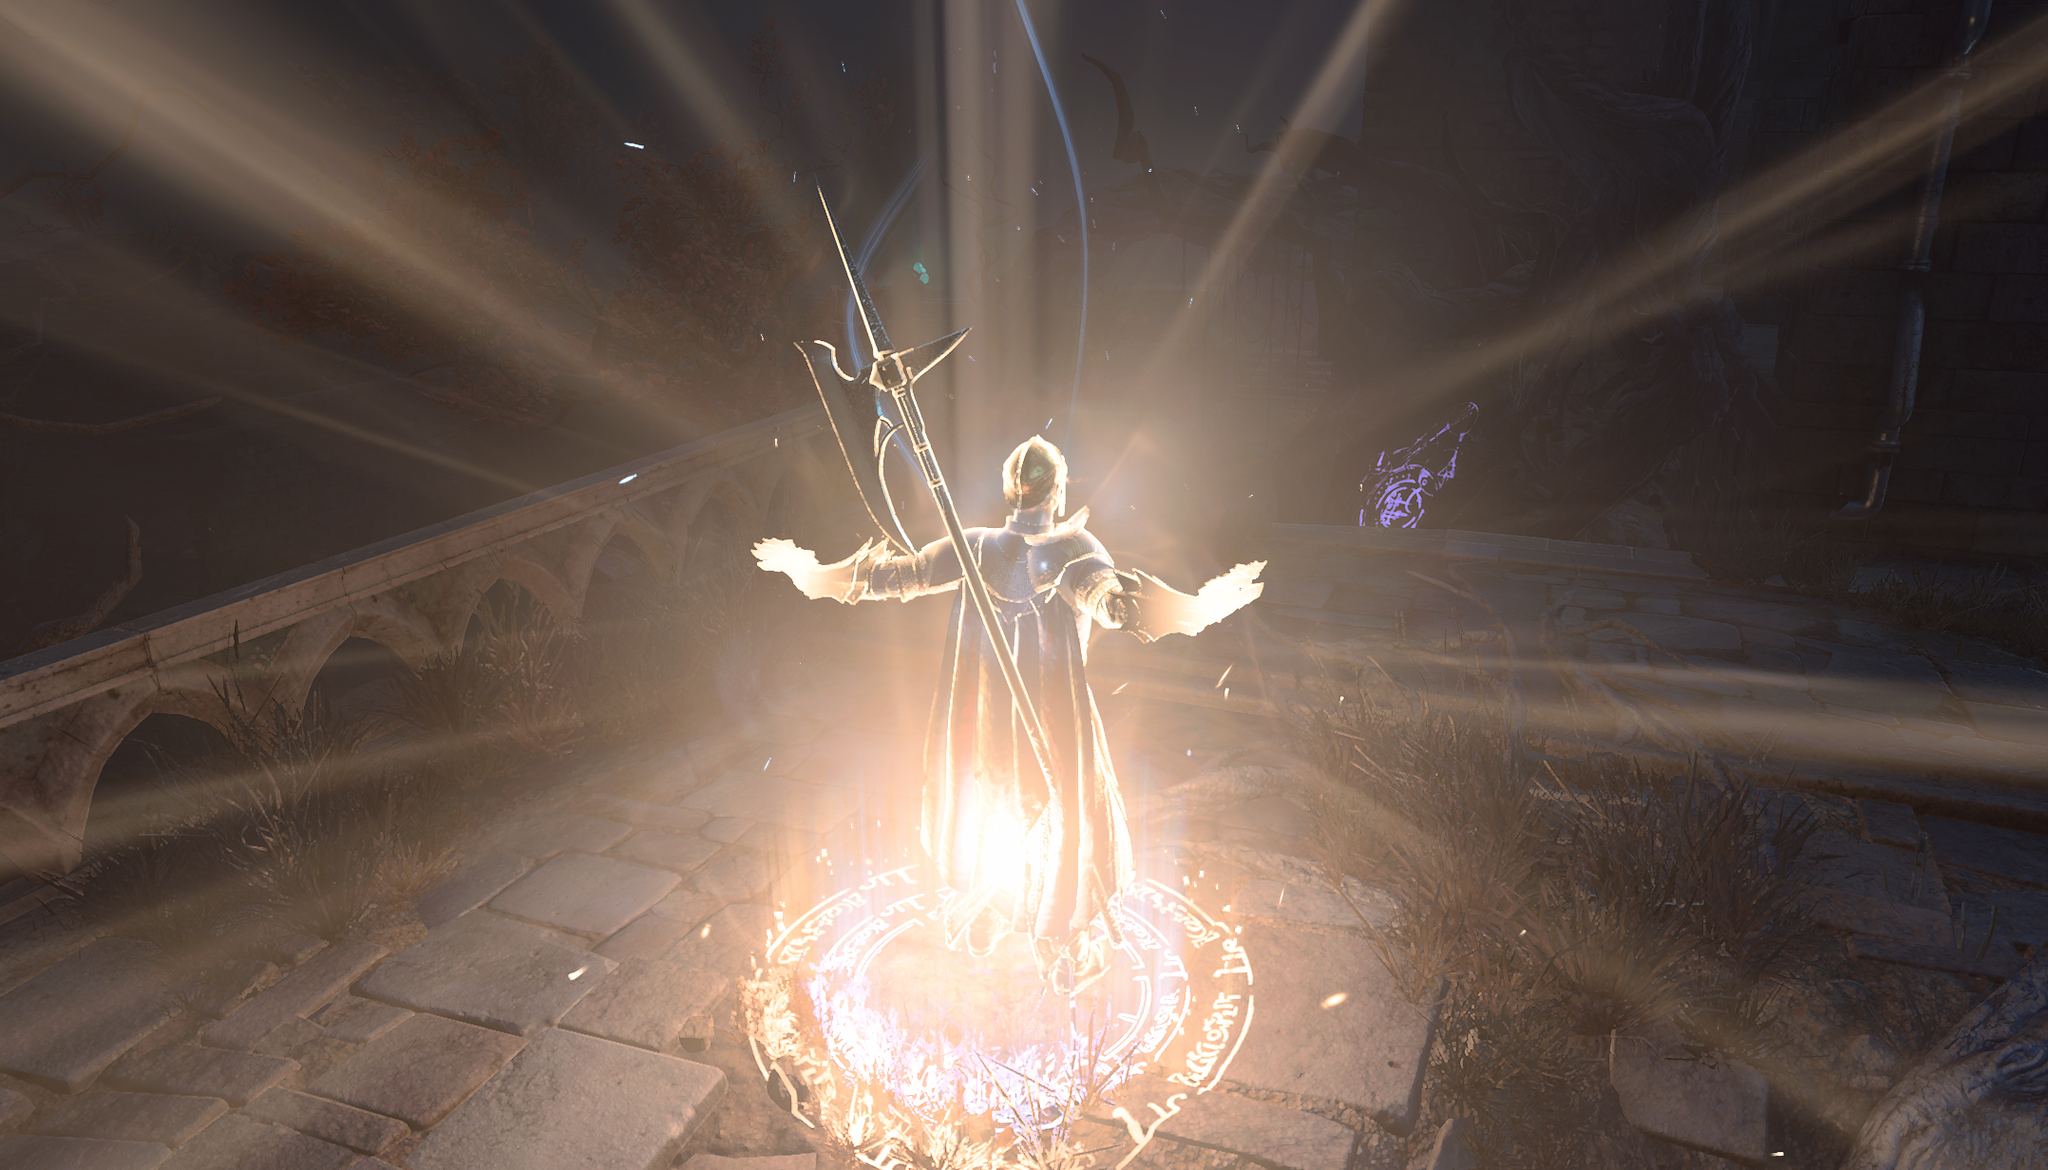
The Devotion subclass is the true roleplay of "Superman" You are the protector of good and always stand up to the weak. You could say this is the highest standard of Shining Knight in the Forgotten Realms. They never lie, cheat, steal, or trick people as this goes against their Oath.
This, of course, comes with its own caveats. The subclass excels in protecting and healing others. It makes them the weakest option in terms of damage compared to other Paladin Oaths. They are also similar to clerics and have innate healing support like Beacon of Hope.
Devotion Paladin is best played with Two-Handed Weapons. The subclass provides a unique action - ![]() Sacred Weapon. This gives bonus attack rolls based on the Charisma modifier. This is perfect to counter the penalty from
Sacred Weapon. This gives bonus attack rolls based on the Charisma modifier. This is perfect to counter the penalty from ![]() Great Weapon Master: All In.
Great Weapon Master: All In.
I do think this is the least powerful subclass out of all Paladin options.
So let's jump into the build!
Class Contribution
As this is the single class build the build gets all features just from Paladin.
12 Devotion Paladin
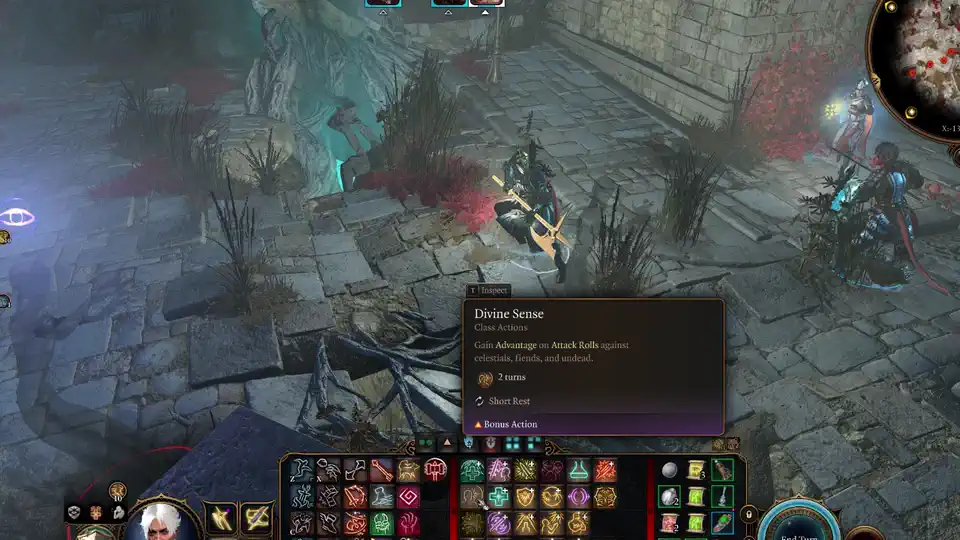
 Divine Sense - an easy
  Advantage in case you fight these specific enemies.
- Proficiencies with all gear
 Lay on Hands - a healing action, which I found is best used outside of combat for curing diseases.
- The iconic Paladin action -
 Divine Smite. With optimisations and some preparations, this can land very powerful strikes and obliterate enemies.
 - Fighting Style choice, for a small stat boost
 Divine Health helps resist diseases.
 Extra Attack for an additional weapon attack from level 5 onward.
 Aura of Protection - one of the best paladin features, giving an easy way to maintain spell
  Concentration.
- Enables you to resist
 Frightened with
  Aura of Courage.
 - Additional radiant damage with all melee weapon hits thanks to
 Improved Divine Smite.
  Sacred Weapon is a powerful option to improve the hit chance with your weapon.
 Sanctuary is one of those spells that are there for when things do not go as planned. It can save you from death, and help to rally.
- Subclass
 Aura of Devotion only has niche uses, which makes it somewhat disappointing.
Synergy with other builds
Devotion Paladin is similar to almost any other melee martial. The goal is to hit hard, and when opportunity arises, land that ![]() Divine Smite for maximum damage.
Divine Smite for maximum damage.
Controllers
Almost any party can benefit from good controllers that use ![]() Hold Person,
Hold Person, ![]() Glyph of Warding: Sleep, or
Glyph of Warding: Sleep, or ![]() Hold Monster. They guarantee a 100% critical chance and allow you to maximise the whole group's damage. As the build uses
Hold Monster. They guarantee a 100% critical chance and allow you to maximise the whole group's damage. As the build uses ![]() Divine Smite, this can exacerbate damage more than one expects. It is especially easy to utilise for melee builds:
Divine Smite, this can exacerbate damage more than one expects. It is especially easy to utilise for melee builds:
- Fire Sorcerer - one of the most reliable builds for this type of setup with
 Hat of Fire Acuity +
  Scorching Ray
 - Lorecerer - similar to Fire Sorcerer, can use the same combo and can easily apply total control. Sadly, it is just limited to
 Hold Person and
  Glyph of Warding.
 - Spellsword build - Sorcadin, Bardadin, Swords Bard Archer, other caster-related builds- Lore Bard or even Arcane Trickster with access to unlimited scrolls.
Piercing party
By wearing a ![]() Bhaalist Armour, the Devotion Paladin can ensure that enemies are vulnerable to piercing damage via
Bhaalist Armour, the Devotion Paladin can ensure that enemies are vulnerable to piercing damage via ![]() Aura Of Murder.
Aura Of Murder.
- For Archers - Arcane Archer, Swords Bard Archer
- Thrower builds - Eldritch Knigh Thrower, Berserker Thrower
- Melee martials with piercing weapons - Bardadin, Battle Master, Sorcadin, Bladelock
Support
As this build uses ![]() Great Weapon Master: All In, it does receive a penalty to attack rolls. For the early game, this is a major problem, but it becomes less and less apparent as you get more bonuses throughout the game.
Great Weapon Master: All In, it does receive a penalty to attack rolls. For the early game, this is a major problem, but it becomes less and less apparent as you get more bonuses throughout the game.
In general, I would recommend someone who can cast ![]() Bless, specifically via
Bless, specifically via ![]() The Whispering Promise +
The Whispering Promise + ![]() Healing Word/
Healing Word/![]() Mass Healing Word. This is a cheap and easy way to increase attack rolls, and make you land hits early on easier. Here are some recommended builds:
Mass Healing Word. This is a cheap and easy way to increase attack rolls, and make you land hits early on easier. Here are some recommended builds:
- Clerics - Light Domain, Life Domain, Tempest Domain, etc.
- Lore Bard or Bardlock
Just having one of these will take your group to the next level and make the late game a breeze.
Leveling Overview
Here is a concise table with all the main picks during your levelling progression. For more detailed reasoning, I go further in the article. Also, do not forget to check the recommended gear, as it is crucial.
Strength Elixir Setup
| Level | Class | Selection |
|---|---|---|
| 1 | Paladin 1 | Subclass: Oath of Devotion |
| Abilities: STR - 8, DEX - 16 (15+1), CON - 14, INT - 8, WIS - 10, CHA - 17 (15+2) | ||
| Skills: Intimidation, Persuasion, Athletics | ||
| 2 | Paladin 2 | Fighting Style: |
| 3 | Paladin 3 | - |
| 4 | Paladin 4 | Feat: |
| 5 | Paladin 5 | - |
| 6 | Paladin 6 | - |
| 7 | Paladin 7 | - |
| 8 | Paladin 8 | Feat: Ability Improvement - +2 Charisma |
| 9 | Paladin 9 | - |
| 10 | Paladin 10 | |
| 11 | Paladin 11 | - |
| 12 | Paladin 12 | Feat: |
The Natural Strength Setup
| Level | Class | Selection |
|---|---|---|
| 1 | Paladin 1 | Subclass: Oath of Devotion |
| Abilities: STR - 17 (15+2), DEX - 14, CON - 10, INT - 8, WIS - 8, CHA - 16 (15+1) | ||
| Skills: Intimidation, Persuasion, Athletics | ||
| 2 | Paladin 2 | Fighting Style: |
| 3 | Paladin 3 | - |
| 4 | Paladin 4 | Feat: |
| 5 | Paladin 5 | - |
| 6 | Paladin 6 | - |
| 7 | Paladin 7 | - |
| 8 | Paladin 8 | Feat: Ability Improvement - +2 Strength |
| 9 | Paladin 9 | - |
| 10 | Paladin 10 | |
| 11 | Paladin 11 | - |
| 12 | Paladin 12 | Feat: |
Build Variations
Here are some variations that work similarly and utilize the same classes at their core.
| Setup | Description |
|---|---|
Honour Mode Lockadin:
|
This variation sacrifices the third feat, to obtain the Hexblade multiclass. The main point of this is to get |
Lockadin (Tactician or lower)
|
This variation only works on Tactician and below, and enables stacking of |
Starting the Game - Level 1
This section covers the creation screen and what would go into the best Races, Abilities, and Skills for the Oath of Devotion Paladin build. If you have already started playing, feel free to do a respec at Withers and follow along. This will make it easy to follow the build step by step.
Races
Picking a race provides various benefits - abilities, dialogue options, looks, etc.
| Race | Features | Description |
|---|---|---|
 High Half-Elf High Half-Elf |
|
High subrace of elves gives access to additional cantrips. The main one to get is |
 High Elf High Elf |
|
|
| Wood Half-Elf |
|
One of the most recommended races, thanks to the simple boost of movement speed. All melee builds gain significant benefits from this. |
 Wood Elf Wood Elf |
|
|
 Half-Orc Half-Orc |
|
Excellent race for melee builds with a slight damage boost on crits, and the ability to instantly resurrect when |
 Zariel Tiefling Zariel Tiefling |
|
Gains access to additional free smites, but most importantly, gets |
Class
| Overview | |
|---|---|
 Paladin Paladin |
|
| Features | |
| Use your blessed touch to heal a creature or cure it of all diseases and poisons. | |
| Gain |
|
 Channel Oath Charges Channel Oath Charges |
You gain the ability to channel the power contained in your Paladin Oath, which you can use to fuel certain actions. |
Subclass
| Overview | |
|---|---|
| Features | |
| With steep casting cost, the effect is pretty disappointing. | |
| The main requirements to uphold the oath. | |
Background
Backgrounds are mostly for role-playing, and you can pick whatever you prefer. If you want to optimize, then it would be good to pick backgrounds that are based on your ability points of Charisma, Dexterity, or Strength.
| Background | Skills | Description |
|---|---|---|
| Soldier | Athletics Intimidation |
The most relevant background as it gives a skill using both strength and charisma abilities. |
| Entertainer | Acrobatics Performance |
Uses both dexterity and charisma modifiers that you will have a good investment. |
| Guild Artisan | Insight Persuasion |
Persuasion proficiency is the main aspect of this background. |
| Noble | History Persuasion |
Similar to the above, but gives History skills. |
Abilities
Now, let's take a look at the abilities of the Devotion Paladin build. Correct allocation will allow you to maximize the early gameplay and get good modifier bonuses.
Here are some key points to know about ability points:
- They give "ability modifiers" that apply to various skill checks. For example, Charisma works on Intimidation and persuasion checks. Wisdom on Survival or Animal Handling, and so on.
- You get a higher ability modifier on even values - 10, 12, 14, etc. So keeping it on odd may be useless. However, there are various +1/2 modifiers in the game, specifically
 Auntie Ethel's Hair or Feats that help round this up.
 - Weapons can benefit from either Dexterity or Strength, depending on their type
- You also have a spellcasting modifier, which can be Wisdom, Charisma or Intelligence depending on your class.
You have two options for setting up your ability scores. I will leave for you to decide how you want to approach:
| Abilities | Description |
|---|---|
| Strength Elixir Setup: Strength - 8 Dexterity - 16 (15+1) Constitution - 14 Intelligence - 8 Wisdom - 10 Charisma - 17 (15+2) |
This option is for those who would like to minmax the ability scores from the start. It allows you to have all the core abilities at very high values - Dexterity, Charisma, and Strength. It does limit your weapon options to Finesse for the early areas. Once you reach |
| Natural Strength: Strength - 17 (15 +2) Dexterity - 10 Constitution - 14 Intelligence - 8 Wisdom - 8 Charisma - 16 (15+1) |
This is more of a natural setup that enables you to freely use any weapon in the early parts of the game, namely |
Skills and Expertise
Overall, the skills should be impacted by your roleplaying and background decisions. However, you would still want those that will give you the best benefits. My recommendations are to pick those at which you have a high ability modifier or are useful in general:
- Intimidation
- Persuasion
- Athletics
Levelling Progression - Levels 2-12
Here is the detailed progression for the Devotion Paladin build to get you started. You can use it as a guideline because early games can be daunting and overwhelming. Later on, once you get a feel for the class, you can start picking your options.
Level 2
By this time, you should have landed on the ![]() Ravaged beach already.
Ravaged beach already.
| Action | Description |
|---|---|
| A very powerful action unique to Paladins. It will allow you to empower weapon attacks at the cost of spell slots. Use it when you need high damage to take out a foe as fast as possible or land a critical hit. Using higher-level spell slots will improve |
Fighting Style
| Style | Description |
|---|---|
| Gives +1 Armour Class, which results in a decent increase in survivability. I would say this is the only pick that has a significant impact on the build performance. |
Prepared Spells
| Spell | Description |
|---|---|
| Deals decent damage and gives use for Bonus Action early in the game, when you might not have a use yet. Also, making an enemy |
|
| Gives +2 Armour Class as long as you can maintain |
|
| Can command the creature to drop a weapon, run away, come close, etc. It can be useful in some encounters, especially against low Wisdom enemies. | |
| An easy way to boost damage with a bonus action. |
Stocking on Strength Elixirs
Early in Act 1, after you reach the first settlement - ![]() Druid's Grove, you can stock up on some powerful potions for Acts 1 and 2 -
Druid's Grove, you can stock up on some powerful potions for Acts 1 and 2 - ![]() Elixir of Hill Giant Strength.
Elixir of Hill Giant Strength.
What do they do? They increase the Strength to 21 until a Long rest. More or less, this negates any need to have an investment in Strength if you plan to use it till the late game. This enables using various two-handed weapons, not just Finesse ones, and maximizes combat potential in the early game.
Later, you will have an option to obtain ![]() Gauntlets of Frost Giant Strength to increase strength by more and open up an elixir Slot.
Gauntlets of Frost Giant Strength to increase strength by more and open up an elixir Slot.
This is pretty easy, and you can stock up on these in a few minutes. Here is a guide to stock up on Elixir of Hill Giant Strength.
Level 3
We continue levelling Paladin. Level 3 brings features both for class and subclass. First, the class benefits:
| Feature | Description |
|---|---|
| Prevents diseases from affecting the Paladin. |
In addition, you get subclass actions:
| Action | Description |
|---|---|
| This is pretty good buff, and plays a significant role in the early game, where the low hit chance is the biggest issue. The main problem is that this costs a full action, so I would recommend only casting it before a combat sequence to save actions. | |
| Can be a powerful option when there are undead and fiends nearby. |
In addition, we get subclass-specific spells:
| Spells | Description |
|---|---|
| The spell plays a minor role. | |
| When well used, |
Level 4
Level 4 brings a new feat, slightly improving the build capabilities
Feat
| Feat | Description |
|---|---|
| One of the best feats for two-handed weapons. First, it gives a bonus attack using a bonus action if you kill an enemy or land a critical hit. Second, it gives a big 10 damage boost, which comes with a -5 penalty to attack rolls. I recommend checking my guide on Attack Roll Increase, to get ideas on how to easily overcome this penalty. |
Level 5
Finally, level 2 spells are unlocked, new Oath spells, and you get a new and powerful class feature:
| Feature | Description |
|---|---|
| Can make an additional free attack after making an unarmed or weapon attack. |
Always ready spells:
| Spell | Description |
|---|---|
| There are a few use cases for this spell, but otherwise it is not useful. | |
| Can be used to disable spellcasting if well placed, and force enemies to waste their turn for movement. |
Level 2 Spells for Prepared list
As level 2 spells are unlocked, here are some considerations to include in your build:
| Spell | Description |
|---|---|
| This spell can empower your weapons with bonus damage rolls and attack rolls. The higher the spell slot you use, the bigger the bonus. Another thing is that the bonus may seem low, but it will boost your success on hitting while having |
|
| It can heal disease, poison, paralysis, and some other negative effects. Not mandatory, but good to have if the situation arises. | |
| This can be a useful spell if you don't have another source of it. Still, Paladin is kind of limited with spell slots, so I would use this sparingly, or rely on Cleric for this. |
Level 6
Another important level for the build, as you will get access to an Aura.
| Feature | Description |
|---|---|
| Gives a bonus to saving throws, making Paladin an excellent option for resisting spells and maintaining |
Level 7
A new subclass feature is unlocked:
| Feature | Description |
|---|---|
| Sadly, it is an underwhelming aura that provides minor use cases, only against particular enemies like Mindflayers. |
Level 8
A second feat becomes available
Feat
| Feat | Description |
|---|---|
| Ability Improvement - +2 Charisma | The increased charisma will be great for both auras - |
| Ability Improvement - +2 Strength | If you are doing the Natural Strength setup, this is the best pick, as you maximise the ability score. |
Level 9
This level gives the last Devotion features:
| Spell | Description |
|---|---|
| Both of these spells are good. However, as Paladin is limited by level 3 spell slots, I would avoid using them, and only utilise them as a last resort. | |
Level 3 Spells for Prepared list
| Spell | Description |
|---|---|
| Deals good 3d8 radiant damage and applies |
|
| Buffs your weapons, especially useful to increase hit chance and give a slight damage boost. This is an alternative to the |
Level 10
You gain additional aura:
| Feature | Description |
|---|---|
| The aura is nothing spectacular, but as it's free and applies to nearby allies, no reason not to use it. |
Level 11
| Feature | Description |
|---|---|
| Free 1d8 damage boost! |
Level 12
The last level is quite important, as it allows selecting the last feat. It all depends on your requirements, but here are options:
| Feat | Description |
|---|---|
| In terms of damage, this is the best pick. With |
|
| This is only relevant if you were not able to round up your Charisma by getting |
That's it, the build is done!
Maximizing Ability Scores
Now, as the build progression is covered, there are a few aspects and important decisions you will have to make throughout the game. These will decide your final score for abilities.
Charisma
- 17 Charisma - the base from character creation.
- (Optional) Act 1 - Auntie Ethel's Hair - you will want to get +1 Charisma if you pick this choice.
- Feat 1 - Ability Improvement - +2 Charisma.
- Act 3 - Mirror of Loss - pick +2 Charisma.
- Act 3 - Mirror of Loss - Patriar's Memory - +1 Charisma if did not take Auntie Ethel's Hair.
- Feat 2 -
 Actor, if you were not able to get Auntie Ethel's Hair or Patriar's Memory.
This results in 22 Charisma, so it is a good modifier of +6.
Strength
In case you decide to pump it naturally, here are the possibilities:
- 17 Strength - the base from character creation.
- Act 1 - Auntie Ethel's Hair - you will want to get +1 Strength if you pick this choice.
- Feat - Ability Improvement - +2 Strength.
- Act 2 - Potion of Everlasting Vigour - +2 Strength.
- Feat 2 - if not taken Auntie Ethel's Hair, then you can take
 Athlete: Standing Up and get +1 Strength
 - Act 3 - Mirror of Loss - pick +2 Strength.
Potions, Elixirs, and Consumables
Let's take a look at what consumables you can use to further empower the build.
Potions
| Consumable | Description |
|---|---|
| This is a very powerful potion. It gives an additional action point which can be used to cast a spell or attack. The activation is generally by drinking using a bonus action. However, you can stack together with party members and make one member |
|
| The attack roll bonus is pretty good, which improves your chances of hitting. | |
| Helps with attack and damage rolls. | |
| An easy way to restore level 1-2 spell slots. These are mainly used for |
|
| Fully restores all spell slots, but probably best saved for casters. | |
| It can be used in two ways - the first one is to enter combat with a |
|
| Gives |
Elixirs
Unfortunately, only one Elixir can be active at a time. However, the good thing is that they last until a long rest, making them very useful and economical.
Be sure to activate them before combat, as otherwise, you will need to use Bonus Action.
| Consumable | Description |
|---|---|
| I recommend using this elixir until you are able to get |
|
| You can obtain these in Act 3, before getting |
|
| The elixir gives an easy option to get an additional action point - just kill a foe. It's the best elixir in the game in terms of damage potential. | |
| Gives an additional level 3 spell slot, especially useful when you see that none of them are available for one more encounter before a long rest. | |
| For some encounters, you will want to go first. This elixir will ensure that it overcomes even |
|
| Gives an |
|
| Provides bonus damage of 1d4 and some other good bonuses. | |
| Boosts attack rolls by 1d4; this is a good boost to increase the likelihood of landing attacks. |
Illithid Powers
This special mechanic in Baldur's Gate 3 allows you to consume tadpoles and unlock special Illithid Powers.
At first, you can only use the base powers. As you move to Act 3, you will be able to unlock the outer ring powers, also called Elite.
| Illithid Power | Type | Description |
|---|---|---|
| Base | Beneficial power to take as it does not have any costs, and provides only benefits on the first hits with attack rolls. | |
| Base | It's an easy way to ensure you land critical hits, especially good with |
|
| Base | It can help to kill an enemy faster if it is left with a few HP. | |
| Base | Excellent way to deal additional damage with reaction, early and mid game. | |
| Base | Decreases enemy ability score. | |
| Base | Excellent option for bonus temporary HP. It can also apply |
|
| Elite | It can be used to maximize the effectiveness of charisma-based skills, especially those relevant to the main character. | |
| Elite | It can be used to save yourself from a deadly spell. | |
| Elite | Gives a free use of spells and works on Channel Oath actions. |
Equipment Recommendations
Now I would like to go through some gear recommendations to maximize the Devotion Paladin Build. Items are especially important as they take the build to the next level thanks to their unique effects.
Act 1
| Slot | Item | Description |
|---|---|---|
 Melee (Two-Handed) Melee (Two-Handed) |
These weapons are go-to picks if you want other options, especially for more damage. You either need high strength or |
|
| An excellent weapon that can be used with both dexterity and strength. It also comes with |
||
| Similar to |
||
| +1 Weapon | Purchase any +1 weapon in |
|
 Ranged Ranged |
Gives bonus initiative, allowing one to go earlier in combat. | |
| Gives easy |
||
 Head Head |
One of the best headwear for pure weapon damage increase. | |
| Gives immunity to critical hits. | ||
| Improves movement speed, allowing one to reach important targets easily, early in the game. | ||
 Cloak Cloak |
Accessible if you are Dark Urge. | |
 Armor Armor |
The best Act 1 heavy armor, with critical immunity and damage reduction. | |
| Early armour, once you get a few levels up, comes with 17 Armour Class. | ||
| This can be equipped when starting the game by taking it from Lae'zel. Perfect option with a high Armour Class. | ||
 Gloves Gloves |
Gives easy |
|
| Excellent gloves that apply |
||
| One of the best picks for Natural Strength setup. This allows for maintaining high investment in Strength, Charisma, and Dexterity. | ||
| Applies the |
||
| It can be used together with |
||
 Boots Boots |
The best boots in the game for walking on |
|
| Excellent boots to help move through |
||
 Amulet Amulet |
If you can acquire it, this can be the best amulet option for most of the game. | |
| Excellent amulet that gives an easy vulnerability source for the main damage types. | ||
| Gives a free |
||
 Rings Rings |
The best ring for now in terms of damage boost. | |
| Bonus armour for survivability. | ||
| Improves damage on each hit. | ||
| Movement speed boost, which is especially important in some big area fights in Act 1. |
Act 2 - mid-game
| Slot | Item | Description |
|---|---|---|
| Melee (Two-Handed) |
Obtainable at the later part of Act 2, depending on your decision regarding Nightston. This will reward you with one of these. The |
|
| One of the first weapons with +2 enchantment and comes with a Force damage rider. | ||
| - | Previous Act weapons still play a decent role, and can be used effectively. | |
| Ranged |
The bonus initiative still plays a major role | |
| Allows casting |
||
| Head |
It's not better than |
|
| Cloak |
Improves survivability and Saving Throw success. You want to equip this cloak to maintain that good Armour Class. | |
| Armor |
A semi-upgrade to |
|
| I would only wear this if you have 16 dexterity, to make it a competitive armour. | ||
| Gloves |
Solid gloves for weapon damage boost. | |
| You will want to wear these gloves if you are using the Natural Strength setup, to invest dexterity points into Constitution. | ||
| Both of these gloves are a decent option, the higher ones give additional action to curse creatures in at least |
||
| Boots |
Gives +1 Armour Class, which is a significant survivability boost. | |
| - | Boots from Act 1 are still perfect. | |
| Amulet |
Continues to be the best amulet in terms of damage boost. | |
| Excellent pick with |
||
| Excellent amulet that can help in tight situations when you are |
||
| Rings |
Gives additional damage boost while the target is at least |
|
| Gives a psychic damage rider, which is easy to activate by using one of the Concentration spells. | ||
| If you have a hard time getting |
||
| Improves armour class, making it easier to avoid enemy attacks. | ||
| Can be used for a single encounter, to get a guaranteed critical hit. After that, you can switch it with other rings. |
Act 3 - Final Build setup
Here, the main setup change is that you will use ![]() Gauntlets of Frost Giant Strength and switch them up with Strength Elixirs.
Gauntlets of Frost Giant Strength and switch them up with Strength Elixirs.
| Slot | Item | Description |
|---|---|---|
| Melee (Two-Handed) |
(BiS) |
These are the best weapons in terms of damage, but require you to have |
| These are the two-hander options, without |
||
| Ranged |
Easy initiative source, to go early. | |
| Head |
In terms of pure damage, this is the best option as it enables you to activate |
|
| A flat damage boost on melee attacks. | ||
| This is one of the options, in case the headwear is free. You can use it together with |
||
| In terms of utility, this is one of the best headwear - critical immunity, |
||
| Cloak |
One of the best defensive cloaks, improving your chances of avoiding enemy attacks. | |
| Armor |
(BiS) |
This is the best pick in terms of combat potential. It doesn't mean that you have to wear it, but at least one frontline member should have it. It will double piercing damage via |
| Both of these are great armours. I would probably prioritize |
||
| Gloves |
(BiS) |
Sets the Strength to 23, allowing you to stop using |
| Gives a good damage and attack roll boost. | ||
| The simplest option for Natural Strength setup. | ||
| Boots |
(BiS) |
These are the best boots to take for any kind of build to avoid any of the various surface effects. |
| Amulet |
Gives increased damage as long as you drink a potion or get a healing source. | |
| Not that high of a priority here, especially when not using items like |
||
| - | Amulets from the previous Acts. | |
| Rings |
(BiS) |
Pretty easy to get the bonus damage boost while enemies are at least |
| As the build has plenty of concentration spells, the psychic damage rider is easy to obtain and can be even doubled if any of the party members use |
||
| This ring can only be used if you have |
||
| The ring allows casting spells with bonus action and can be used with |
||
| A solid ring that boosts armour class. | ||
| A one-time ring that you can use to land a critical hit with |
||
| Still an option, but I would avoid it, as getting |
Build Mechanics
In this section, I would like to dive deep into how to play the Devotion Paladin Build. This will help you utilise it to the fullest and correctly use various actions and spells throughout the game.
Important Mechanics and Combos
Let's go through key mechanics and tips on how to use the build effectively.
Managing Great Weapon Master
The most important aspect of most two-handed builds is correctly utilizing ![]() Great Weapon Master: All In and its -5 attack roll penalty. By putting an effort into minimizing the debuff, from level 4, you can get 10 flat damage boosts, making most of the enemies a cakewalk.
Great Weapon Master: All In and its -5 attack roll penalty. By putting an effort into minimizing the debuff, from level 4, you can get 10 flat damage boosts, making most of the enemies a cakewalk.
 Bless from Cleric or Paladin, for a 1d4 bonus.
- Spells like
 Faerie Fire, and
  Blindness give an Advantage to attackers.
  Oil of Accuracy or
  Diluted Oil of Sharpness, for a 1 and 2 attack roll bonus.
 Gloves of the Growling Underdog - can be obtained in Goblin Camp and give an Advantage for attack rolls.
 Phalar Aluve: Sing gives 1d4 to attack rolls.
Now, if you want more in-depth information, I have a guide covering how to increase attack rolls, which lists a lot of options and combinations. You can then pick the bonuses based on your party setup.
Effectively using Divine Smites
The key aspect of any build that involves at least 2 levels of Paladin is ![]() Divine Smite. It is one of the coolest actions, punishing your targets with a ray of light. To use it effectively, there are a few tips that I have.
Divine Smite. It is one of the coolest actions, punishing your targets with a ray of light. To use it effectively, there are a few tips that I have.
First, update your reactions and make sure the ![]() Divine Smite has a reaction on critical hit and asks you to use it:
Divine Smite has a reaction on critical hit and asks you to use it:
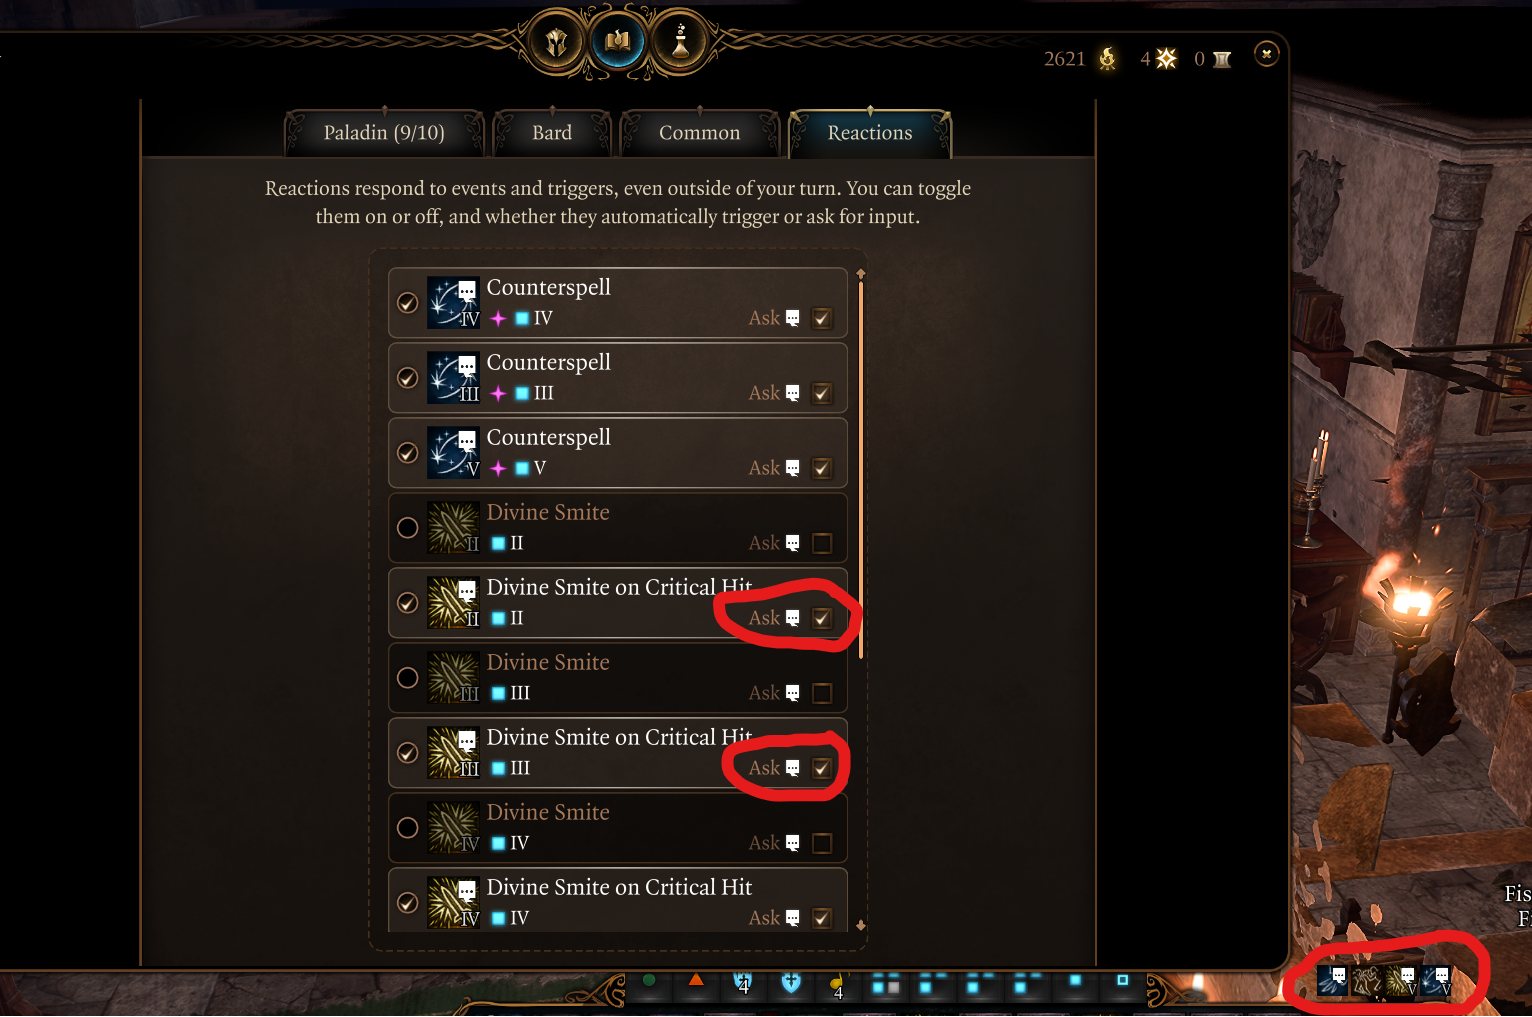
This way, you will not waste your time with unnecessary pop-ups and can use it when needed. For example, using a critical hit ![]() Divine Smite on a weak foe with a few HP will feel like a waste. However, you still might want to use it on the boss even if it has few HP to finish them off.
Divine Smite on a weak foe with a few HP will feel like a waste. However, you still might want to use it on the boss even if it has few HP to finish them off.
If you want to use the normal smite, just activate it from the quick bar by selecting the ![]() Divine Smite action. Or set it also as a reaction "Ask", but it might get irritating with all the popups. Try playing, and decide based on your experience.
Divine Smite action. Or set it also as a reaction "Ask", but it might get irritating with all the popups. Try playing, and decide based on your experience.
Overall, critical hits are extremely important for these attacks as the large number of dice rolls gets doubled and gets rerolled with ![]() Savage Attacker. That is why I recommend
Savage Attacker. That is why I recommend ![]() Killer's Sweetheart,
Killer's Sweetheart, ![]() Luck of the Far Realms, and spells like
Luck of the Far Realms, and spells like ![]() Hold Person.
Hold Person.
Another option, if you want, a big nova damage, is to use one of the special smites - ![]() Blinding Smite,
Blinding Smite, ![]() Thunderous Smite, and use
Thunderous Smite, and use ![]() Divine Smite as a reaction on the same attack. This can deal huge damage, but burns through spell slots very fast. I only recommend this if
Divine Smite as a reaction on the same attack. This can deal huge damage, but burns through spell slots very fast. I only recommend this if ![]() Great Weapon Master: Bonus Attack has not activated.
Great Weapon Master: Bonus Attack has not activated.
As I mentioned, other types of smites - ![]() Thunderous Smite,
Thunderous Smite, ![]() Searing Smite, come with unique effects and can apply various effects like
Searing Smite, come with unique effects and can apply various effects like ![]() Blinded,
Blinded, ![]() Frightened, etc. Generally, I do not recommend using them if you have
Frightened, etc. Generally, I do not recommend using them if you have ![]() Great Weapon Master: All In, as your bonus action is a very valuable source of damage.
Great Weapon Master: All In, as your bonus action is a very valuable source of damage.
Maintain allies in close position
Paladins benefit from the allies that are close to them. The main reason is that their auras work in a small range - 3 meters. However, something like ![]() Aura of Protection is a huge boost for surviving spell effects. Sadly, you don't get any Subclass-specific auras, which limits your support and combat potential.
Aura of Protection is a huge boost for surviving spell effects. Sadly, you don't get any Subclass-specific auras, which limits your support and combat potential.
Spellsword Setup
Paladin can be a semi-spellcaster, albeit not too effective. They are limited by spell selection and spell slots. Still, a few possibilities exist. This is enabled by a few items:
 Helmet of Arcane Acuity - allows stacking
  Arcane Acuity with attacks.
 Gloves of Battlemage's Power - only works with
  Booming Blade attacks and also stacks Arcane Acuity
- Items like
 Drakethroat Glaive with
  Draconic Elemental Weapon can apply Thunder Rider and Hat of Storm Scion's Power for attacks, also getting Arcane Acuity.
 - The last puzzle is the
 Band of the Mystic Scoundrel, which allows casting illusion and enchantment spells with bonus action. Paladin comes with a good option for that -
  Command, which is cheap to use and does not use Concentration slot. Depending on subclass, you can also cast Hold Person (Vengeance) or
  Plant Growth (Ancients).
So if you want a unique spin on your Paladin setup, you have an option
Early Game Combat
This section covers how to play the build at levels 1-6:
- Overall, concentrate on hitting enemies, and getting attack roll buffs.
- Divine Smite should be used sparingly as it will eat away your spell slots fast. Try to only activate it on critical hits.
- The main feature of Devotion Paladin is Sacred Weapon. Try to cast it before combat if possible. This saves you a full action point, greatly improving your combat capabilities.
- The first big boost will be at level 4, once you get
 Great Weapon Master: All In. Remember, it can be disabled in case your hit chance is very low. Try to maintain 70%+.
 - Your best friend is
 Elixir of Hill Giant Strength, which helps maintain high hit chance and equips more weapon options. use it after each long rest.
 - Once you get Aura of Protection, remember to activate it.
Late Game Combat
This covers the combat from level 7 to 12.
- The core gameplay remains more or less the same. Hit enemies, maintain high hit chance, and land Divine Smite when needed.
- Remember to activate Aura of Devotion. Although it doesn't give much, it can be useful especially in late Act 2.
- If you decide to go for spellsword setup, be sure to use Command with Band of the Mystic Scoundrel, saving the action point use.
Conclusion
Thank you for reading the Oath of Devotion Paladin Build for Baldur's Gate 3. The shining knight subclass offers a decent kit and holds you to high standards if you plan to maintain the Oath.
Cheers!
Like, Dislike, comment, or share!
Join the Discussion
0 commentsNo comments yet.
Be the first one to leave a comment!