

Tank Rogue - Master of HAM - Baldur's Gate 3 (BG3)
A major asset of Rogues is its capacity to minimize incoming harm using features such as ![]() Cunning Action: Dash/
Cunning Action: Dash/![]() Cunning Action: Disengage,
Cunning Action: Disengage, ![]() Uncanny Dodge, and
Uncanny Dodge, and ![]() Evasion. An excellent strategy for enhancing this durability during the early to intermediate stages of the game is selecting the
Evasion. An excellent strategy for enhancing this durability during the early to intermediate stages of the game is selecting the ![]() Heavy Armour Master feat, which provides a flat 3-point reduction to all incoming physical (bludgeoning, piercing, and slashing) damage.
Heavy Armour Master feat, which provides a flat 3-point reduction to all incoming physical (bludgeoning, piercing, and slashing) damage.
To execute this build successfully, you can combine 11 levels of rogue with a 1 level Cleric dip with proficiency in heavy armor, ensuring you still unlock ![]() Reliable Talent and maintain strong sneak attack progression. Alternatively, kicking off your character build with a single level in Fighter is another viable route unlocking fighting styles like
Reliable Talent and maintain strong sneak attack progression. Alternatively, kicking off your character build with a single level in Fighter is another viable route unlocking fighting styles like ![]() Defence, or
Defence, or ![]() Duelling; But then start with Fighter then go all in with Rogue. While this heavy-armor Rogue archetype truly excels in solo runs, it can functions perfectly well within a standard adventuring party.
Duelling; But then start with Fighter then go all in with Rogue. While this heavy-armor Rogue archetype truly excels in solo runs, it can functions perfectly well within a standard adventuring party.
Contents
In this format of the build we'll focus on Thief Melee archetype of the build with Tempest Cleric dip. If you fancy yourself different subclasses here's a small breakdown;
What Rogue Subclass to choose ?
| Sublass | Description |
|---|---|
|
Assassin |
|
|
Arcane Trickster |
|
|
Thief |
|
|
Swashbuckler |
|


What Cleric Subclass to choose ?
| Subclass | Description |
|---|---|
|
Tempest |
|
Nature |
|
 Life |
|
War |
|
Build Overview
If you'd like you can swap Dexterity with Constitution, you exchange hit points for Dexterity based bonuses like initiative, ranged weapon accuracy etc. If you do so, remember to swap out ![]() Auntie Ethel's Hair bonus ability bonus if you're going to use it.
Auntie Ethel's Hair bonus ability bonus if you're going to use it.
| Level | Class | Selection |
|---|---|---|
| 1 | Rogue 1 |
No
+1 DEX |
|
Background: Urchin, Soldier, Criminal, Charlatan |
||
| Skills: Athletics, Sleight of Hand, Stealth, Persuasion | ||
| 2 | Cleric 1 |
Cantrips: Spells: |
| 3 | Rogue 2 | - |
| 4 | Rogue 3 | - |
| 5 | Rogue 4 | Feat: Ability Improvement - |
| 6 | Rogue 5 | - |
| 7 | Rogue 6 | Skills: Athletics, Sleight of Hand, Stealth, Persuasion |
| 8 | Rogue 7 | - |
| 9 | Rogue 8 | Feat: |
| 10 | Rogue 9 | - |
| 11 | Rogue 10 | Feat: Ability Improvement - +2 Strength or |
| 12 | Rogue 11 | - |
Starting the Game - Level 1
This section covers the creation screen and what would go into the best Races, Abilities, and Skills. Some of these choices are impactful as you cannot respec them.
Races
Picking a race provides various benefits - abilities, dialogue options, looks, etc. If you are having difficulties making a choice, pick whatever you prefer in terms of looks or roleplay. "The perfect race pick" is important if you are into extreme min-maxing.
| Race | Features | Description |
|---|---|---|
 Dwarf Duergar Dwarf Duergar |
|
The Duergar gives |
 Lightfoot Halfling Lightfoot Halfling |
|
Somewhat inferior race pick. |
 Deep Gnome Deep Gnome |
|
Helps with various mental checks, but also gives a stealth |
 Wood Half-Elf Wood Half-Elf |
|
Almost any build can benefit from the extra movement speed. I think the same is here, so I definitely recommend this option. |
 Wood Elf Wood Elf |
|
Origins
| Origin | Features | Description |
|---|---|---|
 Gale Gale |
|
Gale is one of the best choices for specific Arcane Trickster path if he is chosen as the origin character in character creation. In the mid part of Act 2, you can obtain a free level 3 spell slot, which would be used to cast scaled-up |
|
On top of already being a Rogue, in Act 3, Astarion can obtain the |
Class
| Overview | |
|---|---|
 Rogue Rogue |
|
| Features | |
| |
This can be exploited with weapon attacks for an additional 1d6 damage once per turn. Be sure to have an |
| This can be exploited with weapon attacks for an additional 1d6 damage once per turn. Be sure to have an |
|
Background
Backgrounds are mostly for role-playing, and you can pick whatever you prefer. If you want to optimize, then it would be good to pick backgrounds that are based on your Wisdom ability points.
| Background | Skills | Description |
|---|---|---|
| Urchin | Sleight of Hand Stealth |
Excellent pick for being effective in stealth and also disarming traps or pickpocketing. |
| Criminal | Stealth Deception |
This is especially useful for the main character, as you will get proficiency in deception that helps with some dialogue options. |
| Charlatan | Deception Sleight of Hand |
Makes pickpocketing, lockpicking, and trap disarmament easier. Moreover, comes with dialogue-based skill proficiency. |
| Soldier |
Athletics Intimidation |
Athletics makes shoving and throwing opponents easier; Intimidation is a small bonus factor. |
Ability Points
Build ID: 12411
Expertise
Any pick is okay although I recommend:
- Athletics - to shove or throw your targets.
- Sleight of Hand - if you need a dedicated lockpicker or trap disarmer.
- Stealth - generally good for Rogues, penalty from heavy armor can be easily mitigated.
Correctly using Sneak Attack
So the main feature of Rogue is ![]() Sneak Attack which is enabled from the first level. In the early game, this is an excellent source of additional damage, especially if you land a critical hit. However, it does get phased out in the latter part of the game.
Sneak Attack which is enabled from the first level. In the early game, this is an excellent source of additional damage, especially if you land a critical hit. However, it does get phased out in the latter part of the game.
The main thing to know is that you can use the Reaction window to enable it on hit. This means that you can use your offhand bonus action attack to activate it, instead of using the action itself on the main hand.
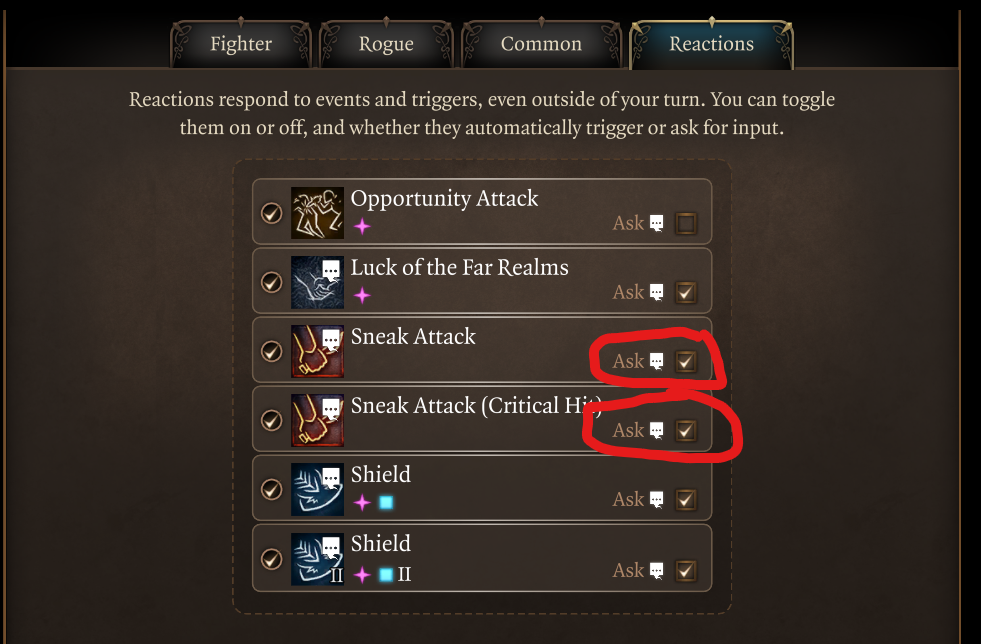
So with this, you will be asked if you want the additional Sneak Attack damage when using normal attacks. However, this can lead to easily miss the activation and it is an important damage source on each turn. So here are the ways that enable the sneak attack:
- You have to use a Finesse weapon - dagger, shortsword, or ranged weapons like bows.
- Have an
 Advantage like
  Prone, being invisible, being hidden, etc.
 - Having an ally close to the enemy circumvents the Advantage requirement.
Leveling Progression 2-12
Levels 2-6
By this time, you should have landed on the ![]() Ravaged beach already and started exploring the initial area. You might need 1 additional encounter if you did not obtain enough XP in the Nautiloid.
Ravaged beach already and started exploring the initial area. You might need 1 additional encounter if you did not obtain enough XP in the Nautiloid.
This part of the progression covers 3 main areas. They are important both from an exploration and experience perspective. This is a huge swath of content, so missing any of the regions can negatively impact the game experience if you especially enjoy finding all the places
- Wilderness that encompasses -
 Druid's Grove, Goblin Camp, Sunlit Wetlands and The Risen Road
 - Underdark - covering Ebonlake Grotto, Arcane Tower, Selûnite Outpost
- Grymforge - Underdark - Duergar Encampment and Adamantite Forge
Again, exploring them will give both awesome gear and a lot of experience, and of course, content with interesting quests. I'd recommend visiting ![]() Adamantite Forge to craft the Adamantine gear ASAP.
Adamantite Forge to craft the Adamantine gear ASAP.
Level 2
So, now in the level-up screen, you can start multiclassing. We're dipping into Tempest Subclass for:
- Easier early game sneak with
 Fog Cloud.
 - Easy retaliation damage from
 Wrath of the Storm pairing well with our tankiness.
 - Most important part, heavy armor proficiency.
Here's a guide how to multiclass:
Class - Cleric
| Overview | |
|---|---|
 Cleric Cleric |
|
| Clerics are representatives of the Gods they worship, wielding potent divine magic for good or ill. | |
| Features | |
 Spell Slots Spell Slots |
These can be used to cast spells and are restored each long rest. |
| |
Unique spell list accessible based on your cleric subclass. |
Cantrips
| Cantrips | Description |
|---|---|
| Good prebuff negating 50% of the damage received from Bludgeoning, Slashing and Piercing damage. | |
| Can give yourself or a companion in dialogue 1d4 to saving throws, generally useful cantrip. | |
| Early game if you're not concentrating on anything it's a good 1d4 bonus to ability checks, even on |
Subclass
| Overview | |
|---|---|
 Tempest Domain Tempest Domain |
|
| Features | |
| Unique reaction that can deal lightning or thunder damage to the targets attacking you. | |
| It can be used to push back enemies from ledges. | |
| Create an obscured area, that can be used to pickpocket or blind enemies. | |
Prepared Spell
Since you're only going to take 1 level of Cleric and have a Wisdom modifier of -1 or 0, you can only prepare one spell, even with modifier score of -1. My general recommendations are:
| Spells | Description |
|---|---|
| |
Extremely good defensive spell, you or an ally cannot be targeted until you attack or harm someone, although you can still take damage from area spells. Very good on solo or in tight situations |
| Give up to 3 allies (including you) 1d4 bonus to attack and saving throws, given your low amount of spell slots I'd use it carefully. | |
| Gives you+2 to your armor score making you a bit harder to hit, small buff to have higher chance to avoid attacks. | |
| |
Useful spell against Undead, Fey, Fiends, Abberations, Elementals and Celestials. On top of preventing crowd control from them it also makes you harder to hit giving those monsters a disadvantage on hitting you. |
| Create an obscured area, that can be used to pickpocket or blind enemies. |
From that point we keep leveling Rogue
Level 3 - Rogue (2)
| Action | Description |
|---|---|
| Bonus action hide, which the Berserker build will not care about. | |
| Cover more distance this turn: double your movement speed. | |
| Retreat safely: moving won't provoke Opportunity Attacks. |
Level 4 - Rogue (3)
Subclass
| Overview | |
|---|---|
 Thief Thief |
|
| Features | |
| Allows another bonus action, in Monk's case this will be Flurry of Blows, for more damage per turn. | |
| Reduces fall damage. | |
Level 5 - Rogue (4)
| Feat | Description |
|---|---|
|
Must have Feat for the build, add +1 Strength to level it up to 18. It only works if the character is wearing Heavy Body armour. Even though it states that HAM works only on non-magical damage, it actually works whenever its magical or not. |
Level 6 - Rogue (5)
| Feature | Description |
|---|---|
|
It doesn't really consume your reaction, but the opponent's who attacks you. The game doesn't treat it as a proper reaction. It's one of a very small handful of multi damage reductions that stack with resistances. It's calculated last and reduces remaining damage by 50%. |
Act 1.5 - Rosymorn Monastery
I will assume that you will reach level 7 as you explore the ![]() Rosymorn Monastery Trail. It has plenty of stuff to explore and some important story bits. The whole map also contains significant gear that you should be on the lookout for.
Rosymorn Monastery Trail. It has plenty of stuff to explore and some important story bits. The whole map also contains significant gear that you should be on the lookout for.
Level 7 - Rogue (6)
Expertise
Any pick is okay although I recommend:
- Athletics - to shove or throw your targets.
- Sleight of Hand - if you need a dedicated lockpicker or trap disarmer.
- Stealth - generally good for Rogues, penalty from heavy armor can be easily mitigated.
Act 2 - Shadow Lands
Depending on your choices, you might even reach Act 2 at level 7, so check the previous recommendations. In most cases, people will enter Act 2 via ![]() Path to Rosymorn Monastery Trail.
Path to Rosymorn Monastery Trail.
Leveling Progression:
Level 8 - Rogue (7)
| Feature | Description |
|---|---|
|
Another big tanking feature, much like Uncanny Dodge, it also does not work as described. It does not strictly matter whether an action has a Dexterity saving throw or whether it is a spell; Ex: explosives or explosions like |
Level 9 - Rogue (8)
| Feat | Description |
|---|---|
|
Rerolls melee damage dice, providing a significant damage boost. Each damage die is rolled twice independently. |
Level 10 - Rogue (9)
| Feature | Description |
|---|---|
| This is an alternative to |
Act 3 - Rivington and Lower City
You are close to reaching the game finale, or so you think. The last part of the game is huge and can be both intimidating and overwhelming.
Here are some recommendations from me:
- You don't need to do all the side quests here; they can take up to 40 hours or more, depending on what you decide to do.
- Leave some quests for other runs. As you reach the maximum level, the game might become less satisfying. This will give a new perspective for your next playthroughs, to find novelty and discovery.
- There is a lot of good gear in this Act, but you don't need to get it all. I recommend prioritizing the most important ones for your builds. You can plan this with the Act 3 Checklist.
Leveling progression:
Level 11 - Rogue (10)
Feat
| Feat | Description |
|---|---|
|
Ability Improvement - +2 Strength |
Optimizes the Strenth value which is important for weapon usage with |
|
|
Gives a whopping +5 to Initiative which can also free your initiative boosting equipment or elixir slot. Not getting |
Level 12 - Rogue (11)
This is a major level for a rogue as you gain a unique feature allowing you to become a master pickpocket and/or wrestler
| Feature | Description |
|---|---|
| The lowest roll for ability checks with proficiency becomes 10. This more or less guarantees that you can pickpocket most of the items without risk, sneak past enemies or |
Gear recommendation
I recommend checking the Item Checklists or Interactive Map, depending on which is easier to use for you. This will help you track which items and when you should pick them.
Act 1
This covers the earliest part of the game, which generally spans ![]() Nautiloid,
Nautiloid, ![]() Wilderness,
Wilderness, ![]() Underdark and the semi Act 1, or to be precise Act 1.5 -
Underdark and the semi Act 1, or to be precise Act 1.5 - ![]() Rosymorn Monastery Trial.
Rosymorn Monastery Trial.
Build ID: 12411
Mode: Full Equipment
Sets: Act 1, Act 1.5 Mountain pass/Gith Creche
Act 2
Don't be in a hurry and enjoy all the stuff that you can encounter in this act. With all the items you acquired in the previous act you should be tanky enough to survive a lot of encounters and surprises waiting for you.
Build ID: 12411
Mode: Full Equipment
Sets: Item set 3
Act 3
This is where you will unlock the strongest weapons and armors for most of the builds. It is split into two major parts, starting with ![]() Rivington and later reaching the huge area -
Rivington and later reaching the huge area - ![]() Lower City itself.
Lower City itself.
Build ID: 12411
Mode: Full Equipment
Sets: Item set 4
Maximizing the Build - Abilities, Illithid, Consumables
Now, as the build progression is covered, there are a few aspects and important decisions you will have to make throughout the game. These will decide your final score for abilities.
I recommend checking Pickpocketing Guide on how to steal a lot and prepare yourself with almost unlimited consumables. This will allow you to have a dedicated character to steal from merchants and have a consumable for every situation. Stealth Guide will also help you with how the mechanic of Stealth works, allowing you to use Rogue features better.
Ability score
- Starting with 17 Strength,
 Heavy Armour Master increases it with +1 to 18. This allows you to use the
  Auntie Ethel's Hair (optional) to use for 16 DEX that gives you more initiative and boots your range attacks capabilities and Dexterity related skills.
 - Act 2 -
 Potion of Everlasting Vigour goes above the natural cap of 20. This allows you to get even up to 24 Strength late into the game. You can get access to it from Araj Oblodra with Astarion in your party; Although be careful as this may have negative effect on your relationship with him.
 - Act 3 - Mirror of Loss - pick +2 Strength which can increase your overall Strength score to 24.
- Act 3 - If you decide to play Arcane Trickster you can sacrifice your Amulet slot for
 Amulet of Greater Health and respec by talking to Withers. Change your stats to:
Abilities [Hag hair +1 DEX]: STR - 17 (15+2), DEX - 15 , CON - 8, INT - 16 (15+1) , WIS - 8, CHA - 8
Abilities [No Hag hair] : STR - 17 (15+2), DEX - 14, CON - 8, INT - 16 (15+1) , WIS - 10, CHA - 8
This will boost your casting capabilities even more and you'll be able to scroll-cast better. If you're not playing Arcane Trickster, boost Wisdom instead.
Illithid Powers
This special mechanic in Baldur's Gate 3 allows you to consume tadpoles and unlock special Illithid Powers.
At first, you can only use the base powers. As you move to Act 3, you will be able to unlock the outer ring powers, also called Elite.
| Illithid Power | Type | Description |
|---|---|---|
| Base | Beneficial power to take as it does not have any costs, and provides only benefits on the first hits with attack rolls. | |
| Base | An easy way to ensure you land critical hits, works both with spells and normal attacks. | |
| Base | Can help to kill an enemy faster if it is left with a few HP. | |
| Base | A great way to weaponise your reaction, especially if you do not have access to |
|
| Base | Excellent option for bonus temporary HP. It can also apply |
|
| Elite | Can be used to maximise the effectiveness of charisma-based skills, especially relevant to the main character. | |
| Elite | Very powerful spell that can be used to pull enemies together. You can then follow up with area-of-effect spells or attacks. In general, it is a very effective action in the hands of any character. | |
| Elite | Can be used to nullify lower-level spells which are equal to your proficiency bonus. | |
| Elite | Remove the cost of spell slots or charges. | |
| Elite | Weakens enemies by reducing their Armour Class. Now it's easier to hit them. |
Potions, elixirs, arrows, consumables
These are general consumables, and most of them are activated for a few turns. Potions are separate from Elixirs and can be active together.
| Consumable | Description |
|---|---|
| This is a very powerful potion. It gives an additional action point, which can be used to cast a spell or attack. The activation is generally by drinking using a bonus action. However, you can stack together with party members and make one member |
|
| It can be used in two ways - the first one is to enter combat with a |
|
| An easy way to get the |
|
| Gives |
|
| Restores level 1 and 2 spell slots. | |
| Acts as a Long Rest, restoring all spell slots. |
Coatings
These are applied directly on weapons, and usually have a 10-turn duration:
| Consumable | Description |
|---|---|
| The attack roll bonus is pretty good, which improves your chances of hitting. | |
| Helps with attack and damage rolls. |
Elixirs
Unfortunately, only one Elixir can be active at a time. However, the good thing is that they last until a long rest, making them very useful and economical.
Be sure to activate them before combat, as otherwise, you will need to use Bonus Action.
| Consumable | Description |
|---|---|
| The elixir gives an easy option to get an additional action point - just kill a foe. This can then be used to attack one more time or cast a full spell. | |
| Makes it easier to maintain spell |
|
| For some encounters, you will want to go first. This elixir will ensure that it overcomes even |
|
|
and |
Respectively grand you level 3 and 4 spell slots for you to use. As mentioned earlier in the guide that allows you to for example buff your |
|
Grants us the effect of |
Scrolls
This is one of the most overpowered mechanics in the game. At first, it might seem that you earn those old, boring spells that you can learn yourself. However, as you play more and more, and get higher-level spells, you can see - wait, I can save a spell slot casting this.
Yeah, and this is where their power comes. During the whole playthrough, you will probably collect a lot of these, so I recommend using them whenever you can.
Arrows
| Consumable | Description |
|---|---|
| One of the most overpowered arrows in the game. What makes it powerful is that it can hit up to 4 targets. It has some strange interactions with |
|
| With all the pickpocketing that the build can do, these arrows allow doubling your damage and inflicting some heavy casualties even without getting access to |
|
| These arrows work especially good if you decide to use the |
Useful Buffs
- Auntie Ethel's Hair - Grants you permanent +1 to a stat of your choice. Granted by haggling with Auntie Ethel.
 Volo's Ersatz Eye grants you permanent
  See Invisibility effect in exchange for one of your eyes. It's a permanent cosmetic change and it's mutually exclusive with
  Paid the Price. It's obtained from Volo.
 Awakened - let's you use your Illithid powers as a bonus action. You can obtain it from the Zaith'isk machine.
- Potion of Everlasting Vigour - Permanent +2 to Strength that goes beyond the 20 cap. Gained from Araj Oblodra
 Resonance Stone can be found in The Mindflayer Colony effectively boosting your Psychic damage for the prize of debuff on mental Saving Throws but also your vulnerability to Psychic damage
 Sweet Stone Features - Grants you the Bless effect. Pay 5000 gold to Boney in the Circus of The Last Days for Stoney to construct a statue of the player character or another party member.
 Anointed in Splendour - Grants +2 to all Saving Throws, offer enough gold to one of the deities in Stormshore Tabernacle. Gold needed scales with the difficulty level of the game and your character level.
 Partial Ceremorphosis - Allows you to become Half Illithid granting you stronger Tadpole powers in exchange for your looks.
- Mirror of Loss can grant you and your companions +2 to any stat permanently. Can also grant additional +1 to charisma offering it +3 instead of regular +2. I recommend looking into Mirror of Loss guide.
Origin specific:
 Happy grants +1 to all Attack rolls, Saving throws and most ability checks, granted from the start by playing Astarion.
- 3 Shadow Spell slots granted by playing Gale, you can obtain them in act 2 by consuming the Shadow Weave.
 Vampire Ascendant - grants you 1d10 necrotic damage to your unarmed or weapon attacks,
  Gaseous Form and improved bite.
Important Mechanics, Combos and Definitions
Let's go through key mechanics and tips on how to use the build effectively.
Armour Class
Most basic and obvious way to "avoid" damage. AC cannot be relied on entirely unless you have an AC higher than the possible attack rolls of enemies. Natural 20 attack roll from an enemy always guaranteeds a critical hit, unless you're wearing Crit Immunity items which we very much want.
Tactician (and Honor Mode) give +2 to attack rolls, and enemies usually have at least +2 proficiency and +2 ability score bonus for MINIMUM needed AC of 27 to mitigate all attacks for a given fight and likely more than that with crit immunity (Big thank you to Captain ET)
High AC in combination with additional damage mitigation like Resistance from ![]() Warding Bond,
Warding Bond, ![]() Blade Ward or
Blade Ward or ![]() Darkfire Shortbow heavily increases your survivability especially with your Features.
Darkfire Shortbow heavily increases your survivability especially with your Features.
Damage reduction
The most valuable formd of damage reduction are:
- Resistance as it is calculated first and reduces damage by 50%.
-
 Adamantine Splint Armour and Heavy Armour Master that grant respectively -2 and -3 damage taken.
 - Lastly we have
 Uncanny Dodge which deducts another 50%. Pairing that with Crit Immunity you'll be very hard to kill.
Swashbuckler Dirty Tricks
Using tricks like ![]() Dirty Trick: Flick o' the Wrist or
Dirty Trick: Flick o' the Wrist or ![]() Dirty Trick: Sand Toss we can activate the effect of
Dirty Trick: Sand Toss we can activate the effect of ![]() Bloodthirst giving an enemy Vulnerability to Piercing which makes them take double the damage from said damage type.
Bloodthirst giving an enemy Vulnerability to Piercing which makes them take double the damage from said damage type.
Arcane Trickster's Mage Hand Legerdemain
In general, many people overlook ![]() Mage Hand and all of the benefits it can bring. Arcane Trickster does get an improved version called
Mage Hand and all of the benefits it can bring. Arcane Trickster does get an improved version called ![]() Mage Hand Legerdemain, which has a special Invisibility effect. The tooltip says it can also pick locks, but that's false for now.
Mage Hand Legerdemain, which has a special Invisibility effect. The tooltip says it can also pick locks, but that's false for now.
Let's go through various tactics that can be used to employ the ![]() Mage Hand Legerdemain:
Mage Hand Legerdemain:
- It can interact with various levers and objects, for example, you cannot access an area but you see it has a lever that could be pulled.
- It can also disarm traps to some extent. Even if it fails, the effect will only affect it and not other party members.
- The hand is invisible and can be used to reach a perfect position or initiate Surprise rounds. Just be careful of enemies that might have See Invisibility.
- Once it is detected, it can safely soak one hit (or more if they are avoided).
- Throwing stuff is one of the more amazing things. For example, when preparing for an encounter, leave the hand somewhere further away and drop a few grenades and potions on the ground. Now the hand can throw those when combat starts.
I hope this will give some ideas for how to use ![]() Mage Hand Legerdemain.
Mage Hand Legerdemain.
Conclusion and Credits
Thank you for reading the Tank Rogue guide, any questions or criticism I'll gladly answer and confront.
Special thanks to the contributors: Captain ET,Remus 71 and tbj_Quag
Like, Dislike, comment, or share!
Join the Discussion
0 commentsNo comments yet.
Be the first one to leave a comment!