
Best Artificer Archer Build - Dragon Age: Inquisition (DAI)
Contents
Artificer Archer Build
The Artificer Archer build is a sight to behold. It has various tools at its disposal, however, the main one is the Leaping Shot. It allows you to move around the battlefield, damage enemies with stacking effects, and avoid being hit.
As a Rogue, you will also have access to Stealth allowing you to get into the perfect position. Moreover, as Artificer you will get all the sweet trap abilities that can knock out targets or leave them prone on the ground defenseless.
The major aspect is Opportunity Knocks and And Take Them Down, which allow for instant talent cooldown, allowing you to spam them non stop with multi-hit attacks.
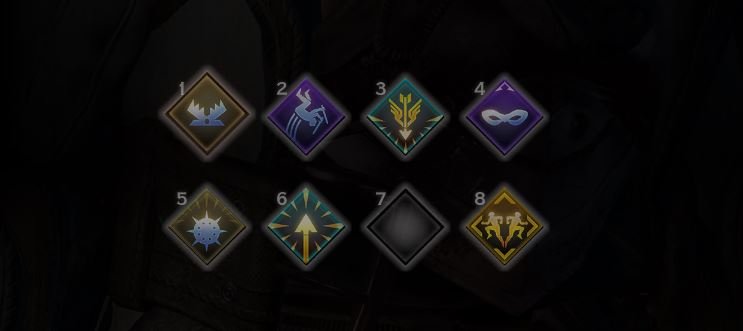
Abilities - before Specialization, Levels 1-10
Until level 10 you will have standard abilities for an archer.
| Order | Skill | Description |
|---|---|---|
| 1 | The first ability to take that greatly increases your survivability and tactical advantage | |
| 2 | The first ability allows dealing a large amount of damage from 15+ meters. Great opener | |
| 3 | We take this ability to unlock the next one | |
| 4 | You can reposition and deal substantial damage to the enemy, especially if you are close to him Moreover, you will enter stealth after using Leaping Shot |
|
| 5 | We take it mainly for progression | |
| 6 | Shadow Step upgrade makes Evade much more agile. You can use this to come close to the enemies or move away | |
| 7 | It will give you mobility while you auto-attack | |
| 8 | Attacks, when the enemy has a high HP the Inquisitor will deal increased damage. Will work well with Long Shot + Stealth. |
I prefer having many abilities that allow you to reposition yourself rather than many ones that attack, early in the game.
Abilities - progression till Endgame
Here I will cover a detailed progression for this Artificer build. This should help you understand when to pick what skills
| Order | Skill | Description |
|---|---|---|
| 1 | This will be your main ability to knock down enemies. Although it does not do much damage it can disable a group of enemies instantly when they are close to you. | |
| 2 | Your best passive ability. Cooldowns are reduced every time you or your companions do a critical hit. This allows you to have much shorter cooldown times if you have a high enough critical rate | |
| 3 | Your traps will deal additional damage because you will use them constantly this ability is essential. | |
| 4 | For this build, this is a complementary ability. The reason is that it does not provide any crowd control. However, it can deal substantial damage if enemies are in a group | |
| 5 | A mandatory passive ability. Your whole party will have an increased critical chance. Greatly buffs the Opportunity Knocks effect. | |
| 6 | This is one of the most powerful focus abilities in the game. It creates two additional images of yourself. This allows The Archer Artificer to use triple Leaping Shots for unimaginable damage numbers. | |
| 7 | We take it mainly for progression to unlock the next ability | |
| 8 | The main skill that you will use to deal damage. You will release 12 projectiles with a single hit. This works well with Opportunity Knocks. | |
| 9 | Although we take it for progression it will also synergize well with Leaping Shot as you enter stealth. The first hit after stealth will deal additional damage | |
| 10 | The passive ability gives a chance to evade enemy attacks | |
| 11 | This is one of your main abilities to position yourself for perfect Leaping Shots | |
| 12 | We mainly take it for progression | |
| 13 | Each critical hit will restore stamina. Imagine how well this works with Leaping Shot's 12 projectiles | |
| 14 | Allows you to maintain high mobility when auto-attacking | |
| 15 | Inquisitor deals increased damage if enemy HP is above 80% | |
| 16 | We mainly take this for progression | |
| 17 | Increase your damage when attacking the same enemy. | |
| 18 | We mainly take this for progression | |
| 19 | Get a 10% damage bonus, at this point in the game every small damage improvement helps immensely | |
| 20 | Sunder enemy armor with critical hits | |
| 21 | As you will be attacking from stealth use this passive ability to increase armor penetration resulting in bigger damage |
Although this build is already crazy powerful, there is one additional skill that I think improves it further:
Poisoned Weapons + Infected Wounds and Fighting Dirty - this will give you a little bit of damage boost for 8 seconds, further increasing your DPS.
Stats and attributes

-
Critical chance – I recommend having at least 70%. It will ensure that you both have fast cooldowns and an almost full stamina bar.
-
Critical Damage – After you have a high critical rate (70%+), prioritize this stat if you are able.
-
Cunning – if you are not able to get direct investment to critical chance get Cunning bonuses
-
Attack – provides larger damage bonus, better than dexterity as you usually get much higher bonuses for Attack
-
Dexterity – alternative to critical damage, but provides less bonus
Equipment and items
This section will explain what gear you should equip for the Artificer build.
Weapons - obtainable
Unfortunately, there are no exceptional options for the bows. If you want to maximize Tempest DPS, you should invest in getting a crafted version.
| Priority | Item | Description |
|---|---|---|
| 1 | Extraordinary bow, that provides 41 dexterity resulting in 41% critical damage increase. Moreover, gives an effect that makes enemy bodies explode on kill | |
| 2 | This bow is available during the Trespasser DLC. Gives 95% armor penetration. I think it is an interesting bow to try but you get it quite late in the game. | |
| 3 | Obtained in Frostback Basin and provides adequate stats. |
Weapons - craftable
| Priority | Item | Description |
|---|---|---|
| 1 | Obtained with Trespasser DLC. Has adequate slots and most importantly explosive arrow effect. | |
| 2 | Provides 3 offensive leather slots excellent to maximize either critical chance or critical damage | |
| 3 | Provides leather slots for maximizing critical chance and critical damage. |
Armors - obtainable
| Priority | Item | Description |
|---|---|---|
| 1 | This armor is a perfect match for this build as it provides a large boost to of 45 Cunning resulting in a much higher critical chance | |
| 2 | Obtainable only in the Trespasser DLC. Boosts Critical Damage, Critical Chance, and Attack. | |
| 3 | This armor reduces ability stamina cost by 20% if not attacked for 5 seconds. This should be easy. |
Armors - craftable
| Priority | Item | Description |
|---|---|---|
| 1 | This armor has 23 utility leather slots if you include upgrades. Feel free to increase either dexterity or cunning based on what the Artificer build needs more. | |
| 2 | This is a cheaper alternative to Superior Prowler Armor Schematic. It also gives less defense and 22 utility leather slots. | |
| 3 | Can be obtained from The Descent DLC. Has decent slots, but is worse compared to the options above. |
Helmets - obtainable
| Priority | Item | Description |
|---|---|---|
| 1 | Has both good bonus stats and armor rating. Can be obtained in The Descent DLC | |
| 2 | A decent mid-game option that gives a good boost to critical damage by increasing Dexterity. | |
| 3 | Alternative to Mask of the Grand Duchess if you have a high critical chance (50%+) | |
| 4 | Alternative to Ambassador's Mask if you have a low critical chance |
Helmets - craftable
| Priority | Item | Description |
|---|---|---|
| 1 | The best craftable helmet that gives 10 leather utility slots and is easy to obtain | |
| 2 | A cheaper alternative of the Superior Skirmisher Hat Schematic. Has only 8 leather utility slots | |
| 3 | Costs only 182 Sovereigns and gives 7 leather utility slots. Get it if you are short on money. |
Amulets
| Priority | Item | Description |
|---|---|---|
| 1 | As the Archer Artificer build will not concentrate on flanking damage this amulet will greatly increase the overall attack power. | |
| 2 | This amulet will increase dexterity resulting in higher critical damage. | |
| 3 | This amulet will increase both critical chance and critical damage | |
| 4 | The amulet will increase the critical chance, allowing to reduce ability cooldowns. |
Belts
| Priority | Item | Description |
|---|---|---|
| 1 | This belt boosts the critical chance. Only obtainable in the Trespasser DLC. | |
| 2 | These belts will help you to generate Artificer focus ability much faster. This way you can use Hail of Arrows in more encounters. | |
| 3 | Allows to interrupt enemy attacks and stagger them more often with normal attacks |
Rings
| Priority | Item | Description |
|---|---|---|
| 1 | Provides a large boost to critical damage, especially powerful once you have 50%+ critical chance | |
| 2 | Only obtainable in Trespasser DLC. However, provides large offensive bonuses | |
| 3 | Increases Critical chance allowing Opportunity Knocks ability to activate more often | |
| 4 | Expensive ring bought in Black Emporium. Boosts your critical damage and critical rate. | |
| 5 | Increases overall Artificer Archer damage |
Tactics
The tactics are fairly simple, please watch the video above to understand how to best utilize this build. As I was testing some abilities, I do not have poisoned weapons at starting fights, however, the core of how to use your skills is all there
In the last fight, I take on boss Giant with some normal enemies - solo. You can then see the full power of Hail of Arrows. This combo also allows you to take out dragons easily.
For the written version:
-
Before the fight use Stealth: to position yourself well and get a damage bonus
-
Activate Poisoned Weapons. (If you took this ability for Artificer build)
-
Either start with Leaping Shot or Spike Trap
-
Now you can use Evade to get close to the enemies again or for example throw Elemental Mines
-
Once you are close to the enemies, activate Spike Trap to knockdown enemies
-
Now use Leaping Shot again.
-
Rinse and repeat
If you have your focus ability ready:
-
Activate Mighty Offense Tonic
-
Activate Hail of Arrows
-
Spam Leaping Shot
-
Everyone should be dead
Conclusion
Thank you for reading this Artificer Archer build guide in the Dragon Age Inquisition. It should help you understand all that you need to know to build the best damage-dealing specialization.
Feel free to leave your feedback below
Like, Dislike, comment, or share!
Join the Discussion
0 commentsNo comments yet.
Be the first one to leave a comment!