
Swords Bard Build - Dazzling Bowmaster - Baldur's Gate 3 (BG3)
Contents
Swords Bard Build - Dazzling Bowmaster
So the build here is what I would call a "ranged spellsword" build. From early levels you will be using ranged weapons like ![]() Hand Crossbow +1 or
Hand Crossbow +1 or ![]() Titanstring Bow to inflict very high damage. This will get better and better as the game progresses.
Titanstring Bow to inflict very high damage. This will get better and better as the game progresses.
Later, the build lifts off as you obtain ![]() Sharpshooter: All In, and throughout Act 2 you will be destroying foes with your arrows. In Act 3, you will become a fully functional spellcaster. This is possible thanks to
Sharpshooter: All In, and throughout Act 2 you will be destroying foes with your arrows. In Act 3, you will become a fully functional spellcaster. This is possible thanks to ![]() Helmet of Arcane Acuity and
Helmet of Arcane Acuity and ![]() Band of the Mystic Scoundrel.
Band of the Mystic Scoundrel.
Does this sound cool? Well, it is, imagine on the starting turn, releasing 4 arrows, pumping up your Spell Save DC, and finishing everything with an arena-wide ![]() Confusion,
Confusion, ![]() Hypnotic Pattern, or
Hypnotic Pattern, or ![]() Hold Person. This will be game over for your enemies and you can watch as your allies delete the leftover foes.
Hold Person. This will be game over for your enemies and you can watch as your allies delete the leftover foes.
The Swords Bard can be as simple or as complex as you want it to be and I think this is its appeal. I hope this got your attention and let's dive deeper!
Class Contribution
The build mostly goes into Bard to obtain all the core parts of the build. Fighter comes into play to improve the archery part of the build.
10 Swords Bard
- Access to flourishes -
 Slashing Flourish (Ranged), and
  Defensive Flourish (Ranged) based on various combat situations and allows maximizing ranged damage.
  Extra Attack is one of those powerful passive features that greatly improves the damage of martial classes.
 Bardic Inspiration which can be used for flourishes or helping with various dice rolls.
- Full spellcaster progression, giving access to plenty of spell slots.
 Song of Rest for additional short rest, helping to manage resources.
- Magical Secrets - allows you to learn 2 spells from other classes, giving some unique combos like
 Banishing Smite (Ranged) or
  Counterspell.
 - Access to multiple skill
 Expertise helping with world exploration and dialogue checks.
2 Fighter
- Obtain all weapon and armor proficiencies, you can freely wear any item that you like or that helps you to adjust the build to your needs.
 Second Wind is a minor addition to restore health when things go bad.
 Action Surge - one of the most powerful actions in the game, giving a full action point. This will work together with Extra Attack for two attacks or one spell casting.
 Archery fighting style, which will improve the chance of landing bow attacks.
Leveling Overview
Here is a concise table with all the main picks during your leveling progression. For more detailed reasoning, I go further in the article. Also, do not forget to check the recommended gear as it is crucial.
| Level | Class | Selection |
|---|---|---|
| 1 | Bard 1 | Cantrips: |
| Spells: |
||
| STR - 8, DEX - 17, CON - 14, INT - 8, WIS - 10, CHA - 16 | ||
| Skills: Sleight of Hand, any Charisma-based. | ||
| 2 | Bard 2 | Spells: |
| 3 | Bard 3 | Spells: |
| Subclass: College of Swords | ||
| Skills: Sleight of Hand, any | ||
| Fighting Style: |
||
| Replace Spell: |
||
| 4 | Bard 4 | Cantrips: |
| Spells: |
||
| Feat: |
||
| 5 | Bard 5 | Spells: |
| 6 | Bard 6 | Spells: |
| Replace Spell: |
||
| 7 | Respec to Fighter 1 and go through Bard 1-6 | Fighting Style: |
| 8 | Fighter 2 | - |
| 9 | Bard 7 | Spells: |
| Replace Spell: |
||
| 10 | Bard 8 | Spells: |
| Feat: Ability Improvement - +2 Dexterity | ||
| 11 | Bard 9 | Spells: |
| 12 | Bard 10 | Skills: anything related to Dexterity or Charisma. |
| Spells: |
||
| Magical Secrets: |
Starting the Game - Level 1
This section covers the creation screen and what would go into the best Races, Abilities, and Skills for the Swords Bard build. Some of these choices are impactful as you cannot respec them.
Races
Picking a race provides various benefits - abilities, dialogue options, looks, etc.
| Race | Features | Description |
|---|---|---|
 Lightfoot Halfling Lightfoot Halfling |
|
One of the best races overall, and gets an |
 Dwarf Duergar Dwarf Duergar |
|
Gets special |
 Wood Half-Elf Wood Half-Elf |
|
They offer improved movement speed and shield proficiency. This is excellent for early game, to improve your survivability when using a bow. |
 Gnome Gnome |
|
No matter which subrace you pick all of them are good the key here is |
 Githyanki Githyanki |
|
Githyanki comes with a wide array of utility actions like |
Class
| Overview | |
|---|---|
 Bard Bard |
|
| Features | |
| Iconic bard feature, that can improve damage, dialogue dice rolls, and saving throws. | |
 Spell Slots Spell Slots |
These can be used to cast spells and are restored each long rest. |
Cantrips
| Cantrip | Description |
|---|---|
| Although the damage is low, it has its purpose. The cantrip can be used to impose a |
|
| If you are the main character and do most of the dialogues, this is also a good choice as it gives an |
Spells
The spells will be useful early on, as you will only have light armor, and being a frontliner with it is risky. Choose 4:
| Spell | Description |
|---|---|
| The only truly offensive level-1 spell. It can also frighten enemies making them unable to move. Later on, it loses its purpose, once ranged attacks become stronger. | |
| It will boost the movement speed by 3m. This is a huge bonus and will allow you to get better positions when in combat. You can also activate it on all party members when not in combat, after a long rest! | |
| In the early game, this spell is wondrous as it makes it easy to get an |
|
| Although this is not a healer build, having a way to instantly make an ally stand up is great way of action point use. |
Starting Instrument
As this is a fun feature, pick the one that you like the best! There are no combat advantages to picking a different one.
Background
Backgrounds are mostly for role-playing and you can pick whatever you prefer. If you want to optimize, then it would be good to pick backgrounds that are based on your ability points. However, this build can become the main pickpocket or lockpicker with a few optimizations.
| Background | Skills | Description |
|---|---|---|
| Charlatan | Deception Sleight of Hand |
I think this is the best pick if you plan on being the one to disarm traps and lockpick chests. |
| Soldier | Athletics Intimidation |
The most relevant background as it gives a skill using both strength and charisma abilities. |
| Entertainer | Acrobatics Performance |
Uses both dexterity and charisma modifiers that you will have a good investment. |
| Guild Artisan | Insight Persuasion |
Persuasion proficiency is the main aspect of this background. |
| Noble | History Persuasion |
Similar to the above, but gives History skills. |
Abilities
Now let's take a look at the abilities of the Swords Bard build. Correct allocation will allow you to maximize the early gameplay and get good modifier bonuses.
| Ability | Value | Description |
|---|---|---|
 Strength Strength |
8 | The build will only need strength once you get |
 |
17 (15+2) | All around great stat as you can round it up to 18 with |
 Constitution Constitution |
14 | Improves health pool and constitution saving throw success. |
 Intelligence Intelligence |
8 | Irrelevant stat. |
 Wisdom Wisdom |
10 | A slight investment to remove negative modifiers against some of the deadliest spells in the game. |
 Charisma Charisma |
16 (15+1) | The main spellcasting stat of Bard also improves the dialogue ability check success rate. |
If you are not getting the ![]() Auntie Ethel's Hair for +1 Dexterity, then I would go with 16 Dexterity and 17 Charisma. Later in Act 3, you have a chance to get +3 and round it down.
Auntie Ethel's Hair for +1 Dexterity, then I would go with 16 Dexterity and 17 Charisma. Later in Act 3, you have a chance to get +3 and round it down.
Skills and Expertise
Overall, the skills should be impacted by your roleplaying and background decisions. However, you would still want those that will give you the best benefits. My recommendation would be to go for these, most relevant to the theme of the build:
- Sleight of Hand
- Stealth (if you will use this mechanic)
- Deception
- Persuasion
- Intimidation
- Performance
Leveling Progression - Levels 2-12
Here is the detailed progression for the Swords Bard Paladin build to get you started. You can use it as a guideline because early games can be daunting and overwhelming. Later on, once you get a feel for the class you can start picking your options
Level 2
By this time you should have landed in the first area already. The level-up gives some welcome improvements for your Bard.
| Feature | Description |
|---|---|
| This will improve your chances of success when doing various dice rolls that you are not proficient in. It's not huge, but will help out during the game. |
We gain a very good utility action to gain additional HP restoration and action reset:
| Action | Description |
|---|---|
| Unique action to Bards. It acts as a third short rest. This is especially useful for Warlocks, as they will gain even more spell slots during the day. |
Spells
I have covered most of the important level 1 spells, that the build needs. In case you need help:
| Spells | Description |
|---|---|
| A useful ritual spell that will help with world exploration and is especially good in some parts of Act 1. |
Replace Spell
Nothing to replace this early in the game.
Level 3
The build reached a very special moment - subclass. It will give some sweet actions that make the Bard much more powerful.
Skills/Expertise
You can select 2 skills in which you become an expert. I would recommend something, that you want to ensure the Bardadin cannot fail. For example, due to high Charisma bonuses, dialogue-related ones are great. Choose two out of these:
- Sleight of Hand - If you are the only one doing lockpicking, this will ensure some irritating fails and wasted time.
- Deception
- Intimidation
- Performance
- Persuasion
Spells
| Spells | Description |
|---|---|
| If playing on Honor Mode, this spell is mandatory. It can save your group from many problems and overcome ability checks where you are not proficient. Otherwise, you can do without it, but I would still recommend someone in your group to have it. |
Subclass
| Overview | |
|---|---|
 College of Swords College of Swords |
|
| Features | |
| Attack up to 2 enemies at once. | |
| Attack up to 2 enemies at once. | |
| Attack defensively, increasing your Armour Class by 4 if you hit. | |
| Attack defensively, increasing your Armour Class by 4 if you hit. | |
| Thrust your weapon with enough force to push your target back 6m. Afterward, you can Teleport to the target. | |
| Shoot a target with enough force to push it back 6m. Afterwards, you can teleport to the target. | |
Fighting Style
For this build, there is no difference in which one you pick in the long run, for the short term:
| Fighting Style | Description |
|---|---|
| This can be useful early in the game, as you can use dual |
Replace Spell
I would recommend removing ![]() Dissonant Whispers for:
Dissonant Whispers for:
| Spells | Description |
|---|---|
| Cast this, if you will not be able to reach a group of enemies to use Flourish. It hits two times - on the initial cast and enemy turn. This is a very effective level 2 spell in the early game. |
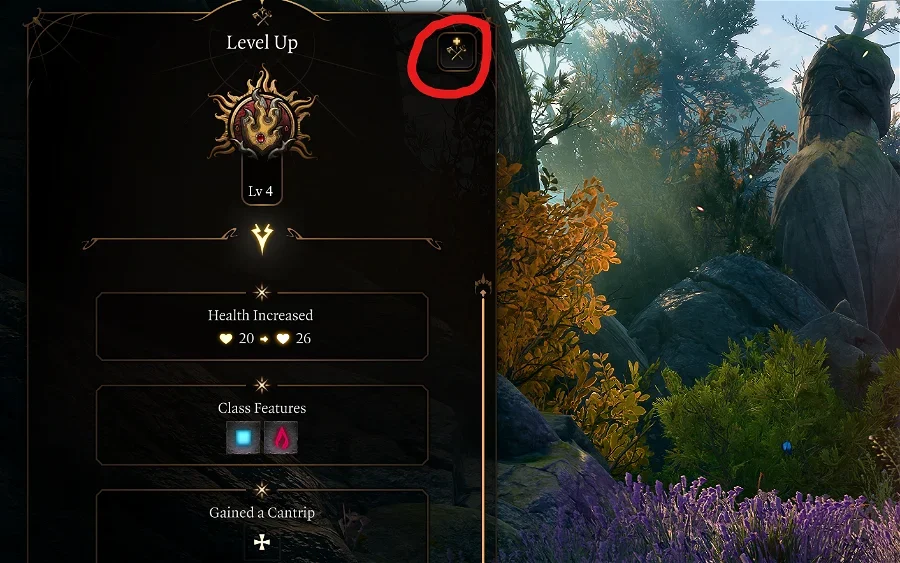
Level 4
Finally, the Swords Bard build will get the first Feat.
Cantrips
Choose one:
| Cantrip | Description |
|---|---|
| This one might be useful in the upcoming Act 2 or in general dark areas. | |
| You can use this one to move enemies together before combat. This can then be utilized |
Spells
| Spells | Description |
|---|---|
| What makes this spell good is that it targets enemy CON and makes it easier to land hits once they are Blinded. It also does not use a |
Feat
For the first Feat, there are a lot of options, and it all depends on your knowledge of the game:
| Feat | Description |
|---|---|
| The best pick for a feat as it will give a +10 damage increase. This of course comes with a downside of -5 to attack rolls. However, there are multiple ways to increase them. If it comes to worst you can disable it via a special button in Spell Book and temporarily don't get any penalty or bonuses to damage. | |
 Ability Improvement Ability Improvement |
Here you can go for +2 Dexterity, but in my opinion, it will become redundant especially if you take |
Replace Spell
Nothing to replace
Level 5
This level is a big one. First, we obtain level 3 spells, which are okay. However, we get awesome class features:
| Feature | Description |
|---|---|
| Greatly improves your damage output throughout the day as you can use flourishes more often. | |
| The bonus gained from Bardic Inspiration increases to +1d8, this will give a higher damage bonus for Flourishes. |
Spells
| Spell | Description |
|---|---|
| Get this spell as soon as possible. It is amazing! You can cast various types of elements, but most importantly it can put enemies to sleep without HP limitations. So this is the perfect crowd control option. |
Replace Spell
Nothing yet to replace as many of the spells are still relevant.
Level 6
This is the last Bard level we are taking before moving to Fighter. This is a huge improvement to the build.
| Feature | Description |
|---|---|
| You can now attack two times and this can be done together with Flourishes. So you can easily hit 4 enemies in one turn, without Haste or Elixir of Bloodlust. |
We also get additional action, that can freely be used before combat:
| Action | Description |
|---|---|
| You and any allies within 9m have an |
Spells
Pick one:
| Spells | Description |
|---|---|
| It can destroy the whole encounter by hypnotizing foes. The result is that they cannot move or take any actions. It will become very powerful once you start using |
Replace Spells
This is the level where I would start cleaning up not-so-useful abilities, especially as you will start getting better and better gear for Archer setup. Remove ![]() Faerie Fire for:
Faerie Fire for:
| Spells | Description |
|---|---|
| A very powerful spell that is useful against humanoids, and can guarantee critical hits from close range once the targets are paralyzed. |
Level 7 - Respec to Fighter Lv 1
To improve the Archer setup of Swords Bard build you will respec to Level 1 Fighter and continue leveling with Bard. The main benefits:
- Access to all weapon proficiencies
- Constitution saving throw proficiency which gives a better chance to avoid enemies breaking your
 Concentration.
 - Archery fighting style to improve ranged weapon hit chance
- Action Surge for a strong nova round when you need an extra action point.
Class
| Overview | |
|---|---|
 Fighter Fighter |
|
| Features | |
| You can use this to heal yourself in tight encounters, to get a little bit more of survivability. | |
Fighting Style
| Style | Description |
|---|---|
| This is the important passive feature as it will improve hit chance and make it easier to land shots with |
Abilities
Pick the same ones from the Level 1 Bard: STR - 8, DEX - 17, CON - 14, INT - 8, WIS - 10, CHA - 16
Level 8 - Fighter Lv 2
The last level of Fighter dip, gives important actions for the build.
| Actions | Description |
|---|---|
| The key action of the level 2 fighter. This will allow the Swords Bard to have an extremely strong nova round. For example, you can use it to build up Spell Save DC with |
Level 9 - Bard Lv 7
We finally unlock level 4 spells these will be one of the strongest control options in the game.
Spells
The aim is to get the best control spells
| Spell | Description |
|---|---|
| This is an amazing spell, that can make many of the combat encounters much easier. It will make enemies wander around, skip turns, or attack allies. Truly a devastating spell. |
Replace Spell
This is a perfect time to replace ![]() Cloud of Daggers if you still have it:
Cloud of Daggers if you still have it:
| Spell | Description |
|---|---|
| A powerful spell, that is excellent against enemies relying on their weapons - fighters, archers, etc. This will leave them helpless. |
Level 10 - Bard Lv 8
You reach level 8 Bard, which will give you the last Feat for the build. You get the first level 5 spell slot.
Spells
More or less everything is covered for the build. Feel free to pick anything that you find fancy. My recommendations:
| Spell | Description |
|---|---|
| Can be useful for some stealth attacks, if you have high Stealth bonuses or have an ally like Gloomstalker Assassin. | |
| Can be used to help an ally escape a dire situation. But this will rarely be useful, especially as Swords Bard can inflict huge damage and take care of most enemies. | |
| A control spell that has no |
Feat
Make sure you have ![]() Sharpshooter: All In as this is the highest damage boost you can get. Here are other options:
Sharpshooter: All In as this is the highest damage boost you can get. Here are other options:
| Feat | Description |
|---|---|
| Ability Improvement | You can either go with +2 Dexterity or +2 Charisma. My recommendation would be the former as it will slightly improve your hit chance with a ranged weapon. |
| Dual Wielding opens multiple options of good gear that you can wear. For example, you can mix something like |
|
| Very popular feat, that easily guarantees that you go first. I do recommend having at least 1 character with the feat as it will help in combat encounters where enemies might surprise you. |
Replace Spell
Nothing to replace, unless you want to try something.
Level 11 - Bard 9
Additional level 5 spell slot is unlocked and Swords Bard gets level 5 spells. This will be a big improvement to overall control capabilities throughout the combat encounter.
Spells
| Spell | Description |
|---|---|
| With this option, Hold Monster, |
Replace Spell
Nothing to replace, besides your personal preferences.
Level 12 - Bard Lv 10
The last level of the build but also with plenty of surprises. The build gets access to bonus features and a plethora of new spells to improve the build further.
| Feature | Description |
|---|---|
| The bonus gained from Bardic Inspiration increases to +1d10, this will give a higher damage bonus for Flourishes. |
Lat, we get bonus skill expertise. Feel free to select anything that you would like to get, this will give an additional boost.
Skills
You can choose an additional 2 skills to obtain expertise in them. I recommend picking any of the Charisma or Dexterity-related ones.
Cantrips
| Cantrips | Description |
|---|---|
| A utility spell, that can summon a spectral hand. It can help with puzzles and shove enemies. |
Spells
For the spell section, I think nothing stands out, and you already picked what was needed. Just choose what you prefer. However, the next section will show how to unlock some very powerful spells.
| Spell | Description |
|---|---|
| Having this spell might be useful in some situations where you want to remove a negative condition. |
Magical Secrets
Okay, this is an awesome spell list that gives you 2 spells to choose from. The downside... There are too many good spells. Of course, I would recommend setting up priorities. First, remember, that you can only have one concentration spell active at one time. Second, think about what situations and encounters were difficult to handle. The spells that you choose could make these much easier.
| Spell | Description |
|---|---|
| At least one party member should have this in the group. It allows canceling any spell and can save your whole group's lives. However, having two of them is even better. | |
| The scariest spell you can use to control the battlefield. Use it to cover enemies and force them to move out of the fog. This will damage them, and you can wait for them outside to hit with your smites. Moreover, they become blind, giving you an |
|
| This is a very powerful control spell. It can target multiple enemies by being upcast and does not use a Concentration slot. So it can work together with other control spells. | |
| Although this is a paladin Smite, the only one to obtain it can be Bard. What makes it powerful, is that it removes an enemy combatant from a fight if it is successful. On top, it deals 5d10 damage. If you can land a critical hit, this is huge. Unfortunately, you will be able to use 3 of them maximum during long rest. |
These are just a few spells, and you can choose many more based on your preferences.
Replace Spell
You can remove anything that is not used and pick another spell to try it out.
Maximizing Ability Scores
Now, as the build progression is covered there are a few aspects and important decisions you will have to make throughout the game. These will decide your final score for abilities. There are a few abilities to concentrate on as this is a multi-ability dependant build:
Strength
Strength is important, especially as you will want to reach maximum damage with ![]() Titanstring Bow. If you skipped the weapon or used it on another character then I would disregard strength.
Titanstring Bow. If you skipped the weapon or used it on another character then I would disregard strength.
- Elixir of Hill Giant Strength - sets to fixed 21, excellent for early game, but does use up elixir slot.
 Club of Hill Giant Strength - sets to fixed 19 value. An early-game alternative that you can dual-wield with another finesse weapon.
 Gauntlets of Frost Giant Strength - sets to fixed 23 value. This will give a good boost to
  Titanstring Bow damage.
- Elixir of Cloud Giant Strength - sets to 27. This is the highest possible value for Act 3. However, you will have to sacrifice Elixir of Bloodlust which will provide a substantial damage boost with an additional hit.
I would go with ![]() Club of Hill Giant Strength for simplicity stake, and it will be the best option till Act 3. After that, you can continue using the club or equip
Club of Hill Giant Strength for simplicity stake, and it will be the best option till Act 3. After that, you can continue using the club or equip ![]() Gauntlets of Frost Giant Strength as you will get access to some powerful stat stick weapons.
Gauntlets of Frost Giant Strength as you will get access to some powerful stat stick weapons.
Dexterity
To reach high Dexterity, you have two main ways, you can have 18-22, depending on which setup you pick:
 Gloves of Dexterity will enable you to have a flat 18 dexterity, and put points elsewhere (like naturally pumping strength, constitution, wisdom). This is a good mid-game pick until you get better gloves.
- Natural Investment into dexterity, allowing to reach 22.
Here is how you can reach high Dexterity naturally:
- Character Creation - 17 Dexterity.
- Feat - Ability Improvement - +2 Dexterity.
- Act 1 -
 Auntie Ethel's Hair - you will want to get +1 Dexterity if you pick this choice.
 - Act 1 -
 The Graceful Cloth for +2 Dexterity, but it will be dropped later in Act 3.
 - Act 3 - Mirror of Loss - pick +2 Dexterity.
This will result in 22 Dexterity.
Charisma
Here you have a few choices, which depend on what happened with Dexterity:
- If you got Auntie Ethel's Hair for +1 Dexterity, you can leave Charisma at 16
- If you did not get Auntie Ethel's Hair +1 Dexterity, then you can set 17 Charisma, and Dexterity to 16. This then opens up Patriar's Memory +1 Charisma from the Mirror of Loss
- There is also an option to instead add +2 Charisma from the feat, instead of +2 Dexterity, but I leave this to your discretion.
This can end up with either 16-18 Charisma, depending on your choices
Potions, Elixirs and Consumables
Let's take a look at what consumables you can use to further empower the build.
Potions
These are general consumables, and most of them are activated for a few turns. Potions are separate from Elixirs and can be active together.
| Consumable | Description |
|---|---|
 Oil of Accuracy Oil of Accuracy |
Gives +2 to attack rolls, which minimizes the negative impact from |
 Diluted Oil of Sharpness Diluted Oil of Sharpness |
Gives a bonus attack roll and damage. It is a good coating if you can apply it before combat. |
 Potion of Speed Potion of Speed |
You can chug this potion before combat, or during combat using bonus action. It gives another action point that gives an additional attack or one more spell cast. Sadly its duration is only 3 turns. |
 Potion of Animal Speaking Potion of Animal Speaking |
Although not something powerful, it is worth stocking up and saving a spell slot. |
 Potion of Invisibility Potion of Invisibility |
Can be used to get a perfect position before the encounter starts. |
Elixirs
Unfortunately, only one Elixir can be active at a time. However, the good thing is that they last until a long rest, making them very useful and economical.
Be sure to activate them before combat as otherwise, you will need to use Bonus Action.
| Consumable | Description |
|---|---|
 Elixir of Bloodlust Elixir of Bloodlust |
As you will be able to easily kill at least the weakest foe, this ensures additional attacks per turn. I recommend starting using it once you obtain |
 Elixir of Vigilance Elixir of Vigilance |
For some encounters, you will want to go first. This elixir will ensure that it overcomes even surprise mechanics. |
 Elixir of Hill Giant Strength Elixir of Hill Giant Strength |
Sets strength value to 21 until the Long Rest. With this option, you can easily gimp on strength in the early game. You can put those points in Dexterity or Strength. Here is a farming guide for Elixir of Hill Giant Strength |
| Elixir of Cloud Giant Strength |
An upgraded version that is available mostly in Act 3 via crafting or purchasing. Sets Strength to 27, the highest value possible. |
 Elixir of Peerless Focus Elixir of Peerless Focus |
Another good choice that allows to better maintain spell Concentration. |
 Superior Elixir of Arcane Cultivation Superior Elixir of Arcane Cultivation |
Grant's a single level 3 spell slot. Could be useful in case you are preparing for a longer encounter. |
 Supreme Elixir of Arcane Cultivation Supreme Elixir of Arcane Cultivation |
Grant's a single level 4 spell slot. Could be useful in case you are preparing for a longer encounter. |
Arrows
This is a very important part of the build and makes it over-the-top powerful. By stocking up with a few of these you can reach very strong potential.
| Consumable | Description |
|---|---|
| One of the most overpowered arrows in the game. What makes it powerful is that it can hit up to 4 targets. This may not seem much as you already have |
|
| All of these arrows can replace |
|
| Other same-name arrows... |
Illithid Powers
This special mechanic in Baldur's Gate 3 allows you to consume tadpoles and unlock special Illithid Powers.
At first, you can only use the base powers. As you move to Act 3, you will be able to unlock the outer ring powers.
| Illithid Power | Type | Description |
|---|---|---|
| Base | Beneficial power to take as it does not have any costs, and provides only benefits on the first hits. | |
| Base | Guarantees a critical hit, use it on important targets, that you want to make sure are killed. Works well with Arrow of Many targets, making each hit a crit. | |
| Base | Can help to kill an enemy faster if it is left with a few HP. | |
| Base | Can help to reduce enemy abilities, particularly dexterity, which then decreases their Armour Class. | |
| Base | A great way to weaponize your reaction before obtaining |
|
| Elite | Can be used to maximize the effectiveness of charisma based skills if you have not done that. | |
| Elite | Very powerful spell that can be used to pull enemies together. | |
| Elite | Can be used to save yourself from a deadly spell. This is especially relevant as you will have a |
|
| Elite | Remove the cost of spell slots or charges. | |
| Elite | You can now use action and bonus action interchangeably, giving two full spell casts each turn. It's not as important for you, but it will help other casters in the group. |
Equipment Recommendations
Now I would like to go through some gear recommendations to maximize the Swords Bard Build. Items are especially important as they take the build to the next level thanks to their unique effects.
Act 1
The core items of the build are obtained in Act 1, so be sure not to miss those items as they will play a crucial role in making the build effective later on, based on your setup.
Ranged Weapons
| Slot | Item | Description |
|---|---|---|
 Ranged Ranged |
The best bow in the game, however, it does require you to pump up strength. I covered some options in the ability maximization section. Generally, my recommendation would be to use |
|
| An interesting alternative bow, that applies Frightened on enemies. If you have Arrow of Many Targets, this is a perfect way to apply some control with each of your shots. | ||
| Equip two of these early in the game. This is the best option in my opinion for high damage, and before you obtain |
Melee stat stick slots
You can equip both or equip just one and use a shield. If you have shield proficiency, there are some decent options in the off-hand:
| Slot | Item | Description |
|---|---|---|
 Melee (One-Handed) Melee (One-Handed) |
This is my recommendation if you plan on using |
|
| One of the best stat sticks in Act 1, giving improved crit chance and a slight damage boost via dice rerolls. | ||
 Shield Shield |
The best shield in Act 1, with good bonuses and immunity to crit hits. | |
| Can be obtained very early with a slight boost to saving throws. |
Other Equipment
| Slot | Item | Description |
|---|---|---|
 Head Head |
Gives a damage boost based on the spellcasting modifier. The activation of the bonus should be easy. | |
| Allows for becoming invisible, perfect for some surprise round setups. | ||
| Improves movement speed, to reach perfect shooting position. However, I would prioritize this on melee characters. | ||
 Cloak Cloak |
Become invisible after killing an enemy. | |
 Armor Armor |
Another powerful armour from Grymforge, that is best worn with 14 Dexterity, to get Bonus Armour Class, making it equal to Heavy Armour. | |
| A 15 AC armor with slight damage reduction. | ||
| This can be equipped when starting the game by taking it from Lae'zel. Very solid option with a high Armour Class that you can use from level 3. | ||
 Gloves Gloves |
Ranged attacks will deal an additional 2 damage. Moreover, these gloves will give proficiency with Longbows if your race doesn't have it. | |
| These can be an excellent choice if you are not using |
||
 Boots Boots |
It is one of the best boots, giving a total |
|
| Gives improved movement when you cast a spell with Concentration. Moreover, you can walk on Ice without falling. | ||
| Excellent boots that improve movement capabilities, especially if enemies are far. | ||
 Amulet Amulet |
The only amulet in the game that gives a direct boost to damage. | |
 Rings Rings |
Adds flat 2 damage bonus. | |
| Gives a slight psychic damage boost while concentrating on spells. | ||
| The bonus Armour Class is a great boost for survivability. | ||
| Improves movement speed, making it easier to reach your targets. |
Act 2 - mid-game
| Slot | Item | Description |
|---|---|---|
| Melee (One-Handed) |
- | Use the same stat stick weapons from Act 1. You can dual-wield them or use only one + shield. |
| Ranged |
The best bow in the and continues to be for the rest of the game. | |
| Shield - if not dual-wielding |
One of the best shields in the game. It will improve Spell Save DC and make it easier to land spells. | |
| Gives a huge boost to initiative. | ||
| Head |
Allows to start stacking Arcane Acuity for higher spell success. | |
| The bonus damage based on your Charisma modifier will give a significant boost. | ||
| Gives a slight boost to ranged attack rolls. | ||
| Cloak |
It allows you to get bonus damage from an element. However, it is bugged and works only once a long rest. | |
| Improves survivability and Saving Throw success. You want to equip this cloak to maintain that good Armour Class. | ||
| Armor |
No matter, which one you get, both of these are powerful armor choices. They will be useful for the start of Act 3. | |
| A solid medium armor, that has no limit to AC bonus from high Dexterity. | ||
| Gloves |
Gives bonus fire damage. It is not much better than |
|
| Decent gloves with necrotic damage rider | ||
| The bonus to attack roll can be useful for a short period of time until you unlock the better gloves. | ||
| Boots |
The additional Armor Class is a great bonus. | |
| One of the best boots, giving a total advantage for movement on difficult surfaces. It also gives |
||
| Gives improved movement when you cast a spell with Concentration. Moreover, you can walk on Ice without falling. | ||
| Amulet |
The only amulet in the game that gives a direct boost to damage. | |
| Allows casting a |
||
| Rings |
A very powerful ring, that will give a permanent |
|
| Adds a radiant rider to improve total damage. | ||
| Gives a slight psychic damage boost while concentrating on spells. | ||
| An alternative option for improved damage while obscured. | ||
| Solid ring for improved Armour Class. |
Act 3 - Final Build setup
| Slot | Item | Description |
|---|---|---|
| Melee (One-Handed) |
(BiS) |
If you are not using Strength Elixirs or |
| One of the best stat stick weapons in the game. It will improve not only damage but Spell Save DC with each enemy kill for a total of +3 bonus. | ||
| Another crazy powerful stat stick, that allows dealing additional damage on critical hits with ranged weapons. This is fairly easy in the late game as you can use |
||
| Stat stick from Act 1, that can be decent to slightly improve the damage of ranged attacks. | ||
| Ranged |
(BiS) |
Still the best bow in the game, with how high strength you can get via various items. If you are not having high strength, I would skip it |
| Second best bow in the game. It does trade blows with |
||
| A decent bow, which is generally used as a stat stick for other builds. | ||
| Head |
(BiS) |
This is the best item for the build to help stack Spell Saves DC via the arcane acuity effect. |
| Cloak |
(BiS) |
Powerful cloak especially when you need to avoid enemy hits to maintain spell concentration. |
| Armor |
(BiS) |
The best armor in the game comes with a major caveat. It does require you to enter close range to enemies for the |
| The best medium armor in the game, that has no Armour Class bonus limits from Dexterity.e | ||
| Light armor option with |
||
| Gloves |
One of the best gloves in the game, giving improved hit chance and damage boost. The damage boost will also work with |
|
| I like these gloves as they fit the build very well, giving both weapon damage bonuses and improved Spell Save DC. | ||
| These gloves are bugged and ridiculously powerful. With an easy way to land critical hits using |
||
| These gloves will most likely go to one of the martials to get the strength to 23. If not, it can be worn on this build for additional damage with |
||
| Boots |
(BiS) |
As this is a ranged build, there is not much need to walk on slippery surfaces, so just pumping AC slightly is the best option here |
| Allows you to force a successful Saving Throw using a reaction. | ||
| Amulet |
(BiS) |
Gives +2 Spell Save DC. However, this item is highly contested by casters and particularly clerics, so I would leave it to them. |
| One of the best amulets as it gives bonus damage. | ||
| Gives a huge survivability boost and ensures that it's highly unlikely that your Concentration saving throws fail. | ||
| Can be used to restore a spell slot and then unequip it. | ||
| Rings |
(BiS) |
The best ring for this build. Together with |
| The psychic damage bonus is good, especially if you use Resonance Stone. | ||
| Less of a priority especially as it will be easy to get an |
||
| An easy +2 radiant damage on each attack. | ||
| Easy +2 Acid damage on each hit. | ||
| +1 Armour Class and Saving Throws, excellent ring for improved protection. |
Build Mechanics
In this section, I would like to dive deep into how to play the Loredin Build. This will help you utilize it to the fullest and correctly use various actions and spells throughout the game.
Important Mechanics and Combos
Let's go through key mechanics and tips on how to use the build effectively.
Managing Sharpshooter
The build mainly uses archery attacks to inflict damage. One of the biggest boosts from the early game is ![]() Sharpshooter: All In feat, giving a 10 damage boost but inflicting -5 to attack rolls. To overcome this problem there are a few ways:
Sharpshooter: All In feat, giving a 10 damage boost but inflicting -5 to attack rolls. To overcome this problem there are a few ways:
- Archery fighting style bonuses
- Oil of Accuracy and Diluted Oil of Sharpness
- High Ground bonuses
I have a full article on increasing attack rolls. that goes into depth on various mechanics that work especially well in the early game. This is when the -5 attack roll, hurts the most.
Stacking Spell Save DC for 100% spell success chance.
The big highlight of this build is the ![]() Helmet of Arcane Acuity +
Helmet of Arcane Acuity + ![]() Band of the Mystic Scoundrel combo. It allows you to stack Spell Save DC with the Arcane Acuity effect. Just use Arrow of Many Targets or double hit with
Band of the Mystic Scoundrel combo. It allows you to stack Spell Save DC with the Arcane Acuity effect. Just use Arrow of Many Targets or double hit with ![]() Slashing Flourish (Melee).
Slashing Flourish (Melee).
Once it is pumped, you can use bonus action with ![]() Band of the Mystic Scoundrel and cast various control spells from Illusion and Enchantment schools -
Band of the Mystic Scoundrel and cast various control spells from Illusion and Enchantment schools - ![]() Confusion,
Confusion, ![]() Hypnotic Pattern,
Hypnotic Pattern, ![]() Hold Person,
Hold Person, ![]() Hold Monster, etc. So you can inflict a lot of damage, and later follow up with an almost 100% spell success chance on these spells. Enemies will not be able to do anything and fights will become a cakewalk.
Hold Monster, etc. So you can inflict a lot of damage, and later follow up with an almost 100% spell success chance on these spells. Enemies will not be able to do anything and fights will become a cakewalk.
Guaranteed Critical hits
With the mentioned ![]() Helmet of Arcane Acuity and
Helmet of Arcane Acuity and ![]() Band of the Mystic Scoundrel combo, you can easily get a very high Spell Success chance. Now, this can also get you guaranteed critical hits. Use
Band of the Mystic Scoundrel combo, you can easily get a very high Spell Success chance. Now, this can also get you guaranteed critical hits. Use ![]() Hold Monster/
Hold Monster/ ![]() Hold Person and target the enemies that you want to disable and get crits on.
Hold Person and target the enemies that you want to disable and get crits on.
Once the spells land, you can come into a 3-meter range. Try to get as close as possible without getting Threatened status, so that you would not lose bonuses to attack rolls. Now fire your arrows away for a huge damage bonus.
Remember this can be the main pickpocket, lockpicker, and trap disarmer.
One thing that may be overlooked is that Bard's are perfect pickpockets and experts in Sleight of Hand. Generally one would assume this is reserved for Rogues. However, you can check my pickpocket guide on how Bard can be very effective with that in the early game.
One thing to remember is that you want to pick proficiency in Sleight of Hand, and later at level 3 expertise in it. This way, with high Dexterity you will get good bonuses making it easy to disarm traps and lockpick chests.
Stealth options
What makes Bard good is that I can also get proficiency in stealth. This does unlock some possibility of cheesy gameplay. Stealth allows:
- Initiate combat with Surprise rounds
- Kill enemies without even engaging in combat
- Reset combat encounters while removing foes
And many others. Bard's of course, are not perfect and some support from other classes to get ![]() Pass Without Trace is beneficial. I have prepared a complete stealth guide that can give you some ideas on how to utilize it for the maximum potential.
Pass Without Trace is beneficial. I have prepared a complete stealth guide that can give you some ideas on how to utilize it for the maximum potential.
Early Game Combat
Let's cover how you should progress combat levels 1-6. This plays as a normal Archer, where you utilize mostly your weapon attacks and a few spells.
- For the few early game fights
 Dissonant Whispers is a solid spell to inflict a decent amount of damage. Otherwise, shoot with your crossbow to save spell slots.
 - I recommend relying on dual
 Hand Crossbow +1 until you obtain Titanstring Bow + Club of Hill Giant Strength. This way, you will have a good use fora bonus action and later a powerful weapon setup.
 - To maximize the number of attacks early on you can use Slashing Flourish (Ranged) and follow up with bonus action offhand attack using Hand Crossbow +1.
 Cloud of Daggers is a very good early-game spell. It can target multiple stacked enemies and hit them two times. It is perfect against some fights like Gnolls, or Goblins where they are close together or need to go through a choke point.
- I would try to maintain distance with Ranged builds. This way you avoid attack penalties but also can make sure enemies will have a harder time hitting you.
- You can disable
 Sharpshooter: All In if your hit chance is below 70%, to make it easier to land hits.
 - Use
 Longstrider to buff your allies and yourself to give you a better position in combat.
  Glyph of Warding and especially
  Glyph of Warding: Sleep can easily disable multiple enemies and give an easy win as you take down enemies one by one as they sleep.
Late Game Combat
Late game is where this build lifts off and can attack and cast spells on the same turn:
- With
 Helmet of Arcane Acuity, you can attack with arrows especially Arrow of Many Targets, and build up Spell Save DC easily. Then you can cast a control spell like
  Hold Person,
  Fear,
Fear,  Confusion, etc.
 - If you can, prioritize
 Hold Monster/Hold Person as you can greatly improve your damage via guaranteed critical hits. This will work both for allies and you, just try to be in the 3-meter range.
 - Freely utilize arrows like
 Arrow of Many Targets and Arrows of Slaying. The latter are extremely powerful and deal double damage to specific enemy types.
Build Variations
Here are some variations that work similarly and utilize the same classes at their core.
| Setup | Description |
|---|---|
|
A very popular Swords Bard setup, that allows scribing level 6 spells from Wizard. So you can learn something like |
|
Gives access to weapon attacks with bonus action via War Priest Charge. Moreover, you retain 6th level spell slots, for the stronger control spell upcasting. |
Conclusion
Thank you for reading the best Swords Bard Build for Baldur's Gate 3. I hope you enjoyed reading this very powerful build setup and how it offers a unique playstyle between an archer and a caster. This is one of the best options for Honour Mode runs.
Cheers!
Like, Dislike, comment, or share!
Join the Discussion
0 commentsNo comments yet.
Be the first one to leave a comment!