

Ninja Stealth Build - Baldur's Gate 3 (BG3)
Contents
Ninja Build
This build is the perfect choice for Dark Urge or Solo playthrough. It is very similar to Gloomstalker Assassin Build, which I made some time ago. The main difference is that this is a much more mobile stealth build, being able to teleport through the arena and vanish into the shadows.
Shadows Monk can teleport using ![]() Shadow Step at the cost of a bonus action. This is a perfect way to get into positions without being seen or escape combat. The action has no limitations besides it being a
Shadow Step at the cost of a bonus action. This is a perfect way to get into positions without being seen or escape combat. The action has no limitations besides it being a ![]() Lightly Obscured area, which are plenty in this game.
Lightly Obscured area, which are plenty in this game.
The next step is ![]() Cloak of Shadows. It allows you to become invisible and stay invisible while obscured. Again, this has no limitation, only action points. Why is being
Cloak of Shadows. It allows you to become invisible and stay invisible while obscured. Again, this has no limitation, only action points. Why is being ![]() Invisible important? If the enemy cannot find you, they leave the combat.
Invisible important? If the enemy cannot find you, they leave the combat.
To top this, the build can utilize both unarmed and melee weapon combat depending on the situation. The main downside is that the build starts going from level 5 and reaches its full potential on level 9. That can be late for some people, but I promise it's worth it!
Hope I got your interest, and let's jump into the build
Leveling Overview
Here is a concise table with all the main picks during your leveling progression. For more detailed reasoning, I go further in the article. Also, do not forget to check the recommended gear as it is crucial.
| Level | Class | Selection |
|---|---|---|
| 1 | Monk | STR - 8, DEX - 17, CON - 15, INT - 8, WIS - 16, CHA - 8 |
| Skills: Acrobatics, Insight | ||
| 2 | Monk | - |
| 3 | Monk | Subclass: Way of Shadow |
| 4 | Monk | Feat: Ability Improvement +2 DEX or |
| 5 | Monk | - |
| 6 | Monk | - |
| 7 | Rogue | - |
| 8 | Rogue | Skills: Perception, Athletics, Acrobatics |
| 9 | Rogue | Subclass: Thief |
| 10 | Monk | - |
| 11 | Monk | Feat: Ability Improvement +2 DEX or |
| 12 | Monk | - |
Starting the Game
This section covers the creation screen and what would go into the best Races, Abilities, and Skills for a Ninja. Some of these choices are impactful, as you cannot respec them.
Races
Picking a race provides various benefits - abilities, dialogue options, looks, etc. Also, keep in mind whether your picked race has Shield proficiency as this can improve survivability or give benefits for offensive.
| Race | Features | Description |
|---|---|---|
 Githyanki Githyanki |
|
A versatile race that unlocks some good actions for combat and exploration. It also gives medium armour proficiency. |
 Wood Elf Wood Elf |
|
Both of these are good picks as they increase movement speed. For any kind of build that mostly engages in melee combat, this is a huge buff. |
 Wood Half-Elf Wood Half-Elf |
|
|
 Drow Drow |
|
Both of these race picks come with the |
 Drow Half-Elf Drow Half-Elf |
|
|
 Deep Gnome Deep Gnome |
|
Although it is a little race, it does get advantages to mental abilities, which is good when you later use |
 Half-Orc Half-Orc |
|
Great race as a frontliner when you are often in melee combat. Moreover, the bonus critical rolls provide a bit of bonus damage. |
Class
| Overview | |
|---|---|
 Monk Monk |
|
| Features | |
| Very powerful attack, allowing you to do two hits with a bonus action and Ki points. | |
 Ki Ki |
A unique resource for Monk actions. |
| Allows getting the armor class from the Wisdom modifier. | |
| Similar to how finesse weapons work, Monk attacks scale based on high ability between Strength and Dexterity. | |
| Set the base attack of unarmed attacks to 1d4, later this becomes 1d6 and 1d8. | |
| Gives an option to attack with your fists using a bonus action. | |
Background
Backgrounds are mostly for role-playing and you can pick whatever you prefer. If you want to optimize, then it would be good to pick backgrounds that are based on your ability points of Wisdom and Dexterity.
Moreover, due to high Dexterity, it is also a good choice to pick Sleight of Hand-related options. These will allow you to become the main lockpicker, pickpocketer, or trap disarmer.
| Background | Skills | Description |
|---|---|---|
| Folk Hero | Animal Handling Survival |
Boosts both of these from your Wisdom modifier. It will synergize well with increased armor class. |
| Urchin | Sleight of Hand Stealth |
An unlikely recommendation, however, as you will multiclass into Rogue, this will be an effective combo to improve your chances of lockpicking and trap disarming. |
| Entertainer | Acrobatics Performance |
Improves Acrobatics skills and gives bonuses to Performance for some dialogue checks. |
| Charlatan | Deception Sleight of Hand |
Mainly good for improved Sleight of Hand to unlock chests and pickpocketing. |
Abilities
Now, let's take a look at the abilities of the Ninja build. Correct allocation will allow us to maximize the early gameplay and get good modifier bonuses.
| Ability | Value | Description |
|---|---|---|
 Strength Strength |
8 | I recommend dumping this stat. The main reason is that either you will go with |
 |
17 (15+2) - With 16 (14+2) - No Hair |
This plays a few roles. First, it improves Armor Class. Second, it improves initiative, allowing one to go earlier during the Turn. Last, if it's higher than your strength damage and attack rolls, you will get a bonus from Dexterity.. |
 Constitution Constitution |
15 | Important for HP and survivability. It will later be rounded to 16 using |
 Intelligence Intelligence |
8 | Not an important ability for the build |
 Wisdom Wisdom |
16 | The ability is important until you start using Light Armor. This will either be Act 2 or Act 3. Wisdom provides a bonus armor class making it easier to avoid enemy hits. However, when wearing armor it will stop serving any purpose besides skill checks. |
 Charisma Charisma |
8 | This build should not rely much on this ability. |
Skills and Expertise
Overall, the skills should be impacted by your roleplaying and background decisions. However, you would still want those that will give you the best benefits. My recommendations are to pick those at which you have a high ability modifier and these are Dexterity-related.
- Acrobatics
- Sleight of Hand
- Stealth
For Wisdom related:
- Animal Handling
- Insight
- Medicine
- Perception
- Survival
Leveling Progression
Here is the detailed progression for the Ninja build to get you started. You can use it as a guideline because early games can be daunting and overwhelming. Later on, once you get the feel for the class you can start picking your options
Overall, up until levels 5-6, it will be quite difficult to do much. You do not have access to the iconic actions - ![]() Shadow Step and
Shadow Step and ![]() Cloak of Shadows. So until then, I recommend staying with a vanilla setup and using your fists and clothing to maximize survivability.
Cloak of Shadows. So until then, I recommend staying with a vanilla setup and using your fists and clothing to maximize survivability.
You could also go with Open Hand Monk Build until level 6 and then respec. If you are doing a solo run, learn the encounters, use the environment to your advantage, and utilize ranged attacks.
Level 2
Reaching the first level-up already brings some good actions to improve tactical options
| Feature | Description |
|---|---|
| Makes it easier to reach and move between enemies. |
That is not all, by using Ki points you can get an improved version of some base actions:
| Action | Description |
|---|---|
| Not something that I would use, as the bonus action has better uses. | |
| Can be used to reach longer distances or jump on enemies on higher ground. | |
| A better option of Disengage by using Ki Point and a bonus action. |
Optional - Elixir of Hill Giant Strength
Well, there is a trick early in Act 1, after you reach the first settlement - Druid's Grove. There you can stock up on some powerful potions for Acts 1, and 2 - ![]() Elixir of Hill Giant Strength.
Elixir of Hill Giant Strength.
What do they do? They increase the Strength to 21 until a Long rest. More or less, this negates any need to have an investment in Strength if you plan to use them till the late game. This way, you can utilize ![]() Tavern Brawler to the maximum potential with unarmed attacks.
Tavern Brawler to the maximum potential with unarmed attacks.
This is somewhat gimmicky, however, if you are interested,d here is a guide on how to farm Elixir of Hill Giant Strength.
You will have an alternative option to use ![]() Club of Hill Giant Strength and later
Club of Hill Giant Strength and later ![]() Gauntlets of Frost Giant Strength to set strength to a high value and open up the elixir slot.
Gauntlets of Frost Giant Strength to set strength to a high value and open up the elixir slot.
Level 3
As a Monk at level 3, you can choose the subclass. It impacts how you play the build and what combat options there are.
| Overview | |
|---|---|
 Way of Shadow Way of Shadow |
|
| Features | |
| Allows hiding with just a bonus action instead of an action. | |
| It can be useful if you need to pass stealth checks with companions. For example, sneaking through areas where enemies may see you. | |
| Very powerful action that can complement both Shadow Monk and Warlock with |
|
| Not useful, and does not work inside |
|
| Another powerful action, that you can use to break enemy |
|
| You can use this while being invisible. Group enemies together and let your caster kill them, or cast |
|
Level 4
Level 4 brings the first feat, it will be a huge improvement.
Feat
Here you can select from a few choices, based on your playstyle and what kind of playthrough you are doing.
| Feat | Description |
|---|---|
| One of the best feats that you can get for Monk builds. Even though the build does not have high strength you can either get it via |
|
| The additional initiative bonus can be great for starting combat early, especially in Honour Mode runs. |
Level 5
This is a huge milestone for the build as it unlocks a few powerful features.
| Feature | Description |
|---|---|
| Allows striking twice, greatly improving the damage output. However, for shadow monks, this will not be as important. The main reason is that the build will be saving that action point for |
Monk class also gains a special action, giving a little bit of crowd control capabilities.
| Actions | Description |
|---|---|
| The signature action of Shadow Monk. You can use an action point to become invisible while staying in obscured places. This is a truly powerful capability that can be used without any limitations. I will cover more on how to utilize this in the Combat section. Just to tell you, it allows Shadow Monk to single-handedly trivialize multiple encounters without getting hit. | |
| This can be activated by utilizing a melee weapon. Makes the enemy skip the turn | |
| It can be activated by utilizing unarmed stats, even if you are wearing a weapon. Makes the enemy skip the turn. |
After unlocking ![]() Cloak of Shadows, I suggest equipping the recommended weapons in the equipment section. You will now use action points for either
Cloak of Shadows, I suggest equipping the recommended weapons in the equipment section. You will now use action points for either ![]() Cloak of Shadows or
Cloak of Shadows or ![]() Stunning Strike (Melee). So this opens up weapon slots as a stat stick to improve your off-hand
Stunning Strike (Melee). So this opens up weapon slots as a stat stick to improve your off-hand ![]() Flurry of Blows damage.
Flurry of Blows damage.
Level 6
This is the last level before jumping into multiclassing, and it unlocks another signature action of Shadow Monk
| Actions | Description |
|---|---|
| This allows you to move freely between shadows. As it costs a bonus action, it can be used indefinitely without a spell slot or other limitations. This is a perfect way to reach enemy backlines or set yourself up before the combat starts. |
The Monk class also gets an additional feature:
| Feature | Description |
|---|---|
| You can now overcome resistance to non-magical attacks. |
Level 7 - Rogue Lv 1
Now, let's jump into the next important step for Ninja Build - unlocking Rogue via multiclass:
| Overview | |
|---|---|
 Rogue Rogue |
|
| Features | |
| This can be exploited with weapon attacks for an additional 1d6 damage once per turn. Be sure to have an |
|
| This can be exploited with weapon attacks for an additional 1d6 damage once per turn. Be sure to have an |
|
Skills
Picking the Rogue class allows one to select additional skills. My recommendation would be Sleight of Hand. With it, you can unlock most of the chests in the game. Here are my suggested options:
- Sleight of Hand
- Acrobatics
- Insight
- Perception
- Survival
Level 8 - Rogue Lv 2
This level gives some options for bonus action. However, there is nothing important.
| Action | Description |
|---|---|
| Hide from enemies by succeeding Stealth checks. Stick to the dark and avoid enemy sightlines. Attacking or casting a spell will reveal your location. Probably the most important. Now you can start sneaking using Bonus action and then use Sneak Attack at the same turn | |
| Cover more distance this turn: double your movement speed. | |
| Retreat safely: moving won't provoke Opportunity Attacks. |
Level 9 - Rogue Lv 3
This level unlocks a rogue subclass that improves Ninja combat prowess, especially with ![]() Flurry of Blows.
Flurry of Blows.
Subclass
| Overview | |
|---|---|
 Thief Thief |
|
| Features | |
| Allows another bonus action, in Monk's case this will be Flurry of Blows, for more damage per turn. | |
| Reduces fall damage. | |
Overall, this will greatly improve your damage output on the first turn.
Level 10 - Monk Lv 7
The level unlocks a few class features
| Feature | Description |
|---|---|
| Gives a huge survivability boost against spells. | |
| Allows for avoiding |
Level 11 - Monk Lv 8
The second feat of the build is unlocked, and an additional Ki Point has been added.
Feat
| Feat | Description |
|---|---|
| Ability Improvement | You can go for Ability Improvement, and in this case, Dexterity +2, is great both for initiative and bonus Armour Class. Moreover, if you are not using |
| One of the options for feat. Makes it easier to go early in combat, especially if you will not utilize |
Level 12 - Monk Lv 9
The last level gives new features that are not relevant to the setup the build uses. However, there is one important upgrade.
| Feature | Description |
|---|---|
| Can freely walk through difficult terrain, making it easier to reach foes. Perfect for situations where there is Ice, Grease, or other effects on the ground. |
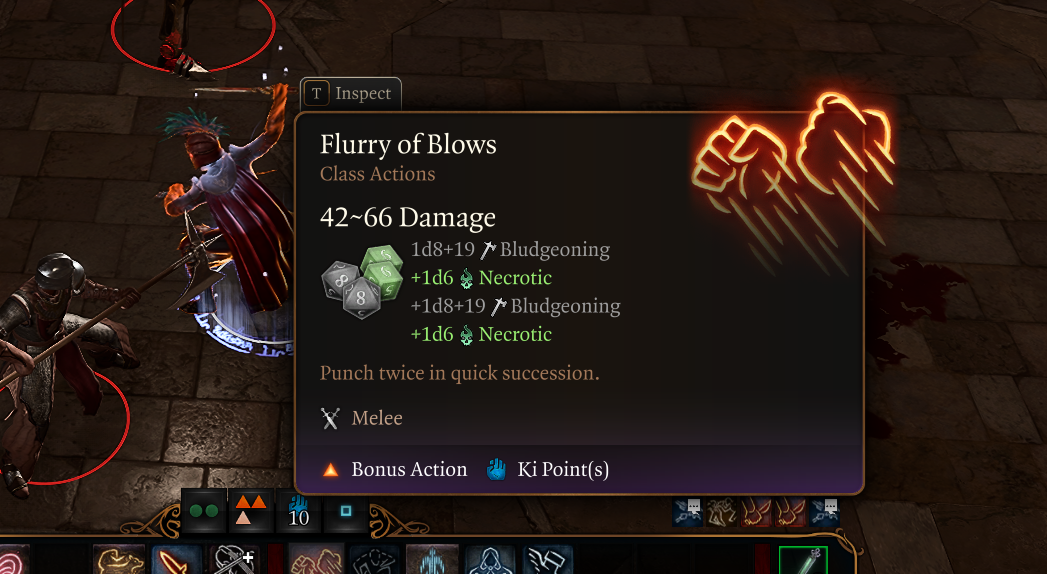
There is an unmentioned upgrade, the monk ![]() Martial Arts: Deft Strikes at level 9 Monk gain 1d8 rolls, instead of 1d6. When using flurries this is an additional 2~ points of damage per flurry.
Martial Arts: Deft Strikes at level 9 Monk gain 1d8 rolls, instead of 1d6. When using flurries this is an additional 2~ points of damage per flurry.
Potions, Elixirs, and Consumables
Let's take a look at what consumables we can use to further empower the build.
Potions
These are general consumables, and most of them are activated for a few turns. Potions are separate from Elixirs and can be active together.
| Consumable | Description |
|---|---|
| This is a very powerful potion. It gives an additional action point which can be used to cast a spell or attack. The activation is generally by drinking using a bonus action. However, you can stack together with party members and make one member |
|
| Although you already have the |
|
| The attack roll bonus is pretty good, which improves your success chances. | |
| Helps with attack and damage rolls. |
Elixirs
Unfortunately, only one Elixir can be active at a time. However, the good thing is that they last until a long rest, making them very useful and economical.
Be sure to activate them before combat as otherwise, you will need to use Bonus Action.
| Consumable | Description |
|---|---|
| One of the best elixirs, as it gives additional action, for more attacks. I would only use it once you stop utilizing |
|
| My recommendation for the early game, to pump strength and improve the effectiveness of |
|
| An upgraded version that is available mostly in Act 3 via crafting or purchasing. Sets Strength to 27, the highest value possible. | |
| This gives a large boost to initiative, almost guaranteeing that you go first. | |
| Provides bonus damage of 1d4 and some other good bonuses. | |
| Boosts attack rolls by 1d4. |
Illithid Powers
This special mechanic in Baldur's Gate 3 allows you to consume tadpoles and unlock special Illithid Powers.
At first, you can only use the base powers. As you move to Act 3, you will be able to unlock the outer ring powers, also called Elite.
| Illithid Power | Type | Description |
|---|---|---|
| Base | Beneficial power to take as it does not have any costs, and provides only benefits on the first hits with attack rolls. | |
| Base | It's an easy way to ensure you land critical hits. | |
| Base | It can help to kill an enemy faster if it is left with a few HP. | |
| Base | A great way to weaponize your reaction and disable spell activation. | |
| Base | Decreases enemy ability score. | |
| Base | Excellent option for bonus temporary HP. It can also apply |
|
| Elite | It can be used to maximize the effectiveness of charisma-based skills, especially those relevant to the main character. | |
| Elite | It can be used to save yourself from a deadly spell. |
Equipment Recommendations
Now I would like to go through some gear recommendations to maximize the Ninja Build. Items are especially important as they take the build to the next level thanks to their unique effects.
Act 1
In Act 1, you should be using Unarmed attacks most time, and pump strength with ![]() Elixir of Hill Giant Strength.
Elixir of Hill Giant Strength.
| Slot | Item | Description |
|---|---|---|
 Melee (One - Handed) Melee (One - Handed) |
I recommend picking this weapon up, it can be dual-wielded with |
|
| This is an amazing weapon as it sets strength to 19 and improves your damage when using |
||
| A decent early-game monk weapon. You can use it until you obtain |
||
 Ranged Ranged |
Gives bonus initiative, allowing one to go earlier in combat | |
| Excellent bow against monstrosities. There are plenty of them in Act 1. | ||
 Head Head |
Provides increased speed at the start of the combat. | |
 Cloak Cloak |
The only option in Act 1 that is okay, is by providing once-per-turn invisibility. Only available to Dark Urge origin. | |
 Armor Armor |
Gives +2 Dexterity, making it a very good choice for the end of Act 1 and the start of Act 2. | |
| Somewhat relatable first unarmed build armor. It is nothing special as I do not think you will utilize the effect. | ||
 Gloves Gloves |
It gives fire damage, increasing the variety of damage types that you do. | |
| Amazing gloves that, after the first hit, will give |
||
 Boots Boots |
Avoids slipping on various terrains and most importantly, unlocks |
|
| Does not slow down the movement, but the terrain effects still apply. | ||
 Amulet Amulet |
Great amulet that will be useful for most of the game. With its actions, it is the perfect choice for Monk. | |
 Rings Rings |
Improves movement speed, making it easier to reach your next target. | |
| Gives defensive bonuses to Armour Class and Saving Throws. |
Act 2 - mid-game
Act 2 changes the landscape, and there will be a lot of dark areas. Moreover, it will provide some amazing items for you to find, which will improve the build damage.
This is also where I recommend equipping ![]() Knife of the Undermountain King and a shield if you can. Besides that, there are a few weapon options if you cannot do that.
Knife of the Undermountain King and a shield if you can. Besides that, there are a few weapon options if you cannot do that.
| Slot | Item | Description |
|---|---|---|
| Melee (One-handed) |
You can obtain this weapon when equipping |
|
| Having this weapon equipped will increase critical roll range. This is important once you start attacking mainly with bonus actions. | ||
| Must use weapon if not using |
||
| Its unique effect can be used to deal bonus damage without breaking concealment. Just be sure to wear this on the main hand. | ||
| Melee (Two-Handed) |
One of the best weapons in the game, which also fits well with the build. It requires a specific evil decision to be accessible, but gives |
|
| Ranged |
Amazing bow that allows to precast |
|
| Head |
A more powerful version, but it requires Medium Armor Proficiency. | |
| This headwear will lead you through the rest of the playthrough unless you have medium armor proficiency for other options. | ||
| Cloak |
Improves survivability and Saving Throw success. | |
| If you have this, it is still a solid choice. | ||
| Armor |
If you can wear medium armor, this is an amazing choice as you can scale its Armour Class beyond +2 from Dexterity and does not impose stealth. | |
| Still a solid option throughout Act 2 due to bonus Dexterity, before getting ASI +2 Dexterity. | ||
| Gloves |
Deals bonus necrotic damage with unarmed attacks and can apply |
|
| Boots |
The boots are still a good option in Act 2. | |
| Bonus armor class for higher survivability. | ||
| Amulet |
The amulet is great as it allows for the restoration of Ki Points. | |
| It can be an effective amulet against humanoid enemies and fully paralyze them. | ||
| Allows casting |
||
| Rings |
An offensive ring that gives bonus damage against |
|
| If you use |
||
| Enables you to use |
||
| Provides an |
||
| Bonus armour class is a good bonus, and the ring still takes place. |
Act 3 - Final Build setup
This is the last act of the game, where you will get access to the most powerful items. To get them as early as possible, you will need some planning, but overall, it should not be a problem.
There are a few weapon setups that I could recommend:
| Slot | Item | Description |
|---|---|---|
| Melee (One - Handed) |
This is perfect for those who attack with their main hand and use bonus actions for |
|
| These are other weapon recommendations that are perfect to be worn in the offhand and act as stat sticks. |
||
| The club is still an offhand option if you are not using |
For a fully evil playthrough:
| Slot | Item | Description |
|---|---|---|
| Melee (Two-Handed) |
Now, this is not as powerful as |
Now, for the other equipment:
| Slot | Item | Description |
|---|---|---|
| Ranged |
(BiS) |
Increases critical range and is perfect for improving damage. However, this requires Longbow proficiency; it's not a big problem if you are not using ranged attacks, as that does not bring any downsides for melee combat. Otherwise, you would have to be an Elf to have the proficiency. |
| Gives a big boost to the initiative, guaranteeing that you can go first. However, you will need to get Longbow proficiency from your race. | ||
| Head |
I think the best option for the helmet is thanks to a necrotic damage boost. This is better than a critical range boost. Otherwise, use the ones from Act 2. | |
| I think this would be the best helmet as you could do an additional |
||
| Cloak |
(BiS) |
Improves the chances of attacks missing the wearer until they get hit for that turn. |
| Ensures an easy way to become invisible and leave combat. | ||
| The cloak can serve a purpose for the build, as you often attack from hiding. However, it should not take priority over survivability; the additional critical range is not that strong when you average everything. | ||
| Armor |
(BiS) |
This is the crème de la crème of this build. It is ridiculously powerful armor, that doubles the damage of piercing weapons. If you are using your weapon attacks to some extent, just take this if the story choices allow. |
| Although not as good as the one above, the |
||
| If you can wear medium armour, this is another great option for a Ninja build. | ||
| Gloves |
As the build relies on |
|
| Excellent gloves, as they work both on weapon and unarmed attacks, covering all your damage options. | ||
| If you mostly rely on Flurries, these gloves are crazy. They give the highest bonus damage of 1d10 | ||
| Boots |
(BiS) |
These boots are amazing. Although you would lose some damage, its advantages of overcoming |
| Very good boots that you obtain early in Act 3. For this reason, you should also have your Wisdom modifier positive. | ||
| Amulet |
(BiS) |
The upgraded version of the amulet is a perfect choice for a Monk. |
| It makes any Constitution ability investment redundant as it maximizes it to 23 points. Use this together with the |
||
| Gives an |
||
| Rings |
(BiS) |
A perfect ring for bonus damage. It requires the enemy to be |
| Gives an easy |
||
| If you use |
||
| Bonus armor class is a good bonus, and the ring still takes place. |
Build Mechanics
In this section, I would like to dive deep into how to play the Ninja Build. This will help you utilize it to the fullest and correctly use various actions and spells throughout the game.
Important Mechanics and Combos
Let's go through key mechanics and tips on how to use the build effectively.
Understand stealth mechanics
The main point of this build is that it is extremely deadly when you utilize stealth mechanics well. I have prepared a complete stealth guide that covers them all. There are plenty of stealth options:
- Attacking and creating surprise rounds
- Leaving combat while in the middle of the fight, to reset it
- Become invisible at will
- Gain attack roll bonuses when in stealth
- And many others.
I would like to emphasize the Surprise rounds. Here are the general steps to activate them:
- You have to be undetected before doing this, best to be outside the red vision cones. If you need to enter the vision cone, make sure that they don't have
 Darkvision, and it's either a
  Lightly Obscured or
  Heavily Obscured area. Or you can just be
  Invisible via effects like
  Potion of Invisibility,
  Cloak of Shadows, etc. This almost guarantees a surprise round.
 - You can start the combat by attacking with melee, ranged weapons, or casting offensive spells. The main prerequisite is that you should be "seeable" and in the line of sight of the enemy once the attack lands. So they would have a clear vision of you, and you are not too far away. This is important, as being far away does not trigger Surprise.
- You can move in other party members if they were ungrouped, so they could also land attacks during this free round.
Cloak of Shadows
Things start to get interesting from level 5. This is when you obtain ![]() Cloak of Shadows. It is the iconic ability of a shadow monk, giving it the ability to become invisible at any time while obscured. If you leave obscured places, the invisibility breaks, so be mindful of that.
Cloak of Shadows. It is the iconic ability of a shadow monk, giving it the ability to become invisible at any time while obscured. If you leave obscured places, the invisibility breaks, so be mindful of that.
Why is this important? It allows you to become invisible in combat and move away from your last location. After that, enemies will try to detect you. If they don't, the combat ends, and you are free to go.
I think you get the gist. You can chain this to clear rooms full of enemies. However, this costs you an action point, which does not leave you many options to attack. Well, this is where Monk's special action comes in, and the Thief Subclass
Bonus Actions and Flurries
Okay, so we have covered the mobility, but now comes the question of damage. The action point would be used for invisibility, how can you then attack? Here is where ![]() Flurry of Blows comes in. It gives two attacks for a cost of a bonus action and ki points. Powerful, right?
Flurry of Blows comes in. It gives two attacks for a cost of a bonus action and ki points. Powerful, right?
With Thief (Rogue lv 3), you can do two of these attacks per turn. You can even reach 3 if using a ![]() Helmet of Grit. So, as you can see, this damage is nothing to scoff at, and you can easily take out one or two enemies per turn, before becoming invisible again.
Helmet of Grit. So, as you can see, this damage is nothing to scoff at, and you can easily take out one or two enemies per turn, before becoming invisible again.
Shadow Step
Now, the last aspect of Shadow Monk. At level 6, you will gain ![]() Shadow Step. It is similar to
Shadow Step. It is similar to ![]() Misty Ste,p and it allows you to move from shadow to shadow at the cost of a bonus action. No cost for spell slots or ki points.
Misty Ste,p and it allows you to move from shadow to shadow at the cost of a bonus action. No cost for spell slots or ki points.
Because you will have at least two bonus actions, if the situation arises, you can just teleport away from the enemy and either flee or become invisible further away.
Using Darkness
This can be one of the most powerful combos that you can do, breaking enemy logic and actions. There are a few sources of it - spell ![]() Darkness, shadow monk action -
Darkness, shadow monk action - ![]() Shadow Arts: Darkness, and items like
Shadow Arts: Darkness, and items like ![]() Shar's Spear of Evening, that can create it at will.
Shar's Spear of Evening, that can create it at will.
The main idea is to have a way to counteract its ![]() Blinded effect. For Monk, you can equip
Blinded effect. For Monk, you can equip ![]() Eversight Ring or
Eversight Ring or ![]() Shar's Spear of Evening and gain an
Shar's Spear of Evening and gain an ![]() Advantage on enemies that dare to enter it.
Advantage on enemies that dare to enter it.
Next, wait till enemies come close to the edges or are inside, then you can attack them without any repercussions. However, before ending the turn, be sure to stand in the middle of the shadow. This was,y enemies with Long Reach cannot hit you.
The good thing is that normal spells and ranged attacks cannot reach you. You can stay safe inside, running to the edge and chipping away at your confused foes. be sure to have a ranged weapon, in case they stand further away.
Early Game Combat
Let's cover how you should progress through combat levels 1-6. The early game is more of a standard monk build as you slowly progress towards the Ninja playstyle.
 Flurry of Blows is the main damage source and a good utility of a bonus action.
- Stay safe, and don't risk too much, as you are still somewhat fragile.
- With Cloak of Shadows unlocked, you can do some stealthy combat approaches or even leave combat when the situation demands.
- Use
 Shadow Step to get behind enemies before combat, and use it together with Cloak of Shadows
 - Try to stay in darker areas to maintain all the advantages of your features.
Mid to Late Game Combat
The late game is more or less the same; the main improvements come from additional bonus action attack and better gear options.
- Try to engage in combat alone if you know of an upcoming encounter. This way, you can kill an enemy and then use Cloak of Shadows to leave combat.
- For a perfect position to enter combat, use Shadow Step.
- Use
 Stunning Strike (Unarmed) to disable foes and force them to skip turns.
 - Use both weapon and Flurry of Blows attacks depending on available resources and what resistances the enemy has.
Build Variations
There are a few variations that the build could be changed about. I think it is more for advanced players who are likely doing some deeper optimizations.
| Setup | Description |
|---|---|
|
This unlocks the third feat, if you need that. However, you lose 1d8 on unarmed attacks and Ki Point. |
|
This is a perfect solo-run build. It gets Action Surge, for first-turn burst attacks, and can equip all weapons. It would require some advanced optimization and testing, with stuff like dual Spears. You will most likely also drop Flurry of Blows and |
Conclusion
Thank you for reading the Ninja build for Baldur's Gate 3. I hope you enjoyed reading the build. This should cover everything that you need to become the ultimate killer from the shadows.
Cheers!
Like, Dislike, comment, or share!
Join the Discussion
0 commentsNo comments yet.
Be the first one to leave a comment!