Best Way of Open Hand - Monk Build - Baldur's Gate 3 (BG3)
Contents
Way of Open Hand Monk Build
The Monk build is the epitome of simplicity and power. You have high movement speed, decent survivability, and a wide variety of fist attacks. Moreover, from the early levels, you have a well-weaponized bonus action - ![]() Flurry of Blows.
Flurry of Blows.
Still, this is just a part of why the monk is powerful, and it can be taken further by picking ![]() Tavern Brawler. This adds an additional strength modifier to unarmed attacks, which can be greatly boosted with some items like
Tavern Brawler. This adds an additional strength modifier to unarmed attacks, which can be greatly boosted with some items like ![]() Elixir of Hill Giant Strength or
Elixir of Hill Giant Strength or ![]() Club of Hill Giant Strength. Nevertheless, if elixirs are not for you, even without
Club of Hill Giant Strength. Nevertheless, if elixirs are not for you, even without ![]() Tavern Brawler, and going for high Dexterity, makes you a solid combatant.
Tavern Brawler, and going for high Dexterity, makes you a solid combatant.
In the late game, monks run around the battlefield, stunning foes, applying ![]() Ki Resonation: Punch, and just inflicting large amounts of damage.
Ki Resonation: Punch, and just inflicting large amounts of damage.
Class Contribution
The build mostly goes into Monk for the core of its combat arsenal, later empowered by the Thief subclass feature.
9 Open Hand Monk
 Flurry of Blows gives a very strong damage option for your bonus action, hitting 2 times.
- Unique variations
 Flurry of Blows: Push,
  Flurry of Blows: Topple allow to apply debuffs on enemies
 - Various passive bonuses to improve Armour Class, fist damage, and others via passives -
 Unarmoured Defence,
  Martial Arts: Deft Strikes, etc.
 - Access to
 Stunning Strike (Melee) to disable enemies
 - Excellent movement speed with
 Unarmoured Movement passives.
 - A substantial boost to damage via different elements with
 Manifestation of Body,
  Manifestation of Mind, and
  Manifestation of Soul.
  Ki Resonation: Punch unique mechanic allowing to deal substantial damage against enemies stacked close by.
3 Thief
- Gives access to bonus action via the
 Fast Hands Thief feature. This will allow for additional fist attacks using
  Flurry of Blows.
 - Bonus skill proficiencies if starting with Rogue.
Strength vs. Dexterity
There is also the question of the main ability points. There is a very powerful feat - ![]() Tavern Brawler, and it works with strength. The caveat is that no matter what, Monk needs Wisdom and Dexterity. So the third ability will spread out your points very thin.
Tavern Brawler, and it works with strength. The caveat is that no matter what, Monk needs Wisdom and Dexterity. So the third ability will spread out your points very thin.
There is a solution - ![]() Elixir of Hill Giant Strength. It is available early in Act 1 and can be stockpiled for the rest of the game. With it, you will have, high, Strength - to use
Elixir of Hill Giant Strength. It is available early in Act 1 and can be stockpiled for the rest of the game. With it, you will have, high, Strength - to use ![]() Tavern Brawler, Dexterity - initiative and Armour Class, Wisdom - Armour Class, and bonus elemental damage.
Tavern Brawler, Dexterity - initiative and Armour Class, Wisdom - Armour Class, and bonus elemental damage.
Here is a guide on how to farm Elixir of Hill Giant Strength. If you decide not to use elixirs, go with the Dexterity-based Monk setup. It will still be a strong combatant, but not an S-Tier build.
Leveling Overview
Here is a concise table with all the main picks during your leveling progression. For more detailed reasoning, I go further in the article. Also, do not forget to check the recommended gear, as it is crucial.
| Level | Class | Selection |
|---|---|---|
| 1 | Monk | STR - 8, DEX - 16, CON - 15, INT - 8, WIS - 17, CHA - 8 |
| Skills: Acrobatics, Insight | ||
| 2 | Monk | - |
| 3 | Monk | Subclass: Way of the Open Hand |
| 4 | Monk | Feat: |
| 5 | Monk | - |
| 6 | Monk | - |
| 7 | Rogue | - |
| 8 | Rogue | Skills: Perception, Athletics, Acrobatics |
| 9 | Rogue | Subclass: Thief |
| 10 | Monk | - |
| 11 | Monk | Feat: Ability Improvement +2 WIS or |
| 12 | Monk | - |
Dexterity Setup
Some people might want to avoid the ![]() Elixir of Hill Giant Strength to fit their roleplay better, or for any other reason. You can then make a so-called "Dex Monk" which concentrates on Dexterity ability for its combat prowess:
Elixir of Hill Giant Strength to fit their roleplay better, or for any other reason. You can then make a so-called "Dex Monk" which concentrates on Dexterity ability for its combat prowess:
| Level | Class | Selection |
|---|---|---|
| 1 | Monk | STR - 8, DEX - 17, CON - 14, INT - 8, WIS - 16, CHA - 10 |
| Skills: Acrobatics, Insight | ||
| 2 | Monk | - |
| 3 | Monk | Subclass: Way of the Open Hand |
| 4 | Monk | Feat: Ability Improvement - +2 DEX |
| 5 | Monk | - |
| 6 | Monk | - |
| 7 | Rogue | - |
| 8 | Rogue | Skills: Perception, Athletics, Acrobatics |
| 9 | Rogue | Subclass: Thief |
| 10 | Monk | - |
| 11 | Monk | Feat: Ability Improvement +2 WIS or |
| 12 | Monk | - |
Build Variations
Here are some variations that work similarly and utilize the same classes at their core.
| Setup | Description |
|---|---|
|
This variation unlocks third feat, and sacrifices a few nice features from the level 9 monk. |
Starting the Game - Level 1
This section covers the creation screen and what would go into the best Races, Abilities, and Skills for the Open Hand Monk build. Some of these choices are impactful, as you cannot respec them.
Origins and Characters
Here are the Origin and character picks that have a slight advantage with this build:
| Origin | Features | Description |
|---|---|---|
|
The main highlight is the |
|
|
In Act 3, Astarion can obtain the |
Races
Picking a race provides various benefits - abilities, dialogue options, looks, etc.
| Race | Features | Description |
|---|---|---|
 Wood Elf Wood Elf |
|
Both races are very similar, the key is that they give improved movement speed, which is important for Open Hand Monk. |
 Wood Half-Elf Wood Half-Elf |
|
|
 Dwarf Duergar Dwarf Duergar |
|
Duergars are great as you can use |
 Githyanki Githyanki |
|
They have various actions like |
Class
| Overview | |
|---|---|
 Monk Monk |
|
| Features | |
| Very powerful attack, allowing you to do two hits with a bonus action and Ki points. | |
 Ki Ki |
A unique resource for Monk actions. |
| Allows getting the armor class from the Wisdom modifier. | |
| Similar to how finesse weapons work, Monk attacks scale based on high ability between Strength and Dexterity. | |
| Set the base attack of unarmed attacks to 1d4, later this becomes 1d6 and 1d8. | |
| Gives an option to attack with your fists using bonus action. | |
Background
Backgrounds are mostly for role-playing and you can pick whatever you prefer. If you want to optimize, then it would be good to pick backgrounds that are based on your ability points of Wisdom and Dexterity.
Moreover, due to high Dexterity, it is also a good choice to pick Sleight of Hand-related options. These will allow you to become the main lockpicker, pickpocket, or trap disarmer.
| Background | Skills | Description |
|---|---|---|
| Folk Hero | Animal Handling Survival |
Both of these use Wisdom as the main ability. |
| Urchin | Sleight of Hand Stealth |
An unlikely recommendation, however, as you will multiclass into Rogue, this will be an effective combo to improve your chances of lockpicking and trap disarming. |
| Entertainer | Acrobatics Performance |
Improves Acrobatics skills and gives bonuses to Performance for some dialogue checks. |
| Charlatan | Deception Sleight of Hand |
Mainly good for improved Sleight of Hand to unlock chests and pickpocketing. |
Abilities
Now, let's take a look at the abilities of the Open Hand build. Correct allocation will allow us to maximize the early gameplay and get good modifier bonuses.
This setup utilizes ![]() Elixir of Hill Giant Strength to reach high strength value very early in the game. This allows for additional damage and very high attack rolls thanks to the
Elixir of Hill Giant Strength to reach high strength value very early in the game. This allows for additional damage and very high attack rolls thanks to the ![]() Tavern Brawler feat.
Tavern Brawler feat.
High Wisdom will ensure that you get increased armor class, bonus damage from ![]() Boots of Uninhibited Kushigo and Open Hand manifestations.
Boots of Uninhibited Kushigo and Open Hand manifestations.
This setup does not use ![]() Elixir of Hill Giant Strength and, in turn, sacrifices
Elixir of Hill Giant Strength and, in turn, sacrifices ![]() Tavern Brawler. However, you are free from consumables and enjoy a bit more tamed monk setup.
Tavern Brawler. However, you are free from consumables and enjoy a bit more tamed monk setup.
This setup enables using ![]() Tavern Brawler for a damage and attack roll boost. The main negative aspect is that you will have low Constitution. So I recommend this only for more experienced players.
Tavern Brawler for a damage and attack roll boost. The main negative aspect is that you will have low Constitution. So I recommend this only for more experienced players.
Skills and Expertise
Overall, the skills should be impacted by your roleplaying and background decisions. However, you would still want those that will give you the best benefits. My recommendations are to pick those at which you have a high ability modifier and these are Dexterity-related.
- Acrobatics
- Sleight of Hand
- Stealth
For Wisdom related:
- Animal Handling
- Insight
- Medicine
- Perception
- Survival
Leveling Progression - Levels 2-12
Here is the detailed progression for the Open Hand Monk to get you started. You can use it as a guideline because early games can be daunting and overwhelming. Later on, once you get a feel for the class you can start picking your options
Level 2
This is where you will have left the tutorial area, and will start exploring the world. Reaching the first level-up already brings some good actions to improve tactical options
| Feature | Description |
|---|---|
| Makes it easier to reach and move between enemies. |
That is not all, by using Ki points you can get an improved version of some base actions:
| Action | Description |
|---|---|
| Not something that I would use, as the bonus action has better uses. | |
| Can be used to reach longer distances or jump on enemies on higher grounds. | |
| A better option of Disengage by using Ki Point and a bonus action. |
Optional - Elixir of Hill Giant Strength
There is a trick early in Act 1 after you reach the first settlement - Druid's Grove. There you can stock up on some powerful potions for Acts 1, and 2 - Elixir of Hill Giant Strength.
What do they do? They increase the Strength to 21 until a Long rest. More or less this negates any need to have strength investment if you plan to use them till the late game. This way you can utilize ![]() Tavern Brawler to the maximum potential with unarmed attacks.
Tavern Brawler to the maximum potential with unarmed attacks.
This is somewhat gimmicky, however, if you are interested here is a guide on how to farm Elixir of Hill Giant Strength.
Going with Strength Monk and using these elixirs will allow you to enjoy an unparalleled martial build. Without it, you should go with a Dexterity-based monk, although it is still powerful, it pales in comparison.
Level 3
This level unlocks subclass and additional class features:
| Feature | Description |
|---|---|
| A useful option for reaction when you are getting shot with a ranged attack, and there are no opponents close by for Attack of Opportunity. |
Subclass
| Overview | |
|---|---|
 Way of the Open Hand Way of the Open Hand |
|
| Features | |
| The weakest option in my opinion. It is situationally useful in a few encounters. | |
| This is an excellent choice when you are fighting bosses, especially in Honour Mode, to disable their reactions to legendary actions. | |
| One of the best options for the bonus action attack as Prone enemies can be hit by allies with |
|
Level 4
Level 4 brings the first feat, it will be a huge improvement.
Feat
The pick depends on the setup you have and how you allocate ability points.
| Feat | Description |
|---|---|
| Take the +1 Constitution option to round it to 16. The recommended option for this build as it will make the Open Hand Monk ridiculously powerful. You will need to use |
|
| Ability Improvement | This option is here if you are doing a Dexterity-based Monk build. Then take +2 Dexterity. |
Level 5
Another major milestone for the build and unlocks great features:
| Feature | Description |
|---|---|
| An important feature, that will allow you to attack two times with the main hand. This will pair well with the next unlock - |
|
| It acts as a normal attack but can also stun enemies when attacking with a weapon. | |
| It acts as a normal attack but can also stun enemies when attacking unarmed. |
Level 6
This is an important level for the Open Hand Monk as you will get a feature that will give additional damage such as necrotic, or radiant.
| Feature | Description |
|---|---|
| You can now overcome non-magical resistances with unarmed attacks. | |
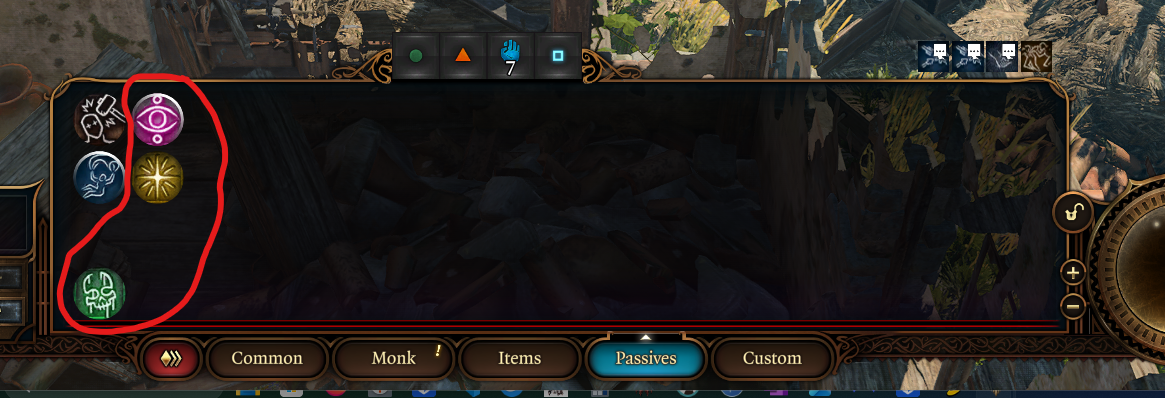
| Different types of damage based on the situation you need. These have base 1d4 damage and are further empowered via the Wisdom ability modifier. You need to enable them in your "Passives" hotbar | |
| Restore ki and gain additional bonus action that can be used for |
Don't forget to enable the manifestations in the Passives:
Level 7 - Rogue 1
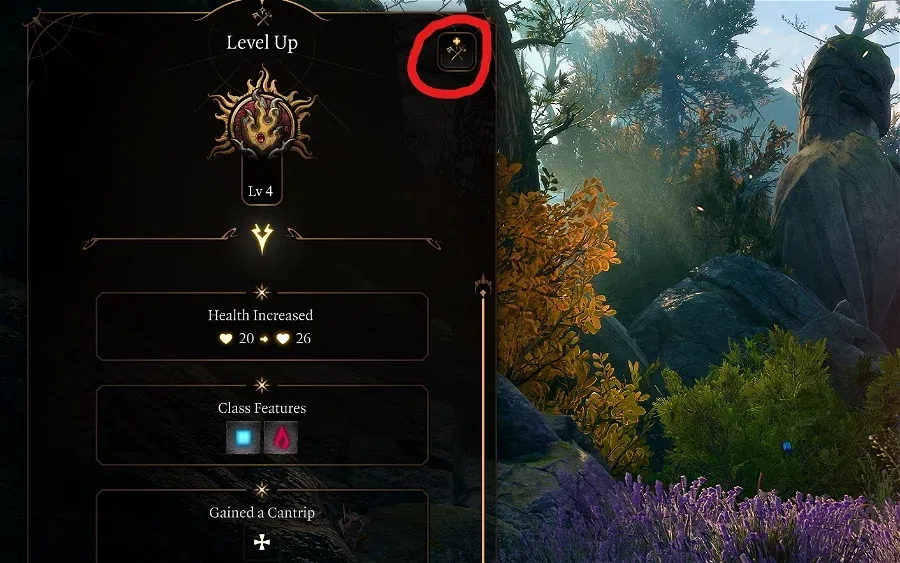
For this level multiclass into Rogue as it will be the next target of the build. To access multiclass click here in level-up screen:
Class
| Overview | |
|---|---|
 Rogue Rogue |
|
| Features | |
| Exploit a foe's distraction to deal an additional 1d6 damage. Damage increases by 1d6 for every uneven Rogue Level gained. | |
| Exploit a foe's distraction to deal an additional 1d6 damage. Damage increases by 1d6 for every uneven Rogue Level gained. | |
Abilities
You can pick two skills of expertise. My recommendation:
- Sleight of Hand - Monk can now be the main lockpicker and trap disarmer in the group.
- Acrobatics - resist being shoved.
Level 8 - Rogue Lv 2
This level does not give any flashy moves, however, it unlocks cunning actions. These are similar to normal actions but instead of using Action Points, use Bonus actions. So in the same turn, you can attack and use them:
| Action | Description |
|---|---|
| Hide from enemies by succeeding Stealth checks. Stick to the dark and avoid enemy sightlines. Attacking or casting a spell will reveal your location. Probably the most important. Now you can start sneaking using Bonus action and then use Sneak Attack at the same turn | |
| Cover more distance this turn: double your movement speed. | |
| Retreat safely: moving won't provoke Opportunity Attacks. |
Level 9 - Rogue Lv 3
This level will give a huge boost to Monk's damage, as you will obtain additional bonus action to use with fist attacks.
Subclass
| Overview | |
|---|---|
 Thief Thief |
|
| Features | |
| Very powerful feature, that will ensure you can do additional |
|
| Reduces fall damage. | |
Level 10 - Monk Lv 7
New class features of Monk are unlocked:
| Feature | Description |
|---|---|
| Greatly reduces spell damage on Monks. | |
| Resistances against some effects that could impede movement speed. |
Level 11 - Monk Lv 8
Second Feat becomes accessible.
Feat
| Feat | Description |
|---|---|
| Ability Improvement | Get +2 Wisdom as this will give a boost to damage thanks to Manifestations and |
| This feat can also be a choice. You will have a bit of reduced Armor Class and damage, but this will guarantee that you go first. |
Level 12 - Monk Lv 9
This level gives a few unlisted bonuses, mainly improved unarmed damage rolls of 1d8. Here are other things:
| Feature | Description |
|---|---|
| Freely move on difficult terrain. | |
| Together, these allow the creation of powerful blasts if used on multiple enemies standing close together. | |
Maximizing Ability Scores
Now, as the build progression is covered there are a few aspects and important decisions you will have to make throughout the game. These will decide your final score for abilities.
Strength - strength-based Monk
If you went with the Strength based Monk, this ability becomes very important
- 19 Strength -
 Club of Hill Giant Strength (but you need it to wear in offhand with this trick)
 - 21 Strength - Elixir of Hill Giant Strength for Acts 1 and 2.
- 27 Strength -
 Elixir of Cloud Giant Strength for Act 3. I was too lazy to farm them, so I continued using the weaker ones till the end of the game.
Dexterity - dexterity-based Monk
If you are maximizing Dexterity setup, here is how you can do that:
- +2 Dexterity - Ability Improvement feat
- +2 Dexterity -
 The Graceful Cloth
This will leave you at a total of 20 Dexterity - 18 if you went with ![]() Vest of Soul Rejuvenation.
Vest of Soul Rejuvenation.
Wisdom
The stat will ensure that you get a higher Armour Class and various damage bonuses from Open Hand monk features, like ![]() Manifestation of Mind or
Manifestation of Mind or ![]() Boots of Uninhibited Kushigo:
Boots of Uninhibited Kushigo:
- +2 Wisdom - Ability Improvement feat
- +2 Wisdom - Mirror of Loss, Act 3.
- +1 Wisdom -
 Khalid's Gift in Act 3.
The result is 22 Wisdom
Potions, Elixirs and Consumables
Let's take a look at what consumables we can use to further empower the build.
Potions
These are general consumables, and most of them are activated for a few turns. Potions are separate from Elixirs and can be active together.
| Consumable | Description |
|---|---|
 Potion of Speed Potion of Speed |
In case you or your other casters have a |
 Potion of Invisibility Potion of Invisibility |
Can be used to get a perfect position before the encounter starts. |
Elixirs
Unfortunately, only one Elixir can be active at a time. However, the good thing is that they last until a long rest, making them very useful and economical.
Be sure to activate them before combat as otherwise, you will need to use Bonus Action.
| Consumable | Description |
|---|---|
 Elixir of Bloodlust Elixir of Bloodlust |
As you will be able to easily kill at least the weakest foe, this ensures additional attacks per turn. I would go with this option once you have 22 base strength, otherwise look at the options below. |
 Elixir of Vigilance Elixir of Vigilance |
For some encounters, you will want to go first. This elixir will ensure that it overcomes even surprise mechanics. |
 Elixir of Hill Giant Strength Elixir of Hill Giant Strength |
Sets strength value to 21 until the Long Rest. With this option, you can easily gimp on strength in the early game. You can put those points in Dexterity or Strength. Here is a farming guide for Elixir of Hill Giant Strength |
 Elixir of Cloud Giant Strength Elixir of Cloud Giant Strength |
An upgraded version that is available mostly in Act 3 via crafting or purchasing. Sets Strength to 27, the highest value possible. |
Illithid Powers
This is a special mechanic in Baldur's Gate 3, that allows you to consume tadpoles and unlock special Illithid Powers. These range from somewhat useful, to extremely deadly. I would like to leave a few recommendations:
Base Illithid Powers
| Order | Illithid Power | Description |
|---|---|---|
| 1 |  Favourable Beginnings Favourable Beginnings |
Very useful power to take as it does not have any costs, and provides only benefits on the first hits. |
| 2 |  Luck of the Far Realms Luck of the Far Realms |
Guarantees a critical hit, a very powerful action to have. |
| 3 |  Concentrated Blast Concentrated Blast |
Taking only for progression, to unlock the next power. |
| 4 |  Cull the Weak Cull the Weak |
Passive feature that does not cost anything and automatically deals bonus psychic damage around the target, once it is close to death. |
| 5 |  Shield of Thralls Shield of Thralls |
Taking for progression, to unlock the next power, but it also provides a good bonus as temporary health. |
Elite Illithid Powers
These become unlocked later in the game as you progress. They are extremely powerful additions to the build.
| Order | Illithid Power | Description |
|---|---|---|
| 1 |  Freecast Freecast |
Removes any cost of Ki from using Monk actions. |
Equipment Recommendations
Now I would like to go through some gear recommendations to maximize the Open Hand Monk build. Items are especially important as they take the build to the next level thanks to their unique effects.
Act 1
| Slot | Item | Description |
|---|---|---|
 Melee (One - Handed) Melee (One - Handed) |
This item can be used to set strength to 19 and avoid using |
|
| This weapon gives bonus unarmed damage and also deals 1d8 damage, which is better than your fists. However, you should remove it once you have |
||
 Ranged Ranged |
Gives bonus initiative, allowing one to go earlier in combat | |
| Excellent bow against monstrosities. There are plenty of them in Act 1. | ||
 Head Head |
Provides increased speed at the start of the combat. | |
 Cloak Cloak |
The only option in Act 1 that is okay, is by providing once-per-turn invisibility. Only available to Dark Urge origin. | |
 Armor Armor |
Gives +2 Dexterity making it a very good choice for the end of Act 1 and the start of Act 2. | |
| Somewhat relatable first unarmed build armor. It is nothing special as I do not think you will utilize the effect. | ||
 Gloves Gloves |
Amazing gloves that, after the first hit will give |
|
| Gives fire damage, increasing the variety of damage types that you do. | ||
| Can be used for short period of time before obtaining the ones above. | ||
 Boots Boots |
Avoids slipping on various terrains and most importantly unlocks Misty Step each short rest. These boots can last till Act 3, as walking on icy surfaces can be deadly for melee build. The item removes this problem. | |
| Allows the Monk to walk freely on difficult terrain. | ||
 Amulet Amulet |
Great amulet that will be useful for most of the game. With its actions, it is the perfect choice for Monk. | |
 Rings Rings |
Improves movement speed, making it easier to reach your next target. | |
| Gives defensive bonuses to Armour Class and Saving Throws. |
Act 2 - mid-game
Act 2 changes the landscape and there will be a lot of dark areas. Moreover, it will provide some amazing items for you to find, that will improve the build damage.
| Slot | Item | Description |
|---|---|---|
 Melee (One-handed) Melee (One-handed) |
- | Not using any weapons or only |
 Ranged Ranged |
I recommend using this one if you need to cast |
|
 Head Head |
The helmet is still useful for high mobility. | |
 Cloak Cloak |
Improves survivability and Saving Throw success. | |
| If you have this, it is still a solid choice. | ||
 Armor Armor |
Still a solid option throughout Act 2 due to bonus Dexterity. | |
| If you can wear medium armor, it gives solid protection even if you lose the benefits of |
||
 Gloves Gloves |
Deals bonus necrotic damage with unarmed attacks and can apply |
|
| - | Gloves from previous acts are still good and can be used. | |
 Boots Boots |
Bonus armor class for higher survivability. | |
| The boots are still a good option in Act 2. | ||
 Amulet Amulet |
The amulet is great as it allows to restore Ki, which can now be easily used up using multiple hits. | |
| It can be an effective amulet against humanoid enemies, and fully paralyze them. | ||
| Allows casting Shield spell, can be a lifesaver if attacked heavily for one turn. | ||
 Rings Rings |
Provides an |
|
| The ring effect can be activated easily by having someone cast Light on the monk. It does not work together with |
||
| An offensive ring that gives bonus damage against obscured enemies. | ||
| Helps to reach targets faster, and not get immobilized by enemy effects. | ||
| Bonus armor class is a good bonus, and the ring still takes place. |
Act 3 - Final Build setup
This is the last act of the game, where you will get access to the most powerful items. To get them as early as possible, you will need some planning, but overall, it should not be a problem.
Here there are a lot of options for glove slots. Each element has its own pairs. However, there will be only one most powerful legendary gloves close to the end.
Normal Monk Setup
| Slot | Item | Description |
|---|---|---|
 Melee (One - Handed) Melee (One - Handed) |
- | Not using any weapons |
 Ranged Ranged |
(BiS) |
Increases critical range, and is perfect for improving damage. |
| Gives a big boost to the initiative, guaranteeing that you can go first. | ||
 Head Head |
(BiS) |
The best headwear for Open Hand Monk gives a solid damage boost. Just be sure not to have your HP full, decrease it a little. |
| Early Act 3 helmet, which improves damage when surrounded. | ||
 Cloak Cloak |
(BiS) |
Improves the chances of attacks missing the wearer until getting hit for that turn. |
| Bonus armor class is good for improved survivability. | ||
 Armor Armor |
+2 Dexterity is a significant boost and makes this one of the best armors for the rest of the game. | |
| Although not as good for offensive stats as |
||
| Best for additional armor class, other effects will require you to use bonus action, so it's best to activate them before combat. | ||
 Gloves Gloves |
(BiS) |
The best gloves for an Open Hand monk build. Provides 1d10 Force damage boost, which is hard to skip. |
| The only option for gauntlets is if you do not plan on using |
||
| Each of these gloves provides a different element damage bonus and various spells. Choose the element that you deal the least damage with, this way you will variety of damage. You want to be able to deal damage to enemies that will be resistant to Blunt attacks. | ||
 Boots Boots |
(BiS) |
The best boots hands down for Monk build. Be sure to have at least 16 Wisdom, to best utilize these. |
 Amulet Amulet |
(BiS) |
The best amulet for Monk, giving +1 to Wisdom. To make use of it effectively, be sure to have 17 base Wisdom. |
| It makes any Constitution ability investment redundant as it maximizes it to 23 points. This greatly improves the overall survivability. I would take this only if you took |
||
| The upgraded version of the amulet is a perfect choice for a Monk. | ||
 Rings Rings |
(BiS) |
A perfect ring for bonus damage. It requires the enemy to be obscured, so check the stealth icon, whether the sun is half-empty or full-empty. |
| The ring effect can be activated easily by having someone cast |
||
| Bonus armor class is a good bonus, and the ring still takes place. |
Weapon slot
| Slot | Item | Description |
|---|---|---|
 Melee (One-Handed) Melee (One-Handed) |
Surprisingly, monks can wear melee weapons and still hit with fists. This is possible thanks to |
|
Build Mechanics
In this section, I would like to dive deep into how to play the Open Hand Monk Build. This will help you utilize it to the fullest and correctly use various actions and spells throughout the game.
Important Mechanics and Combos
Let's go through key mechanics and tips on how to use the build effectively.
Using different Flurries
The main highlight of Open Hand Monk is it's special flurry attacks:
 Flurry of Blows: Push - excellent choice, for when you want to force an enemy off the ledge
 Flurry of Blows: Topple - my favourite option, as it gives an easy
  Advantage on attacks for other group members via
  Prone.
 Flurry of Blows: Stagger - least used action, can be a good option against bosses with special reactions.
Enable Manifestations at level 6
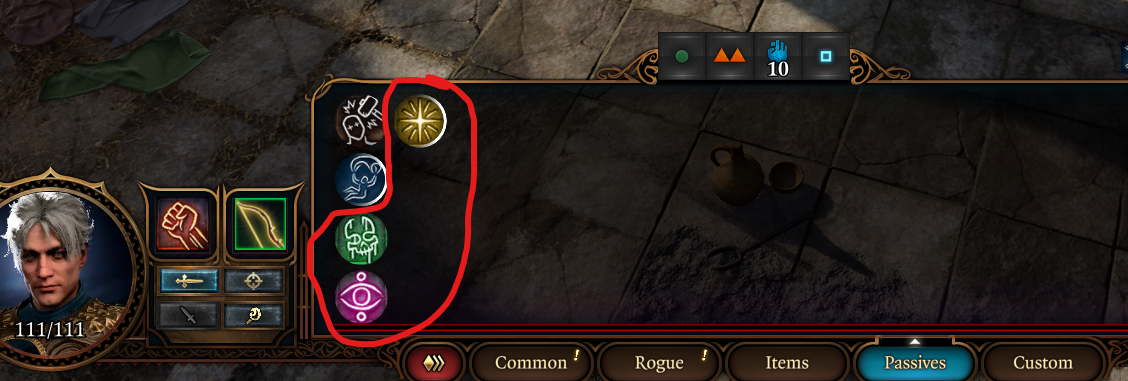
The special feature of the Open Hand monk is that they can utilise wisdom for even more increased damage with elements like radiant, psychic and necrotic. With the huge number of attacks, this can result in a significant increase.
The main crux, is that many people forget to activate them, or don't change them if the enemy is immune to psychic damage or necrotic. So be mindful of that:
You should also remember that if your party is running ![]() Resonance Stone, the
Resonance Stone, the ![]() Manifestation of Mind damage gets doubled...
Manifestation of Mind damage gets doubled...
Utilising Ki Resonation
The open hand monk comes with a special mechanic called Ki Resonation, which unlocks special actions - ![]() Ki Resonation: Punch and
Ki Resonation: Punch and ![]() Ki Resonation: Blast. This is an extremely powerful tool if enemies are stacked together, as each resonating foe will detonate separate explosions. As you can expect, the numbers get ridiculous pretty fast
Ki Resonation: Blast. This is an extremely powerful tool if enemies are stacked together, as each resonating foe will detonate separate explosions. As you can expect, the numbers get ridiculous pretty fast
The action can be used both with a bonus action and an action. I would only use the latter, as your flurry attacks are just too powerful compared to resonation. There are no downsides to using the ![]() Ki Resonation: Punch, and it free normal attack upgrade. However, it can only be used once on a single enemy.
Ki Resonation: Punch, and it free normal attack upgrade. However, it can only be used once on a single enemy.
Stunning Strike to disable foes
Although this might not be the reason why you go with monk, it has decent control capabilities thanks to ![]() Stunning Strike (Unarmed). It is a very powerful tool in the arsenal, and if successful, can for enemies to skip their turn.
Stunning Strike (Unarmed). It is a very powerful tool in the arsenal, and if successful, can for enemies to skip their turn.
Using this together with flurries can eat up your ki-points pretty fast. For this reason, I recommend also using ![]() Wholeness of Body, in case you are out of them.
Wholeness of Body, in case you are out of them.
Early Game Combat
This part would cover how the build plays up until level 6. Overall, Open Hand Monk is pretty straightforward:
- At the start of the game, use
 Flurry of Blows to inflict significant damage as these are 2 attacks in one.
 - Use short rests, as they help you restore Ki Points, for your main attacks.
- Once you unlock Open Hand flurries, use them accordingly.
 Flurry of Blows: Topple is my favourite early game, as it gives an easy attack
  Advantage.
 - Use
 Stunning Strike (Unarmed) to disable foes for 1 turn.
Late Game Combat
The late game is kind of more of the same, with a few adjustments:
- Be sure to activate Manifestation at level 6, with appropriate element -
 Manifestation of Body,
  Manifestation of Mind, etc.
 - The main addition is the
 Ki Resonation: Punch on multiple closely stacked targets, followed by
  Ki Resonation: Blast. The result is a force damage explosion which deals damage exponentially.
 - Utilize your two bonus actions for the maximum number of hits via flurry attacks -
 Flurry of Blows,
  Flurry of Blows: Push, etc.
Conclusion
Thank you for reading the Open Hand Monk build for Baldur's Gate 3. I hope you enjoyed reading the build. This should cover everything that you need to become the ultimate unarmed martial. The levelling is simple, and it's easy to fill the build with very good items.
Cheers!
Like, Dislike, comment, or share!

Discussion
No comments yet.
Be the first one to leave a comment!