
Barbarian Berserker Thrower Build - Throwzerker - Baldur's Gate 3 (BG3)
Contents
Barbarian Berserker Tavern Brawler Build - Throwzerker
Going Berserker is already an easy game, as they are a very powerful class early in the game. However, we will ensure that they continue to be your top damage dealer till the end of the game. For this, you will need multiclassing.
By going with Thief, the build can utilize another bonus action for ![]() Frenzy +
Frenzy + ![]() Enraged Throw on the first turn. Although this seems like a simple improvement, it unlocks a lot of potential possibilities not only for damage but also for utilizing consumables during the fight.
Enraged Throw on the first turn. Although this seems like a simple improvement, it unlocks a lot of potential possibilities not only for damage but also for utilizing consumables during the fight.
Later, you multiclass into Fighter. It will give a whole action once per short rest, allowing you to sling two more throws. Another thing is that based on subclass selection, you will be able to use a wider variety of weapons or go all-in on maximizing damage.
Here is some late-game combat showcase, where each throw guarantees an enemy kill:
Build Overview
Here is a concise table with all the main picks during your levelling progression. For more detailed reasoning, I go further in the article. Also, do not forget to check the recommended gear, as it is crucial.
This is a general overview of the build that contains item and leveling choices. I go deeper into the setup, combat approach and gear selection reasons for the progression of each act.
Leveling
| Level | Class | Selection |
|---|---|---|
| 1 | Barbarian 1 | Abilities: STR - 17 (15+2), DEX - 16 (15+1), CON - 14, INT - 8, WIS - 10, CHA - 8 |
| Skills: Athletics, Intimidation, Perception, Survival | ||
| 2 | Barbarian 2 | - |
| 3 | Barbarian 3 | Subclass: Berserker |
| 4 | Barbarian 4 | Feat: |
| 5 | Barbarian 5 |
- |
| 6 | Rogue 1 | Skills: Athletics, Acrobatics, any |
| 7 | Rogue 2 | - |
| 8 | Rogue 3 | Subclass: Thief |
| 9 | Rogue 4 | Feat: Ability Improvement +2 Strength or |
| 10 | Fighter 1 | Fighting Style: |
| 11 | Fighter 2 | - |
| 12 | Fighter 3 | Subclass: Eldritch Knight or Champion |
Gear Choices
Build ID: 84
Mode: Paper Doll
Sets: All
Starting the Game - Level 1
We start with the early game. I would go into what are the best Races, Abilities, and Skills for a Barbarian Berserker Thrower Build. Some of these choices are impactful as you cannot respec them.
Races
Picking a race provides various benefits - abilities, dialogue options, looks, etc. Also, keep in mind whether your picked race has Shield proficiency as this can improve survivability or give benefits for offensive.
| Race | Features | Description |
|---|---|---|
 Half-Orc Half-Orc |
|
A perfect race for physical attacks, that gain additional roll for critical hits, but most importantly, can stand up instead of being Downed. |
 Duergar Dwarf Duergar Dwarf |
|
Very solid choice, especially as they can enlarge themselves and also become invisible. Another reason for dwarves is that they can use the |
 Halfling Halfling |
|
Pick any subrace. A halfling is a perfect race for most martial as it can reroll in case you get critical failure of rolling 1. This greatly reduces your chances of missing an attack. |
 Githyanki Githyanki |
|
Very versatile race, that unlocks some good actions for combat and exploration. |
 Wood Half-Elf Wood Half-Elf |
|
One of the more popular options, Wood Subrace gets bonuses to bonus mobility, you will not need that as much later in the game. |
Class
The starting class is Barbarian. This will give the core of the throwing mechanics needed to be effective from the early game.
| Overview | |
|---|---|
 Barbarian Barbarian |
|
| Features | |
| Unique action to Barbarians that boosts damage and gives physical resistance. Make sure to attack each turn to sustain the bonuses. | |
| Gives some utility to the Constitution when going with Barbarian. Sadly, the build relies on various armors so this will not be utilized to the full extent. | |
Background
Backgrounds are mostly for role-playing and you can pick whatever you prefer. Barbarian, mainly benefits from Strength-related skills. However, as we will multiclass into Rogue, dexterity-related backgrounds can also be taken.
| Background | Skills | Description |
|---|---|---|
| Outlander | Athletics Survival |
Gives a boost to Athletics, which improves your |
| Soldier | Athletics Intimidation |
Gives a better chance to resist shove, and increases the success of Intimidation dialogues. |
| Urchin | Sleight of Hand Stealth |
Improves stealth-related skills, allowing for better pickpocketing and trap disarmament. |
| Charlatan | Deception Sleight of Hand |
Mainly good for improved Sleight of Hand to unlock chests and pickpocketing. |
Abilities
Now, let's take a look at the abilities of the Berserker Tavern Brawler build. Correct allocation will allow us to maximize the early gameplay and get good modifier bonuses.
Build ID: 84
Skills and Expertise
Overall, the skills should be impacted by your roleplaying and background decisions. However, you would still want those that will give you the best benefits. My recommendations are to pick those at which you have a high ability modifier and these are Strength-related:
- Athletics
However, you may want some other options, especially if you are the main character
- Intimidation
- Perception
- Survival
Leveling Progression - Level 2-12
Here is the detailed progression for the Berserker Thrower build to get you started. You can use it as a guideline because early games can be daunting and overwhelming. Later on, once you get the feel for the class you can start picking your options
Level 2
From the get-go, we gain some neat features with the Barbarian class.
| Action | Description |
|---|---|
| This action is good until level 4, after that, the build solely concentrates on Throws. This is very valuable early on, as that's when it is the easiest to miss most of the attacks due to bad gear. |
And also a class feature:
| Feature | Description |
|---|---|
| A decent utility skill. It is nothing major and does not have a big impact on the build |
Level 3
As a Barbarian at level 3, you can choose the subclass. It impacts how you play the build and we will be going with Berserker. It will allow exploiting the Bonus Action for more damage early on.
| Overview | |
|---|---|
 Berserker Berserker |
|
| Features | |
| An upgraded version of Rage. It unlocks two new attacks that can be used with your bonus action. | |
| A melee attack with a bonus action | |
| Throw an attack with a bonus action. | |
One thing that you may notice, is that each of these new attacks decreases attack rolls after each hit. Although it would be a problem, the next-level ![]() Tavern Brawler will fix it.
Tavern Brawler will fix it.
Level 4
Level 4 brings the first feat. You could say the build is fully ready, as we will get the main thing it needs.
Feat
| Feat | Description |
|---|---|
| This Feat makes the build very powerful. With high strength, you will have extremely high chances to hit and even better damage from its bonus effect. You want to take +1 Strength. However, if using Elixir of Hill Giant Strength choose +1 Constitution. |
Level 5
This is a huge milestone for the build as it will become even more powerful.
| Feature | Description |
|---|---|
| This allows attacking two times instead of one, theoretically doubling the build's damage output. | |
| Amazing feature of Barbarian, that will make it easier to get a better position for higher ground. |
Level 6
Ideally, we would like to multiclass into Rogue now. However, it does not bring much to the table until the level 3 Thief subclass. For this reason, I would recommend sticking with Barbarian until Level 8 and then doing a respec of Barbarian 5/ Rogue 3.
If you do not want to do a respec, you can multiclass straight to Rogue Lv 1. This is a little bit less effective, but nothing to be worried about. So for now I will continue with Barbarian. This gives additional Rage Charge and a new subclass feature.
| Feature | Description |
|---|---|
| The resistance can be useful in some encounters. You do not want Berserker Thrower to tap out of combat greatly diminishing the group's potential. |
Level 7
The last level before doing a respec. Level 7 Barbarian also gives a very good passive that you will surely utilize to the full extent.
| Feature | Description |
|---|---|
| Similar to |
Level 8 - respec to Barbarian Lv 5/Rogue Lv 3
This is a major milestone. I now recommend doing a respec as this will allow enjoying the best features from both classes:
- Start with Barbarian Lv 5 and use the same stats as previously
- After that multiclass into Rogue Lv 1 and continue leveling till level 3. The Rogue is very important as at level 3 you gain a subclass
Subclass
| Overview | |
|---|---|
 Thief Thief |
|
| Features | |
| Very powerful feature, that will ensure we can do another throw on the initial turn of combat. | |
| Reduces fall damage. | |
Overall, this will greatly improve your damage output on the first turn.
Level 9 - Rogue Lv 4
A second feat is unlocked that will greatly improve what you can do with the build.
Feats
| Feat | Description |
|---|---|
| Ability Improvement - +2 Strength | This is a perfect option that allows you to reach 24 strength. The increased modifier will increase damage and attack rolls. |
| The feat provides options to use dual-wielding with throwing weapons. There are some decent stat sticks that you could use to further improve the damage potential. | |
| Gives a good boost to the initiative and ensures that you cannot be surprised. |
Level 10 - Fighter Lv 1
Now we enter the optimization phase of the build. For this reason, take Fighter, to unlock its subclasses for further improvements to the build.
Class
| Overview | |
|---|---|
 Fighter Fighter |
|
| Features | |
| You can use this to heal yourself in tight encounters, to get a little bit more of survivability. | |
Fighting Style
I see two main contenders for the Berserker Tavern Brawler build
| Fighting Style | Description |
|---|---|
| The only choice that is relevant for the build. It will give a higher survivability. | |
| The damage bonus is okay, nothing special, but it will stack up with multiple hits. However, I think this may be a bug and be patched someday as you are still using two weapons. |
Level 11 - Fighter Lv 2
At the second level already fighter gains its most popular action:
| Action | Description |
|---|---|
| For each short rest, you can add additional action points for bonus attacks. As you progress and obtain |
Overall, this encourages having constant short rests if you want to have the full potential of the Fighter.
Level 12 - Fighter Lv 3
And we reach the final level of the Berserker Thrower build. This also requires making on major decision about which subclass to pick. There are two main contenders:
| Subclass | Description |
|---|---|
 Eldritch Knight Eldritch Knight |
Eldritch Knight has a unique effect |
 Champion Champion |
This subclass is the simplest option in the whole game. The main idea here is that you get |
My personal preference is Eldritch Knight, with neat utility spells and its other features:
| Overview | |
|---|---|
 Eldritch Knight Eldritch Knight |
|
| Features | |
| Your weapon cannot be knocked out from the hand and returns when thrown. This further improves the array of weapons that you can use throughout the game as throwing ones. | |
Cantrips
I do not think it matters much what you pick at this point in the game. You are already close to the end and the most important aspects of your group loadout should be covered. Still, my recommended choices would be:
| Cantrip | Description |
|---|---|
| Can be used in dialogues to get an |
|
| Move enemies together to one place by drawing their attention. This can be perfectly exploited with |
|
| Could be used for exploration and some world interactions. |
Spells
I think only one spell is needed, for the second one pick whatever you prefer:
| Spell | Description |
|---|---|
| Allows you to increase Armour Class by 5. This can be a big boost and negate most of the damage per turn. |
Expanded
For an expanded spell list, pick one utility, or anything else. I am guessing you already have companions who can use ![]() Longstrider,
Longstrider, ![]() Enhance Leap, etc.
Enhance Leap, etc.
Maximizing Ability Scores
Now, as the build progression is covered there are a few aspects and important decisions you will have to make throughout the game. These will decide your final score for abilities. here I will assume you did not take Strength Elixirs.
 Tavern Brawler feat - +1 Strength
- Act 2 - Potion of Everlasting Vigour - +2 Strength.
- Ability Improvement - +2 Strength.
- Act 3 - Mirror of Loss - pick +2 Strength.
This will allow you to reach 22-24 natural Strength, and result in a +6 ability modifier on attacks and ability checks.
Potions, Elixirs and Consumables
Let's take a look at what consumables we can use to further empower the build.
Potions
These are general consumables, and most of them are activated for a few turns. Potions are separate from Elixirs and can be active together.
| Consumable | Description |
|---|---|
| This is a very powerful potion. It gives an additional action point which can be used to cast a spell or attack. The activation is generally by drinking using a bonus action. However, you can stack together with party members and make one member |
|
| It can be used in two ways - the first one is to enter combat with a |
|
| Gives |
Elixirs
Unfortunately, only one Elixir can be active at a time. However, the good thing is that they last until a long rest, making them very useful and economical.
Be sure to activate them before combat as otherwise, you will need to use Bonus Action.
| Consumable | Description |
|---|---|
| As you will be able to easily kill at least the weakest foe, this ensures additional attacks per turn. Only use this if not taking the below elixirs, as otherwise your strength will be low and you will not be able to hit effectively. | |
| Sets strength value to 21 until the Long Rest. This is a perfect option for the early game, while you are limited to 18 Strength. Here is a farming guide for Elixir of Hill Giant Strength | |
| Provides bonus damage of 1d4 and some other good bonuses. | |
| For some encounters, you will want to go first. This elixir will ensure that it overcomes even surprise mechanics. However, if you have |
Illithid Powers
This special mechanic in Baldur's Gate 3 allows you to consume tadpoles and unlock special Illithid Powers.
At first, you can only use the base powers. As you move to Act 3, you will be able to unlock the outer ring powers, also called Elite.
| Illithid Power | Type | Description |
|---|---|---|
| Base | Beneficial power to take as it does not have any costs, and provides only benefits on the first hits with attack rolls. | |
| Base | It's an easy way to ensure you land critical hits, especially good with |
|
| Base | It can help to kill an enemy faster if it is left with a few HP. | |
| Base | Can be used to improve damage with additional psychic rider on each hit. | |
| Base | Excellent way to deal additional damage with reaction, early and mid game. | |
| Base | You can use it to drain health when activating |
|
| Base | Decreases enemy ability score, free use, so worth getting it. | |
| Base | Excellent option for bonus temporary HP. It can also apply |
|
| Elite | It can be used to maximize the effectiveness of charisma-based skills, especially those relevant to the main character. | |
| Elite | It can be used to save yourself from a deadly spell. |
Equipment Recommendations
Now I would like to go through some gear recommendations to maximize the Barbarian Tavern Brawler build effectiveness. Items are especially important as they take the build to the next level thanks to their unique effects.
Act 1
Build ID: 84
Mode: Full Equipment
Sets: Item set 1
Act 2 - mid-game
This is the mid-game, where most of the areas will be covered by dark. Radiant equipment will shine here and having ![]() Darkvision is recommended. You also can get some great items, albeit some will stay the same from Act 1.
Darkvision is recommended. You also can get some great items, albeit some will stay the same from Act 1.
Build ID: 84
Mode: Full Equipment
Sets: Act 2
Act 3 - Final Build setup
This is the last act of the game, where you will get access to the most powerful items. Getting them as early as possible will need some planning, but overall, it should not be a problem.
Act 3 gives so many different items, that the build can be changed multiple times as you explore it. For example:
- Going with Thrown weapon and Shield
- Thrown weapon and
 Dual Wielder a shortsword or dagger for various bonuses
 - Using a Thrown weapon, equipping
 Bhaalist Armour, and going in melee range for double-throw damage.
Each of these provides different options based on your risk appetite and expected damage output. Of course, the silliest and the strongest is the last one:
Weapon and Shield
This is another option where you skip ![]() Dual Wielder feat and instead concentrate on single-handed thrown weapons and shields. This option may be picked if your other characters have taken the offhand weapons or you want to have increased survivability with bonus AC from the shield.
Dual Wielder feat and instead concentrate on single-handed thrown weapons and shields. This option may be picked if your other characters have taken the offhand weapons or you want to have increased survivability with bonus AC from the shield.
Build ID: 84
Mode: Full Equipment
Sets: Act 3 - Weapon and Shield
Dual Wielding Setup
This option is if you took the ![]() Dual Wielder feat. The main feature while dual wielding, after you
Dual Wielder feat. The main feature while dual wielding, after you ![]() Throw a weapon, is that it returns to your off-hand. This seems strange, but unfortunately, that's how it works technically.
Throw a weapon, is that it returns to your off-hand. This seems strange, but unfortunately, that's how it works technically.
Build ID: 84
Mode: Full Equipment
Sets: Act 3 - Dual Wield
Other Items
The rest of the items that the build utilizes
Build ID: 84
Mode: Full Equipment
Sets: Act 3 - Armors
How to use the Build
Now I would like to cover some general tips on how to play the Berserker Tavern Brawler build.
Important Mechanics and Combos
Let's go through key mechanics and tips on how to effectively use the build.
Using melee attacks
One thing that may blindside you is that you can only throw. Definitely not, as you are as effective in melee combat as in ranged throwing. Of course, the bonuses from ![]() Tavern Brawler are so ridiculous that even with penalties from close range, it is still usually better to use
Tavern Brawler are so ridiculous that even with penalties from close range, it is still usually better to use ![]() Throw attacks in melee range.
Throw attacks in melee range.
But some weapons have amazing melee actions, that can knock back or debilitate enemies. So don't sleep on them if the opportunity arises and the enemy is close by.
Crushing Damage
The important aspect of any Thrower build is the type of damage these weapons can deal. I would like to draw your attention to the crushing damage that is possible when something drops from very high heights.
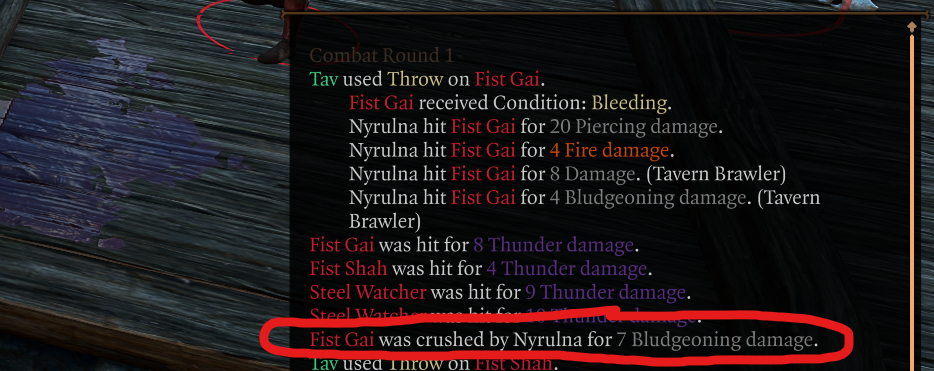
Why is this special? It pushes the enemy forward and can sometimes make them fall down the ledges. For this reason, always look for upper ground in combat to activate this bonus.
Do not use Throw attacks from Stealth
I do not know if this is a bug or intended but sometimes, if you throw a weapon from stealth and combat initiates it does not return. This is extremely irritating and sometimes can leave you without a weapon.
For this reason, I would avoid attacking from Stealth with a Thrower build.
Have an ally with  Phalar Aluve equipped
This sword provides one of the most powerful buffs in the game. This decreases enemy Saving Throw rolls of Charisma, Intelligence, and Wisdom. But more importantly, each hit that you or your ally does adds a bonus 1d4 Thunder damage. So multiple attacks that you do, will stack up quite neatly against enemies.
Using  Helmet of Grit
If you will be using this amazing item in the late game, make sure to have your health at 50% or less. You can also use ![]() Transfuse Health to activate it instantly.
Transfuse Health to activate it instantly.
Early Game Combat
To be honest, Thrower builds are as simple as it gets. Before obtaining ![]() Returning Pike you can just attack in melee range, or use any random spear for throwing. Once you get the pike here is the main sequence you have to do:
Returning Pike you can just attack in melee range, or use any random spear for throwing. Once you get the pike here is the main sequence you have to do:
- Use
 Frenzy once in combat
 - Use Throw with
 Returning Pike
 - Finish your turn
- Use Throw
- Use
 Enraged Throw with a bonus action
Rinse and repeat, pretty simple, right? At level 5, you will get an ![]() Extra Attack for an additional Throw with an action.
Extra Attack for an additional Throw with an action.
Late Game Combat
Here things get a little bit interesting, but overall, the same sequence repeats. Before combat, if using a ![]() Helmet of Grit make sure you have 50% health.
Helmet of Grit make sure you have 50% health.
- Use Frenzy at the start of the combat
- Use up your main action with Throw.
- Do multiple times Enraged Throw
- Activate
 Action Surge
 - Do more Throws
Still, simple, but now you do much more damage compared to the early game.
Conclusion
Thank you for reading the Barbarian Berserk Thrower build for Baldur's Gate 3. Using ![]() Tavern Brawler or most of the builds makes them very powerful and the same is true here. The post will help you with leveling progression and the best gear in each act.
Tavern Brawler or most of the builds makes them very powerful and the same is true here. The post will help you with leveling progression and the best gear in each act.
Feel free to leave a comment below!
Like, Dislike, comment, or share!
Join the Discussion
0 commentsNo comments yet.
Be the first one to leave a comment!