
Ultimate Magic Missile Build - Pact Missile Launcher - Baldur's Gate 3 (BG3)
Contents
Magic Missile Build - Pact Missile Launcher
As the name suggests, the build relies mostly on ![]() Magic Missile spell for its damage. Of course, as a Wizard, you also have access to other options, but this one, where the bulk of optimizations will happen. Later, you will get an upgrade -
Magic Missile spell for its damage. Of course, as a Wizard, you also have access to other options, but this one, where the bulk of optimizations will happen. Later, you will get an upgrade - ![]() Curriculum of Strategy: Artistry of War, which is an even stronger version.
Curriculum of Strategy: Artistry of War, which is an even stronger version.
Of course, being a Wizard allows you to scribe spells and you can learn a lot of them. Then you can choose the ones you need based on the situation at hand. So this does not limit you to just spamming ![]() Magic Missile. You can also cast control spells like
Magic Missile. You can also cast control spells like ![]() Confusion,
Confusion, ![]() Hypnotic Pattern, etc.
Hypnotic Pattern, etc.
That is not all, you get the unique ![]() Empowered Evocation feature, which will empower spells with a bonus spellcasting modifier. This is what makes
Empowered Evocation feature, which will empower spells with a bonus spellcasting modifier. This is what makes ![]() Magic Missile deadly in the late game. Moreover, even area-of-effect spells like
Magic Missile deadly in the late game. Moreover, even area-of-effect spells like ![]() Lightning Bolt and
Lightning Bolt and ![]() Fireball will prove deadly in the end game.
Fireball will prove deadly in the end game.
Class Contribution
11 Evocation Wizard
- Spell Scribing is the main highlight of Wizards, allowing them to learn any spell from scrolls and put it into their spellbook. Later, it can be assigned to Prepared spells and used during exploration or combat.
 Arcane Recovery - a special feature that allows restoring spell slots, and prolongs your combat potential until long rest.
- Although the Evocation School gives a few nice features, for this build, particularly only one is the main highlight -
 Empowered Evocation, which will give a significant damage boost to all your Evocation spells.
  Sculpt Spells is useful for those area of effect spells like
  Fireball, but this build will only use these on rare occasions.
1 Hexblade
There are only a handful of features that are relevant for this build, but quite important for damage maximization:
- Warlock Spellslots that reset on short rest.
 Hex Warrior with bonus proficiencies in Medium Armor and Shields.
  Hexblade's Curse - excellent action early in the game to improve damage and gain some survivability
Synergy with other builds
To be fair, this build has minimal synergies with other builds. Not that it is bad, and it can work with almost everything, - a wizard can learn most of the spells in the game.
However, as the main spell is ![]() Magic Missile, which deals force damage, this has minimal synergies with other setups and is self-sufficient on its own. So I would not worry too much about what party composition you run and concentrate only on whether you will be able to get all the gear.
Magic Missile, which deals force damage, this has minimal synergies with other setups and is self-sufficient on its own. So I would not worry too much about what party composition you run and concentrate only on whether you will be able to get all the gear.
Another caveat is that many of the items may overlap with Cleric. So, if you want the full potential of the Magic Missile Build, your cleric will have to lose some of those items.
Leveling Overview
Here is a concise table with all the main picks during your leveling progression. For more detailed reasoning, I go further in the article. Also, do not forget to check the recommended gear as it is crucial.
| Level | Class | Selection |
|---|---|---|
| 1 | Warlock 1 | Cantrips: |
| Subclass: Hexblade | ||
| Spells: |
||
| Abilities: STR - 8, DEX - 16 (15+1), CON - 14, INT - 17 (15+2), WIS - 10, CHA - 8 | ||
| Skills: Arcana, History, Investigation, Deception, Intimidation | ||
| 2 | Wizard 1 | Cantrips: |
| Spells: |
||
| 3 | Wizard 2 | Subclass: Evocation School |
| Spells: any | ||
| 4 | Wizard 3 | Spells: |
| 5 | Wizard 4 | Cantrips: |
| Spells: |
||
| Feat: |
||
| 6 | Wizard 5 | Spells: |
| 7 | Wizard 6 | Spells: |
| 8 | Wizard 7 | Spells: |
| 9 | Wizard 8 | Spells: |
| Feat: Ability Improvement +2 Intelligence or |
||
| 10 | Wizard 9 | Spells: |
| 11 | Wizard 10 | Cantrips: any |
| Spells: |
||
| 12 | Wizard 11 | Spells: |
Starting the Game - Level 1
This section covers the creation screen and what would go into the best Races, Abilities, and Skills for the Magic Missile build. Some of these choices are impactful as you cannot respec them.
Races
Picking a race provides various benefits - abilities, dialogue options, looks, etc. Also, keep in mind whether your picked race has Shield proficiency as this can improve survivability, especially in the early game.
| Race | Features | Description |
|---|---|---|
 Halfling Halfling |
|
The |
 Zariel Tiefling Zariel Tiefling |
|
I love this race for its |
 High Half-Elf High Half-Elf |
|
You can pick an additional cantrip for free; in case it is a combat one, it will scale well as your main ability is Intelligence. |
 High Elf High Elf |
|
Class
The build starts with Warlock, which does seem counterintuitive. However, this does simplify the progression and proves to be very valuable early on, when you have limited spell slots. The level 10 feature, ![]() Empowered Evocation, gets delayed to level 11. But I think that is not a big problem, as this will be late in the game, and it's better to optimize on what is coming next.
Empowered Evocation, gets delayed to level 11. But I think that is not a big problem, as this will be late in the game, and it's better to optimize on what is coming next.
| Overview | |
|---|---|
 Warlock Warlock |
|
| Features | |
 Warlock Spell Slots Warlock Spell Slots |
These spell slots can be used to cast spells and refill each Short Rest. |
Cantrips
You can only take two, and non-offensive ones, as your main ability is still Intelligence:
| Cantrip | Description |
|---|---|
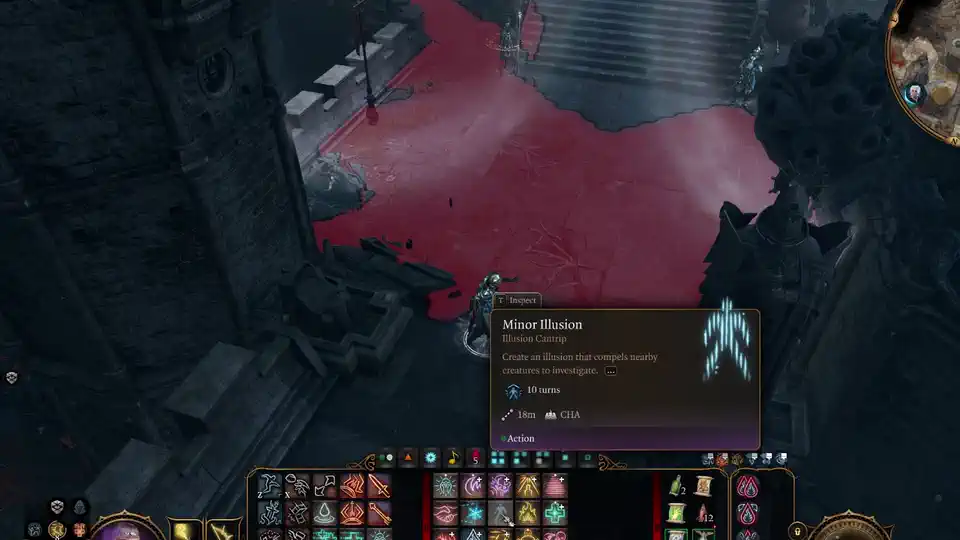
| The cantrip can be ridiculously powerful as it can be used outside of combat to group or lure enemies to a specific place. | |
| This is a somewhat optional cantrip. It can be extremely useful in dialogue checks. However, be careful not to cancel it near the affected NPC, as they can start attacking you. |
Subclass
| Overview | |
|---|---|
| Features | |
| This action allows you to bind any melee weapon and makes you proficient in it. This also results in using Charisma modifier instead of Strength or Dexterity. It also has a 20% chance to apply |
|
| This is the most important feature that the Magic Missile build needs. The bonus damage gets applied to each |
|
| This passive is responsible for the multiple bonuses you get, specifically armor and shield proficiencies. | |
Spells
| Spell | Description |
|---|---|
| Extremely valuable spell early in the game. Albeit with limited warlock spell slots, this becomes expensive to use in later levels. So I would only use it for the early game, or if you are in a pinch. | |
| The spell is nothing fancy, but can later be used to improve damage with |
Background
Backgrounds are mostly for role-playing, and you can pick whatever you prefer. If you want to optimize, then it would be good to pick backgrounds that are based on your ability points. I recommend taking those that are Charisma and Intelligence-based:
| Background | Skills | Description |
|---|---|---|
| Acolyte | Insight Religion |
Provides proficiency in religion that is impacted by high Intelligence. |
| Sage | Arcana History |
The most relevant background for Wizard in my opinion, as both skills greatly benefit from intelligence. |
| Noble | History Persuasion |
This option is great as it also improves Persuasion, which can then be used in various dialogues. |
Abilities
Now, let's take a look at the abilities of the Hexblade build. Correct allocation will allow you to maximize the early gameplay and get good modifier bonuses.
The core mechanic to understand for ability points is that they give "ability modifiers" that apply to various skill checks. For example, Charisma works on Intimidation and persuasion checks. Wisdom on Survival or Animal Handling, and so on.
You get a higher ability modifier on even values - 10, 12, 14, etc. So keeping it on odd may be useless. However, there are various +1/2 modifiers in the game, specifically ![]() Auntie Ethel's Hair or Feats that help round this up.
Auntie Ethel's Hair or Feats that help round this up.
| Ability | Value | Description |
|---|---|---|
 Strength Strength |
8 | This build does not need strength. |
 Dexterity Dexterity |
16 (15+1) | This plays an important role in improving armor class and increasing initiative. Going early will allow you to land damage or control spells. |
 Constitution Constitution |
14 | Enough Constitution for better survivability and spell |
 Intelligence Intelligence |
17 (15+2) - With 16 (14+2) - No Hair |
The main ability of a Wizard that determines spell success chance. It will also benefit your skills related to Arcana, Religion, etc. |
 Wisdom Wisdom |
10 - with 12 - no hair |
Additional Wisdom to avoid any negative modifiers, as many spells target this ability. |
 Charisma Charisma |
8 | Sadly, there are not many ability points left to spend here. For the main character, this could be disappointing. |
Skills and Expertise
Overall, the skills should be impacted by your roleplaying and background decisions. However, you would still want those that will give you the best benefits. My recommendations are to pick those at which you have a high ability modifier or relevant to the main character:
- Arcana
- Deception
- History
- Intimidation
- Investigation
- Nature
- Religion
Leveling Progression - Levels 2-12
Here is the detailed progression for the Magic Missile build to get you started. You can use it as a guideline because early games can be daunting and overwhelming. Later on, once you get a feel for the class, you can start picking your options.
Wizard Mechanics Disclaimer
As this build will heavily rely on Wizard, there are a few special mechanics to know before using it.
Scribing spells
One important aspect is that any spell scrolls you find can be learned. This consumes a scroll and some additional gold. As a result, the spell is added to the spellbook:
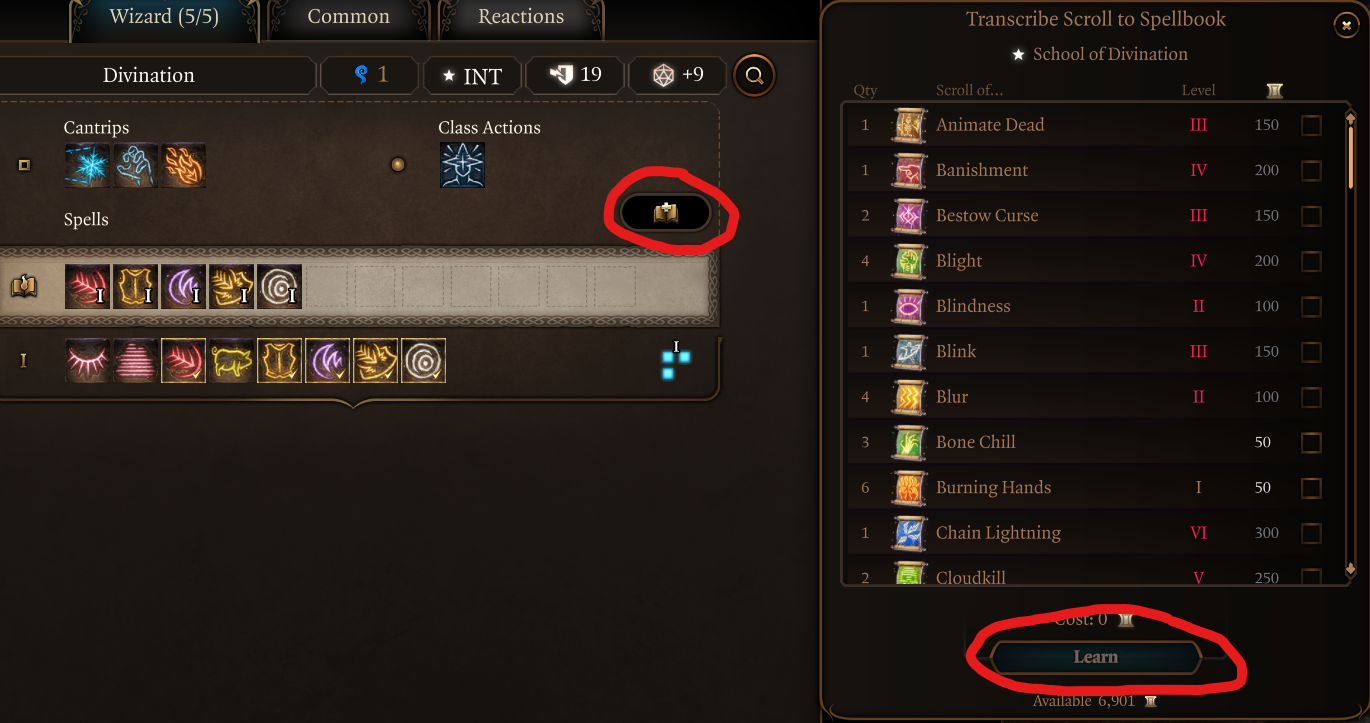
This means that you get those spells that you do not learn by leveling. Just wanted to tell you so that you would not be surprised in case the spells are talked about, and I did not suggest taking it.
Preparing Spells
The second stage, after you learn or scribe spells, is that you can then "prepare" them. This means that you have a limited number of spells active at a time.
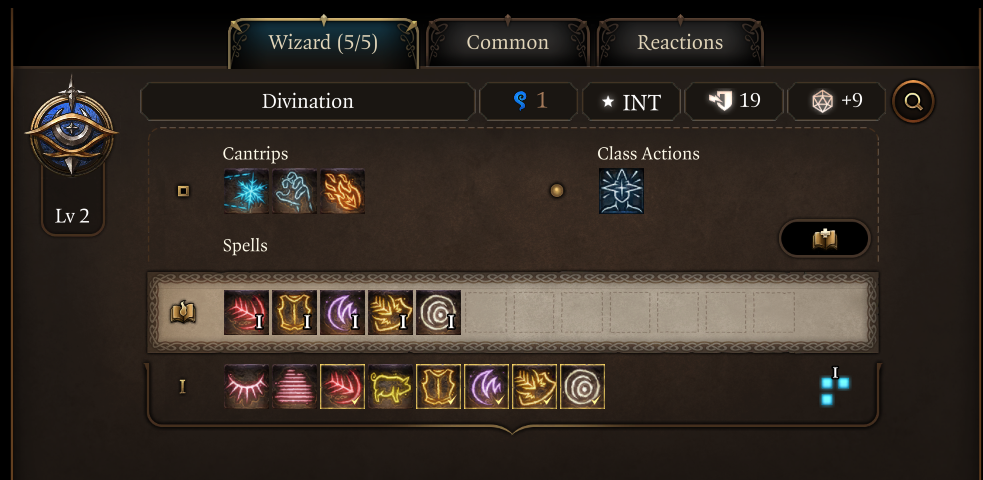
This is a good thing as you can change them based on the situation outside of combat. For example, you will be fighting enemies that are weak to Fire. Just add ![]() Fireball or
Fireball or ![]() Wall of Fire. Fighting a large group of enemies, maybe include
Wall of Fire. Fighting a large group of enemies, maybe include ![]() Glyph of Warding or
Glyph of Warding or ![]() Confusion to disable them.
Confusion to disable them.
Level 2 - Wizard Lv 1
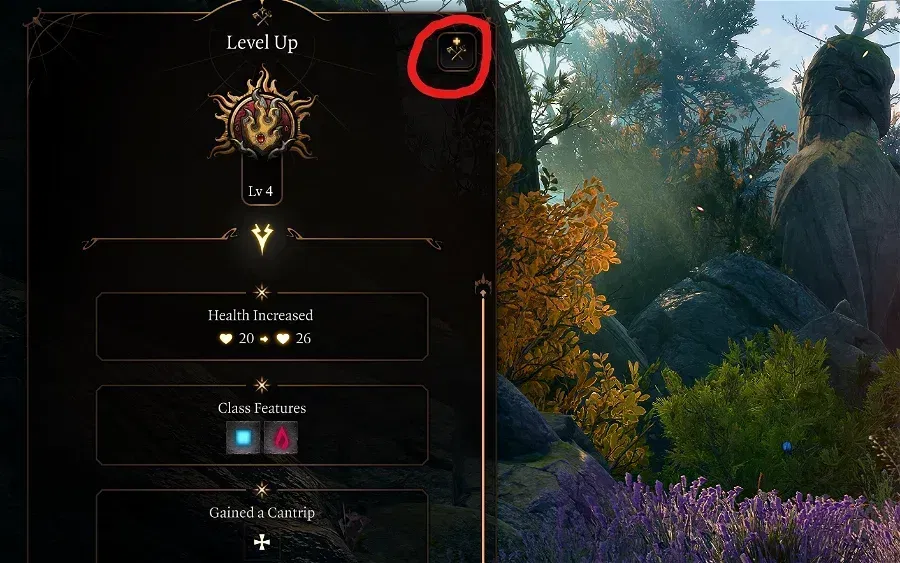
By this time, you should have landed in the Wilderness area already. The level up will go straight to Wizard, which you will take for the rest of the game.
Multiclass into Wizard
During the level up screen, select the multiclass button, and then pick Wizard:
Class
| Overview | |
|---|---|
 Wizard Wizard |
|
| Features | |
| Provides a way to restore spell slots with Arcane Recovery Charges. | |
 Spell Slots Spell Slots |
These can be used to cast spells and are restored each long rest. |
Cantrips
| Cantrip | Description |
|---|---|
| An effective fire spell, that you can also use to create explosions with fire wine or oil barrels. | |
| Deals good damage, especially on enemies with less than maximum HP. It should be used when the enemy has low Wisdom to increase the chance of landing it. | |
| Can be used in world exploration or to throw items that you drop. |
Level 1 Spells for Leveling and Scribing
As a Wizard, you can obtain spells in a few ways, so it is hard to recommend the progression:
- Picking them in the leveling screen
- Scribing from the scrolls that you find or buy in the game.
Based on what you need or lack in the combat, you can prioritize these for different uses
| Spell | Description |
|---|---|
| Right from the start this spell is awesome. Although it does not deal huge damage, you can easily kill enemies with low HP in case you don't wish to miss it. This spell will get better as higher-tier spell slots are unlocked. | |
| Amazing spell that you can use on yourself but also on party members. This will set the Armour Class to 13 if not wearing light or heavier armor. With high dexterity and a shield, this will easily reach 18. | |
| I recommend adding this spell, in case no one in your group has it. Outside combat it is free to cast and greatly improves the mobility of the whole group. | |
| Almost mandatory exploration spell, which enables you to jump very long distances. | |
| Useful in some exploration scenarios, to remove the damage from high falls. | |
| It is a very popular spell that can hit with different elements. This way, you can double-damage wet targets or pick different elements based on the situation. | |
| Creates an ice surface, which can make enemies prone. Good spell early on, but loses potential at later levels. |
Level 3 - Wizard Lv 2
This level allows to choose a subclass.
Subclass
| Overview | |
|---|---|
 Evocation Evocation |
|
| Features | |
| You avoid targeting allies with friendly fire when using area spells. | |
| Evocation Savant | Evocation spells are cheaper. |
Spells
Add 2 more spells from the recommended list
Prepared Spells
Continue using the same or add new ones.
Level 4 - Wizard Lv 3
Finally, you get access to level 2 spells.
Level 2 Spells for Leveling and Scribing
As a Wizard, you can obtain spells in a few ways, so it is hard to recommend the progression:
- Picking them in the leveling screen
- Scribing from the scrolls that you find or buy in the game.
Based on what you need or lack in the combat, you can prioritize these for different uses.
| Spells | Description |
|---|---|
| Gives a boost to mobility and allows you to move around the battlefield with a bonus action. | |
| The biggest damage spell at level 2. It damages twice - first when you cast, and second after it is the enemy's turn. You could also use this as a replacement for any spells you do not use. | |
| Excellent spell that gives crowd control capabilities, just be sure that your allies don't step on it. | |
| A control spell that makes ranged foes useless, and it does not use a |
|
| This can be especially useful if you have characters that can utilize the 100% critical hit chance in close range - melee martial, ranged, throwers, etc. | |
| A great spell to have in certain encounters. |
Prepared Spells
I would prioritize ![]() Misty Step and
Misty Step and ![]() Cloud of Daggers to be included.
Cloud of Daggers to be included.
Level 5 - Wizard Lv 4
Now, you get some other great choice picks - the first feat is unlocked.
Cantrips
There are a few good choices here, so pick based on your preference:
| Cantrip | Description |
|---|---|
| The cantrip will be particularly useful in Act 2, given the numerous dark areas. |
Spells
Pick an additional 2 spells from the recommended list
Feat
| Feat | Description |
|---|---|
| My first recommendation is |
|
| Ability Improvement - +2 Intelligence | Improves the main spellcasting stat of the Wizard. For now, it has no direct impact on |
Prepared Spells
Adjust any of the spells as needed
Level 6 - Wizard Lv 5
Level 3 spells are unlocked, meaning your ![]() Magic Missile will become stronger. Also, you get some nice new spells, which can be very powerful if used correctly.
Magic Missile will become stronger. Also, you get some nice new spells, which can be very powerful if used correctly.
Level 3 Spells for Leveling and Scribing
So, these spells I would say are game changers in terms of power play. Some of them can single-handedly change the encounter to your side, disable a group of foes, or instantly delete them.
Core Spells:
| Spell | Description |
|---|---|
| This spell is good on the Balanced and Tactician difficulties and mandatory on Honour Mode. It can save your run from a deadly enemy spell by fully cancelling it. | |
| The lightning element spells are always mandatory in my spell arsenal. If enemies align perfectly and you have |
|
| The spell is generally overlooked cause it doesn't deal any damage. But do not be fooled, it instantly |
Additional Spells:
| Spell | Description |
|---|---|
| On one hand, this is a very powerful spell, on the other hand, it does have problems, like using |
|
| Versatile spell that can apply different elemental damage. The main problem is that its range is somewhat short. |
|
| Very popular spell with straightforward effect - large radius fire damage. I do recommend it, if you have a slot for it, but I think |
|
| This spell can be useful in some boss fights later down the road. It lowers their number of actions, reduces AC giving, so needed bonuses for longer fights. | |
| Another powerful control spell that is especially effective against foes that use weapons. This leaves them outright defenseless and makes them flee. |
Prepare Spells
With access to new spells, make sure to include ![]() Counterspell in the spellbook
Counterspell in the spellbook
Level 7 - Wizard Lv 6
Further progression with Wizard levels:
| Cantrip | Description |
|---|---|
| As you rarely use cantrips with this build, I would say the feature's effect is negligible. |
Spells
Take 2 levels from the recommended spell list of the previous level
Prepare Spell
Adjust based on your needs
Level 8 - Wizard Lv 7
Level 4 spells are unlocked:
Level 4 Spells for Leveling and Scribing
There are a few situationally good spells; otherwise, pick the ones that may look relevant to you
| Spell | Description |
|---|---|
| I have a soft spot for this spell. It deals two types of damage, creates ice fields, applies control - everything that you need for many Act 2 encounters. | |
| My favourite spell in the game with how it functions. It can disable large groups of enemies, but it does not target allies. | |
| A very valuable spell to have on hand. It can help you and a companion move a long distance and reach targets or escape them. | |
| A somewhat good spell that can hit multiple times per turn, if enemies are forced to pass through it. | |
| Mainly mentioning it here, as I don't think it is valuable alone. However, if you have something like a Gloomstalker Assassin build it can allow it to kill enemies even without entering combat. | |
| The spell can prove useful in some encounters, especially the |
Prepared Spells
Perfect time to add those new level 4 spells and try them out.
Level 9 - Wizard Lv 8
Learn more level 4 spells, and obtain an additional feat:
Spells
Learn any additional spells that you find relevant or useful.
Prepare Spells
Do any prepared spell changes that are needed.
Feat
There are a few relevant picks here:
| Feat | Description |
|---|---|
| Ability Improvement - +2 Intelligence | Take this if your previously had not done that, the bonus intelligence will come in useful at level 11 once you get |
| Take this if you have not done that already; it will allow wearing a few great weapon options in both hands in Act 3. | |
| The feat can be useful, especially if no one in the party can take it. Having one member always going first and avoiding |
Level 10 - Wizard Lv 9
A plethora of new level 5 spells can be learned.
There is one optimization that you could make, but I don't recommend it. Respec to 10 levels of wizard. Then at the next level - level 11, respec again, and do 1 Hexblade -> 10 Evocation Wizard. What's the benefit here? You get ![]() Empowered Evocation 1 level earlier, which is okay optimization, but might be too much of a hassle. That's why I leave it out and leave it for you to decide if you want it.
Empowered Evocation 1 level earlier, which is okay optimization, but might be too much of a hassle. That's why I leave it out and leave it for you to decide if you want it.
Level 5 Spells for Leveling and Scribing
Good spell options are introduced. Learn them via leveling or through Scroll scribing.
Core Spells:
Additional Spells:
| Spell | Description |
|---|---|
| This spell is an alternative to |
|
| If you have been using |
|
| These are good summons that can both cause real damage and act as distractions for enemies. The really powerful one is |
|
| The spell can be cast multiple times and can be a source of control. Sadly, it only targets a single enemy, but you can throw them into chasms or water. |
Prepare Spells
Add any of the newly learned spells.
Level 11 - Wizard Lv 10
As Evocation Wizard, you get the main feature we need to make the Magic Missile deal significantly more damage:
| Feature | Description |
|---|---|
| Your evocation spells get a damage bonus from the spellcasting modifier, which is Intelligence. With |
Accessing Artistry of War
![]() Curriculum of Strategy: Artistry of War is an upgraded version of
Curriculum of Strategy: Artistry of War is an upgraded version of ![]() Magic Missile, which only the Wizard can learn. It is accessed through
Magic Missile, which only the Wizard can learn. It is accessed through ![]() Sorcerous Sundries in Lower City, Act 3.
Sorcerous Sundries in Lower City, Act 3.
Once there, go to the second floor, unlock the locked door, and look for Clasped Book. Interacting with it will open a portal. You will need to enter the secret Vault, where you obtain Red Knight's Final Stratagem. After reading it, you will get ![]() Scroll of Artistry of War. Do not use it, but scribe it with Wizard.
Scroll of Artistry of War. Do not use it, but scribe it with Wizard.
Spells
Take any of the spells that you still find relevant
Prepare Spells
Add the spells, if needed, to the spellbook. Be sure to add ![]() Curriculum of Strategy: Artistry of War.
Curriculum of Strategy: Artistry of War.
Level 12 - Wizard Lv 11
The last level, which unlocks the level 6 spell slot, and the most powerful spells.
Level 6 Spells for Leveling and Scribing
There are a lot of good spells but for now, pick two. The rest can be learned via scribing.
| Spells | Description |
|---|---|
| This one spell can make you invincible during its effect. It's excellent against numerous game bosses, where you can safely turtle away and chip them with your characters. After that, return to the globe. | |
| The strongest spell in the game in terms of damage. It hits 4 times, and with |
|
| It can be perfect to hit a well-stacked group of enemies with the wall effect and the ice particles. The problem is that it uses Concentration, limiting your other control spells. | |
| The initial effect cannot be resisted. Enemies can only try to avoid it on the next turn via a Saving Throw. |
Prepared Spells
I would urge you to add ![]() Globe of Invulnerability the moment you get it, as it's one of the best spells for the endgame encounters.
Globe of Invulnerability the moment you get it, as it's one of the best spells for the endgame encounters.
Maximizing Ability Scores
Now, as the build progression is covered, there are a few aspects and important decisions you will have to make throughout the game. These will decide your final score for abilities.
- Act 1 -
 Auntie Ethel's Hair - you will want to get +1 Intelligence if you pick this choice.
 - Feat - Ability Improvement - +2 Intelligence.
- Act 3 - Mirror of Loss - pick +2 Intelligence.
This will allow you to reach 22 natural Intelligence, and result in a +6 ability modifier on your spells and rolls.
Potions, Elixirs, and Consumables
Let's take a look at what consumables we can use to further empower the build.
Potions
These are general consumables, and most of them are activated for a few turns. Potions are separate from Elixirs and can be active together.
| Consumable | Description |
|---|---|
| An alternative to |
|
| Enables you to speak with animals, which unlocks a few interesting dialogue lines. | |
| It can be used in two ways - the first one is to enter combat with a |
Elixirs
Unfortunately, only one Elixir can be active at a time. However, the good thing is that they last until a long rest, making them very useful and economical.
Be sure to activate them before combat as otherwise, you will need to use Bonus Action.
| Consumable | Description |
|---|---|
| You gain additional action by killing an enemy. This is one of the best options that you can use. |
|
| Gain 3 stacks of Arcane Acuity. I would say this should be the most used Wizard elixir for higher spell success. | |
| Another good choice that allows for better maintenance of spell Concentration. | |
| Grant's a single level 3 spell slot. It could be useful in case you are preparing for a longer encounter. | |
| Grant's a single level 4 spell slot. It could be useful in case you are preparing for a longer encounter. | |
| For some encounters, you will want to go first. This elixir will ensure that it overcomes even surprise mechanics. However, if you have |
Illithid Powers
This special mechanic in Baldur's Gate 3 allows you to consume tadpoles and unlock special Illithid Powers. These range from somewhat useful, to extremely deadly. I would like to leave a few recommendations:
| Illithid Power | Type | Description |
|---|---|---|
| Base | Beneficial power to take as it does not have any costs, and provides only benefits on the first hits with attack rolls. | |
| Base | An easy way to ensure you land critical hits. | |
| Base | Can help to kill an enemy faster if it is left with a few HP. | |
| Base | A great way to weaponize your reaction before obtaining |
|
| Elite | Can be used to maximize the effectiveness of charisma-based skills, especially relevant to the main character. | |
| Elite | Very powerful spell that can be used to pull enemies together. You can then follow up with area-of-effect spells or attacks. In general, it is a very effective action in the hands of any character. | |
| Elite | Can be used to save yourself from a deadly spell. This is especially relevant as you will have a |
|
| Elite | Remove the cost of spell slots or charges. | |
| Elite | You can now use action and bonus action interchangeably, giving two full spell casts each turn. It's not as important for you, but it will help other casters in the group. |
Equipment Recommendations
Now I would like to go through some gear recommendations to maximize the Magic Missile Build. Items are especially important as they take the build to the next level thanks to their unique effects.
Act 1
For the game to begin, you will want to obtain ![]() The Spellsparkler, as it will give a big boost to
The Spellsparkler, as it will give a big boost to ![]() Magic Missile damage. This can be done easily at level 3.
Magic Missile damage. This can be done easily at level 3.
| Slot | Item | Description |
|---|---|---|
 Melee (One - Handed) Melee (One - Handed) |
This is the best stave that you can use, will activate |
|
| Either have someone else equip this weapon or use |
||
| Another weapon option that you should use |
||
 Ranged Ranged |
Gives bonus initiative, allowing one to go earlier in combat | |
| Equip two of these so that you can attack with your bonus action. This is an amazing weapon as you can use bonus action to break water bottles to apply wet. | ||
 Shield Shield |
It provides a substantial defensive boost by reducing critical hit damage. | |
| Gives a bonus to saving throws, easily accessible early in the game. | ||
 Head Head |
The best headwear in Act 1. Just be sure to be at least |
|
 Armor Armor |
Best clothing for caster in Act 1, will synergize well with |
|
| Make sure to get this armor as later it can be synergized with one ring, for |
||
 Gloves Gloves |
These gloves work very well with |
|
| Decent early-game gloves that give good armor class, in case you do not have Shield proficiency. | ||
 Boots Boots |
These are not the best boots, but they are good, especially if you use other spells that apply conditions besides |
|
| Very effective boots that allow you to have 3 |
||
 Amulet Amulet |
The best amulet for Magic Missile Build until Act 3. It gives additional missiles, and you can cast a level 1 spell, to save some slots for each long rest. | |
| Restore up to a level 3 spell slot. Can be unequipped after use. | ||
| Gives mobility improvement thanks to the |
||
 Rings Rings |
This ring works very well with |
|
| The best option for Act 1. The bonus Armour Class is a great boost for survivability. |
Act 2 - mid-game
| Slot | Item | Description |
|---|---|---|
| Melee (One-handed) |
- | Use weapons from Act 1. |
| Ranged |
This crossbow will give you a free cast of Level 3 |
|
| Shield |
The best shield there is for a caster. | |
| It provides a substantial defensive boost by reducing critical hit damage. | ||
| Head |
Improves spell success chance and increases the likelihood of going first. | |
 Cloak Cloak |
As you will be constantly applying Reverbation, this cloak is amazing and allows Dazing enemies who dare to attack you. | |
| Improves survivability and Saving Throw success. | ||
| Armor |
Still continues to be one of the best choices | |
| In Act 2, you can obtain |
||
| Another robe that gives +1 Spell Save DC. | ||
| Gloves |
In Act 2, these will also work extremely well with |
|
| Boots |
Can apply |
|
| These boots can give a huge damage boost. However, this will require some preparation and getting close to enemies to receive |
||
| Amulet |
Still, the best amulet to use for optimal |
|
| Rings |
Amazing ring, that works well with this build. You will get bonus Reverbation stacks while wearing |
|
| This ring will be even more powerful as you can apply |
||
| Inflict |
||
| As you will still cast spells, enemies that fail against them will incur |
||
| Applies |
Act 3 - Final Build setup
This is the last act of the game, where you will get access to the most powerful items. To get them as early as possible, you will need some planning, but overall, it should not be a problem.
Now, for the other equipment:
| Slot | Item | Description |
|---|---|---|
| Melee (One - Handed) |
(BiS) |
The best caster staff in the game (well, almost the best). This fits the build extremely well and you can use |
| The second-best weapon for Magic Missile build. It requires you to kill 3 enemies (this can be done by taking out some guards) which buffs up each Missile with a flat 3 damage bonus. Moreover, it improves Spell Save DC for other spells. | ||
| - | Weapons from previous acts | |
| Ranged |
(BiS) |
Gives a big boost to the initiative, guaranteeing that you can go first. |
| Head |
If you want to maximize the damage of |
|
| The hood gives solid +2 Spell Save DC, greatly improving spell success chance. | ||
| Cloak |
Improve Spell Save DC by one, the best option for a direct increase in build effectiveness. | |
| Improves the chances of attacks missing the wearer until they get hit for that turn. | ||
| As you will be constantly applying |
||
| Armor |
I would say |
|
| Gloves |
Use this to stack |
|
| Another option in Act 3, also gives a level 3 |
||
| Boots |
Still the best boots, if you are not lazy about doing all the setups. | |
| Can apply |
||
| Amulet |
(BiS) |
Although this would be best in a slot amulet, it can be irritating to activate. You will need Fire surfaces to utilize the bonus damage. |
| I would say still a relevant amulet, even in Act 3. | ||
| The +2 Spell Save DC is a huge boost, giving a large success improvement for spells. | ||
| Restores up to level 6 spell slots. After using it, you can unequip it for another amulet. | ||
| Rings |
The ring still stands on top for improved damage and applying Reverbation stacks. | |
| Improves burst damage from |
||
| If you are more keen on debuffing enemy attack rolls, use this one. |
Build Mechanics
In this section, I would like to dive deep into how to play the Magic Missile Build. This will help you utilize it to the fullest and correctly use various actions and spells throughout the game.
Important Mechanics and Combos
The build is very versatile, allowing one to take full control of enemy actions.
Wet + Lightning and Cold Spells
I think this is the most important mechanic to learn in Baldur's Gate 3 for caster. It is very easy to set up and can guarantee you easy wins for most encounters.
The first step is to apply water here are some options for how to do that:
- Have a Cleric or Druid Cast
 Create or Destroy Water
 - Storm Sorcerer gets access to Create or Destroy Water at level 6
- Throw Water bottle
- The easiest, drop the water bottle on the ground and destroy it with an attack (
 Off-Hand Attack (Ranged) with bonus action is perfect for that)
Once the enemy is wet, they will become vulnerable to Ice and Lightning damage. This means you deal double the amount. After this, follow up with your favorite spell - ![]() Chain Lightning,
Chain Lightning, ![]() Lightning Bolt,
Lightning Bolt, ![]() Cone of Cold, etc.
Cone of Cold, etc.
Expeditious Retreat bonus damage
With the ![]() Boots of Arcane Bolstering, you can further boost your magic
Boots of Arcane Bolstering, you can further boost your magic ![]() Magic Missile damage. This is, in a sense, somewhat easy and hard. It's easy because you only need to activate one level 1 spell and use a bonus action to Dash.
Magic Missile damage. This is, in a sense, somewhat easy and hard. It's easy because you only need to activate one level 1 spell and use a bonus action to Dash.
The hard part becomes remembering this and not forgetting to cast another spell to break the concentration. Overall, if you can do this setup, the damage boost is amazing.
What you need to do:
- Cast
 Expeditious Retreat before combat.
 - During combat, activate a special
 Dash from the side hotbar that uses a bonus action.
 - Make sure the enemy is
 Threatened, this can be easily achieved by moving your ally close to them.
 - Release the
 Magic Missile for a damage boost.
This is somewhat tedious, and I did not use it much myself. Of course, if I knew a difficult encounter was coming, I would do this.
Phalar Aluve bonus damage
Want to take damage even further? Then you can utilize your group members, usually clerics to go close to the enemies and activate ![]() Phalar Aluve: Shriek. Each
Phalar Aluve: Shriek. Each ![]() Magic Missile will deal a bonus 1d4 thunder damage, increasing damage output even further.
Magic Missile will deal a bonus 1d4 thunder damage, increasing damage output even further.
Elemental Torment
This is the last improvement to do to maximize your ![]() Magic Missile damage. In Act 3 you can obtain
Magic Missile damage. In Act 3 you can obtain ![]() Amulet of Elemental Torment. With it, you can further add 1d4 fire damage to each missile.
Amulet of Elemental Torment. With it, you can further add 1d4 fire damage to each missile.
The setup can be done in multiple ways:
- Walk on a fire surface from a spell like Fireball or some explosive grease.
- Use
 Alchemist's Fire consumable. First, drop it on the ground and then destroy it with Off-Hand Attack (Ranged).
If you are not lazy with this setup, this is another 2.5 average damage bonus on each missile.
Maximum Possible Damage
So with all of these mechanics, how can you reach the maximum damage?
 Psychic Spark for an additional missile
 Lightning Charges - +1 damage and +1d8 after 5 stacks. Enabled with
  The Spellsparkler and
  Markoheshkir +
  Bolts of Doom later in Act 3
- Hexblade's Curse - +2-4 bonus damage is based on proficiency bonus with each missile
 Callous Glow Ring - 2 radiant damage on each missile
 Reverberation 5 stacks - 1d4 thunder from
  Gloves of Belligerent Skies + Callous Glow Ring.
 Ring of Absolute Force - additional 1 thunder damage on Reverberation 5 stacks.
 Phalar Aluve - 1d4 thunder damage with its
  Phalar Aluve: Shriek.
 Arcane Charge - +2 damage on Threatened status enemies.
 Amulet of Elemental Torment - 1d4 fire damage on fire surface.
 Rhapsody - +3 damage with Scarlet Remittance effect.
Early Game Combat
Let's cover how you should progress through combat levels 1-6.
- Very early in the game, you will not have many big damage-dealing spells.
 Sleep is an effective option for dealing with single targets. Use this until level 4-5.
 - Remember to cast
 Mage Armour after a Long rest, it's a big survivability boost for a caster.
 - Magic Missile becomes very effective after obtaining The Spellsparkler. Overall, you should use it if you want a guaranteed finish of the enemy or multiple enemies with a few HP. They will also get greatly empowered with Gloves of Belligerent Skies in terms of damage.
- To further boost Magic Missile damage, make sure to apply Hexblade's Curse; this way, each missile will deal additional damage based on proficiency bonus. The bonus increases as your level rises.
 Cloud of Daggers is a very effective damage spell at level 3. Use it to hit multiple enemies multiple times.
- Wet status from Create Water or Water Bottle +
 Lightning Bolt almost guarantees a win in the encounter. You can do this from level 5.
  Glyph of Warding can be used to put multiple enemies to
  Sleeping. This is especially effective if you know that your other area of effect spells will not be enough to effectively damage targets.
 Hold Person is a great spell, but I only recommend using it if you have an 80% success chance; otherwise, it is not worth risking the whole action point.
Late Game Combat
The Magic Missile Build comes online at about level 10-11. This is when you get ![]() Empowered Evocation. As a Wizard, you can cast various damage and control spells, but I will mainly emphasize
Empowered Evocation. As a Wizard, you can cast various damage and control spells, but I will mainly emphasize ![]() Magic Missile usage:
Magic Missile usage:
- Check the Combo section on how to maximize the Magic Missile and
 Curriculum of Strategy: Artistry of War damage. The latter is an upgraded version, and I recommend using it on stronger enemies that have at least 100 HP.
 - For good damage, Gloves of Belligerent Skies, Markoheshkir, Callous Glow Ring already ensure that you deal high damage. With further optimizations, you can reach some big numbers.
- Make sure you have a
 Light spell on yourself or ally with a shining weapon to illuminate enemies. This way you will deal a bonus 2 Radiant damage from Callous Glow Ring.
 - Before combat, I recommend activating Expeditious Retreat so that you can use a bonus action in combat to activate Arcane Synergy for bonus damage.
- And you are ready to launch your missiles!
Here are some other tips that I think are helpful in general for the Wizard.
 Sleet Storm is an amazing spell; if you have a Warlock or a Bard, use it together with
  Hunger of Hadar to disable a large group of enemies.
 Ice Storm is a great spell to create ice surfaces and does not require concentration.
- If you are fighting a boss first time, I recommend
 Globe of Invulnerability. This will greatly reduce risks and allow you to evaluate the encounter before jumping into offensive combat.
  Confusion is an amazing spell that can be cast on the first turn. I recommend using it if you see multiple enemies bunched up together. This way, all of them get affected, and they can start fighting each other.
- Use Hexblade's Curse against targets where you need maximum damage, like bosses.
Build Variations
There are a few variations that the build could be changed about. I think it is more for advanced players who are likely doing some deeper optimizations.
| Setup | Description |
|---|---|
|
This can be an extremely strong setup, especially if you take Tempest Domain Cleric. It can maximize |
|
This is what I covered in the build, and it gives access to the third Feat. |
Conclusion
Thank you for reading the Magic Missile build for Baldur's Gate 3. It is a unique setup that exploits two spells, similar to homing missiles, which never miss. The build uses the Wizard class due to ![]() Empowered Evocation. The post should help you with the correct leveling setup and gear pickups.
Empowered Evocation. The post should help you with the correct leveling setup and gear pickups.
Cheers!
Like, Dislike, comment, or share!
Join the Discussion
0 commentsNo comments yet.
Be the first one to leave a comment!