
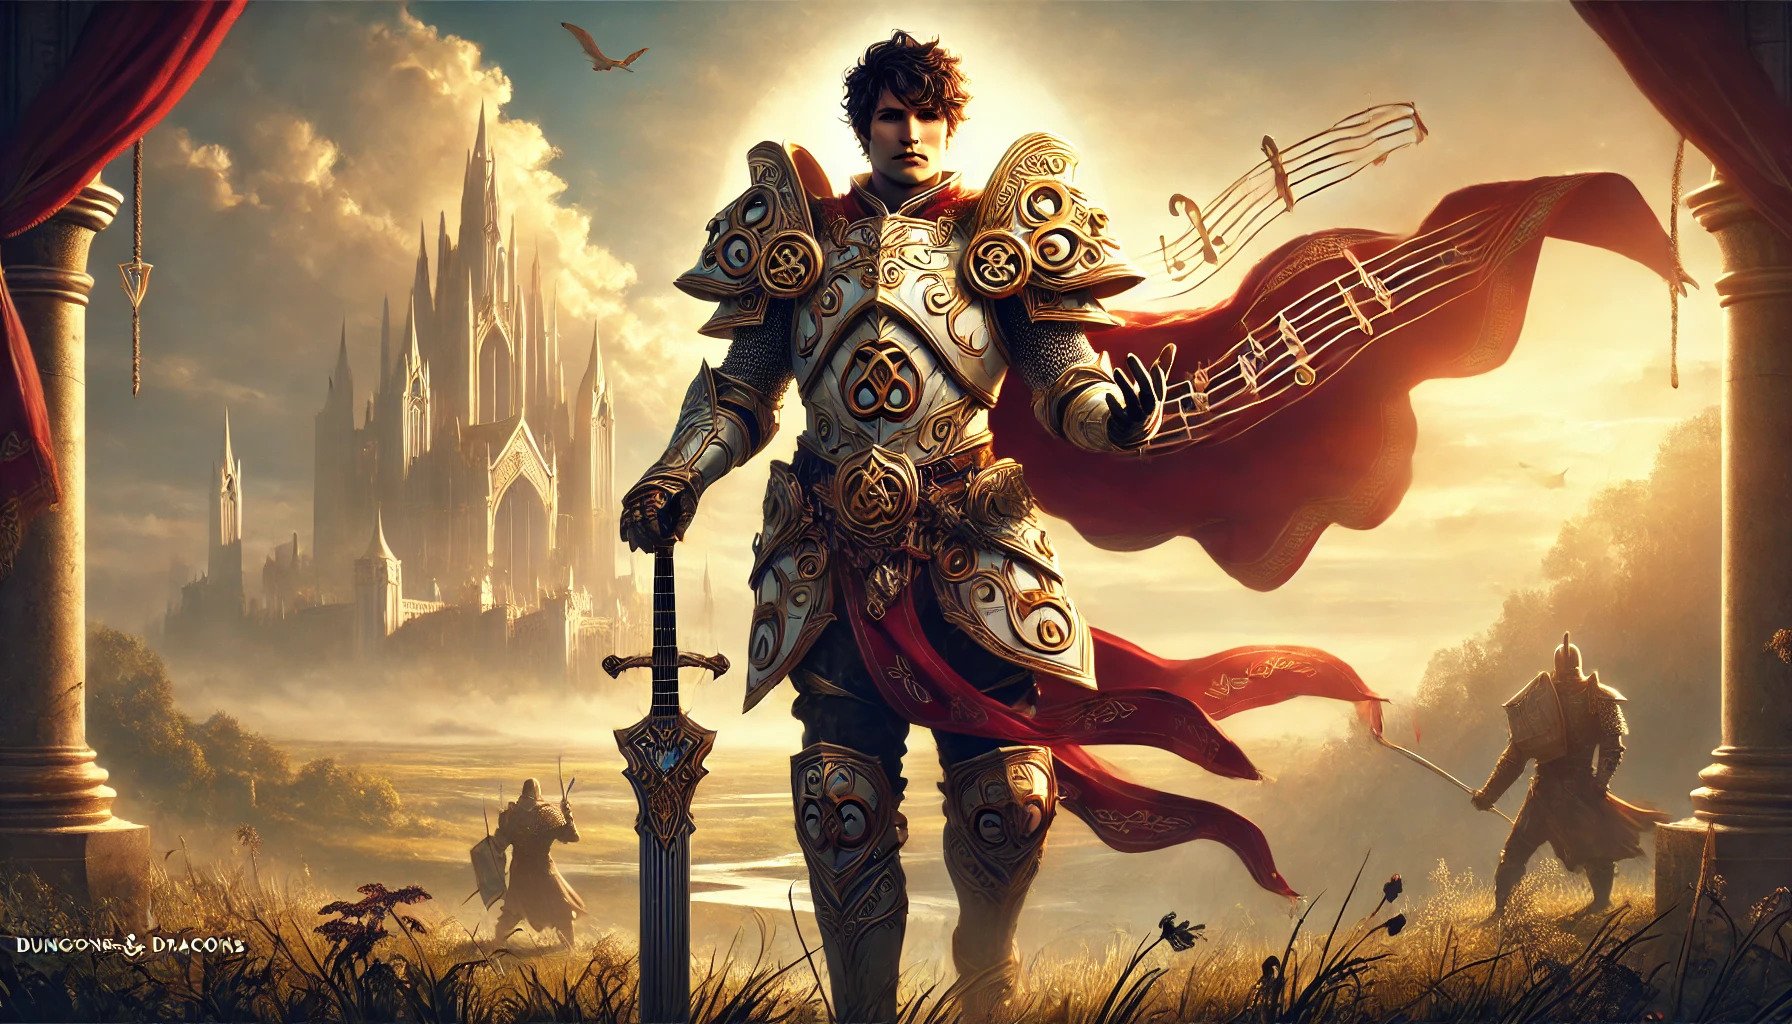
Loredin Build - Lore Bard and Paladin Multiclass - Baldur's Gate 3 (BG3)
Contents
Loredin - Lore Bard and Paladin Multiclass Build
At the core of this build stands a Paladin, that will do most of the heavy lifting. Mainly you will engage in combat as melee martial using ![]() Divine Smite and other goodies available to the class.
Divine Smite and other goodies available to the class.
But instead of going fully Paladin, the build finished with Bard, specifically College of Lore. This is an interesting synergy, especially as both classes have the same Spellcasting modifier. This setup will encourage you to start leaning into the support role.
Lore Bard comes with various tools at its disposal - ![]() Cutting Words, more spell slots, and Magical Secrets. All of these will help you shape your Loredin into something more than just a fighter hitting with radiant damage.
Cutting Words, more spell slots, and Magical Secrets. All of these will help you shape your Loredin into something more than just a fighter hitting with radiant damage.
So let's get into the build
Class Contribution
The build equally splits into Paladin and Lore Bard, gaining major features of both classes.
6 Paladin (can be Devotion or Vengeance)
- Access to a very powerful radiant damage tool -
 Divine Smite.
 - Ability to use
 Aura of Protection to have high success chances with saving throws.
 - Arsenal of spells, that are not the main highlight of the build, but can be used if the situation arises -
 Command,
  Shield of Faith,
  Thunderous Smite,
  Magic Weapon, etc.
 - Proficiencies to wield any weapon and armor.
- Access to Oath abilities like
 Vow of Enmity,
  Sacred Weapon, etc. depending on your subclass.
  Extra Attack for that sweet second hit to boost your damage output.
6 Lore Bard
- Powerful reaction to weaken foes -
 Cutting Words. It will also spew some hilarious words.
 - Improves the amount of spell slots that Paladin has access to.
- Bonus utility spells like
 Enhance Ability,
  Longstrider, etc.
  Bardic Inspiration, although this will mostly be used for Cutting Words. it can still help with various ability check rolls, when needed.
 Song of Rest - if this is the only bard, the additional short rest is great at restoring various resources like Ki, Bardic Inspiration, Warlock spell slots, etc.
- Bonus skill proficiencies
- Magical Secrets - access to almost all spells up to level 3 from any class. There are a few great options here, that will allow Loredin to be specced based on your playstyle.
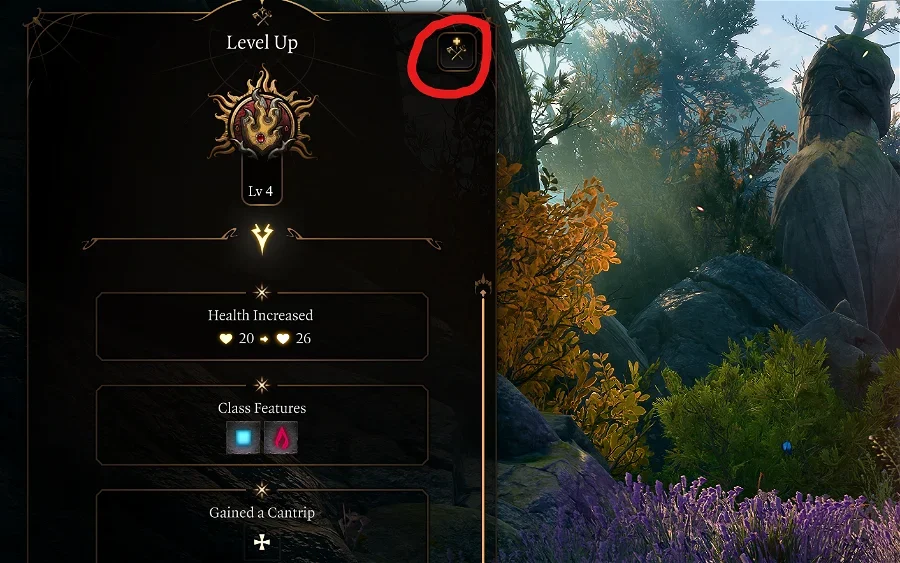
Leveling Overview
Here is a concise table with all the main picks during your leveling progression. For more detailed reasoning, I go further in the article. Also, do not forget to check the recommended gear as it is crucial.
| Level | Class | Selection |
|---|---|---|
| 1 | Paladin 1 | STR - 8, DEX - 16, CON - 14, INT - 8, WIS - 10, CHA - 17 |
| Skills: any | ||
| Subclass: Oath of Vengeance |
||
| 2 | Paladin 2 | Fighting Style: |
| Prepare Spells: |
||
| 3 | Paladin 3 | - |
| 4 | Paladin 4 | Feat: |
| 5 | Paladin 5 |
Prepare Spells: |
| 6 | Paladin 6 | - |
| 7 | Bard 1 | Cantrips: |
| Spells: |
||
| Abilities: Charisma-related if it is the main character. | ||
| 8 | Bard 2 | Spells: Any |
| 9 | Bard 3 | Spells: |
| Subclass: College of Lore | ||
| Skills: pick any, and be sure to cover Charisma ones. | ||
| 10 | Bard 4 | Cantrips: |
| Spells: any | ||
| Feat: |
||
| 11 | Bard 5 | Spells: |
| Replace Spell: 1 spell that you do not use -> |
||
| 12 | Bard 6 | Spells: |
| Magical Secrets: |
Starting the Game - Level 1
This section covers the creation screen and what would go into the best Races, Abilities, and Skills for the Loredin build. Some of these choices are impactful as you cannot respec them.
Races
Picking a race provides various benefits - abilities, dialogue options, looks, etc.
| Race | Features | Description |
|---|---|---|
 Wood Half-Elf Wood Half-Elf |
|
The bonus movement speed is excellent for any martial build. Otherwise, you will get all the necessary proficiencies. |
 Wood Elf Wood Elf |
|
|
 Half-Orc Half-Orc |
Excellent race for martial builds. The |
|
 Githyanki Githyanki |
|
Githyanki comes with a wide array of utility actions like |
Class
| Overview | |
|---|---|
 Paladin Paladin |
|
| Features | |
| Use your blessed touch to heal a creature or cure it of all diseases and poisons. | |
| Gain |
|
 Channel Oath Charges Channel Oath Charges |
You gain the ability to channel the power contained in your Paladin Oath, which you can use to fuel certain actions. |
Subclass
| Overview | |
|---|---|
 Oath of Vengeance Oath of Vengeance |
|
| Features | |
| Improves weapon damage based on spellcasting modifier. | |
| Requirements that you need to meet to uphold the oath. | |
Background
Backgrounds are mostly for role-playing and you can pick whatever you prefer. If you want to optimize, then it would be good to pick backgrounds that are based on your ability points of Charisma, Dexterity, or Strength.
| Background | Skills | Description |
|---|---|---|
| Soldier | Athletics Intimidation |
The most relevant background as it gives a skill using both strength and charisma abilities. |
| Entertainer | Acrobatics Performance |
Uses both dexterity and charisma modifiers that you will have a good investment. |
| Guild Artisan | Insight Persuasion |
Persuasion proficiency is the main aspect of this background. |
| Noble | History Persuasion |
Similar to the above, but gives History skills. |
Abilities
Now let's take a look at the abilities of the Loredin build. Correct allocation will allow you to maximize the early gameplay and get good modifier bonuses.
| Ability | Value | Description |
|---|---|---|
 Strength Strength |
8 | Although strength is important my recommendation would be to use Elixir of Hill Giant Strength or rely on Dexterity-based weapons until Act 3. Paladin already has an unfavorable stat split, so this alleviates some early-game problems. |
 |
16 (15+1) | Dexterity is important, as it will improve your chances of going early in the turn. Moreover, if you use Medium armor, this will give an additional Armour Class. High Dexterity will also provide a way to wear some powerful finesse weapons like |
 Constitution Constitution |
14 | High Constitution will ensure you get ample HP and a higher chance of maintaining |
 Intelligence Intelligence |
8 | Not relevant for the build |
 Wisdom Wisdom |
10 | A slight boost to Wisdom, so that there would not be a negative modifier to saving throws. |
 Charisma Charisma |
17(15+2) | The main spellcasting ability of paladins and bards. This will improve the effectiveness of spells and auras. |
Skills and Expertise
Overall, the skills should be impacted by your roleplaying and background decisions. However, you would still want those that will give you the best benefits. My recommendation would be to go for these, most relevant to the theme of the build:
- Intimidation
- Persuasion
- Athletics
Leveling Progression - Levels 2-12
Here is the detailed progression for the Lore Bard Paladin build to get you started. You can use it as a guideline because early games can be daunting and overwhelming. Later on, once you get a feel for the class you can start picking your options
Level 2
This is where you will have left the tutorial area, and will start exploring the world.
| Action | Description |
|---|---|
| A very powerful action unique to Paladins. It will allow you to empower weapon attacks at the cost of spell slots. Use it when you need high damage to take out a foe as fast as possible or land a critical hit. Using higher-level spell slots will improve |
Fighting Style
| Style | Description |
|---|---|
| Gives +1 Armour Class which results in a decent increase in survivability. I would say this is a better pick, as |
|
| When you roll a 1 or 2 on a damage die for an attack with a two-handed melee weapon, that die is rerolled once. |
Prepared Spells
| Spell | Description |
|---|---|
| Deals decent damage and gives use for Bonus Action early in the game, when you might not have a use yet. Also making an enemy Prone will make it easier to hit them next time. | |
| Gives +2 Armour Class as long as you can maintain |
|
| Can command the creature to drop a weapon, run away, come close, etc. It can be useful in some encounters, especially against low Wisdom enemies. |
Optional Elixir of Hill Giant Strength
Well, there is a trick early in Act 1, after you reach the first settlement - Druid's Grove. There you can stock up on some really powerful potions for the rest of the game - Elixir of Hill Giant Strength.
What do they do? They increase the Strength to 21 until a Long rest. More or less this negates any need to have strength investments if you plan to use them. This is somewhat gimmicky, however, if you are interested here is a guide on how to farm Elixir of Hill Giant Strength.
Because of the build dumps strength, this is a recommended option if you do not want to use Finesse weapons. Overall, for Act 1 and 2 this saves a lot of headaches for build optimization and makes you truly powerful.
Level 3
We continue leveling Paladin. Level 3, brings some great things both for class and subclass. First the class benefits:
| Feature | Description |
|---|---|
| Prevents diseases from affecting the Paladin. |
In addition, you get subclass actions:
| Action | Description |
|---|---|
| This is kind of expensive action to use, and I would not recommend it. | |
| A powerful option, that is excellent when you are fighting a stronger enemy. This will ensure you can land multiple hits more easily, especially once you obtain |
In addition, you get Oath spells:
| Feature | Description |
|---|---|
| Not relevant in my opinion, as the cost of using it is very high. | |
| It's an okay action for the early game but loses its value very fast as you will gain more and more uses for bonus action. Moreover, Vengeance Paladin already has plenty of options. |
Level 4
Finally, the Loredin build will get the first Feat. In addition, another Lay on Hands Charge is unlocked, for more healing spells.
Feat
| Feat | Description |
|---|---|
| The recommended feature greatly empowers the build by giving a flat 10 damage boost. However, it does reduce your attack rolls by 5. Here are some ways to counteract this effect in the early game - improve attack rolls. Another aspect is that you gain |
|
| Ability Improvement | If you want to avoid managing |
Level 5
Finally, level 2 spells are unlocked, new Oath spells and you get a new and powerful class feature:
| Feature | Description |
|---|---|
| Can make an additional free attack after making an unarmed or weapon attack. |
Always ready spells:
| Spell | Description |
|---|---|
| This spell can be a very powerful option, allowing you to inflict guaranteed critical hits. I do recommend using this together with |
|
| Excellent spell that gives a big mobility boost, whether you need to escape or enter combat. |
Prepared Spells
As level 2 spells are unlocked here are some considerations to include in your build:
| Spell | Description |
|---|---|
| Can heal disease, poison, paralysis, and some other negative effects. Not mandatory, but good to have if the situation arises. | |
| This spell can empower your weapons with bonus damage rolls and attack rolls. The higher the spell slot you use the bigger the bonus. Another thing is that the bonus may seem low, but it will greatly boost your success on hitting while having |
Level 6
Another important level for Loredin build as you will get access to an Aura.
| Feature | Description |
|---|---|
| Gives a bonus to saving throws making Paladin an excellent option for resisting spells and maintaining |
Level 7 - Bard Lv 1
To fit the Loredin Build, the build now pivots to Bard. Slowly you will gain an arsenal of utility actions and spells to expand the arsenal of Paladin in support.
Class
| Overview | |
|---|---|
 Bard Bard |
|
| Features | |
| Iconic bard feature, that can improve damage, dialogue dice rolls, and saving throws. | |
 Spell Slots Spell Slots |
These can be used to cast spells and are restored each long rest. |
Cantrips
| Cantrips | Description |
|---|---|
| If you are the main character and do most of the dialogues, this is mandatory as it gives an |
|
| This will be useful in Act 2, but also if you plan on using rings like |
Spells
| Spell | Description |
|---|---|
| I like having this spell on hand, as it can be used to raise a downed ally in a tight situation just by using bonus action. | |
| Improves movement speed. | |
| Great for exploration when you need to jump down from high places. | |
| Can be situationally useful, as it does not engage enemies in combat. The guaranteed |
Starting Instruments
Pick the coolest looking for you.
Abilities
I recommend getting Charisma-based ones - Deception, Persuasion, Performance or Intimidation.
Level 8 - Bard Lv 2
This is where you will have left the tutorial area, and will start exploring the world. From the get-go, Bard gets some useful bonuses.
| Features | Description |
|---|---|
| A truly useful passive throughout the whole game to increase your chances of ability roll success. |
That is not all, there is another surprise waiting:
| Actions | Description |
|---|---|
| This is a very important Bard action, and with it, you can use Short Rest a third time before Long Rest. Use it to heal or restore class-specific resources. So do not save those, and use them to your heart's content. Moreover, classes like Warlock, and Fighter, greatly benefit from it. |
Spells
To be fair, pick any spell, I do not think they will give a big boost or any empowerment.
Replace Spell
Nothing to replace yet.
Level 9 - Bard Lv 3
The Bard gets to choose its subclass. Moreover, level 2 spells are unlocked, giving some better offensive and control options.
Subclass
| Overview | |
|---|---|
 College of Lore College of Lore |
|
| Features | |
| This is a very powerful feature, you can use |
|
Skills
By picking Lore Bard you get to pick three additional skills in which you gain proficiency. Again I would recommend picking anything that is Charisma related (if not yet picked). After that, you can take - Perception, Insight, Sleight of Hand, or anything else.
Spells
Now some good spells are unlocked that will improve your options.
| Spells | Description |
|---|---|
| I would say this is mandatory on Honour Mode, and optional on lower difficulties. The spell can be a lifesaver as it will give a huge chance of success in case you need a roll |
Replace Spell
Feel free to take anything that you want to try.
Level 10 - Bard Lv 4
The main highlight of this level is another Feat unlocked.
Cantrips
You can pick any cantrip, that you think might be useful, my recommendation:
| Cantrip | Description |
|---|---|
| Can be used to pull potential targets together. Should be used before combat. Use an area-of-effect spell for maximum effect. | |
| Can be used in exploration to set off traps, distract enemies, or interact with the world. |
Spells
| Spell | Description |
|---|---|
| You will be getting this spell with Oath of Vengeance Paladin, however, if you took Oath of Devotion be sure to take this one. | |
| Can be useful in a few situations in Act 3. |
Feat
| Feat | Description |
|---|---|
| If you did not take it for level 4, this is the optimal choice, as you will have a higher chance to hit, thanks to the proficiency bonuses. | |
| Improves damage of weapon attacks, and works with |
|
| Ability Improvement | Another safe option, invest +2 Charisma. It will improve your |
Level 11 - Bard 5
Level 5 Bard gets access to level 3 spells, which are good. Moreover, you gain some other bonuses:
| Feature | Description |
|---|---|
| Extremely potent feature, that makes your |
|
| Higher bonuses when using |
Spells
| Spells | Description |
|---|---|
| The only spell that you need, for now... It can cause damage using most elements, so if the enemy is wet, just use the Lightning/Cold element. However, the most important aspect is that it can put multiple targets to sleep. This can easily invalidate many fights. |
Replace Spell
I recommend removing any spell that you do not use and taking:
| Spells | Description |
|---|---|
| Can be used to disable multiple foes. Especially potent if you will use |
Level 12 - Bard Lv 6
The last level gives a huge power-up in terms of spell arsenal for Loredin. You will have a few options to tailor the build to your play style.
Spells
| Spells | Description |
|---|---|
| A potent spell for a melee build can make enemies drop their weapons and run. | |
| Requires no concentration and can be used to greatly slow foes passing by. The speed is cut to a quarter. |
Magical Secrets
This is a very important milestone, specifically for the Loredin build. Here you can choose 2 spells, and I would like to recommend a few of them.
| Spells | Description |
|---|---|
| The most important spell to get in my opinion. This will ensure you can disable enemies if they are about to cast a powerful spell. | |
| Pick this if you are going for a Light debuff setup, applying Reverbation and Radiating Orbs. This is a strong option, especially for making enemies miss their attacks and getting prone. | |
| One of the most deadly spells in the game. By itself, it can cover an area in a dark fog, which blinds and slows enemies. In addition, they will receive cold and acid damage every turn. This spell can be a guaranteed win in various encounters, so use it freely! |
Replace Spell
Feel free to choose anything that you want to try or have no need for.
Maximizing Ability Scores
Now, as the build progression is covered there are a few aspects and important decisions you will have to make throughout the game. These will decide your final score for abilities.
Charisma
- Act 1 -
 Auntie Ethel's Hair - you will want to get +1 Charisma if you pick this choice.
 - Feat - Ability Improvement - +2 Charisma
- Act 3 - Mirror of Loss - pick +2 Charisma.
- Act 3 - Mirror of Loss - Patriar's Memory - +1 Charisma in case you did not get Auntie Ethel's Hair
This will allow you to reach 22 natural Charisma.
Strength
For your weapon abilities, you can go with Elixir of Hill Giant Strength to set it at 21. If not, ![]() Gloves of Dexterity will help you to set high strength by dumping Dexterity, more about this in the next section.
Gloves of Dexterity will help you to set high strength by dumping Dexterity, more about this in the next section.
In Act 3, you can use ![]() Gauntlets of Frost Giant Strength to set strength at 23 and effectively use any melee weapon.
Gauntlets of Frost Giant Strength to set strength at 23 and effectively use any melee weapon.
Naturally high Strength
There is a setup option for natural strength. Why would you want to do this? Here are the main reasons:
- Using the Elixir of Hill Giant Strength, is assumed as cheating by some people.
- Have access to the Bloodlust Elixir, especially in the early game.
- A consistent +7 ability modifier.
Overall, it does complicate progression in my opinion, and Bloodlust Elixir can be scarce in Acts 1 and 2. Here is how you can reach high natural strength:
- 17 natural Strength via Ability points.
- Act 1 - +1 Strength Auntie Ethel's Hair
- Feat - Ability Improvement +2 Strength
- Act 2 - Potion of Everlasting Vigour - +2 Strength.
- Act 3 - Mirror of Loss - pick +2 Strength.
This leaves 24 Strength in total, resulting in a +7 ability modifier for attacks.
It does require some sacrifices throughout the game, but overall you should use these items as you progress:
 Gloves of Dexterity (my recommended option) - sets dexterity to 18, improving initiative and giving bonus armor class with medium and light armor. Can be used for all the acts, till you finish the game.
 Amulet of Greater Health can be used as a substitute for Gloves of Dexterity. This will leave Dexterity at 14, which is less than ideal, but you will have a huge pool of HP. This option is great if you plan on using Medium or Heavy armor for the end-game. Moreover, you will unlock a glove slot for
  Legacy of the Masters or
  Helldusk Gloves.
Potions, Elixirs and Consumables
Let's take a look at what consumables you can use to further empower the build.
Potions
These are general consumables, and most of them are activated for a few turns. Potions are separate from Elixirs and can be active together.
| Consumable | Description |
|---|---|
 Oil of Accuracy Oil of Accuracy |
Gives +2 to attack rolls, which minimizes the negative impact from |
 Diluted Oil of Sharpness Diluted Oil of Sharpness |
Gives a bonus attack roll and damage. It is a good coating if you can apply it before combat. |
 Potion of Speed Potion of Speed |
You can chug this potion before combat, or during combat using bonus action. It gives another action point that gives an additional attack or one more spell cast. Sadly its duration is only 3 turns. |
 Potion of Animal Speaking Potion of Animal Speaking |
Although not something powerful, it is worth stocking up and saving a spell slot. |
 Potion of Invisibility Potion of Invisibility |
Can be used to get a perfect position before the encounter starts. |
Elixirs
Unfortunately, only one Elixir can be active at a time. However, the good thing is that they last until a long rest, making them very useful and economical.
Be sure to activate them before combat as otherwise, you will need to use Bonus Action.
| Consumable | Description |
|---|---|
 Elixir of Bloodlust Elixir of Bloodlust |
As you will be able to easily kill at least the weakest foe, this ensures additional attacks per turn. I recommend starting using it once you obtain |
 Elixir of Vigilance Elixir of Vigilance |
For some encounters, you will want to go first. This elixir will ensure that it overcomes even surprise mechanics. |
 Elixir of Hill Giant Strength Elixir of Hill Giant Strength |
Sets strength value to 21 until the Long Rest. With this option, you can easily gimp on strength in the early game. You can put those points in Dexterity or Strength. Here is a farming guide for Elixir of Hill Giant Strength |
| Elixir of Cloud Giant Strength |
An upgraded version that is available mostly in Act 3 via crafting or purchasing. Sets Strength to 27, the highest value possible. |
 Elixir of Peerless Focus Elixir of Peerless Focus |
Another good choice that allows to better maintain spell Concentration. |
 Superior Elixir of Arcane Cultivation Superior Elixir of Arcane Cultivation |
Grant's a single level 3 spell slot. Could be useful in case you are preparing for a longer encounter. |
 Supreme Elixir of Arcane Cultivation Supreme Elixir of Arcane Cultivation |
Grant's a single level 4 spell slot. Could be useful in case you are preparing for a longer encounter. |
Illithid Powers
This special mechanic in Baldur's Gate 3 allows you to consume tadpoles and unlock special Illithid Powers.
At first, you can only use the base powers. As you move to Act 3, you will be able to unlock the outer ring powers.
| Illithid Power | Type | Description |
|---|---|---|
| Base | Beneficial power to take as it does not have any costs, and provides only benefits on the first hits. | |
| Base | Guarantees a critical hit, use it on important targets, that you want to make sure are killed. This will make |
|
| Base | Can help to kill an enemy faster if it is left with a few HP. | |
| Elite | As you are not a charisma-based character, these proficiencies help with dialogue checks. | |
| Elite | Very powerful spell that can be used to pull enemies together. | |
| Elite | Can be used to save yourself from a deadly spell. This is especially relevant as you will have a |
|
| Elite | Remove the cost of spell slots or charges. | |
| Elite | You can now use action and bonus action interchangeably, giving two full spell casts each turn. |
Equipment Recommendations
Now I would like to go through some gear recommendations to maximize the Loredin Build. Items are especially important as they take the build to the next level thanks to their unique effects.
Act 1
The core items of the build are obtained in Act 1, so be sure not to miss those items as they will play a crucial role in making the build effective later on, based on your setup.
Weapons with high dexterity and low strength
| Slot | Item | Description |
|---|---|---|
 Melee (Two-Handed) Melee (Two-Handed) |
A strong sword, that can be wielded as a two-hander. The main aspect is its special action - Phalar Aluve: Sing for bonus attack rolls and improved saving throws. This weapon can also use Dexterity as the main damage ability. | |
| A good weapon that has a solid area of effect special action to hit multiple enemies. |
Weapons for high strength with elixirs
| Slot | Item | Description |
|---|---|---|
| Melee (Two-Handed) |
Solid choice as it increases the critical chance and provides an |
|
| One of the top Act 1 Greatswords. If you manage to get it, I recommend using |
||
| A very good choice, it has +1 Enchantment but most importantly it can use a spell that gives +2 Armour Class. |
Other Equipment
| Slot | Item | Description |
|---|---|---|
 Ranged Ranged |
Gives bonus initiative, allowing one to go earlier in combat. | |
 Head Head |
The best option that will lead you through the game. Be sure to use Divine Smite on the first attack, to activate Arcane Synergy. | |
| Gives resistance to critical hits and allows the use of Hunter's Mark, for additional single-target damage. | ||
| Provides increased speed at the start of the combat. | ||
 Cloak Cloak |
- | Nothing relevant for the build |
 Armor Armor |
Another powerful armour from Grymforge, that is best worn with 14 Dexterity, to get Bonus Armour Class, making it equal to Heavy Armour. | |
| This can be equipped when starting the game by taking it from Lae'zel. Very solid option with a high Armour Class. | ||
| This will work with |
||
 Gloves Gloves |
These can be an excellent choice if you are not using Cloud of Hill Giant Strenght elixirs. Moreover, they are also useful thanks to the +1 Attack roll bonus. | |
| Excellent gloves for martial builds early in the game to increase the hit chance with |
||
 Boots Boots |
One of the best boots, giving a total advantage for movement on difficult surfaces. It also gives |
|
| I suggest making sure you get these boots, as they might be useful later on. | ||
| Gives improved movement when you cast a spell with Concentration. Moreover, you can walk on Ice without falling. | ||
| Excellent boots that improve movement capabilities, especially if enemies are far. | ||
 Amulet Amulet |
The only amulet in the game that gives a direct boost to damage. | |
 Rings Rings |
Adds flat 2 damage bonus. | |
| Improves movement speed, making it easier to reach your targets. | ||
| The bonus Armour Class is a great boost for survivability. |
Act 2 - mid-game
If you are not using Elixir of Hill Giant Strength then continue utilizing ![]() Phalar Aluve or
Phalar Aluve or ![]() Larethian's Wrath until Act 3. Then you can obtain
Larethian's Wrath until Act 3. Then you can obtain ![]() Gauntlets of Frost Giant Strength for fixed 23 strength.
Gauntlets of Frost Giant Strength for fixed 23 strength.
| Slot | Item | Description |
|---|---|---|
| Melee (Two-Handed) |
One of the best weapons in the game, having great bonuses and actions. | |
| Good playthrough weapon that gives +3 enchantment and few unique actions. | ||
| Has a passive light effect, making it effective with |
||
| Strong Act 2 weapon, that comes with +2 enchantment and 1d4 force damage rider. | ||
| Ranged |
The same bow from Act 1. | |
| Head |
The bonus damage based on your Charisma modifier will give a significant boost. | |
| Be sure to get it, as it can be useful in Act 3 depending on what build setup you will go for. | ||
| Is cool-looking and provides good bonuses for Saving Throws. | ||
| Cloak |
Because most of the enemies you come across will have Reverbation this cloak will further help to weaken those foes. | |
| Improves survivability and Saving Throw success. You want to equip this cloak to maintain that good Armour Class. | ||
| Armor |
Truly a solid heavy armor option for a frontline. It also increases the Constitution for higher HP. | |
| I would only use this if you equip |
||
| Gloves |
Bonus damage rider and a chance to inflict Bleeding. | |
| These can be extremely useful due to the |
||
| Boots |
One of the best boots, giving a total advantage for movement on difficult surfaces. It also gives |
|
| Gives improved movement when you cast a spell with Concentration. Moreover, you can walk on Ice without falling. | ||
| Amulet |
The only amulet in the game that gives a direct boost to damage. | |
| Allows casting a |
||
| Rings |
The ring is very potent on Paladin as a critical hit with |
|
| A very simple yet risky way to obtain |
||
| Provides additional radiant damage. This can be used together with |
||
| Can be useful in |
||
| Solid ring for improved Armour Class. |
Act 3 - Final Build setup
Act 3, is where the Loredin Build can split into a few variations depending on what gear is available and the playstyle you want to go for.
Spirit Guardians setup
The main idea of this setup is to use ![]() Spirit Guardians which deal radiant damage and will debuff enemies thanks to the equipment you have. The whole setup can even act as a Cleric in the late game, as the core playstyle revolves around the
Spirit Guardians which deal radiant damage and will debuff enemies thanks to the equipment you have. The whole setup can even act as a Cleric in the late game, as the core playstyle revolves around the ![]() Spirit Guardians.
Spirit Guardians.
Another aspect is what weapons you choose. If you are willing to make a few evil decisions in Act 3 you can get ![]() Bhaalist Armour. Equip an ally with it to make them activate
Bhaalist Armour. Equip an ally with it to make them activate ![]() Aura Of Murder in the melee range and use one of the mentioned spears below.
Aura Of Murder in the melee range and use one of the mentioned spears below.
Otherwise, take the Two-Handed Swords as they will serve you well, with a little bit less damage.
| Slot | Item | Description |
|---|---|---|
| Melee (Two-Handed) |
The best spear if you have an ally that has equipped |
|
| An excellent weapon that comes with plenty of weapon actions, a thunder damage rider, and +3 enchantment. However, it does have a base roll of 1d8 which is inferior when not having piercing vulnerability. If you have an ally with |
||
| An excellent weapon that comes with plenty of weapon actions, and +3 enchantment. However, it does have a base roll of 1d8 which is inferior when not having piercing vulnerability. If you have an ally with |
||
| This weapon is an excellent choice as it has good bonuses and also adds bonus damage based on the strength modifier. | ||
| It is an excellent sword, especially if you are Githyanki or can use |
||
| Ranged |
In terms of damage bonuses, this weapon is an excellent stat stick to improve critical rolls. | |
| This bow gives +3 Initiative. I think it is extremely valuable for this Radiant setup as you can go first and debuff enemies using |
||
| Head |
With various gear bonuses and debuffs you can easily avoid most of the enemy attacks, this will reflect Radiant damage which will also proc |
|
| Improves weapon damage based on the charisma modifier once you apply an effect. T | ||
| Cloak |
Powerful cloak especially when you need to avoid enemy hits to maintain spell concentration. | |
| Increases Armour Class and improves Saving Throws. | ||
| Armor |
The key item of this setup. Each time you deal Radiant damage you will apply Radianting Orb stacks, weakening enemy attack rolls and making them miss. | |
| Gloves |
These gloves set your Strength to 23, giving a solid 6 ability modifier and you can effectively use strength weapons. | |
| Considered the best weapon martial gloves, but these would require you to use Strength Elixirs to compensate for low strength. | ||
| If you want to go all-in on the debuff role and apply even more stacks this is a strong option. However, without the |
||
| Boots |
The best option for boots, especially as they will work extremely well with |
|
| Amulet |
You will be a target of enemies when using |
|
| Rings |
The ring is very potent on Paladin as a critical hit with |
|
| A very simple yet risky way to obtain |
||
| Provides additional radiant damage. This can be used together with |
||
| +1 Armour Class and Saving Throws, excellent ring for improved protection. |
Bhaalist Setup
You can go for this setup if you are more interested in Spellswords playstyle that utilizes control spells, and uses ![]() Divine Smite and
Divine Smite and ![]() Cutting Words. It is a powerful option in terms of damage but does offer a more Bardadin-like playstyle.
Cutting Words. It is a powerful option in terms of damage but does offer a more Bardadin-like playstyle.
| Slot | Item | Description |
|---|---|---|
| Melee (Two-Handed) |
One of the most powerful weapons that should be used together with |
|
| A solid choice if used together with |
||
| It is a cool-looking rapier that also comes with additional Reaction per turn. Now you can use second |
||
| Ranged |
In terms of damage bonuses, this weapon is an excellent stat stick to improve critical rolls. | |
| This bow gives +3 Initiative. Excellent for going first, to reach enemies and activate the |
||
| Head |
Pick this helmet for the ability to empower your spells with stacks of Arcane Acuity. These will improve spell success chances and you can have 90%+ with spells like |
|
| As the setup wears |
||
| Cloak |
Powerful cloak especially when you need to avoid enemy hits to maintain spell concentration. | |
| Increases Armour Class and improves Saving Throws. | ||
| Armor |
One of the most powerful armors in the game, giving an |
|
| Gloves |
These gloves set your Strength to 23, giving a solid 6 ability modifier and you can effectively use strength weapons. | |
| Boots |
One of the best boots, giving a total advantage for movement on difficult surfaces. It also gives |
|
| Gives improved movement when you cast a spell with Concentration. Moreover, you can walk on Ice without falling. | ||
| Amulet |
One of the only amulets to give additional damage rider. | |
| A high Constitution ensures good survivability and allows one to keep concentrating on spells. | ||
| Rings |
The ring is very potent on Paladin as a critical hit with |
|
| The ring allows casting illusion and Use the ring together with |
||
| A very simple yet risky way to obtain |
||
| +1 Armour Class and Saving Throws, excellent ring for improved protection. |
Build Mechanics
In this section, I would like to dive deep into how to play the Loredin Build. This will help you utilize it to the fullest and correctly use various actions and spells throughout the game.
Important Mechanics and Combos
Let's go through key mechanics and tips on how to use the build effectively.
Managing Great Weapon Master
The most important aspect of most two-handed builds is correctly utilizing ![]() Great Weapon Master: All In and its attack roll penalty. By putting an effort into this, from level 4, you can get 10 flat damage boosts, making most of the enemies a cakewalk.
Great Weapon Master: All In and its attack roll penalty. By putting an effort into this, from level 4, you can get 10 flat damage boosts, making most of the enemies a cakewalk.
Here are a few ways to increase attack rolls:
- Oil of Accuracy
- Diluted Oil of Sharpness.
 Bless
Bless Gloves of the Growling Underdog
- Negative status effects like - Blinded, Stunned, Prone, etc.
I have a separate article covering how to improve attack rolls. It lists almost all options, especially in the early game to help you manage your hit chance.
Effectively using Divine Smites
The key aspect of any build that involves at least 2 levels of Paladin is ![]() Divine Smite. It is one of the coolest actions, punishing your targets with a ray of light. To use it effectively, there are a few tips that I have.
Divine Smite. It is one of the coolest actions, punishing your targets with a ray of light. To use it effectively, there are a few tips that I have.
First, update your reactions and make sure the ![]() Divine Smite has a reaction on critical hit and asks you to use it:
Divine Smite has a reaction on critical hit and asks you to use it:
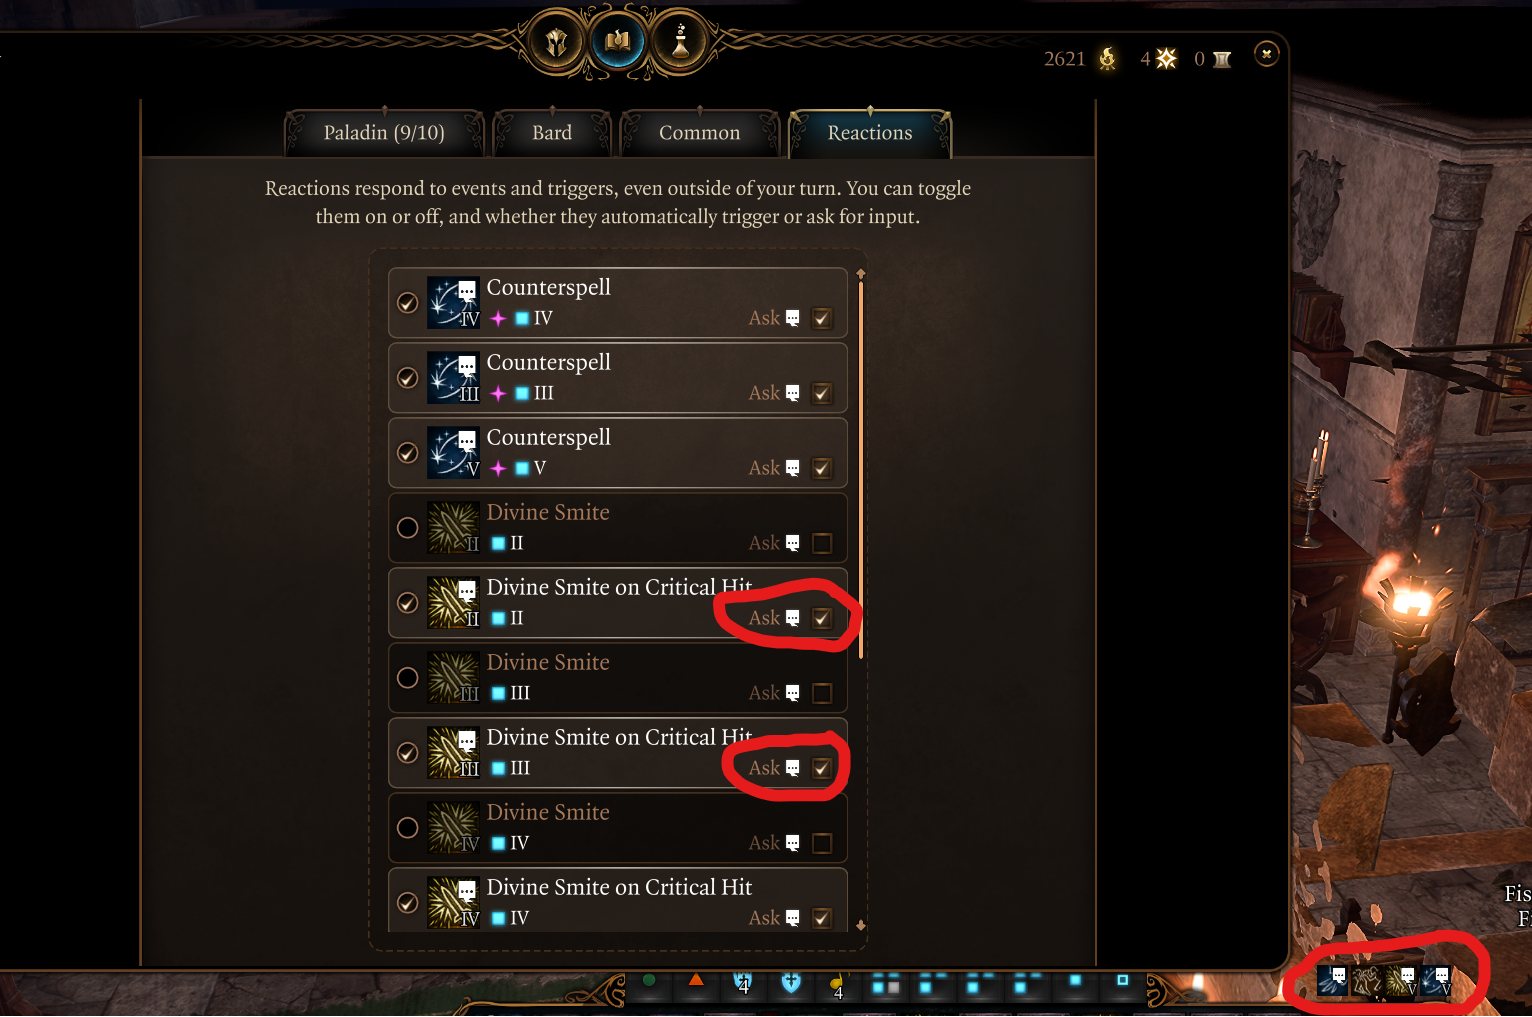
This way, you will not waste your time with unnecessary pop-ups and can use it when needed. For example, using a critical hit ![]() Divine Smite on a weak foe with a few HP will feel like a waste. However, you still might want to use it on the boss even if it has few HP to finish them off.
Divine Smite on a weak foe with a few HP will feel like a waste. However, you still might want to use it on the boss even if it has few HP to finish them off.
If you want to use the normal smite, just activate it from the quick bar by selecting the ![]() Divine Smite action. Or set it also as a reaction "Ask", but it might get irritating with all the popups. Try playing, and decide based on your experience.
Divine Smite action. Or set it also as a reaction "Ask", but it might get irritating with all the popups. Try playing, and decide based on your experience.
Overall, critical hits are extremely important for these attacks as the large number of dice rolls gets doubled and gets rerolled with ![]() Savage Attacker. That is why I recommend
Savage Attacker. That is why I recommend ![]() Killer's Sweetheart,
Killer's Sweetheart, ![]() Luck of the Far Realms, and spells like
Luck of the Far Realms, and spells like ![]() Hold Person.
Hold Person.
Another option, if you want, a big nova damage, is to use one of the special smites - ![]() Blinding Smite,
Blinding Smite, ![]() Thunderous Smite, and use
Thunderous Smite, and use ![]() Divine Smite as a reaction on the same attack. This can deal huge damage, but burns through spell slots very fast. I only recommend this if
Divine Smite as a reaction on the same attack. This can deal huge damage, but burns through spell slots very fast. I only recommend this if ![]() Great Weapon Master: Bonus Attack has not activated.
Great Weapon Master: Bonus Attack has not activated.
As I mentioned, other types of smites - ![]() Thunderous Smite,
Thunderous Smite, ![]() Searing Smite, come with unique effects and can apply various effects like
Searing Smite, come with unique effects and can apply various effects like ![]() Blinded,
Blinded, ![]() Frightened, etc. Generally, I do not recommend using them if you have
Frightened, etc. Generally, I do not recommend using them if you have ![]() Great Weapon Master: All In, as your bonus action is a very valuable source of damage.
Great Weapon Master: All In, as your bonus action is a very valuable source of damage.
Cutting Words - to the help
One of the main features of this build is Lore Bard levels. You gain its unique reaction - ![]() Cutting Words. It can be used to weaken enemies and target different rolls:
Cutting Words. It can be used to weaken enemies and target different rolls:
- Attack Roll
- Ability Check
- Saving Throw
So this helps with overcoming the most important problems - incoming enemy hits that may do large damage or helping you land spells by weakening the enemy's Saving Throws. In the late game, this can ensure that control spells land.
Moreover, it includes an insult (fully voice-acted) from the character using it.
Spirit Guardians setup
One of the setups I mentioned utilizes ![]() Spirit Guardians, which is otherwise accessible only to clerics. What makes this special is that it creates a radiant damage field following the caster. So your Loredin can walk in the group of enemies and have them all receive Radiant Damage.
Spirit Guardians, which is otherwise accessible only to clerics. What makes this special is that it creates a radiant damage field following the caster. So your Loredin can walk in the group of enemies and have them all receive Radiant Damage.
The main highlight comes when you synergize this with various gear. For example, using ![]() Luminous Armour will apply Radiant Orb, weakening foes and making them receive -1 to attack rolls per stack.
Luminous Armour will apply Radiant Orb, weakening foes and making them receive -1 to attack rolls per stack.
On the other hand, ![]() Boots of Stormy Clamour helps apply Reverbation. This reduces enemy strength, dexterity, and constitution saving throws. Still, the main highlight is when you reach 5 stacks and apply 1d4 thunder damage + chance to Prone an enemy. If they fall, your allies attacking close by will get an
Boots of Stormy Clamour helps apply Reverbation. This reduces enemy strength, dexterity, and constitution saving throws. Still, the main highlight is when you reach 5 stacks and apply 1d4 thunder damage + chance to Prone an enemy. If they fall, your allies attacking close by will get an ![]() Advantage.
Advantage.
Arcane Acuity mechanics explained
Another important mechanic is accessible with a specific item - ![]() Helmet of Arcane Acuity. I mention this in the Bhaalist setup. The idea is that by attacking with melee attacks you build up Arcane Acuity stacks. Each one of them increases Spell Save DC by 1. With enough stacks, you can reach a very high spell success chance.
Helmet of Arcane Acuity. I mention this in the Bhaalist setup. The idea is that by attacking with melee attacks you build up Arcane Acuity stacks. Each one of them increases Spell Save DC by 1. With enough stacks, you can reach a very high spell success chance.
By itself, this doesn't seem fancy, because you will need to use action to cast spells and waste melee attacks. However, you can use ![]() Band of the Mystic Scoundrel to cast spells like
Band of the Mystic Scoundrel to cast spells like ![]() Hold Person,
Hold Person, ![]() Hypnotic Pattern, or
Hypnotic Pattern, or ![]() Fear using bonus action. These can outright disable foes and give effects like guaranteed crits.
Fear using bonus action. These can outright disable foes and give effects like guaranteed crits.
Early Game Combat
Let's cover how you should progress combat levels 1-6. This plays as a normal Paladin, where you utilize mostly your weapon attacks and a few concentration spells.
- Shield of Faith is an excellent spell to use early on to improve Armour Class.
- Thunderous Smite can be used in early games to give use for bonus action and inflict adequate damage.
- Based on your hit chance turn on and off
 Great Weapon Master: All In, try keeping it at 65%+. Once you get Magic Weapon it can be used to improve your hit chance.
 - Vow of Enmity is best used on stronger targets that you will be hitting multiple times. The
 Advantage will ensure that it is easy to hit your targets.
 - I would save Divine Smite for critical hits or on enemies like casters or bosses. Due to limited spell slots, you can go through them very fast.
 Misty Step is useful to get close to the enemies if you will not be able to reach them otherwise. It can also be used in the opposite way to get away.
Late Game Combat
For the late game, it will all depend on the setup that you went for.
Spirit Guardians Setup
 Spirit Guardians is best to be cast before combat. If not use it on the first turn. Once you do that get close into enemies and apply debuffs.
- Follow up with Divine Smite, thanks to
 Luminous Armour you will also apply debuffs.
 - Dealing with as much as possible radiant damage will ensure that enemies get Radiating Orb, reducing their chances of hitting anyone.
- Cutting Words is excellent for enemies that will still be able to land a hit on you or an ally. On the other hand, it can be used to help your allies to land control spells.
Bhaalist Setup
This is more of an offensive setup, that also utilizes spellcasting.
- Get close in on enemies to activate
 Aura Of Murder from
  Bhaalist Armour. This way any piercing attacks either from you or allies will get doubled.
 - Apply a few hits to stack up Spell Save DC from
 Helmet of Arcane Acuity. Once you have some of it, you can use
  Band of the Mystic Scoundrel effect to cast control spells like
  Hypnotic Pattern,
  Fear, or Command with a very high success chance.
 - Cutting Words can help you with landing that control spells in case enemies resist it.
- Divine Smite is your main damage dealer and be sure to use it if you land a critical hit for a large damage boost.
Build Variations
Here are some variations that work similarly and utilize the same classes at their core.
| Setup | Description |
|---|---|
Bardadin Build:
|
A very popular and extremly powerful Bard Paladin mutliclass. It is able to hit multiple enemies with single attack and is perfect for gish playstyle with |
Conclusion
Thank you for reading the Loredin build - Lore Bard and Paladin multiclass for Baldur's Gate 3.
Cheers!
Like, Dislike, comment, or share!
Join the Discussion
0 commentsNo comments yet.
Be the first one to leave a comment!