

Bardadin Build - Swords Bard Paladin Multiclass - Baldur's Gate 3 (BG3)
Contents
Bardadin - Paladin Swords Bard Multiclass Build
In this build, I plan on covering the simplest and fairly straightforward Bardadin variation 2 Paladin and 10 Bard. The idea is that you mostly go with Bard and then empower it with a few levels in Paladin. This enables you to be a strong caster and an even better frontliner.
So by going with Bard, you get:
 Bardic Inspiration to improve ability rolls, from level 5 they will also reset on each short rest.
 Song of Rest gives a third short rest
- Swords Bard gives access to medium armor from level 3, which can be used through most of the game till later in Act 3.
- Flourishes like
 Slashing Flourish (Melee) allow hitting multiple enemies, getting increased Armour Class, or teleporting
 - Full caster spell slots, meaning you will get more slots for casting and
 Divine Smite.
For Paladin, even with 2 levels, you get some nice stuff:
- The main one is Divine Smite, which greatly improves burst damage.
- Early Oath actions
- A few spell slots and most importantly
 Command that you will be able to cast with 100% success.
So this creates a unique setup where you can be an excellent party face, deal huge damage with burst attacks, and cast control spells to disable foes. The main highlight will be ![]() Divine Smite +
Divine Smite + ![]() Hold Person/
Hold Person/![]() Hold Monster for guaranteed crits on your smites and normal attacks.
Hold Monster for guaranteed crits on your smites and normal attacks.
Leveling Overview
Here is a concise table with all the main picks during your leveling progression. For more detailed reasoning, I go further in the article. Also, do not forget to check the recommended gear as it is crucial.
| Level | Class | Selection |
|---|---|---|
| 1 | Bard 1 | STR - 8, DEX - 17 (15+2), CON - 14, INT - 8, WIS - 10, CHA - 16 (15+1) |
| Skills: Deception, Persuasion, Performance | ||
| Cantrips: |
||
| Spells: |
||
| 2 | Bard 2 | Spells: |
| 3 | Bard 3 | Skills: Persuasion, Performance |
| Spells: |
||
| Subclass: College of Swords | ||
| Fighting Style: |
||
| Replace Spell: |
||
| 4 | Bard 4 | Cantrips: |
| Spells: |
||
| Feat: |
||
| 5 | Bard 5 |
Spells: |
| 6 | Bard 6 | Spells: |
| Replace Spell: |
||
| 7 | Paladin 1 | Subclass: Oath of Vengeance |
| 8 | Paladin 2 | Fighting Style: |
| 9 | Bard 7 | Spells: |
| Replace Spell: |
||
| 10 | Bard 8 | Spells: anything |
| Feat: |
||
| 11 | Bard 9 | Spells: |
| 12 | Bard 10 | Cantrips: |
| Spells: |
||
| Magical Secrets: |
Starting the Game - Level 1
We start with the early game. I would go into what are the best Races, Abilities, and Skills for Bardadin Build. The early game can be difficult, but let's cover a few options on how to start.
There are two variations that you can use for this build
| Variation | Description |
|---|---|
| Bard Lv 6 -> Paladin Lv 2 -> Bard Lv 10 | Starting with Bard will make you more of a caster for the first 3 levels. After that, you can use Medium armor. This unlocks |
| Paladin Lv 2 -> Bard Lv 10 | This unlocks heavy and medium armor proficiency from the start of the game and at level 2 you can already use Divine Smites. However, the |
I recommend going with the first one, as it is stronger and Bard is very useful early in the game both from proficiencies and dialogue perspectives.
Races
Picking a race provides various benefits - abilities, dialogue options, looks, etc.
| Race | Features | Description |
|---|---|---|
 Half-Orc Half-Orc |
|
Great race for a frontliner. It can resurrect with 1 HP if downed. Moreover, they get some bonuses with Critical hits, but based on the weapons we plan to use they will be minimal |
 High Half-Elf High Half-Elf |
|
These subraces are great for getting |
 High Elf High Elf |
|
|
 Githyanki Githyanki |
|
A very versatile race, that unlocks some good actions for combat and exploration. It also gives good weapon and armor proficiencies allowing you to wear some of the best early-game items. |
| Wood Half-Elf |
|
What makes these special is their increased moving distance and Shield Proficiency. I think this is valuable as once you start taking out enemies one by one with Smites, this will prove advantageous. Overall the same applies to Wood Elf. |
 Halfling Halfling |
Amazing race that improves almost all rolls in the game. The downside is slower movement speed. |
Class
As I mentioned, you start the build as Bard, you can also go with Paladin, but it greatly delays the ![]() Extra Attack. This is a large power spike, that you want as early as possible.
Extra Attack. This is a large power spike, that you want as early as possible.
| Overview | |
|---|---|
 Bard Bard |
|
| Features | |
| Iconic bard feature, that can improve damage, dialogue dice rolls, and saving throws. | |
 Spell Slots Spell Slots |
These can be used to cast spells and are restored each long rest. |
Cantrips
| Cantrip | Description |
|---|---|
| Although the damage is low, it has its purpose. The cantrip can be used to impose a |
|
| If you are the main character and do most of the dialogues, this is also a good choice as it gives an |
Spells
The spells will be useful early on, as you will only have light armor, and being a frontliner with it is risky. Choose 4:
| Spell | Description |
|---|---|
| The only truly offensive level-1 spell. It can also frighten enemies making them unable to move. Later on, it loses its purpose, once we start using Flourishes. | |
| Will boost the movement speed by 3m. This is a huge bonus and will allow you to get better positions when in combat. You can also activate it on all party members when not in combat, after a long rest! | |
| Early game, this spell is wondrous as it makes it easy to get an |
|
| Very powerful spell against level 1-2 enemies, as it succeeds without any resistance checks. |
Starting Instrument
As this is a fun feature, pick the one that you like the best! There are no combat advantages to picking a different one.
Background
Backgrounds are mostly for role-playing and you can pick whatever you prefer. As we start bard and have high Dexterity with Charisma, here are my recommendations:
| Background | Skills | Description |
|---|---|---|
| Charlatan | Deception Sleight of Hand |
Very good choice, especially, if you will not have a dedicated rogue in the party to do disarming and lockpicking. Bard, can pick up this role if needed. |
| Entertainer | Acrobatics Performance |
Both of these skills are very relevant for the build as you have high Dexterity and Charisma. |
I feel these two are the most useful. There are many more relevant, that help with Charisma-related skills - Noble, Guild Artisan, Soldier, but only one of their offered skills has high effectiveness.
Abilities
Now, let's take a look at the abilities of the Bard Paladin build. Correct allocation will allow you to maximise the early gameplay and get good modifier bonuses.
Here are some key points to know about ability points:
- The +1/+2 means that you have an option to select additional bonus in the ability screen where to put either +1 or +2.
- Abilities give "ability modifiers" that apply to various skill checks. For example, Charisma works on Intimidation and Persuasion checks. Wisdom on Survival or Animal Handling, and so on.
- You get a higher ability modifier on even values - 10, 12, 14, etc. So keeping it on odd may be useless. However, there are various +1/2 modifiers in the game, specifically
 Auntie Ethel's Hair or Feats that help round this up.
 - Weapons can benefit from either Dexterity or Strength, depending on their type
- You also have a spellcasting modifier, which can be Wisdom, Charisma, or Intelligence, depending on your class.
Overall, this build can be adjusted in multiple ways, based on what you will use or pick during your playthrough:
- Using
 Elixir of Hill Giant Strength allows reducing strength investment to 0.
 - Getting
 Gloves of Dexterity (later in Act 1) allows you to put all points into Strength.
 - On the other hand, in Act 3, you can go with
 Gauntlets of Frost Giant Strength and gimp on strength.
 - Act 3 also gives options for
 Amulet of Greater Health to free up the glove slot and ability points from the constitution.
 - Or you can go for maximum dexterity from the first levels.
Here are my recommendations:
| Abilities | Description |
|---|---|
| Recommended Setup: Strength - 8 Dexterity - 16 (15+1) Constitution - 14 Intelligence - 8 Wisdom - 10 Charisma - 17 (15+2) |
This setup is perfect if you plan on using |
| Natural Strength Setup: Strength - 17 (15+2) Dexterity - 10 Constitution - 14 Intelligence - 8 Wisdom - 8 Charisma - 16 (15+1) |
If you want to avoid using |
| Dex Bardadin Setup Strength - 8 Dexterity - 17 (15+2) Constitution - 14 Intelligence - 8 Wisdom - 10 Charisma - 16 (15+1) |
This setup skips |
Skills and Expertise
Overall, the skills should be impacted by your roleplaying and background decisions. However, you would still want those that will give you the best benefits. My recommendations are to pick those at which you have a high ability modifier:
- Sleight of Hand - can be taken situationally, if this build is on a companion, but I would prioritize Charisma picks otherwise.
- Deception
- Intimidation
- Performance
- Persuasion
Levelling Progression - Level 2-12
Here is the detailed progression for the Bardadin to get you started. You can use it as a guideline because early games can be daunting and overwhelming. Later on, once you get the feel for the class you can start picking your options
Level 2
By this time you should have landed in the first area already. The level-up gives some welcome improvements for your Bard.
| Feature | Description |
|---|---|
| This will improve your chances of success when doing various dice rolls that you are not proficient in. It's not huge, but will help out during the game. |
We gain a very good utility action to gain additional HP restoration and action reset:
| Action | Description |
|---|---|
| Unique action to Bards. It acts as a third short rest. This is especially useful for Warlocks, as they will gain even more spell slots during the day. |
Spells
I have covered most of the important level 1 spells, that the build needs. In case you need help:
| Spells | Description |
|---|---|
| Can be used to throw off enemies from ledges. Will be useful in a few encounters in Act 1. |
Replace Spell
Nothing to replace this early in the game.
Stocking on Strength Elixirs
Early in Act 1, after you reach the first settlement - ![]() Druid's Grove, you can stock up on some powerful potions for Acts 1 and 2 -
Druid's Grove, you can stock up on some powerful potions for Acts 1 and 2 - ![]() Elixir of Hill Giant Strength.
Elixir of Hill Giant Strength.
What do they do? They increase the Strength to 21 until a Long rest. More or less, this negates any need to have an investment in Strength if you plan to use it till the late game. This enables using various two-handed weapons, not just Finesse ones, and maximizes combat potential in the early game.
Later, you will have an option to obtain ![]() Gauntlets of Frost Giant Strength to increase strength by more and open up an elixir Slot.
Gauntlets of Frost Giant Strength to increase strength by more and open up an elixir Slot.
This is pretty easy, and you can stock up on these in a few minutes. Here is a guide to stock up on Elixir of Hill Giant Strength.
Level 3
The build reached a very special moment - subclass. It will give some sweet actions that make the Bard much more powerful.
Skills/Expertise
You can select 2 skills in which you become an expert. I would recommend something, that you want to ensure the Bardadin cannot fail. For example, due to high Charisma bonuses, dialogue-related ones are great. Choose two out of these:
- Deception
- Intimidation
- Performance
- Persuasion
I would also would not forget Sleight of Hand. If you are the only one doing lockpicking, this will ensure some irritating fails and wasted time.
Spells
| Spells | Description |
|---|---|
| If playing on Honor Mode, this spell is mandatory. It can save your group from many problems and overcome ability checks where you are not proficient. Otherwise, you can do without it, but I would still recommend someone in your group to have it. |
Subclass
| Overview | |
|---|---|
 College of Swords College of Swords |
|
| Features | |
| Attack up to 2 enemies at once. | |
| Attack up to 2 enemies at once. | |
| Attack defensively, increasing your Armour Class by 4 if you hit. | |
| Attack defensively, increasing your Armour Class by 4 if you hit. | |
| Thrust your weapon with enough force to push your target back 6m. Afterward, you can Teleport to the target. | |
| Shoot a target with enough force to push it back 6m. Afterwards, you can teleport to the target. | |
Fighting Style
As a Swords Bard, you can choose a fighting style for some small bonuses. If you are going for Two-Handed weapons, these don't matter. If you are dual-wielding then these one choice:
| Fighting Style | Description |
|---|---|
| The most relevant choice no matter what you ability is your main one. It is relevant if you plan on using |
|
| This is relevant if you plan on using something like |
Replace Spell
I would recommend removing ![]() Sleep for:
Sleep for:
| Spells | Description |
|---|---|
| Cast this, if you will not be able to reach a group of enemies to use Flourish. It hits two times - on the initial cast and enemy turn. This is a very effective level 2 spell in the early game. |
Level 4
The first feat of the build is unlocked.
Cantrips
| Cantrip | Description |
|---|---|
| This one might be useful in the upcoming Act 2 or in general dark areas. | |
| You can use this one to move enemies together before combat. This can then be utilized |
Spells
| Spells | Description |
|---|---|
| The spell is very useful, however, it will mostly be utilized in Act 3, once you get |
Feat
For the first Feat, there are a lot of options, and it all depends on your knowledge of the game:
| Feat | Description |
|---|---|
| This is the strongest feat if you are using two-handed weapons. First, it gives a bonus attack using a bonus action if you kill an enemy or land a critical hit. Second, it gives a big 10 damage boost, that comes with a -5 penalty to attack rolls. This is problematic in the early game but can be overcome in various ways. I recommend checking my guide on Attack Roll Increase, to get ideas on how to mitigate it. | |
| Ability Improvement - +2 Dexterity/Strength | I would recommend this pick if you are doing either natural strength or dexterity setups. Still |
Replace Spell
Nothing to replace
Level 5
This level is a big one. First, we obtain level 3 spells, which are okay. However, we get awesome class features:
| Feature | Description |
|---|---|
| Greatly improves your damage output throughout the day as you can use flourishes more often. | |
| The bonus gained from Bardic Inspiration increases to +1d8, this will give a higher damage bonus for Flourishes. |
Spells
| Spell | Description |
|---|---|
| Get this spell as soon as possible. It is amazing! You can cast various types of elements, but most importantly it can put enemies to sleep without HP limitations. So this is the perfect crowd control option. |
Replace Spell
For spell replacing, I don't think there is anything to replace yet.
Level 6
This is the last Bard level we are taking before moving to Paladin. This is a huge improvement to the build.
| Feature | Description |
|---|---|
| You can now attack two times and this can be done together with Flourishes. So you can easily hit 4 enemies in one turn, without Haste or Elixir of Bloodlust. |
We also get additional action, that can freely be used before combat:
| Action | Description |
|---|---|
| You and any allies within 9m have an |
Spells
Pick one:
| Spells | Description |
|---|---|
| It can destroy the whole encounter by hypnotizing foes. The result is that they cannot move or take any actions. | |
| A perfect crowd-control spell. Enemies drop their weapons and run away. It will become very powerful once you start using |
Replace Spells
I would remove ![]() Thunderwave as you will exclusively start relying on weapon damage:
Thunderwave as you will exclusively start relying on weapon damage:
| Spells | Description |
|---|---|
| Good utility spell that helps with exploration. |
Level 7 - Paladin Lv 1
The Bardadin build now comes to fruition by multiclassing the first level in Paladin.
| Overview | |
|---|---|
 Paladin Paladin |
|
| Features | |
| Use your blessed touch to heal a creature or cure it of all diseases and poisons. | |
| Gain |
|
 Channel Oath Charges Channel Oath Charges |
You gain the ability to channel the power contained in your Paladin Oath, which you can use to fuel certain actions. |
Subclass
For the Bardadin build, you can pick any subclass. We will only allocate 2 levels into Paladin, meaning that you should evaluate first-level actions. Here is a short overview
- Oath of the Crown - comes with
 Righteous Clarity, which is useful for early and mid-game. However, in Act 3, it does lose its value as you get more and more uses for bonus action, specifically via
  Band of the Mystic Scoundrel.
 - Oath of Vengeance - fight the Evil forces of the world. A much more aggressive option that gives
 Inquisitor's Might. It provides bonus radiant damage and is effective in a 9-meter radius for 2 turns. I would pick this one due to its simplicity.
So in my case, I will go with Oath of Vengeance:
| Overview | |
|---|---|
 Oath of Vengeance Oath of Vengeance |
|
| Features | |
| Gives a radiant boost to damage. This costs only bonus action, so is a good choice, for minimal negative impact on Damage per turn. | |
| The oath revolves around revenge, where someone was wronged and you have to clear the equation. | |
Level 8 - Paladin Lv 2
At Level 2 Paladin gets the most famous action - Divine Smite. Moreover, we obtain 2 level 1 spell slots.
| Actions | Description |
|---|---|
| This Paladin-specific feature gives +2d8 Radiant Damage and an additional 1d8 against undead and fiends. it expends a spell slot if hits. Using higher-level spell slots deals more damage. |
Fighting Style
Now, with our Bardadin build you can go with this:
| Style | Description |
|---|---|
| Gain +1 to Armour Class, especially valuable if you are dual-wielding, as you cannot wear a shield. |
Other choices are also noteworthy, however, ![]() Great Weapon Fighting gives a very small damage boost that will be less and less important as you get stronger.
Great Weapon Fighting gives a very small damage boost that will be less and less important as you get stronger.
Prepared Spells
Paladin level 1 spells are okay. They do not provide any crazy tactics but can work in some situations. Here are my recommendations for what is good to have in your arsenal
| Spell | Description |
|---|---|
| Mandatory pick. This spell can ensure that enemies lay on the ground, stay still, or come to you to be attacked via opportunity attacks and your |
To be honest, anything else is optional, and is just there for flavor:
| Spell | Description |
|---|---|
| A smite alternative that deals Thunder damage and can make enemy prone. I would use it in case you have a free bonus action that you do not plan on using. Otherwise, use normal Smite. | |
| Gives +2 Armour Class as long as you can maintain |
|
| Although it uses a |
|
| Another Smite option that can frighten enemies leaving them stuck in place and with various disadvantages. |
Level 9 - Bard Lv 7
We finally unlock level 4 spells. Some of them will be extremely strong or you could use those spell slots for a stronger ![]() Divine Smite.
Divine Smite.
Spells
The aim is to get the best control spells
| Spell | Description |
|---|---|
| This is an amazing spell, that can make many of the combat encounters much easier. It will make enemies wander around, skip turns, or attack allies. Truly a devastating spell. |
Replace Spell
This is a perfect time to replace ![]() Cloud of Daggers if you still have it:
Cloud of Daggers if you still have it:
| Spell | Description |
|---|---|
| Use this spell in case you forget Potion of Animal Speaking. |
Level 10 - Bard Lv 8
You reach level 8 Bard, which will give you the last Feat for the build. We get the first level 5 spell slot.
Spells
For spells, we now have everything that is needed to fully utilize the build with available options. You could try:
| Spell | Description |
|---|---|
| Use this spell to increase the damage you deal with each hit. It boosts it by 1d8 necrotic. Best used on boss enemies as otherwise, the spell slot cost is too steep. |
Feat
| Feat | Description |
|---|---|
| A perfect feat to maximize damage by rolling two dice and taking the better one. It works with weapon attacks and Smites. The most valuable damage will come from the latter, especially on critical hits. |
Level 11 - Bard Lv 9
Additional level 5 spell slot is unlocked and Bardadin gets level 5 spells. This will be a big improvement to overall control capabilities throughout the combat encounter.
Spells
| Spell | Description |
|---|---|
| With this option, Hold Monster, |
Replace Spell
Nothing to replace, besides your personal preferences.
Level 12 - Bard Lv 10
The last level of the build but also with plenty of surprises. The build gets access to a level 6 spell slot, allowing upcast control spells like ![]() Command,
Command, ![]() Hold Person, etc. for very strong results. Moreover new feature is unlocked:
Hold Person, etc. for very strong results. Moreover new feature is unlocked:
| Feature | Description |
|---|---|
| The bonus gained from Bardic Inspiration increases to +1d10, this will give a higher damage bonus for Flourishes. |
Lat, we get bonus skill expertise. Feel free to select anything that you would like to get, this will give an additional boost.
Skills
You can choose an additional 2 skills to obtain expertise in them. I recommend picking any of the Charisma-related ones.
Cantrips
| Cantrips | Description |
|---|---|
| A utility spell, that can summon a spectral hand. It can help with puzzles and shove enemies. |
Spells
For the spell section, I think nothing stands out, and you already picked what was needed. Just choose what you prefer. However, the next section will show how to unlock some very powerful spells.
| Spell | Description |
|---|---|
| Having this spell might be useful in some situations where you want to remove a negative condition. |
Magical Secrets
Okay, this is an awesome spell list that gives you 2 spells to choose from. The downside... There are too many good spells. Of course, I would recommend setting up priorities. First, remember, that you can only have one ![]() Concentration spell active at one time. Second, think about what situations and encounters were difficult to handle. The spells that you choose could make these much easier.
Concentration spell active at one time. Second, think about what situations and encounters were difficult to handle. The spells that you choose could make these much easier.
| Spell | Description |
|---|---|
| At least one party member should have this in the group. It allows canceling any spell and can save your whole group's lives. However, having two of them is even better. | |
| The scariest spell you can use to control the battlefield. Use it to cover enemies and force them to move out of the fog. This will damage them, and you can wait for them outside to hit with your smites. Moreover, they become blind, giving you an |
|
| An amazing spell that synergizes well with Bardadin's build. You will get additional radiant/necrotic hits against enemies. Pair this with a |
|
| Although this is a paladin Smite, the only one to obtain it can be Bard. What makes it powerful, is that it removes an enemy combatant from a fight if it is successful. On top, it deals 5d10 damage. If you can land a critical hit, this is huge. Unfortunately, you will be able to use 3 of them maximum during long rest. |
These are just a few spells, and you can choose many more based on your preferences.
Maximizing Ability Scores
Now, as the build progression is covered there are a few aspects and important decisions you will have to make throughout the game. These will decide your final score for abilities. There are a few abilities to concentrate on as this is a multi-ability dependant build:
Strength maximization without spending ability points
It gives a lot of weapon choices throughout the game and in Act 3, the best options are strength-based. Here are a few ways to maximize it:
- Gauntlets of Frost Giant Strength - sets to fixed 23 value. This will be enough to consistently hit enemies and get good modifier bonuses. Recommended option for late game
- Elixir of Hill Giant Strength - sets to fixed 21, excellent for early game. I already talked about this in the progression section. Recommended option for early game
 Elixir of Cloud Giant Strength - sets to 27. This is the highest possible value for Act 3. However, you will have to sacrifice
  Elixir of Bloodlust, which will provide a substantial damage boost with an additional hit.
Going with this setup, means that all ability bonuses from various sources are free to use elsewhere, which in turn allows to maximize Charisma.
Natural Strength option
There is also a way to naturally reach high strength, but then you will have to wear ![]() Gloves of Dexterity to compensate for low dexterity:
Gloves of Dexterity to compensate for low dexterity:
- 17 base Strength
- Act 1 - Auntie Ethel's Hair - you will want to get +1 Strength if you pick this choice.
- Feat - Ability Improvement - +2 Strength. However, this is optional if you want maximum damage with
 Great Weapon Master: All In and
  Savage Attacker.
 - Act 2 - Potion of Everlasting Vigour - +2 Strength.
- Act 3 - Mirror of Loss - pick +2 Strength.
So what is my recommendation? For simplicity, ![]() Elixir of Hill Giant Strength, followed by the
Elixir of Hill Giant Strength, followed by the ![]() Gauntlets of Frost Giant Strength are a good pick and will allow you to pump charisma. Otherwise, if for any reason you don't want to use Elixir, you can go with natural strength.
Gauntlets of Frost Giant Strength are a good pick and will allow you to pump charisma. Otherwise, if for any reason you don't want to use Elixir, you can go with natural strength.
Dexterity Bardadin setup
Having high Dexterity the goal here. Here is how you can maximize it:
- 17 base Dexterity
- Act 1 - Auntie Ethel's Hair - you will want to get +1 Dexterity if you pick this choice.
- Feat - Ability Improvement - +2 Dexterity. However, this is optional if you want maximum damage with Great Weapon Master: All In and Savage Attacker.
- Act 3 - Mirror of Loss - pick +2 Dexterity.
No matter if you end up with 20 or 22 it will be enough for high armour class and good hit chance.
Charisma
Maximizing Charisma is only relevant if you are using ![]() Elixir of Hill Giant Strength. This way, you can get highest bonuses to spellcasting modifier:
Elixir of Hill Giant Strength. This way, you can get highest bonuses to spellcasting modifier:
- 17 from initial character creation
- Act 1 - Auntie Ethel's Hair - +1 Charisma
- Feat - Ability Improvement - +2 Charisma.
- Act 3 - Mirror of Loss - Charisma +2
- Act 3 - Mirror of Loss - Patriar's Memory - additional +1 Charisma, if you started with 17.
No matter if you end up with 20 or 22 it will be enough for a solid controller build.
Potions, Elixirs and Consumables
Let's take a look at what consumables we can use to further empower the build.
Potions
These are general consumables, and most of them are activated for a few turns. Potions are separate from Elixirs and can be active together.
| Consumable | Description |
|---|---|
 Oil of Accuracy Oil of Accuracy |
Gives +2 to attack rolls, which minimizes the negative impact from |
 Diluted Oil of Sharpness Diluted Oil of Sharpness |
Gives a bonus attack roll and damage. It is a good coating if you can apply it before combat. |
 Potion of Speed Potion of Speed |
In case you or your other casters have a Concentration spell slot taken and cannot cast Haste, use this potion. It acts similarly, but the effect is just for 3 turns. |
 Potion of Invisibility Potion of Invisibility |
Can be used to get a perfect position before the encounter starts. |
 Potion of Animal Speaking Potion of Animal Speaking |
Although not something powerful, it is worth stocking up and saving a spell choice. |
Elixirs
Unfortunately, only one Elixir can be active at a time. However, the good thing is that they last until a long rest, making them very useful and economical.
Be sure to activate them before combat as otherwise, you will need to use Bonus Action.
| Consumable | Description |
|---|---|
 Elixir of Bloodlust Elixir of Bloodlust |
As you will be able to easily kill at least the weakest foe, this ensures additional attacks per turn. I would go with this option once you have 22 base strength, otherwise look at the options below. |
 Elixir of Vigilance Elixir of Vigilance |
For some encounters, you will want to go first. This elixir will ensure that it overcomes even surprise mechanics. |
 Elixir of Hill Giant Strength Elixir of Hill Giant Strength |
Sets strength value to 21 until the Long Rest. With this option, you can easily gimp on strength in the early game. You can put those points in Dexterity or Strength. Here is a farming guide for Elixir of Hill Giant Strength |
| Elixir of Cloud Giant Strength |
An upgraded version that is available mostly in Act 3 via crafting or purchasing. Sets Strength to 27, the highest value possible. if using this one, you could set the strength to 8 via respec. |
Illithid Powers
This is a special mechanic in Baldur's Gate 3, that allows you to consume tadpoles and unlock special Illithid Powers. These range from somewhat useful, to extremely deadly. I would like to leave a few recommendations:
Base Illithid Powers
| Order | Illithid Power | Description |
|---|---|---|
| 1 | Very useful power to take as it does not have any costs, and provides only benefits on the first hits. | |
| 2 | Guarantees a critical hit, a very powerful action to have. | |
| 3 | Taking only for progression, to unlock the next power. | |
| 4 | Passive feature that does not cost anything and automatically deals bonus psychic damage around the target, once it is close to death. | |
| 5 | A decent use for reaction to deal some bonus psychic damage. | |
| 6 | Taking it for progression | |
| 7 | Taking for progression, to unlock the next power, but it also provides a good bonus as temporary health. | |
| 8 | Only taking for progression |
Elite Illithid Powers
These become unlocked later in the game as you progress. They are extremely powerful additions to the build.
| Order | Illithid Power | Description |
|---|---|---|
| 0 | Automatically unlocked. You can use this to initiate attacks of opportunity without spending any movement. | |
| 2 | Removes any cost of spell slots or consumable resources. | |
| 3 | Extremely valuable power that can also help other casters to use up their Bonus action effectively. | |
| 4 | Great action, that can negate spell casting of some foes. |
Equipment Recommendations
Now I would like to go through some gear recommendations to maximize the Paladin Bard multiclass build. Items are especially important as they take the build to the next level thanks to their unique effects.
I would like to offer dual-wielding and two-handed setup options. Generally, you would go with a two-handed for strength setup and dual-wielding for dexterity. But to be honest, you can go with any setup with the former - Strength works on all melee weapons.
Act 1
The Swords Bard, does have limitations in Act 1, and in general, it could be the best played just as a Swords Bard Archer build, until you get to level 8. Still, going with the Bardadin, setup here are my recommendations:
Dual Wield Setup Weapons
| Slot | Item | Description |
|---|---|---|
 Melee (One-Handed) Melee (One-Handed) |
The best shortsword in Act 1, will lead you to Act 2. It gives higher critical rolls and improves damage output. Can be dual-wielded. | |
| A pretty good weapon with +1 enchantment and radiant damage rider. | ||
| These are the only good weapons that can be used to wear for the first part of the game. | ||
| This has a |
||
 Ranged Ranged |
Improves initiative and allows going earlier in combat. I recommend this if you plan on using Dual-wielding weapons. | |
| These weapons can be dual-wielded, making them perfect very early in the game. Use this before obtaining better ones. What makes this good is that it can use bonus action for additional damage. |
Two-Handed Setup Weapons
This is the go-to option if you want the highest damage early in the game.
| Slot | Item | Description |
|---|---|---|
| Melee (Two-Handed) |
Solid choice as it increases the critical chance and provides an |
|
| One of the best greatswords that you can get in Act 1. The bonus to attack rolls is great for counteracting |
||
| A solid greatsword, that gives bonus armour class with |
||
| This sword can be very powerful, especially if you can precast one of its powerful effects. |
||
| The earliest good weapon that a Bard can wear before obtaining the above ones. | ||
| Ranged |
Gives bonus initiative, allowing one to go earlier in combat. | |
| Equip two of these so that you can attack with your bonus action. This is an amazing weapon as you can use bonus action to break water bottles to apply wet. |
Other Equipment
As a bard in the early game, you can only wear light armor. So just stay with it until level 3, then with Swords Bard, equip Medium Armor.
| Slot | Item | Description |
|---|---|---|
 Head Head |
The helmet can be used to improve your weapon attacks with a spellcasting modifier. | |
| The circlet improves the success of your spells as long as you are obscured. | ||
| Provides increased speed at the start of the combat. | ||
 Cloak Cloak |
The only option in Act 1 that is okay, is by providing once-per-turn invisibility. Only available to Dark Urge origin. | |
 Armor Armor |
The best medium armor in Act 1. It will also lead you to Act 2. | |
| A slight improvement due to additional bonuses. 15 Armour Class is best for now. | ||
| This can be equipped when starting the game by taking it from Lae'zel. Perfect option with a high Armour Class. | ||
 Gloves Gloves |
I think these gloves are quite good for this section of the game. You get +1 Attack Rolls and a bonus to dexterity for higher initiative. They are also mandatory if you are doing natural strength setup. | |
| Very strong gloves as they give |
||
| You get additional |
||
 Boots Boots |
Avoids slipping on various terrains and most importantly unlocks Misty Step each short rest. These boots can last till Act 3, as walking on icy surfaces can be deadly for melee build. The item removes this problem. | |
| Good boots that allow moving without slowing down on difficult terrain. | ||
| As you may cast some spells with concentration these boots will give bonus survivability via temporary hit points. | ||
 Amulet Amulet |
This is a very powerful amulet, that will lead you through most of the game, the 1d6 bonus damage is very good. | |
| This is a great amulet, even if not worn. It can be used to restore spell slots when out of combat. | ||
| Gives mobility improvement thanks to the |
||
 Rings Rings |
Provides 2 damage increase on each weapon hit, making it a good choice in Act 1. It is very expensive. | |
| It's easy to activate it as you can concentrate on multiple spells in your arsenal, which will result in bonus psychic damage. | ||
| Gives defensive bonuses to Armour Class and Saving Throws. | ||
| A good movement boost makes it easier to reach those targets. |
Act 2 - mid-game
This is the mid-game, where most of the areas will be covered by dark. Radiant equipment will shine here, and having ![]() Darkvision is recommended. You can also get great items, albeit many will stay the same from Act 1.
Darkvision is recommended. You can also get great items, albeit many will stay the same from Act 1.
Dual Wield Setup Weapons
| Slot | Item | Description |
|---|---|---|
| Melee (One - Handed) |
The best shortsword with |
|
| This one still plays a big role in maximizing damage, until you get some items in Act 3. | ||
| Although more intended for assassin-type builds this is still an interesting weapon to have in the arsenal. | ||
| Melee (Two-Handed) |
You can imbue a weapon with any element 1d4 damage and gain a +1 to attack rolls. You can get the bonus elemental damage on any weapon. For example, drop another weapon on the ground, cast the spell with this glaive, and equip the said weapon. This is a very powerful combo, although it may be a bug. | |
| Ranged |
Amazing bow that allows to precast |
Two-Handed Setup Weapons
| Slot | Item | Description |
|---|---|---|
| Melee (Two-Handed) |
The most powerful weapon that most of the martials can use if you will also take |
|
| A bit weaker alternative to |
||
| A significantly strong weapon with force damage rider. Moreover, it gives bonus initiative. | ||
| You can imbue a weapon with any element 1d4 damage and gain a +1 to attack rolls. You can get the bonus elemental damage on any weapon. For example, drop another weapon on the ground, cast the spell with this glaive, and equip the said weapon. This is a very powerful combo, although it may be a bug. | ||
| Ranged |
Amazing bow that allows to precast |
Other Equipment
| Slot | Item | Description |
|---|---|---|
| Head |
One of the core items of the build. It will ensure that any spells you use will increase Spell Save DC, once you land a few hits. Best to activate this effect with |
|
| The helmet can be used to improve your weapon attacks with a spellcasting modifier. | ||
| Cloak |
Improves survivability and Saving Throw success. | |
| Reflect 1d4 acid damage if somebody hits you in melee range. | ||
| Armor |
Medium armor that will reach 19 Armour class together with |
|
| A solid heavy armor, that can take you to Act 3 once you have Paladin multiclass. | ||
| Gloves |
Amazing gloves that also give a good way to utilize a bonus action. | |
| Adds bonus fire damage | ||
| These gloves are excellent if you are aiming for natural strength progression, as I mentioned previously. Otherwise, I would go with the ones above if you are okay with using |
||
| Boots |
Bonus armor class for higher survivability. | |
| The boots are still a good option in Act 2. | ||
| Amulet |
Still, the best amulet as it provides a substantial damage boost if healed - drink a potion or a cleric can do that. | |
| Not a perfect amulet, but could be useful once you have |
||
| Allows casting Shield spell, can be a lifesaver if attacked heavily for one turn. | ||
| Rings |
Provides an |
|
| 2 Acid damage on any kind of attack. With multiple attacks you do the bonus is substantial. | ||
| As you have multiple cheap spells to enable concentration, this ring is very useful for a bit more damage. |
Act 3 - Final Build setup
This is the last act of the game, where you will get access to the most powerful items. To get them as early as possible, you will need some planning, but overall, it should not be a problem.
The Bardadin Build can make some crazy optimizations here, which turn the build around.
One-Handed Setup
In Act 3 (and late Act 2), a few rapier weapons become available, which makes it worthwhile to do a full setup around them. If you go for these, be sure to remove ![]() Great Weapon Master: All In feat when respeccing at Withers.
Great Weapon Master: All In feat when respeccing at Withers.
You should also take ![]() Duelling instead of
Duelling instead of ![]() Two-Weapon Fighting, so that you would get a slight boost in damage.
Two-Weapon Fighting, so that you would get a slight boost in damage.
| Slot | Item | Description |
|---|---|---|
| Melee (One - Handed) |
(BiS) |
A beautiful and deadly weapon that also gives an option to attack with a bonus action. As a piercing weapon, it benefits from |
| A solid weapon for a spell sword type of build. Allowing to summon a |
||
| Ranged |
Gives +3 Initiative almost guaranteeing that you go first. | |
| You could use this bow as an alternative in case the other two options are taken. It gives bonus damage on critical hits. For now, this bonus works on melee attacks also and might be fixed in upcoming patches. | ||
| Decreases the rolling requirement for Critical Hit by 1. |
Dual Wield Setup Weapons
Act 3 showers you in some good daggers and shortswords, allowing a compelling dual-wield setup. If you go for these, be sure to remove ![]() Great Weapon Master: All In feat when respeccing at Withers.
Great Weapon Master: All In feat when respeccing at Withers.
| Slot | Item | Description |
|---|---|---|
| Melee (One-Handed) |
(BiS) |
The perfect weapon for the main hand. Perfect to be used with |
(BiS) |
Use it together with |
|
| I think this is the best thing that you have equipped. It improves all the offensive stats that you need - Spell Save DC, damage, and attack rolls. Of course, the effect only applies once you kill enemies. | ||
| As you have multiple ways of getting an |
||
| Ranged |
Gives +3 Initiative almost guaranteeing that you go first. | |
| You could use this bow as an alternative in case the other two options are taken. It gives bonus damage on critical hits. For now, this bonus works on melee attacks also and might be fixed in upcoming patches. | ||
| Decreases the rolling requirement for Critical Hit by 1. |
Two-Handed Setup Weapons
| Slot | Item | Description |
|---|---|---|
| Melee (Two-Handed) |
A truly powerful weapon that gives a 1d6 thunder damage bonus. Moreover, it comes with unique weapon actions that can inflict bleeding and knockback foes. This is the best weapon to use if you plan on equipping |
|
| One of the top weapons if using |
||
| The strongest greatsword in the game. It gets a big damage boost from your strength modifier. | ||
| Ranged |
Gives +3 Initiative almost guaranteeing that you go first. | |
| If you do not care about bonus initiative with |
||
| Improves critical range for attack rolls. |
Other Equipment
| Slot | Item | Description |
|---|---|---|
| Head |
(BiS) |
The best helmet for this build. It will stack up your Spell Save DC while using flourishes. Then you can cast a crowd control spell like Hold Person/Monster with 100% success. After that... just finish the enemy with guaranteed critical hits. |
| Cloak |
(BiS) |
Improves the chances of attacks missing the wearer until getting hit for that turn. |
| Armor |
(BiS) |
The best armor if you are maximizing damage. The |
| Excellent armor if you will use |
||
| If you are looking for solid heavy armor, this is the one to go with. It gives a big damage reduction with |
||
| A good option for medium armor. However, I would prioritize it on a character with high Dexterity. | ||
| Gloves |
(BiS) |
If you want to maximize strength efficiently I do recommend these gloves as they will set the strength to 23. This way you simplify the build and only need to worry about Dexterity and Charisma investments. |
| Gives a solid bonus of 1d6 fire damage on hit, and improves Spell Save DC, for better success of spells. | ||
| The best gloves till the end of the game, if you want to naturally pump the Strength of the build. | ||
| Gives an increase to attack and damage rolls of 2. | ||
| Boots |
(BiS) |
The best option, as it provides indirect bonuses to damage with |
| Allows avoiding failed Saving Throws, and uses reaction to change the outcome. Moreover, provides bonus actions for mobility and damage. | ||
| One of the best boots, allowing for free movement on all terrains. | ||
| Gives a huge boost to mobility and avoids difficult terrain. | ||
| Amulet |
(BiS) |
The amulet still pulls strong even in the late game. |
| Makes any Constitution ability investment redundant as it maximizes it to 23 points. If you are doing a Strength-Based setup, this can free up the glove slot. But if you are min-maxing |
||
| Gives an |
||
| Rings |
(BiS) |
This is a powerful ring for Bardadin build as it allows casting enchantment and illusion spells with Bonus Action. These include Hold Person and other Crowd Control options. |
| Powerful ring, that allows for increased damage when enemies are at least |
||
| Provides an |
||
| Mentioning this accessory as it is a solid option to have in the arsenal in case, you cannot use the rings above. | ||
| 2 Acid damage on any kind of attack. With multiple attacks you do the bonus is substantial. Can be equipped after |
How to use the Build
Now I would like to cover some general tips on how to play Bardadin Build.
Main Mechanics
Bardadin is quite a complex build, there are a lot of synergies between Bard, Paladin and the gear you acquire. So I think it is mandatory to understand how to use the build fully.
Utilizing Flourishes
This is an important mechanic and it makes College of Swords Bard stand out from most of the other martial classes. Early in the game, I recommend using Slashing Flourish (Ranged) with your preferred bow. This way you can hit two enemies with a single shot and it's the best utility of your damage.
Slashing Flourishes are the earliest option of ![]() Extra Attack from all classes. You can also use melee flourishes if needed.
Extra Attack from all classes. You can also use melee flourishes if needed. ![]() Slashing Flourish (Melee) will become very powerful once the build gets
Slashing Flourish (Melee) will become very powerful once the build gets ![]() Divine Smite, and each of the hits can deal huge damage. On top, you will get an
Divine Smite, and each of the hits can deal huge damage. On top, you will get an ![]() Extra Attack for even more hits.
Extra Attack for even more hits.
Managing Great Weapon Master
One of the more important feats of the build is ![]() Great Weapon Master: All In. It gives a flat damage boost at the cost of decreased attack rolls. Generally, it is best to take this later in the game at level 8+, when you have higher attack bonuses and better gear.
Great Weapon Master: All In. It gives a flat damage boost at the cost of decreased attack rolls. Generally, it is best to take this later in the game at level 8+, when you have higher attack bonuses and better gear.
However, if you can effectively use it at level 4, you will be able to easily kill most of the enemies you encounter, especially as it is easy to die in Act 1. So if you are up for putting in additional effort the benefits are immense. Here are the main ways to increase your attack rolls:
 Bless from Cleric or Paladin, for a 1d4 bonus.
- Spells like
 Faerie Fire, and
  Blindness give an
  Advantage to attackers.
 - Oil of Accuracy or Diluted Oil of Sharpness, for 1 and 2 attack roll bonus.
 Gloves of the Growling Underdog - can be obtained in Goblin Camp, and gives an Advantage for attack rolls.
 Svartlebee's Woundseeker - early game greatsword that you can get before engaging in any of the major battles of Act 1.
Now, if you want more in-depth information, I have a guide covering how to increase attack rolls, which lists a lot of options and combinations. You can then pick the bonuses based on your party setup.
Effectively using Divine Smites
The key aspect of any build that involves at least 2 levels of Paladin is ![]() Divine Smite. It is one of the coolest actions, punishing your targets with a ray of light. To use it effectively, there are a few tips that I have.
Divine Smite. It is one of the coolest actions, punishing your targets with a ray of light. To use it effectively, there are a few tips that I have.
First, update your reactions and make sure the ![]() Divine Smite has a reaction on critical hit and asks you to use it:
Divine Smite has a reaction on critical hit and asks you to use it:
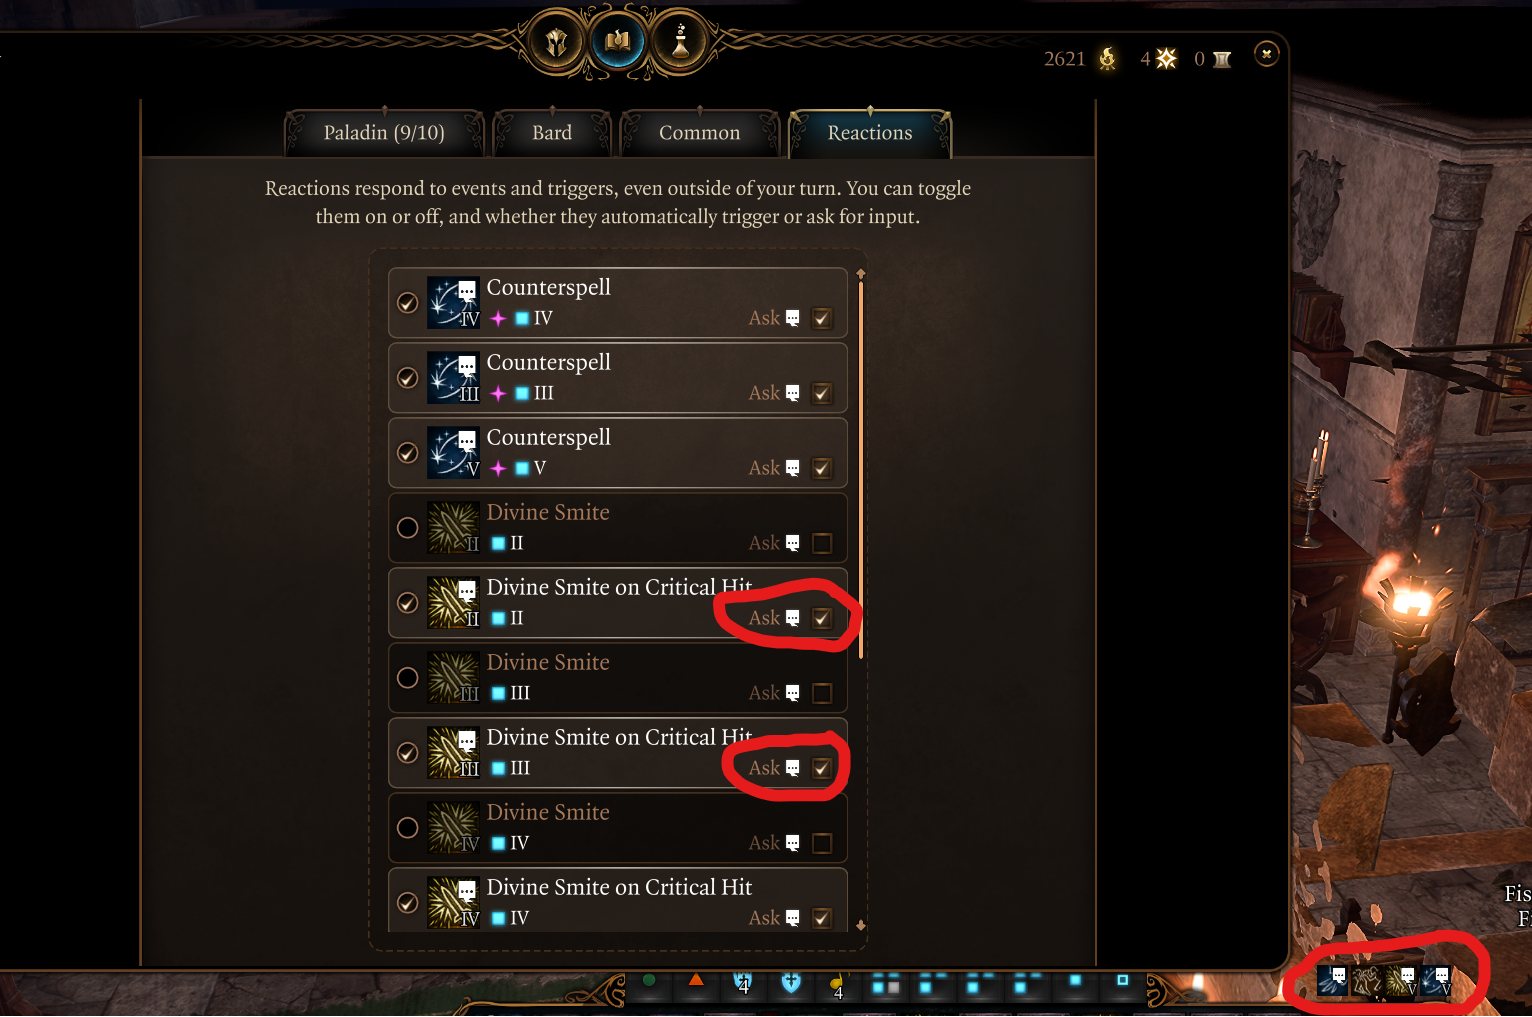
This way, you will not waste your time with unnecessary pop-ups and can use it when needed. For example, using a critical hit ![]() Divine Smite on a weak foe with a few HP will feel like a waste. However, you still might want to use it on the boss even if it has few HP to finish them off.
Divine Smite on a weak foe with a few HP will feel like a waste. However, you still might want to use it on the boss even if it has few HP to finish them off.
If you want to use the normal smite, just activate it from the quick bar by selecting the ![]() Divine Smite action. Or set it also as a reaction "Ask", but it might get irritating with all the popups. Try playing, and decide based on your experience.
Divine Smite action. Or set it also as a reaction "Ask", but it might get irritating with all the popups. Try playing, and decide based on your experience.
Overall, critical hits are extremely important for these attacks as the large number of dice rolls gets doubled and gets rerolled with ![]() Savage Attacker. That is why I recommend
Savage Attacker. That is why I recommend ![]() Killer's Sweetheart,
Killer's Sweetheart, ![]() Luck of the Far Realms, and spells like
Luck of the Far Realms, and spells like ![]() Hold Person.
Hold Person.
Another option, if you want, a big nova damage, is to use one of the special smites - ![]() Blinding Smite,
Blinding Smite, ![]() Thunderous Smite, and use
Thunderous Smite, and use ![]() Divine Smite as a reaction on the same attack. This can deal huge damage, but burns through spell slots very fast. I only recommend this if
Divine Smite as a reaction on the same attack. This can deal huge damage, but burns through spell slots very fast. I only recommend this if ![]() Great Weapon Master: Bonus Attack has not activated.
Great Weapon Master: Bonus Attack has not activated.
As I mentioned, other types of smites - ![]() Thunderous Smite,
Thunderous Smite, ![]() Searing Smite, come with unique effects and can apply various effects like
Searing Smite, come with unique effects and can apply various effects like ![]() Blinded,
Blinded, ![]() Frightened, etc. Generally, I do not recommend using them if you have
Frightened, etc. Generally, I do not recommend using them if you have ![]() Great Weapon Master: All In, as your bonus action is a very valuable source of damage.
Great Weapon Master: All In, as your bonus action is a very valuable source of damage.
Mixing Divine Smites with Bard Paladin multiclass
College of Swords Bard has unique attack actions flourishes - ![]() Slashing Flourish (Melee),
Slashing Flourish (Melee), ![]() Defensive Flourish (Melee), etc. With the reaction setup I mentioned above, you can use these flourishes and divine smites on the same hit.
Defensive Flourish (Melee), etc. With the reaction setup I mentioned above, you can use these flourishes and divine smites on the same hit.
If you went with Dual weapons, remember that ![]() Divine Smite can be activated on each hit. This is very useful when you need lots of damage in a single turn. This is the best option in terms of damage for bonus action when using an offhand attack.
Divine Smite can be activated on each hit. This is very useful when you need lots of damage in a single turn. This is the best option in terms of damage for bonus action when using an offhand attack.
Stacking Arcane Acuity
This is an important mechanic that Bard Paladin Multiclass uses which comes from ![]() Helmet of Arcane Acuity. Each hit that you do will give Arcane Acuity stack. As you can imagine, those
Helmet of Arcane Acuity. Each hit that you do will give Arcane Acuity stack. As you can imagine, those ![]() Slashing Flourish (Melee) will rack up.
Slashing Flourish (Melee) will rack up.
Why do you want Arcane Acuity? It will rack up Spell Save DC and give all your spells have almost 100% spell success chance. This will fit nicely with some combos I talk about later when using ![]() Band of the Mystic Scoundrel.
Band of the Mystic Scoundrel.
Early Game Combat
Now let's take a look at how to use the build in the early game. This is where you still don't have access to Paladin and rely only on Bard.
- I recommend utilizing spells early in the game. For example,
 Dissonant Whispers deal adequate damage and frighten a foe, making them stay in place. It's a good opener against melee targets.
  Sleep can disable low-level targets making the encounters easier.
 - Don't rush engaging in melee combat early on. You can even stay with Ranged weapons till at least level 4. Level 3
 Slashing Flourish (Ranged) is much stronger on bows.
 - From level 4, if you got Great Weapon Master: All In you can start using Two-Handed weapons. This is a huge damage improvement, just be sure to maintain high attack rolls and have an Advantage.
 Cloud of Daggers is an amazing spell and is much better than weapon attacks if there are at least two foes stacked together.
 Glyph of Warding with sleep effect is an extremely powerful spell, that you get at level 5. You can put to sleep groups of enemies and then take them out one by one.
Late Game Combat
So this is where the build becomes a true powerhouse. You will get access to Paladin and its ![]() Divine Smite with
Divine Smite with ![]() Command.
Command.
- I recommend having someone precast
 Haste or use Potion of Speed. That one action point will be very valuable.
 - I would save higher-level spell slots (5-6) for control spells so that you could use them on multiple enemies. Divine Smite is perfect for spell slot levels 1-4 as it does not gain any higher benefits.
- You want to start hitting a foe or a few enemies standing together with Slashing Flourish (Melee). This will stack up Arcane Acuity, 6-8 stacks are plenty so that your spells would have very high success.
- Now you can follow up with control spells using Band of the Mystic Scoundrel -
 Hold Person/
 Hold Monster or Command. I would start with the latter and force enemies to approach or grovel. As enemies get closer to you it will be easier to use Slashing Flourish (Melee) to hit 2 at the same time.
 - If you see a stronger enemy that has 100+ HP I would use Hold Person/Hold Monster and follow up with melee attacks + Divine Smite. This will deal huge amounts of damage and kill them in a few hits if not instantly. Hold Person upcasted can hit multiple targets, so it's even more deadly.
- You can continue repeating Command each turn via bonus action and use actions for weapons attacks. This way enemies are forced to do what you tell them without any options.
Remember ![]() Command does not cost a Concentration slot, so you can have other spells activate at the same time.
Command does not cost a Concentration slot, so you can have other spells activate at the same time.
Conclusion
Thank you for reading the Bardadin - Paladin Bard multiclass build for Baldur's Gate 3. We went through the progression of the build, what spells to take, and how to utilize flourishes with Divine Smites for the highest damage.
Cheers!
Credits
A major influence of the playstyle of this build was Ethan, or Prestigious_Juice341 - https://www.reddit.com/r/BG3Builds/comments/18pxoy9/honor_mode_102_smite_swords_bard_ssb_complete/
Like, Dislike, comment, or share!
Join the Discussion
0 commentsNo comments yet.
Be the first one to leave a comment!