Best Reaver Warrior Build - Two Handed - Dragon Age: Inquisition (DAI)
Contents
As you can guess Reaver's skills revolve around losing and gaining your HP to maximize damage. As a warrior, you will also be on the frontline.
Unfortunately, I do not recommend using Reaver as a tank as in my opinion this is both too risky and you miss the point of the builds. The build works well on Nightmare difficulty. You can see the showcase video of the top, and how alone it can tear through the hardest game enemies.
Abilities early game, levels 1-10
This is the beginning of the game. More or less you will need to once you unlock Reaver specialization. But before that, you still need to contribute to the party.
For this here are some recommended abilities and skills that you should get before reaching level 10
| Order | Skill | Description |
|---|---|---|
| 1 | Easily accessible ability to knockdown enemies | |
| 2 |  Horn of Valor + Fortifying Blast Horn of Valor + Fortifying Blast |
Will allow you to generate Guard for your party members. Moreover, they will get buffs to armor and damage |
| 3 | Deals AOE 500% weapon damage. You can also use it to reposition yourself. Ability also has a short cooldown |
Otherwise, select abilities as you see fit.
After you get to levels 10-12 you will have a chance to unlock new specializations. Do it as soon as you reach New Haven. Now you are ready for the build.
Two-Handed Reaver Build
The idea of this Reaver build is to use Two-Handed weapons to maximize your damage. Of course, it will also unlock some amazing skills like Pommel Strike. Moreover, your main attack ability will be Dragon Rage.
Do not forget to respecialize abilities before moving forward
Abilities - detailed explanation
Here I will list out what abilities you should invest in after you respec at level 10~ (once you get Reaver specialization). The abilities are listed in the order that they should be selected.
So as you progress through the game you can easily know what skills to get next.
| Order | Skill | Description |
|---|---|---|
| 1 | Mandatory ability to unlock other skills. It drains a lot of stamina, so its usage is fairly limited | |
| 2 | You will probably never have your HP full, use that to your advantage and get a damage boost | |
| 3 | Increases your damage after an enemy is killed nearby | |
| 4 | Low health near enemies buffs your critical hit chance and speed. | |
| 5 | Your main survival ability. You will restore some HP to keep you from dying. | |
| 6 | Your main damage ability. You lose HP but you deal a lot of damage. | |
| 7 | Doesn't matter which you pick. It is a progression ability | |
| 8 | This combo has a big benefit: gives you more mobility, allows you to generate more guard, and allows you to use a skill with 0 stamina | |
| 9 | Progression ability | |
| 10 | A bonus ability | |
| 11 | Deals AOE 500% weapon damage. You can also use it to reposition yourself. Ability also has a short cooldown |
You should be at level 15 with these abilities. The core of the Reaver build for the Dragon Age Inquisition is finished. Now you can optimize the build around your playstyle, strengths, and weaknesses.
Defensive approach
Invest in these abilities if you want to feel more secure on the battlefield by staggering and knocking down enemies.
| Order | Skill | Description |
|---|---|---|
| 12 | I do not use this ability, use it for progression | |
| 13 | Once you have a high critical chance, you can drastically decrease the cooldown of your abilities. | |
| 14 | A powerful ability dealing 700% weapon damage. Moreover, it will stun enemies. |
Offensive approach
This approach will allow the character to concentrate more on the offense. The result is larger stamina regeneration and more offensive abilities.
| Order | Skill | Description |
|---|---|---|
| 12 | Strong ability, allowing to knock down an enemy. However, it is stamina intensive skill | |
| 13 | After a critical hit enemies become weaker by losing armor. | |
| 14 | AOE attack, is useful when you are surrounded | |
| 15 | Drastically increases stamina regeneration as you will be hitting many enemies with your abilities | |
| 16 | Focus ability can be of great help in tight situations. |
Some other abilities to consider
| Ability | Description |
|---|---|
| You will need to get additional abilities from the Sword and Shield tree. However, it will be much easier to manage your stamina as you lose HP | |
 Horn of Valor + Fortifying Blast Horn of Valor + Fortifying Blast |
Will buff you and your allies by increasing damage. The upgrade will allow you to also generate Guard on hit. |
| Great skill if you find that you are out of stamina often | |
| Can be fun to use, but then you will need to catch your enemies, which can result in wasted time. | |
| You will be less likely to get staggered |
This section covers recommended stats and gear that you should use.
Note: some of the items are not the "best". However, their better versions are only available in Trespasser DLC, which is close to the end of the game. Due to this, they will be useful for a few hours at maximum
Stats and Attributes
These are the stats that I recommend prioritize:
- Guard * on hit - important stat, so that you would be able to always have a full Guard bar.
- Critical chance - have about 40%, after that concentrate on Critical damage.
- Critical damage - invest in it once you have a high critical chance. It will drastically increase your damage.
- Cunning - this attribute will help you get a higher critical rate
- Attack - increase overall damage.
- Willpower - increases the damage and also gives magic defense
- Strength - your base damage attribute
Items and Equipment
In this section, I will cover Dragon Age Inquisition Reaver build recommended gear. Be sure to read it as it is important to have the correct equipment.
Masterwork materials
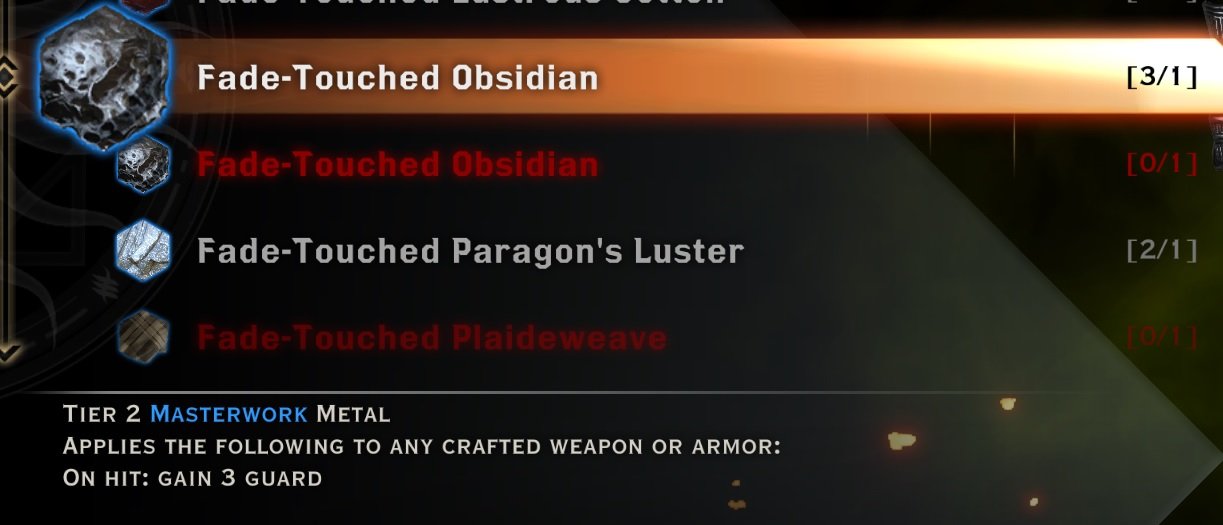
I suggest looking for Masterwork materials that give Guard on hit. These include materials like Fade-Touched Obsidian:
| Masterwork skill | Description | Materials |
|---|---|---|
| Guard on Hit | Essential to have for this build, otherwise the Reaver may die too often | Fade-Touched Obsidian Fade-Touched Silverite |
Weapons - obtainable
| Priority | Item | Description |
|---|---|---|
| 1 | Available during the Trespasser DLC. It is quite a powerful axe. I suggest trying it out and seeing, as it has unique abilities | |
| 2 | Extremely powerful Maul, that makes enemies explode after they are killed. I prefer this one compared to the others. | |
| 3 | Similar to Prismatic Greataxe, you will randomly deal elemental damage together with physical damage. This weapon can last you until the end of the game. The sword makes this Reaper Two-Handed build especially powerful | |
| 4 | The sword gives a +36% Attack boost, this equates to an almost 72 strength bonus. This can be an alternative to the Chromatic Greatsword if you don't prefer its looks | |
| 5 | Due to the weapon mechanics, this weapon deals a bonus of 100% elemental damage. So with a skill like Pommel Strike, you will deal 600% elemental damage and 600% physical damage. |
Weapons - craftable
Schematics are usually better than obtainable counterparts. However, you need good materials for that.
| Priority | Item | Description |
|---|---|---|
| 1 | One of the more overpowered weapons that deals additional elemental damage together with Physical damage. Expect the Reaver build to deal crazy amounts of damage | |
| 2 | One of the more overpowered weapons. However, the schematic can only be obtained in Trespasser DLC. Similar to Prismatic Greataxe Schematic | |
| 3 | Has large Leather offensive slots, and can be easily obtained in a Black Emporium |
Armors - obtainable
Unfortunately, there are not many options for obtainable armor that provide offensive bonuses
| Priority | Item | Description |
|---|---|---|
| 1 | Obtainable only in the Trespasser DLC. Boosts Critical Damage, Critical Chance, and Attack. | |
| 3 | Abilities cost 10% less stamina with this armor. Moreover, it is perfect if you want the Reaver to have high armor | |
| 4 | Gives bonus stamina, which allows the use of more abilities | |
| 5 | Abilities cost 7.5% less stamina. Moreover, gives bonus defensive stats. |
Armors - craftable
Sadly there are not too many armors that you can craft to give a lot of offensive options. Your main priority is to either get Leather or Metal utility slots
| Priority | Item | Description |
|---|---|---|
| 1 | This medium armor can be worn by anyone and it has leather utility slots. This means it can boost either critical chance or critical damage. | |
| 2 | A decent schematic that gives a large metal utility slot. However, you will need some luck to get it in The Descent DLC. This should be picked if you wish to have a higher armor value. | |
| 4 |  Battlemaster Armor Schematic Battlemaster Armor Schematic |
Great tier 3 schematic that you can get in Hissing Wastes. It also comes with Upgrade slots. |
Helmets - obtainable
| Priority | Item | Description |
|---|---|---|
| 1 | One of the best helmets in the game. Gives a decent boost to dexterity and cunning stats. | |
| 2 | The helmet provides fewer offensive stats than the Winter Palace masks, however, it has a much higher armor rating. | |
| 3 | This Winter Palace mask provides an 8% boost to critical damage. Equip it if you have a high critical chance of 50%. It can be used until you feel that your armor values are getting low | |
| 4 | This Winter Palace mask provides a 12% boost to critical chance. It can be used until you feel that your armor values are getting low |
Helmets - craftable
| Priority | Item | Description |
|---|---|---|
| 1 | This helmet gives Leather utility slots that you can use to increase the critical chance and critical damage. This is the best helmet in terms of DPS and damage and is easy to buy. | |
| 2 |  Revered Defender Helm Schematic Revered Defender Helm Schematic |
Provides a large number of metal utility slots, good for increasing pure attack damage |
| 3 |  Duke's Mane Schematic Duke's Mane Schematic |
This schematic allows crafting a helmet with 11 metal utility slots. However, it is quite demanding to obtain the schematic as you will need first to finish the Jaws of Hakkon DLC. |
| 4 |  Superior Venatori Helmet Schematic Superior Venatori Helmet Schematic |
The helmet can be purchased early in the game if you have The Short List perk. It gives 10 Utility metal slots. |
Amulets
| Priority | Item | Description |
|---|---|---|
| 1 | This is my recommended Amulet for Reaver. It will allow the build to survive in most of the fights. If you feel safe enough look at the second option to get additional stamina regeneration | |
| 2 | This amulet will give stamina and hp regeneration after each enemy that dies nearby. Quite good as you will be in the front lines and constantly use abilities | |
| 3 | When the Reaver has a comfortable 40% critical chance. Use the amulet to boost critical damage by 20% | |
| 4 | Use this amulet to increase Reaver's Critical Damage and critical rate in the late-game | |
| 5 | This amulet should be worn if you have a critical chance of less than 50%. |
Belts
| Priority | Item | Description |
|---|---|---|
| 1 | If you manage to keep HP at 50% this belt will drastically increase the Reaver build attack speed. Of course, that is quite risky as you can die easily. | |
| 2 | Top-tier Belt, unfortunately only available in Trespasser DLC. Boosts Critical Chance by 10% | |
| 3 | Great belt, if you need survivability, gives +200 Maximum Health | |
| 4 | This belt gives +100 Maximum Health. |
Rings
| Priority | Item | Description |
|---|---|---|
| 1 | This ring will drain HP from dying enemies. I think it is a safe option to use for Reaver. However, if you see that your build can work without it, look at more offensive options below. | |
| 2 | You only obtain this ring in Trespasser DLC. However, it gives a +20% Critical Damage bonus | |
| 3 | The rings boost critical damage by 10% and critical chance by 5%. It is one of the best rings for this build | |
| 4 | Gives +20% critical damage, equip it once you have a high enough critical rate, otherwise go for the below option | |
| 5 | Gives a +10% critical chance. Great to boost it, if you have less than 40% |
Tactics and tips
This is the trickiest part of the two-handed Reaver build. I include a video (at the top of the post) where I show how to best utilize the character and what tactics I use when running solo. With the party, it is 5 times easier, as you do not need to worry that archers will take you down.
Attention! Combat Roll can be used in any step if you need to get back from being knocked down or to reposition yourself fast.
- Start by using Charging Bull – this builds the initial guard and barrier (if you have Enhanced Amulet of Barrier equipped)
- In case there is an enemy with a shield use Pommel Strike
- Use Dragon-Rage two or three times.
- Use Charging Bull
- Use Devour
- Repeat from step 3
Conclusion
Thanks for reading this Dragon Age Inquisition Best Reaver build. It took a while to make the build and I can say it is amazing. I did not think it was possible to run solo with the Reaver. But it is and on Nightmare difficulty. You can constantly keep enemies under pressure, deal a tremendous amount of damage, and reposition yourself at will.
Not only that you are constantly protected by a barrier and Guard. I would say this build makes you a terrifying foe on the field.
Feel free to leave your feedback below! Thank you for reading.
Like, Dislike, comment, or share!

Discussion
No comments yet.
Be the first one to leave a comment!