
Thundersnow Herald - Druid Build - Baldur's Gate 3 (BG3)
Contents
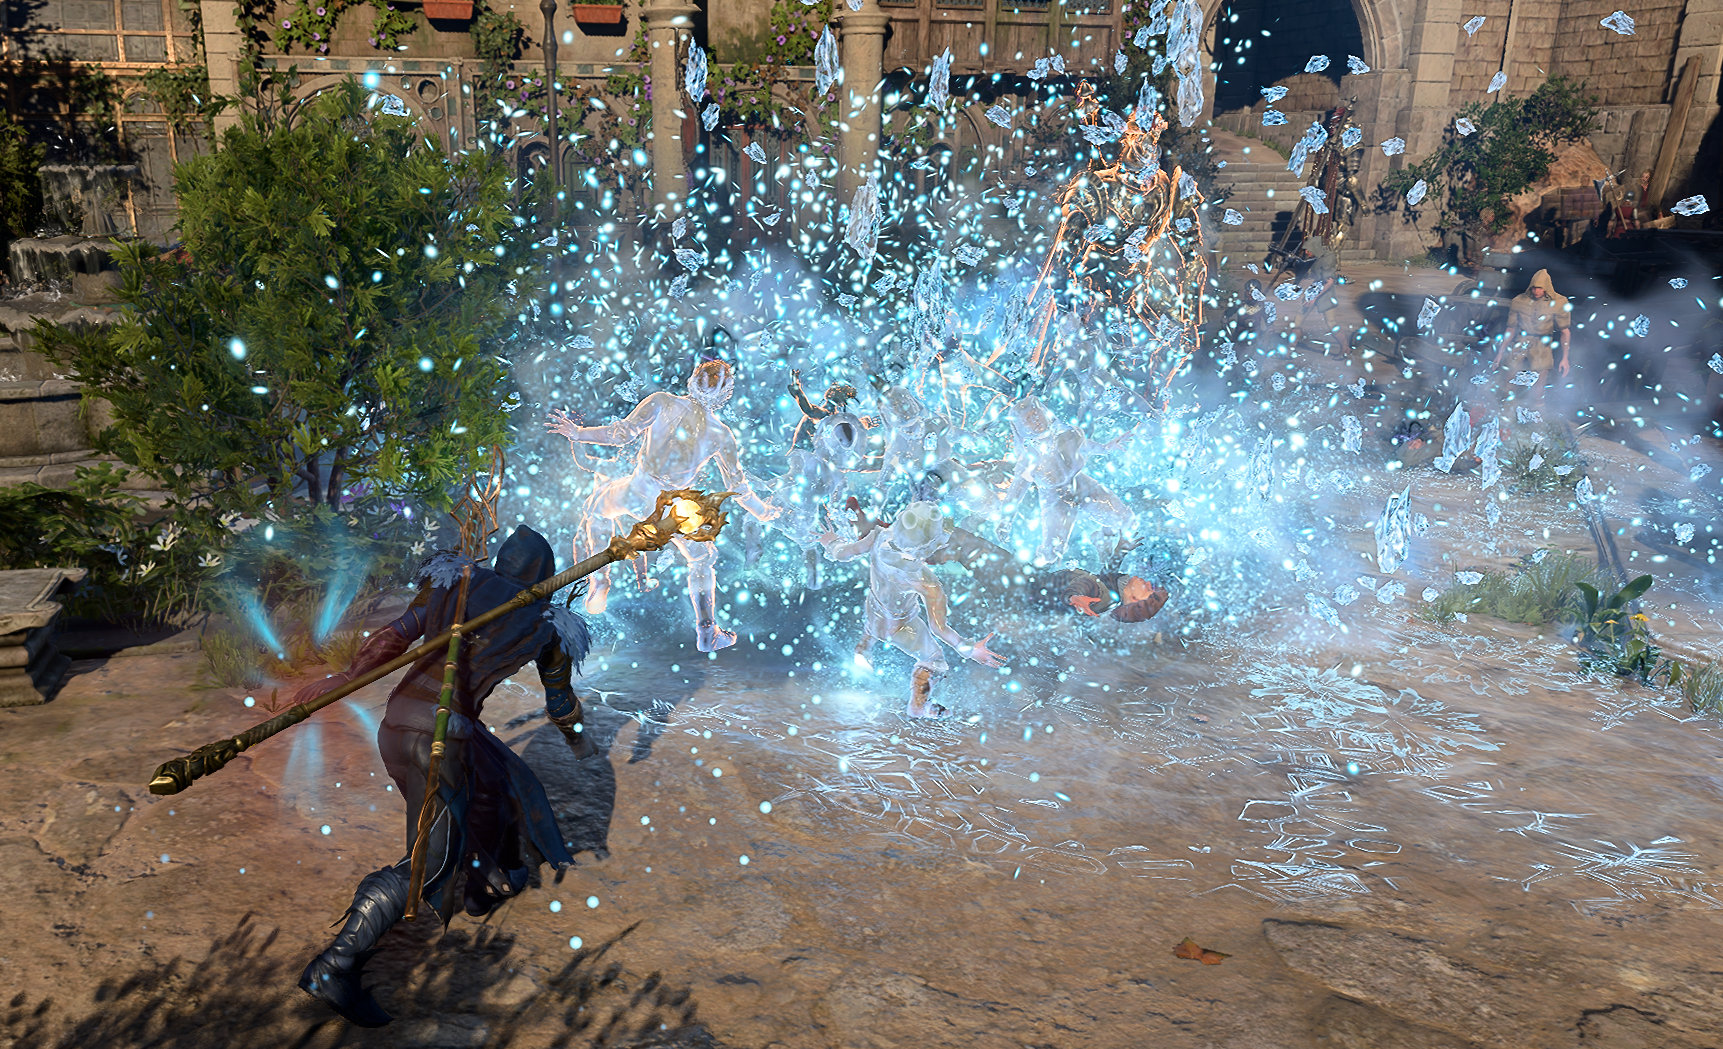
Druid Build - Thundersnow Herald
The idea of this build is to embrace the Lightning spells that Druid gets - ![]() Call Lightning and
Call Lightning and ![]() Lightning Bolt. This allows you to create a caster that with Cleric multiclass can deal large amounts of damage. Moreover, as a Druid, you have plenty of control spells if the situation requires.
Lightning Bolt. This allows you to create a caster that with Cleric multiclass can deal large amounts of damage. Moreover, as a Druid, you have plenty of control spells if the situation requires.
So what is the story here? The idea is that as a Land Druid, you find joy in using nature's gifts - lightning, and cold, which seem to regulate the world order with Blizzard and Thunderstorms. However, with looming dangers, you decide that you need to expand your horizons.
You learn that taking a Cleric's mantle and worshipping Talos, will give you that power that you need. Now you can protect the balance of nature and have the required power in your hands. Becoming a Tempest Cleric gives you ![]() Destructive Wrath, allowing you to use the inner Cleric power to unleash all destroying Lightning spells.
Destructive Wrath, allowing you to use the inner Cleric power to unleash all destroying Lightning spells.
As you increase your knowledge and obtain better gear, you will also fully learn to control Cold magic and spells like ![]() Ice Storm or
Ice Storm or ![]() Cone of Cold will cover whole areas in chilling freeze. The end goal is to be able to create a special thunderstorm - Thundersnow, a rare sight seen in nature, where Lightning and Snow intertwine.
Cone of Cold will cover whole areas in chilling freeze. The end goal is to be able to create a special thunderstorm - Thundersnow, a rare sight seen in nature, where Lightning and Snow intertwine.
The build idea is from Jevin the Paladin, Druid multiclass guide - https://www.reddit.com/r/BG3Builds/comments/1b3zoo0/a_comprehensive_druid_multiclassing_cheatsheet
Class Contribution
The build gets access to 2 feats, which can be limiting. However, generally, this should be enough, especially if you will have another full caster in the group. Here is what each class bring to the table:
9-10 Level Land Druid
You can go either 9 or 10 Druid depending on your needs. The main difference is that level 10 gives ![]() Improved Wild Strike and
Improved Wild Strike and ![]() Nature's Ward, which can be situationally useful, but otherwise are not relevant for the build.
Nature's Ward, which can be situationally useful, but otherwise are not relevant for the build.
- Control spells - Druid comes with plenty of control spells -
 Sleet Storm,
  Plant Growth,
  Confusion,
  Web, etc. These are excellent options to be used to weaken foes and unlock the full potential of the party for
  Advantage on attack rolls.
 - Summons like
 Conjure Woodland Being, offer additional free
  Spike Growth, that damages enemies and slows them down. You can also get
  Conjure Elemental, which unlocks Water Myrmidon - the most powerful option for Lightning spell casters.
  Wild Shape - the iconic action of Druids allowing them to change into different animals. This is useful in the early to mid-game but loses its value as you become a full spell caster.
- The main highlights are spells -
 Call Lightning and
  Lightning Bolt, which will be your bread and butter as damage-dealing spells. Later you will also unlock
  Ice Storm and
  Cone of Cold, to cover areas in Ice.
 - Gives
 Create Water, that can be used together with Lightning spells for double damage.
2-3 Level Tempest Cleric
Feel free to choose whether you need 2 levels or 3 if you require access to level 2 spells. I will go with 3 levels.
- The main highlight is Tempest Cleric's
 Destructive Wrath passive, allowing you to maximize the lightning damage of your spells. This is what will make you a destructive menace with Call Lightning and Lightning Bolt.
 - Access to various useful spells -
 Command,
  Sanctuary, etc. Moreover, if you decide to go with 3 Clerics, you will also obtain a
  Spiritual Weapon,
  Warding Bond, etc.
  Wrath of the Storm is an excellent way to weaponize your reactions, especially if enemies are wet for double damage.
Leveling Overview
Here is a concise table with all the main picks during your leveling progression. For more detailed reasoning, I go further in the article. Also, do not forget to check the recommended gear as it is crucial.
| Level | Class | Selection |
|---|---|---|
| 1 | Druid 1 | STR - 8, DEX - 16, CON - 15, INT - 8, WIS - 17, CHA - 8 |
| Skills: Perception, Medicine | ||
| Cantrips: |
||
| Recommended Prepared Spells: |
||
| 2 | Druid 2 | Subclass: Circle of the Land |
| Cantrips: |
||
| 3 | Druid 3 | Circle of Land: |
| Recommended Prepared Spells: |
||
| Scribe Spells: |
||
| 4 | Druid 4 | Cantrips: |
| Feat: Ability Improvement +2 Wisdom or +1 Wisdom and +1 Constitution | ||
| 5 | Druid 5 |
Circle of Land: |
| Recommended Prepared Spells: |
||
| 6 | Cleric 1 | Cantrips: |
| Subclass: Tempest Domain | ||
| Deity: Talos | ||
| Prepare Spells: |
||
| 7 | Cleric 2 | - |
| 8 | Druid 6 | - |
| 9 | Druid 7 | Circle of Land: |
| Recommended Prepared Spells: |
||
| 10 | Druid 8 | Feat: |
| 11 | Druid 9 | Circle of Land: |
| Recommended Prepared Spells: |
||
| 12 | Cleric 3 | Prepare Spells: |
Starting the Game - Level 1
This section covers the creation screen and what would go into the best Races, Abilities, and Skills for the Druid build. Some of these choices are impactful as you cannot respec them.
Races
Picking a race provides various benefits - abilities, dialogue options, looks, etc. Also, keep in mind whether your picked race has Shield proficiency as this can improve survivability, especially in the early game.
| Race | Features | Description |
|---|---|---|
 Halfling Halfling |
One of the best races for casters giving dice rerolls and reducing chances of spell |
|
 Gnome Gnome |
|
Gives advantages to spellcasting abilities, making you resistant to the most deadly control spells. |
 High Elf High Elf |
|
Access to bonus cantrip, |
 Drow Drow |
|
Gives access to Hand Corssbows, which can be used to weaponize your bonus action for a little additional damage. |
Class
| Overview | |
|---|---|
 Druid Druid |
|
| Druids channel the elemental forces of nature and share a deep kinship with animals. Mastery of Wild Shape allows them to transform into beasts from all over the Realms. | |
| Features | |
 Spell Slots Spell Slots |
These can be used to cast spells and are restored each long rest. |
Cantrips
You can choose two options for the 1st level. You will be able to pick more later on.
| Cantrip | Description |
|---|---|
| Pick this if you do not have a cleric in the group. This is the most useful cantrip in the game that helps with almost all ability roll checks. | |
| It is a good early-game damage cantrip, but it requires you to enter melee range. | |
| It can be used in a situation where you do not have a way to effectively attack. Use this to buff yourself or a party member. Be careful as it will cancel any other spell |
Prepare Spells
I will cover my recommended prepared spells to include for each Spell level. Pick the ones that are interesting or fit your playstyle.
| Spell | Description |
|---|---|
| Excellent spell for the early game, where you might need an instant recovery of an ally. However, it loses value on Druid as you progress. | |
| One of the S-Tier spells, that is good to have in your arsenal. You can use it to weaken enemies for Ice and Lightning spells. | |
| Excellent spell early in the game, that can deal decent damage and apply Ice surfaces for enemies to slip. | |
| Excellent early game spell, where getting |
|
| If you do not have another buffer in the group, having this spell is a great way to improve your and allies' movement speed. |
Background
Backgrounds are mostly for role-playing and you can pick whatever you prefer. If you want to optimize, then it would be good to pick backgrounds that are based on your ability points of Wisdom.
| Background | Skills | Description |
|---|---|---|
| Guild Artisan | Insight Persuasion |
A great choice, especially as you also get persuasion for better dialogue outcomes. |
| Folk Hero | Animal Handling Survival |
Useful choice, that gives two wisdom-related skill proficiencies. |
| Acolyte | Insight Religion |
A somewhat mixed bag. Insight is good, for some game situations, but religion is not related to many impactful things. |
Abilities
Now let's take a look at the abilities of the Thundersnow Druid build. Correct allocation will allow you to maximize the early gameplay and get good modifier bonuses.
| Ability | Value | Description |
|---|---|---|
 Strength Strength |
8 | Not relevant for the build. |
 |
16 (15+1) | Very important ability. It will give a higher Armour Class and improve initiative, allowing you to go earlier in combat. |
 Constitution Constitution |
15 | If you get Hag's Hair, then I would set this at 14, as you will use the Ability Improvement feat for +2 Wisdom. However, without it, you can then allocate +1 to Wisdom and +1 to Con. |
 Intelligence Intelligence |
8 | Least important stat for the build. |
 Wisdom Wisdom |
17 (15+2) | The main spellcasting ability of Druid, which will determine spell success. |
 Charisma Charisma |
8 | If you will leave Constitution at 14, put the 2 points here. Otherwise, leave it at 8. |
Skills and Expertise
Overall, the skills should be impacted by your roleplaying and background decisions. However, you would still want those that will give you the best benefits. My recommendations are to pick those at which you have a high ability modifier and these are Wisdom-related.
- Perception
- Insight
- Medicine
- Survival
- Animal Handling
Leveling Progression - Levels 2-12
Here is the detailed progression for the Lightning Druid to get you started. You can use it as a guideline because early games can be daunting and overwhelming. Later on, once you get a feel for the class you can start picking your options
It will take a few levels before you can start using those powerful Lightning spells that I mentioned.
Level 2
This is where you will have left the tutorial area, and will start exploring the world.
Subclass
Now you are ready to pick the subclass. As you can expect:
| Overview | |
|---|---|
 Circle of the Land Circle of the Land |
|
| Features | |
 Wild Shape Charge Wild Shape Charge |
Allows transforming into a beast using |
| Take the form of an animal. As you progress to higher levels, new options are unlocked. | |
| Excellent way to restore spell slots, to extend the combat capabilities for the next encounter. | |
Cantrips
| Spell | Description |
|---|---|
| Excellent cantrip can be used to deal damage and light up dark areas. |
Level 3
First level 2 spells become available
Circle of the Land
This is a unique feature to land druids giving additional spell access besides the one in the prepared list. Generally, I recommend taking those picks that have spells that you cannot prepare.
| Options | Description |
|---|---|
| Accessing both |
Prepare Spells
As second-level spells are unlocked here are a few recommendations that I recommend to keep on your list:
| Spell | Description |
|---|---|
| Excellent spells can be reused multiple times during a fight, saving spell slots. | |
| This can be used to make enemies slow down and get damage. After you obtain |
|
| Very useful control spell, for the early game. You can use it to make targets drop their weapons, disabling some very strong early-game opponents. | |
| Usually, I reserve this spell for Bard. However, if you do not have it, |
Level 4
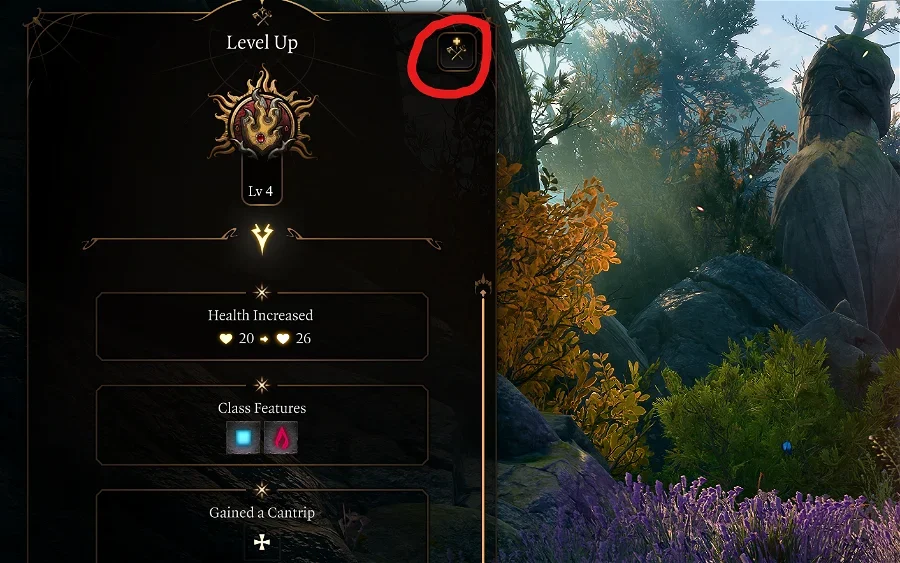
Now, you get some other great picks - the first feat is unlocked.
Cantrips
| Spell | Description |
|---|---|
| Did not use it much, but could be useful in some situations where you could pull enemies closer to your group. |
Feat
| Feat | Description |
|---|---|
| Ability Improvement | If you will get |
Level 5
Level 5, is a big step for any caster and especially Druid. Not only do you unlock level 3 spells, but get improvements to the ![]() Wild Shape forms.
Wild Shape forms.
| Feature | Description |
|---|---|
| Allows making a second attack with Wild Shape transformation. |
Circle of the Land
Because we are going for the Lightning build setup, here is my recommendation:
| Options | Description |
|---|---|
| Both of the spells here are not accessible to Druid. However, |
Prepare Spells
As third-level spells are unlocked here are a few recommendations that I recommend to keep on your list:
| Spell | Description |
|---|---|
| This spell is a sleeper and is overlooked by many people. It is ridiculously strong, allowing you to make enemies skip their turns as they fall. Follow up with attacks with allies for |
|
| If you need a blaster spell, this is a great option, however, it will require Concentration, so be careful not to cancel other spell effects. Also, |
|
| This spell does not use any concentration spell and can slow down enemies to a stop. It can also work well in |
Level 6 - Cleric Lv 1
So to fit the theme and gain access to some powerful empowerments for Lightning Druid, multiclass into Cleric:
Class
| Overview | |
|---|---|
 Cleric Cleric |
|
| Clerics are representatives of the gods they worship, wielding potent divine magic for good or ill. | |
| Features | |
| Spell Slots |
These can be used to cast spells and are restored each long rest. |
| Unique spell list accessible based on your cleric subclass. | |
Cantrips
| Cantrip | Description |
|---|---|
| Although this cantrip is notorious for failing, with high Spell Save DC, you will have an option for some radiant damage, which is especially useful in Act 2. | |
| You can illuminate yourself or your allies. | |
Subclass
| Overview | |
|---|---|
 Tempest Domain Tempest Domain |
|
| Features | |
| Unique reaction that can deal lightning or thunder damage to the targets attacking you. | |
| It can be used to push back enemies from ledges. | |
| Create an obscured area, that can be used to pickpocket or blind enemies. | |
Deity
So generally you can pick whatever. However, as the build revolves around being a master of Lightning and Talos' icon is Lightning, I think it is a perfect pick. So choose Talos.
Prepare Spells
| Spell | Description |
|---|---|
| It can improve the armor class but uses a Concentration slot. | |
| One of the more powerful control spells, that does not use Concentration. It can also make enemies do various actions - flee, grovel, or drop their weapons. | |
| Excellent defensive spell, that makes it impossible for enemies to attack you. You can use it together with |
Level 7 - Cleric 2
The second cleric level is the most important for this build. This unlocks a crucial feature to make Lightning Damage hit for those big numbers:
| Feature | Description |
|---|---|
| Allows to maximize lightning spell damage. Use |
|
| Make undead run away from you. |
Level 8 - Druid Lv 6
This is a major step for Druid. You unlock a few class features, that will pair well with terrain control spells:
| Feature | Description |
|---|---|
| You can now easily move on that difficult terrain that you can summon |
New ![]() Wild Shape options are unlocked:
Wild Shape options are unlocked:
| Action | Description |
|---|---|
| It can become invisible and attack with bonus damage. | |
| The most powerful wild shape in my opinion. Owl Bear has a decent attack with bonus action, and tons of HP and can be used to crush enemies. |
Level 9 - Druid Lv 7
Level 4 spells are unlocked and some of them give unique Druid aspects.
Circle of the Land
To be fair, I would pick any of the choices here. Check the next section on recommended spells. Druid can prepare all of them except one:
| Options | Description |
|---|---|
Prepare Spells
Level 4 spells are plentiful and all of them bring something unique, here are my picks:
| Spell | Description |
|---|---|
| Deals decent damage, but most importantly create Ice surfaces that will leave enemies Prone. | |
| This spell is almost a mandatory pick. The Dryad can cast |
|
| Although it may not seem special, the spell only costs bonus action and has no Concentration requirement. It's a perfect control addition to an already strong arsenal of Land Druid. | |
| One of the most powerful control spells, that can outright win encounters for you. | |
| A very strong spell, that if placed correctly can destroy foes. It does hit them multiple times - at your and your enemy's turn. | |
| This spell can be used for free with the special effect of |
Level 10 - Druid Lv 8
The main highlight of this level is the feat.
Feats
Now you have plenty of choices here that you can pick based on your preferences.
| Feat | Description |
|---|---|
| I think having one caster in a party who can always go first is important, especially on Honour Mode. | |
| Generally, this is mandatory on any caster as there are really good spellcasting weapons. However, if you are wildshaping often, the bonus Spell Save DC may become redundant. I would also skip this if you have another caster like Sorcerer in the group. | |
| Ability Improvement | If you have started with 16 Wisdom, because you have no access to |
Level 11 - Druid Lv 9
Now you get access to level 5 spells.
Circle of the Land
| Options | Description |
|---|---|
Prepare Spells
Compared to previous levels, there are fewer spells to pick and even fewer that I think are useful. However, they are still worthy of consideration.
| Spell | Description |
|---|---|
| With level 5 spell slots, this spell is okay. But it starts shining once you get access to Level 6 spell slots. You can then summon |
|
| If you did not obtain this one from the Circle of Land picks, it is a perfect choice. These locusts deal a good amount of damage, and can also work together with other control spells like |
|
| Nothing spectacular, however, there are a few situations where removing curses can help. |
Level 12 - Pick your last class level
So the last level can either be Cleric or Druid. This depends on your needs. Generally, as a Caster, I would go with Cleric, as it will give some additional spells. Level 10 Druid does not offer much to expand the playstyle we are going for here.
So I will go with Cleric Lv 3:
| Spell | Description |
|---|---|
| An okay spell that has its uses against constructs, however, it will not play a major role in the last part of the game. | |
| Can push enemies 5 meters and force them to become off-balance. |
Prepare Spells
Level 2 spells for Cleric can be situationally useful:
| Spell | Description |
|---|---|
| It can be used to improve your summons' and allies' HP. | |
| Excellent spell that can be used to improve the survivability of your party members, by increasing their resistances. The cost is that you will also receive the same amount of damage. | |
| Although these weapons are not some powerful destroyers, they can be summoned using bonus action and distract enemies in the middle of the fight. |
Maximizing Ability Scores
Now, as the build progression is covered there are a few aspects and important decisions you will have to make throughout the game. These will decide your final score for abilities.
- Act 1 -
 Auntie Ethel's Hair - you will want to get +1 Wisdom if you pick this choice.
 - Feat - Ability Improvement - +2 Wisdom
- Act 3 - Mirror of Loss - pick +2 Wisdom.
This will allow you to reach 22 natural Wisdom.
Potions, Elixirs and Consumables
Let's take a look at what consumables you can use to further empower the build.
Potions
These are general consumables, and most of them are activated for a few turns. Potions are separate from Elixirs and can be active together.
| Consumable | Description |
|---|---|
 Potion of Speed Potion of Speed |
In case you or your other casters have a Concentration spell slot taken and cannot cast Haste, use this potion. It acts similarly, but the effect is just for 3 turns. |
 Potion of Animal Speaking Potion of Animal Speaking |
Although not something powerful, it is worth stocking up and saving a spell slot. |
 Potion of Invisibility Potion of Invisibility |
Can be used to get a perfect position before the encounter starts. |
Elixirs
Unfortunately, only one Elixir can be active at a time. However, the good thing is that they last until a long rest, making them very useful and economical.
Be sure to activate them before combat as otherwise, you will need to use Bonus Action.
| Consumable | Description |
|---|---|
 Elixir of Bloodlust Elixir of Bloodlust |
Very effective elixir that gives another action point if you kill an enemy. I would say this is the best one to use to maximize your output through the turn. |
 Elixir of Battlemage's Power Elixir of Battlemage's Power |
Gain 3 stacks of Arcane Acuity. I would say this should be the most used elixir for higher spell success. |
 Elixir of Peerless Focus Elixir of Peerless Focus |
Another good choice that allows to better maintain spell Concentration. |
 Superior Elixir of Arcane Cultivation Superior Elixir of Arcane Cultivation |
Grant's a single level 3 spell slot. Could be useful in case you are preparing for a longer encounter. |
 Supreme Elixir of Arcane Cultivation Supreme Elixir of Arcane Cultivation |
Grant's a single level 4 spell slot. Could be useful in case you are preparing for a longer encounter. |
 Elixir of Vigilance Elixir of Vigilance |
For some encounters, you will want to go first. This elixir will ensure that it overcomes even surprise mechanics. However, if you have |
Illithid Powers
This special mechanic in Baldur's Gate 3 allows you to consume tadpoles and unlock special Illithid Powers.
At first, you can only use the base powers. As you move to Act 3, you will be able to unlock the outer ring powers.
| Illithid Power | Type | Description |
|---|---|---|
| Base | Beneficial power to take as it does not have any costs, and provides only benefits on the first hits. | |
| Base | A decent use for reaction to deal some bonus psychic damage. | |
| Base | This power works in |
|
| Base | Can help to kill an enemy faster if it is left with a few HP. | |
| Elite | As you are not a charisma-based character, these proficiencies help with dialogue checks. | |
| Elite | One of the most powerful illithid powers works well with Druid's area control spells. | |
| Elite | Extremely strong action that can be used by your allies. | |
| Elite | Remove the cost of spell slots or charges. |
Equipment Recommendations
Now I would like to go through some gear recommendations to maximize the Land Druid Build. Items are especially important as they take the build to the next level thanks to their unique effects.
The main aspect of Druid is that they can wear both Light and Medium Armor. Generally, I would recommend robes with Spell Save DC. If you cannot use those, then take something sturdier.
Act 1
| Slot | Item | Description |
|---|---|---|
 Melee (One-Handed) Melee (One-Handed) |
Although this staff does not give improved Spell Save DC, it gives unique effects with cold spells like |
|
| The best staff for caster in Act 1 as it gives bonus Spell Save DC, improving spell success. | ||
| If this is free, you could use it to get some bonuses from |
||
| Do you think I am joking? Fortunately, no. With |
||
 Ranged Ranged |
Gives bonus initiative, allowing one to go earlier in combat. I recommend this for the early games, as you will have low dexterity. | |
| Equip two of these so that you can attack with your bonus action. This is a great way to get some bonus damage, especially if you cannot reach the target. Only works if you are a Drow. | ||
 Head Head |
The only truly relevant headwear for Act 1. There are other options but they are just side bonuses. | |
 Cloak Cloak |
- | Nothing really of note here. |
 Armor Armor |
The best caster armor in Act 1. | |
| The most relevant early-game armor, that you can take from Lae'zel | ||
 Gloves Gloves |
The +2 Armour class is a big boost especially if you do not have a shield proficiency. | |
| These gloves can be useful when using spells like |
||
 Boots Boots |
One of the best boots, giving a total advantage for movement on difficult surfaces. It also gives |
|
| Excellent shoes, as you will be casting Concentration spells left and right. This will reduce your chance of getting the spell canceled. | ||
| Excellent boots, although I would leave them for a frontline character if their slots are free. Can be used to avoid getting hit while running away. | ||
 Amulet Amulet |
Can be used to restore spell slots | |
| Gives mobility improvement thanks to the |
||
 Rings Rings |
The best option for Act 1. The bonus Armour Class is a great boost for survivability. | |
| I would say there is a niche use of this early in the game when you can cast |
||
| The ring can be useful if you are running with a dual-wield |
Act 2 - mid-game
You will get access to some better caster items, but overall no major changes to the build setup.
| Slot | Item | Description |
|---|---|---|
| Melee (Two-Handed) |
- | Use the ones from Act 1. |
| Ranged |
Amazing bow that allows to precast |
|
| These hand crossbows are excellent if you need to weaponize your bonus action. | ||
| Head |
The best caster headwear in Act 2. | |
| Although this works only once per turn, it works well with spells that target Dexterity like |
||
| Cloak |
Improves survivability and Saving Throw success. You want to equip this cloak to maintain that good Armour Class. | |
| Deal additional damage to the attackers. | ||
| Armor |
If you need a higher Armour Class and |
|
| You can wear this if |
||
| Gloves |
You have access to Lightning and Thunder damage sources. Moreover, you can easily get Radiant damage via |
|
| Boots |
One of the best boots, giving a total advantage for movement on difficult surfaces. It also gives |
|
| Optional boots if you need a little bit more Armour Class. | ||
| Amulet |
I like |
|
| Allows casting a |
||
| Rings |
If you have a |
|
| Excellent ring, that you can activate its effects with your control spells. | ||
| A good ring that can apply additional radiant damage per target. |
Act 3 - Final Build setup
This is the last act of the game, where you will get access to the most powerful items. To get them as early as possible you will need some planning, but overall, it should not be a problem.
| Slot | Item | Description |
|---|---|---|
| Melee (One-Handed) |
The most powerful stave in the game. If it is free, feel free to use it and activate relevant Kereska's Favour based on the spells you use. My favorite picks are Frost of Dark Winter and Bolts of Doom. | |
| Very powerful stave that also gives access to |
||
| Gives additional effects like healing. | ||
| Ranged |
The bonus initiative is an excellent boost to go early in combat. If it is not a surprise round, it is almost guaranteed. | |
| A solid hand crossbow that you can obtain in Act 3. | ||
| Head |
The best caster headwear, that gives +2 Spell Save DC. | |
| The helmet can be used to be able to see in |
||
| Cloak |
The best cloak in the game for casters. | |
| Great way to avoid attacks and reduce the chance of enemy attacks landing. | ||
| Armor |
One of the best caster items in general, as it gives Constitution Saving Throw an |
|
| Gives bonus Armour Class and improves Spell Save DC. | ||
| Gloves |
Gives bonuses to Spell Save DC, which will increase spell success chance. | |
| Gives +1 Spell Save DC. | ||
| These gloves will be able to apply Reverbation via your Lightning spells. However, they will trigger only once, with |
||
| Allows casting spells with bonus action once per short rest. | ||
| Boots |
One of the best boots, giving a total advantage for movement on difficult surfaces. It also gives |
|
| You can avoid failing a saving throw using a reaction. This might break your concentration and ruin the whole encounter. | ||
| Gives bonus armor class and increased saving throw rolls. | ||
| Amulet |
Although this is the best amulet of the caster, generally it is best in the slot for cleric builds. However, I would not skip this if you are playing this build as a main character. | |
| It allows restoring spell slots easily. | ||
| Rings |
The only ring that gives access to +1 Spell Save DC. This effect is not listed. | |
| Still a good ring from Act 1, that will work with some of your spells. | ||
| Allows creating patches of Ice, with spells like |
||
| Allows avoiding the fail of Dexterity saving throw. These usually are wide-area spells. |
Build Mechanics
In this section, I would like to dive deep into how to play the Druid. This will help you utilize it to the fullest and correctly use various actions and spells throughout the game.
Important Mechanics and Combos
Let's go through key mechanics and tips on how to effectively use the build.
Shillelagh
So one of the unique druid cantrips is ![]() Shillelagh. It is very effective in the early game, where you can make a weapon like
Shillelagh. It is very effective in the early game, where you can make a weapon like ![]() Torch one of the strongest weapons.
Torch one of the strongest weapons. ![]() Symbiotic Entity also helps by giving additional necrotic damage rider, giving a decent damage boost.
Symbiotic Entity also helps by giving additional necrotic damage rider, giving a decent damage boost.
You may use this cantrip with other late-game weapons like ![]() Markoheshkir,
Markoheshkir, ![]() Staff of Spell Power, etc. However, it does start to fall off, especially as Druid does not get access to
Staff of Spell Power, etc. However, it does start to fall off, especially as Druid does not get access to ![]() Extra Attack. Moreover, you have access to very strong control spells, using the same action resource. So I do recommend this mechanic in the early game, but it does fall off later on.
Extra Attack. Moreover, you have access to very strong control spells, using the same action resource. So I do recommend this mechanic in the early game, but it does fall off later on.
Using different area Control spells
The interesting part of Druid class is that it has access to plenty of area-of-effect spells. For example, you can use two types of controls, one for the air and another for the ground. So for example - ![]() Plant Growth and
Plant Growth and ![]() Insect Plague, making the area inaccessible and enemies getting destroyed.
Insect Plague, making the area inaccessible and enemies getting destroyed.
The strongest combo in my opinion would be ![]() Sleet Storm together with
Sleet Storm together with ![]() Hunger of Hadar (that you need Bard or Warlock to cast). This outright makes enemies skip their turn and get damaged by the killing of dark clouds.
Hunger of Hadar (that you need Bard or Warlock to cast). This outright makes enemies skip their turn and get damaged by the killing of dark clouds.
So the main two categories:
- Ground - Sleet Storm, Spike Growth, Plant Growth, Ice Storm,
 Grasping Vine (be careful as it can get damaged by air effects), and so on
 - Air -
 Insect Plague,
  Cloudkill,
  Hunger of Hadar (obtained from other class)
Sanctuary + Moonbeam
Although this applies if you were multiclass into cleric, I still wanted to mention this combo. It allows you to cheese most of the fights while you stay safely under the ![]() Sanctuary effect. Then use
Sanctuary effect. Then use ![]() Moonbeam to move it around and damage enemies.
Moonbeam to move it around and damage enemies.
Wild Shapes forms
This build can effectively use ![]() Wild Shape till about level 10, after that, because you will not get
Wild Shape till about level 10, after that, because you will not get ![]() Improved Wild Strike it falls off. Moreover, the build's idea is being a caster, so turning into a beast form, defeats its purpose.
Improved Wild Strike it falls off. Moreover, the build's idea is being a caster, so turning into a beast form, defeats its purpose.
Maximizing Companion amount
Druid can summon plenty of minions that result in its small army. This can become tedious to manage, but they do offer plenty of bonuses and distractions for enemies.
 Conjure Minor Elemental - either Mud or Ice Mephits, although I do not use these as they are very weak.
- Conjure Woodland Being - summons a Dryad, that has free Spike Growth.
- Drayd's special action
 Fallen Lover, summons a Wood Woad to fight by your side.
 - Conjure Elemental - the goal is to access the level 6 spell slot so that you can use
 Conjure Elemental: Water Myrmidon. This will be a huge helper in combat and can instantly cover the area with water and apply wet status.
This can drain plenty of spell slots, so I do recommend having Potion of Angelic Slumber, to restore those spell slots.
Applying Wet Status
The core of the build relies on Wet status, which will double the damage of Lightning and Cold spells. As a Druid and Cleric, you will have access to ![]() Create or Destroy Water, allowing you to create rain at will.
Create or Destroy Water, allowing you to create rain at will.
However, this will cost a full action, and you will either have to get yourself ![]() Haste or have an ally create it. For example, a Water Bottle is an easy option that any companion can throw and weaken foes.
Haste or have an ally create it. For example, a Water Bottle is an easy option that any companion can throw and weaken foes.
After you get level 6 spell slots at level 11, ![]() Conjure Elemental: Water Myrmidon can do this job perfectly, and replace any need for other sources.
Conjure Elemental: Water Myrmidon can do this job perfectly, and replace any need for other sources.
Maximum Lightning Damage
So, the main build highlight is Lightning damage. To get huge numbers you will need a few things:
- Apply Wet status, which was mentioned above.
- Use Lightning spells like Call Lightning, Lightning Bolt, or
 Chain Lightning (accessible via scrolls or
  Markoheshkir).
 - Once casting a spell activate Destructive Wrath for maximum rolls. This will most likely kill any normal enemies and inflict heavy damage on bosses.
![]() Destructive Wrath is the highlight of the build, however, it is limited as it uses Channel Divinity Charge, which is restored each short rest.
Destructive Wrath is the highlight of the build, however, it is limited as it uses Channel Divinity Charge, which is restored each short rest.
Early Game Combat
Let's cover how you should progress combat levels 1-6.
- You can use a simple
 Torch with
  Shillelagh to deal more damage than all of the early-game weapons. This is useful until you get a weapon that can give Spell Save DC.
 - Use
 Hand Crossbow +1 offhand attack, to deal additional damage from range.
 - Early in the game, you can use
 Healing Word together with
  The Whispering Promise ring, to buff up your allies using bonus action.
 - Cast control or Concentration spells like
 Faerie Fire, Spike Growth, Sleet Storm, etc. These are excellent for the early game.
 - On the other hand, if an encounter is pretty easy, you can cast
 Moonbeam and use it to pick off weak foes each turn, saving spell slots.
 - Once your concentration slot is filled, you can use Plant Growth, and further slow down foes, to be picked down by your companions.
- Be careful when moving onto a Sleet Storm or Spike Growth. These have effects that might make you fall on ice or cancel your concentration.
- Once you get access to Lightning Bolt and Call Lightning, use these on wet enemies to double the damage.
Late Game Combat
Overall, nothing much changes from the early game, just that your beasts get buffed up.
- Conjure Woodland Being - already mentioned, this is an amazing summon, that can cast Spike Growth for free. This saves you a spell slot, and you can follow up with something more deadly like Insect Plague.
- Continue using area control spells like - Ice Storm, Plant Growth, Sleet Storm, etc. These are excellent for breaking enemy positions.
- The top dog is Conjure Elemental: Water Myrmidon which is available once you have access to level 6 spell slots. This can cover the area in water, and apply wet status. This means that you can become a Myrmidon and have a summoned ally with the same effects.
- Get
 Haste or Potion of Speed, to be able to cast two spells per turn. For example, apply Create Water and follow up with Lightning Bolt + Destructive Wrath for an instant kill.
 - Play around with abilities - cover areas on snow, release lightning bolts, and freeze enemies in their tracks. Utilize all that the build has to offer and fight off any type of enemy.
Build Variations
There are a few variations that the build could be changed about. I think it is more for advanced players who are likely doing some deeper optimizations.
| Setup | Description |
|---|---|
Nature's Guardian Build:
|
A more versatile build that can also utilize |
Conclusion
Thank you for reading the Thundersnow Herald - Druid build for Baldur's Gate 3. This is a new thing, I wanted to try, where I concentrate more on creating a backstory and creating a build around that. Moreover, this is a very powerful caster, that can easily destroy hordes of enemies with correct preparation.
Cheers!
</body></html>
Like, Dislike, comment, or share!
Join the Discussion
0 commentsNo comments yet.
Be the first one to leave a comment!