
Best Way of Shadow Monk - Psychic Build - Baldur's Gate 3 (BG3)
Contents
Way of Shadow Monk - Psychic Build
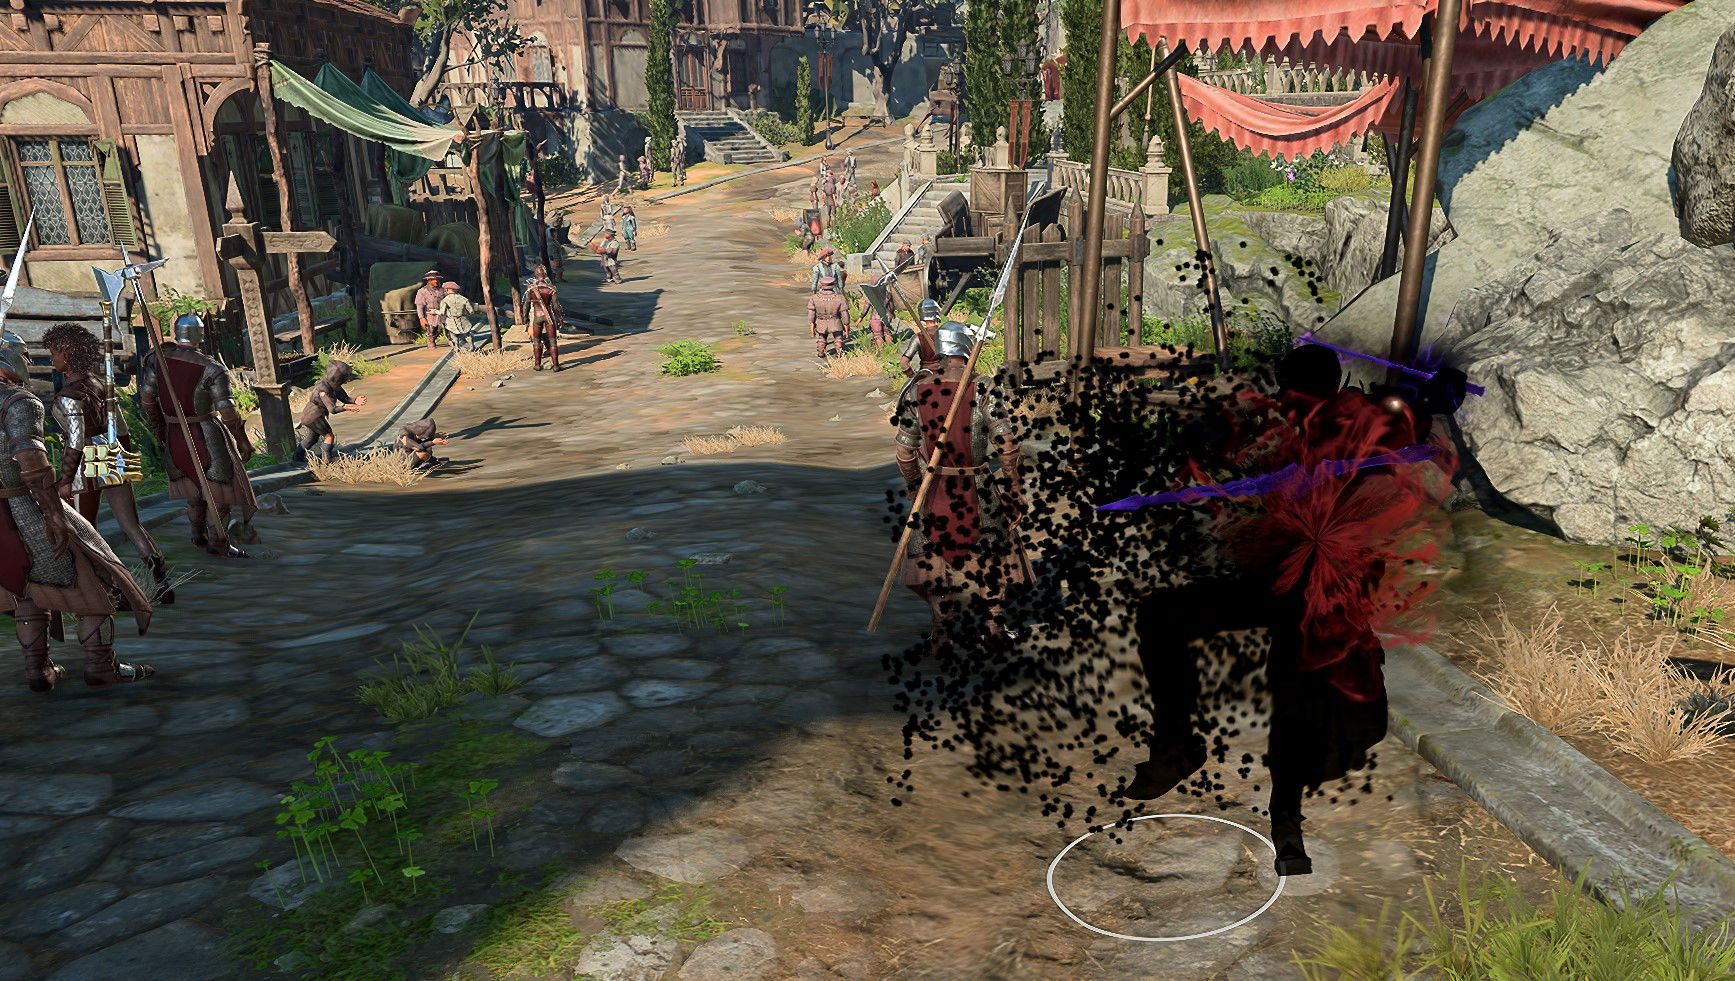
The idea of this build is to utilize the level 11 Shadow Monk action - ![]() Shadow Strike. By itself, the action is very expensive - 3 Ki points. However, with some optimizations and specific items, the damage can one-shot many enemies in the game.
Shadow Strike. By itself, the action is very expensive - 3 Ki points. However, with some optimizations and specific items, the damage can one-shot many enemies in the game.
I am talking, of course, about ![]() Shadow Blade Ring and
Shadow Blade Ring and ![]() Resonance Stone (double psychic damage at the cost of lower spell resistance). This will make you a true psychic assassin. Of course, Shadow Monk comes with other neat features like
Resonance Stone (double psychic damage at the cost of lower spell resistance). This will make you a true psychic assassin. Of course, Shadow Monk comes with other neat features like ![]() Cloak of Shadows and
Cloak of Shadows and ![]() Shadow Step, allowing you to be mobile both during and before combat.
Shadow Step, allowing you to be mobile both during and before combat.
This is a perfect subclass for those who are looking for a stealthy playstyle, disable enemies, create ![]() Darkness fields, or even leave combat altogether once you clear out a few targets.
Darkness fields, or even leave combat altogether once you clear out a few targets.
Hope you like the idea of the build, and enjoy reading it!
How to effectively use and read the build? Here are a few tips:
- Build Overview gives a high-level overview of each level
- Go into the leveling progression to understand why these picks were made, which also offers variations and mechanics explanations
- The equipment section offers gear progression and gives an in-depth explanation of what each piece offers to the build
- Check the Mechanics section to fully understand how the build falls into place
Class Contribution
The build can be made in a few different ways. You could go pure monk, take a dip in Fighter, Rogue, or even Sorcerer. For simplicity's sake, I will be going with pure Monk.
12 Shadow Monk
So this is the core of the build that you will use the most:
- Access to
 Shadow Strike allows dealing 3d8 psychic damage, which can be doubled with Resonance Stone.
  Cloak of Shadows and
  Shadow Step for ultimate stealth mobility and invisibility on demand.
 Stunning Strike (Melee) to stun enemies so that they would skip their turns.
 Shadow Arts: Hide, and enter stealth using a bonus action, which then can be used for a Shadow Strike attack.
- Access to 3 feats, to cover most of the weak points with the build.
There are more choices, but I will leave those in the build variation section at the end of the post.
Build Variations
For this build, there are a lot of options, both from a progression perspective and the level splits
| Setup | Description |
|---|---|
|
A build that meshes fists with weapon attacks, and emphasizes a stealth playstyle to enter and leave combat via |
|
Rogue gives one important benefit - expertise in Stealth. If you want to do some ridiculous stuff with |
Build Overview
Here is a concise table with all the main picks during your leveling progression. For more detailed reasoning, I go further in the article. Also, do not forget to check the recommended gear as it is crucial.
My recommendation is to run this Monk setup until level 11. Then you can decide to switch to Monk weapons or ![]() Shadow Blade or continue going unarmed.
Shadow Blade or continue going unarmed. ![]() Tavern Brawler is a very powerful feat that you can utilize when it is mostly needed - early game.
Tavern Brawler is a very powerful feat that you can utilize when it is mostly needed - early game.
| Level | Class | Selection |
|---|---|---|
| 1 | Monk 1 | STR - 8, DEX - 17, CON - 15, INT - 8, WIS - 16, CHA - 8 |
| Skills: Stealth, Acrobatics | ||
| 2 | Monk 2 | - |
| 3 | Monk 3 | Subclass: Way of Shadow |
| 4 | Monk 4 | Feat: |
| 5 | Monk 5 |
- |
| 6 | Monk 6 | - |
| 7 | Monk 7 | - |
| 8 | Monk 8 | Feat: |
| 9 | Monk 9 | - |
| 10 | Monk 10 | - |
| 11 | Monk 11 | - |
| 12 | Monk 12 | Feat: |
You can start with this setup from the early levels. There are cool weapons like ![]() Lightning Jabber,
Lightning Jabber, ![]() Cacophony but you can also transition to it at level 11, as this is when it shines with
Cacophony but you can also transition to it at level 11, as this is when it shines with ![]() Shadow Strike and all the vulnerabilities that you can enjoy from the late game weapons.
Shadow Strike and all the vulnerabilities that you can enjoy from the late game weapons.
This setup also works with ![]() Shadow Blade that you can obtain with
Shadow Blade that you can obtain with ![]() Shadow Blade Ring later in Act 2.
Shadow Blade Ring later in Act 2.
| Level | Class | Selection |
|---|---|---|
| 1 | Monk 1 | STR - 8, DEX - 17, CON - 14, INT - 8, WIS - 16, CHA - 10 |
| Skills: Stealth, Acrobatics | ||
| 2 | Monk 2 | - |
| 3 | Monk 3 | Subclass: Way of Shadow |
| 4 | Monk 4 | Feat: Ability Improvement +2 Dexterity |
| 5 | Monk 5 |
- |
| 6 | Monk 6 | - |
| 7 | Monk 7 | - |
| 8 | Monk 8 | Feat: |
| 9 | Monk 9 | - |
| 10 | Monk 10 | - |
| 11 | Monk 11 | - |
| 12 | Warlock 1 | Cantrips: |
| Subclass: Hexblade | ||
| Spells: |
Synergy with other builds
This section will give a few ideas on how to utilize other builds to maximize the combat potential of the group. There are usually various synergies that make the group play more enjoyable. However, this should not be the main factor. With full game knowledge, any party composition will work freely.
Darkness Setup
Shadow Monk has access to ![]() Shadow Arts: Darkness, which enables to create a
Shadow Arts: Darkness, which enables to create a ![]() Darkness field. Still, you are not able to see inside of it, so you will need items like
Darkness field. Still, you are not able to see inside of it, so you will need items like ![]() Eversight Ring or
Eversight Ring or ![]() Shar's Spear of Evening
Shar's Spear of Evening
| Synergetic Builds | Enabler | Description |
|---|---|---|
| Beast Master Ranger (level 11) | From level 11, when using |
|
| Shadow Magic Sorcerer | The Sorcerer has an easy way of creating |
|
| Sorlock |
|
Sorlock can create and also see inside the |
Psychic Damage
| Synergetic Builds | Enabler | Description |
|---|---|---|
|
All of these builds have access to |
|
| Open Hand Monk | Open Hand Monk also can deal psychic damage, it's not as big as having full |
Starting the Game - Level 1
This section covers the creation screen and what would go into the best Races, Abilities, and Skills for the Shadow Monk build. Some of these choices are impactful as you cannot respec them.
Races
Picking a race provides various benefits - abilities, dialogue options, looks, etc. Specifically for the Shadow Monk build, they will give important armor proficiencies or advantages on stealth checks to better utilize the assassin playstyle.
| Race | Features | Description |
|---|---|---|
 Drow Drow |
|
All three choices offer you access to a free |
 Asmodeus Tiefling Asmodeus Tiefling |
|
|
 Drow Half-Elf Drow Half-Elf |
|
|
 High Half-Elf High Half-Elf |
|
These picks are relevant mainly for the |
 High Elf High Elf |
|
|
 Deep Gnome Deep Gnome |
|
The main attractiveness of Gnomes is that they have |
 Dwarf Duergar Dwarf Duergar |
|
One of the best race picks overall. The |
| Wood Half-Elf |
|
Comes with a solid movement speed boost that any melee build can utilize well in combat to reach enemies on the initial turn. |
 Wood Elf Wood Elf |
|
Class
| Overview | |
|---|---|
 Monk Monk |
|
| Some reach enlightenment by languid meditation - others do so in the heat of battle. Monks manipulate ki to empower their own strikes and debilitate their foes. | |
| Features | |
| Very powerful attack, allowing you to do two hits with bonus action and Ki points. | |
 Ki Ki |
A unique resource for Monk actions. |
| Allows getting armor class from Wisdom modifier. | |
| Similar to how finesse weapons work, Monk attacks scale based on high ability between Strength and Dexterity. | |
| Set the base attack of unarmed attacks to 1d4, later this becomes 1d6 and 1d8. | |
| Gives an option to attack with your fists using bonus action. | |
Background
Backgrounds are mostly for role-playing, and you can pick whatever you prefer. If you want to optimize, then it would be good to pick backgrounds that are based on your Wisdom ability points.
| Background | Skills | Description |
|---|---|---|
| Urchin | Sleight of Hand Stealth |
Excellent pick for being effective in stealth and also disarming traps or pickpocketing. |
| Criminal | Stealth Deception |
This is especially useful for the main character, as you will get proficiency in deception that helps with some dialogue options. |
| Charlatan | Deception Sleight of Hand |
Makes pickpocketing, lockpicking, and trap disarmament easier. Moreover, comes with dialogue-based skill proficiency. |
Abilities
Build ID: 25
Skills and Expertise
Overall, the skills should be impacted by your roleplaying and background decisions. However, you would still want those that will give you the best benefits. My recommendation would be to go for these, most relevant to the theme of the build:
- Stealth
- Acrobatics
- Insight
Leveling Progression 2-12
Here is the detailed progression for the Shadow Monk to get you started. You can use it as a guideline because early games can be daunting and overwhelming. Later on, once you get a feel for the class you can start picking your options
Levels 2-6
By this time, you should have landed on the ![]() Ravaged beach already and started exploring the initial area. You might need 1 additional encounter if you did not obtain enough XP in the Nautiloid.
Ravaged beach already and started exploring the initial area. You might need 1 additional encounter if you did not obtain enough XP in the Nautiloid.
This part of the progression covers 3 main areas. They are important both from an exploration and experience perspective. This is a huge swath of content, so missing any of the regions can negatively impact the game experience if you especially enjoy finding all the places
- Wilderness that encompasses -
 Druid's Grove, Goblin Camp, Sunlit Wetlands and The Risen Road
 - Underdark - covering Ebonlake Grotto, Arcane Tower, Selûnite Outpost
- Grymforge - Underdark - Duergar Encampment and Adamantite Forge
Again, exploring them will give both awesome gear and a lot of experience, and of course, content with interesting quests.
For most of the builds, early levels are pretty simple, as there are minimal spell options and features that you can use. However, there are notable spikes at levels 5-6:
 Extra Attack
- Level 3 spells
- Major class and subclass features
With these, you will feel how the game combat opens up, and with correct preparations, you can start eliminating foes with minimal preparations.
Level 2
| Feature | Description |
|---|---|
| Makes it easier to reach and move between enemies. |
That is not all, by using Ki points you can get an improved version of some base actions:
| Action | Description |
|---|---|
| It's not something that I would use, as the bonus action has better uses. | |
| It can be used to reach longer distances or jump on enemies on higher grounds. | |
| A disengage option that you can activate with Bonus action and a Ki Point. |
Taking your monk to the next Level - Elixir of Hill Giant Strength
If you are interested in minmaxing, you are lucky, as there is an easy way to get a big boost to your strength via ![]() Elixir of Hill Giant Strength. Why is this important? If you use
Elixir of Hill Giant Strength. Why is this important? If you use ![]() Flurry of Blows, your unarmed attacks can use Strength as the main stat. This is not all, at level 4, you can pick
Flurry of Blows, your unarmed attacks can use Strength as the main stat. This is not all, at level 4, you can pick ![]() Tavern Brawler feat which gives an additional boost to attacks based on strength modifier.
Tavern Brawler feat which gives an additional boost to attacks based on strength modifier.
After you reach the first settlement - ![]() Druid's Grove. There, you can stock up on elixirs for Acts 1 and 2 -
Druid's Grove. There, you can stock up on elixirs for Acts 1 and 2 - ![]() Elixir of Hill Giant Strength. This is somewhat gimmicky; however, if you are interested, here is a guide on how to farm Elixir of Hill Giant Strength.
Elixir of Hill Giant Strength. This is somewhat gimmicky; however, if you are interested, here is a guide on how to farm Elixir of Hill Giant Strength.
Drinking the elixir after each long rest will result in full combat potential of the build, making many encounters a breeze. Later in Act 3, you can even buy an improved version ![]() Elixir of Cloud Giant Strength with a fixed 27 strength stat.
Elixir of Cloud Giant Strength with a fixed 27 strength stat.
Is this mandatory? For sure, no, but if you like big damage numbers and 90%+ hit chance, this is my recommendation.
Level 3
As a Monk at level 3, you can choose the subclass. It affects how you play the build and what combat options are available.
| Overview | |
|---|---|
 Way of Shadow Way of Shadow |
|
| Features | |
| Allows hiding with just bonus action instead of action. | |
| Can be useful if you need to pass stealth checks with companions. For example, sneaking through areas where enemies may see you. | |
| Very powerful action that can complement both Shadow Monk and Warlock with |
|
| Not as good as it sounds. Sadly, it does not work with the |
|
| Another powerful action, that you can use to break enemy |
|
| You can use this while being invisible. Group enemies together and let your caster kill them, or cast Darkness to change the playing field. | |
All of these actions can play an important role in the combat, based on the situation.
Playing with Darkness
So ![]() Darkness is one of those very powerful spells that can break the enemy AI, and make many encounters a breeze. There are a few sources that you can get it from:
Darkness is one of those very powerful spells that can break the enemy AI, and make many encounters a breeze. There are a few sources that you can get it from:
 Darkness or
  Eyes of the Dark: Darkness, Shadow Arts: Darkness spells
 Arrow of Darkness
 Shar's Spear of Evening with it's special Shar's Darkness and
  Edge of Darkness actions.
 Dire Raven Companion at level 11 from Beast Master Ranger, with its flying mechanic.
The created field is special because it will cancel out most of the arrow projectiles, protecting anyone inside it. Of course, it can be buggy, and enemies can still throw stuff, or use ranged attack if they are elevated. There are a few sources of being able to see in the "Magical" Darkness:
 Devil's Sight
 Eyes of the Dark from Eyes of the Dark: Darkness
 Eversight Ring,
  Steel Watcher Helmet allow to see through magical darkness
Shadow Monk cannot see in ![]() Darkness, (
Darkness, ( ![]() Darkvision sadly does not work inside it); for this reason, you will need one of the items mentioned. The earliest one you can get is
Darkvision sadly does not work inside it); for this reason, you will need one of the items mentioned. The earliest one you can get is ![]() Eversight Ring. Even without these, I cover strategies on how to utilize
Eversight Ring. Even without these, I cover strategies on how to utilize ![]() Darkness to your advantage.
Darkness to your advantage.
With all of the requirements and conditions in mind, you can now use Darkness to your advantage. My recommendation is to position the Darkness field in two ways:
Cover enemies with the field - this is an excellent strategy when enemies are clumped together, and you are the one starting the combat. Cast ![]() Darkness on them, so that they would get
Darkness on them, so that they would get ![]() Blinded and use the character that can see in it, and move together with them. Now you have an easy way to avoid enemies; they also cannot freely move, or you will hit them with
Blinded and use the character that can see in it, and move together with them. Now you have an easy way to avoid enemies; they also cannot freely move, or you will hit them with ![]() Opportunity Attack.
Opportunity Attack.
The second option is to use it as a cover field. This is perfect for those situations where you want to take it slowly, there are no enemies that can see in the dark, and you might be overwhelmed by them otherwise. You can then stay in the ![]() Darkness field and once your turn starts, move out, hit enemies with spells or weapons, and go back. The NPCs will have to make a choice - should they go inside and gain
Darkness field and once your turn starts, move out, hit enemies with spells or weapons, and go back. The NPCs will have to make a choice - should they go inside and gain ![]() Disadvantage or stay outside and skip their turn
Disadvantage or stay outside and skip their turn
![]() Darkness comes with a plethora of caveats, so have this in mind when using:
Darkness comes with a plethora of caveats, so have this in mind when using:
- Some enemies can see in Magical Darkness, so check their features in the explanation window
- Other enemies can throw projectiles like
 Javelin and hit you inside the field
 - Sometimes it can be buggy as hell and not work at all.
Another cool thing is that you can use ![]() Darkness strategically, with characters that cannot see inside of it. For example, enemies that are inside the field have
Darkness strategically, with characters that cannot see inside of it. For example, enemies that are inside the field have ![]() Blinded condition. Position your melee characters outside, so that enemies would have to attack with
Blinded condition. Position your melee characters outside, so that enemies would have to attack with ![]() Disadvantage. They might also try to run away, which would allow you to use
Disadvantage. They might also try to run away, which would allow you to use ![]() Opportunity Attack for an additional hit against them.
Opportunity Attack for an additional hit against them.
So the mechanic is very powerful, and I just grazed the surface of it here.
Using Minor Illusion
On the other hand, you can also use something like ![]() Minor Illusion to pull enemies together, changing their vision cones, and attacking with the same spell but hitting all of them. This is a very powerful cantrip that can be overlooked.
Minor Illusion to pull enemies together, changing their vision cones, and attacking with the same spell but hitting all of them. This is a very powerful cantrip that can be overlooked.
First, it does not break Invisibility or stealth (unless you get seen). Second, enemies, when not in combat, will chase it, meaning they will change their vision direction. Third, on most occasions, they will come closer to investigate the illusion.
This creates various opportunities like landing a powerful Area of Effect spell from a caster or scrolls, or hitting with wide attacks.
Level 4
Level 4 brings the first feat, it will be a huge improvement. Here you can select from a few choices, based on your playstyle and what kind of playthrough you are doing.
| Feat | Description |
|---|---|
| If playing as an unarmed monk, this is one of the most powerful feats you can pick. This will require you to use |
|
| Ability Improvement - +2 Dexterity | Another option is improving your dexterity, which is beneficial both for monk weapon attacks and unarmed attacks. |
Level 5
This is a huge milestone for the Shadow Monk build as it unlocks a few powerful features.
| Feature | Description |
|---|---|
| With the double attack, the build becomes significantly more powerful. |
The Monk class also gains special action, giving a little bit of crowd control capabilities.
| Actions | Description |
|---|---|
| One of the best actions overall in the game. You will be able to enter combat with invisibility, easily creating Surprise rounds. Moreover, if the situation is dire, you can always use it to disappear and leave combat. | |
| This can be activated when using melee weapons. Stun status makes the foes skip their turn. | |
| It can be activated when using Unarmed attacks. Stun status makes the foes skip their turn. |
Cloaks of Shadows - ultimate ambush setup
With ![]() Cloak of Shadows unlocked, the Shadow Monk can become the ultimate ambusher and stealth character. You can use it in two ways:
Cloak of Shadows unlocked, the Shadow Monk can become the ultimate ambusher and stealth character. You can use it in two ways:
- Become invisible with Cloak of Shadows condition enabling you to get an easy
 Advantage. Use this to ambush an enemy before combat and activate
  Surprised round
 - Escape combat. Yeah, you can outright leave combat and break enemy AI. Activate the Cloak of Shadows, move slightly away, and see how enemies start searching for you. If they don't find you, then the encounter ends.
The second part is what opens the Shadow Monk for really powerful combat setups. For example, you can go in, remove an enemy, and leave combat. You will need to do this alone, because if party members get dragged into the fight, this no longer works.
You can then kill a few weaker foes before coming in with the whole party to gang up on the boss.
Level 6
This is another major level for Shadow Monk; you will gain another unique feature.
| Feature | Description |
|---|---|
| You can now overcome physical resistances, as your fists count as magical attacks. | |
| Improved Unarmoured Movement | Significantly increases movement speed by 4.5 meters. |
The highlight of the level:
| Actions | Description |
|---|---|
| This allows you to move freely between shadows. As it costs a bonus action, it can be used indefinitely without a spell slot or other limitations. This is a perfect way to reach enemy backlines or set yourself up before the combat starts. It also grants you an |
Levels 7-10
Generally, this covers the Act 2 part of the game. This unlocks items that give a slight boost to a few builds, and you uncover a really interesting part of the story.
Level 7
The level unlocks a few class features
| Feature | Description |
|---|---|
| Gives a huge survivability boost against spells. | |
| Allows for avoiding |
Level 8
The second feat of the build is unlocked, and an additional Ki Point has been added.
Feat
| Feat | Description |
|---|---|
| Going first will allow you to jump on enemies and even stun them using |
|
| Ability Improvement - +2 Dexterity | You can add 2 points to a preferred stat. Remember if you are wearing |
| Feat | Description |
|---|---|
| This would be my go-to pick, if using Monk weapons - |
| Feat | Description |
|---|---|
| Pick this feat if you are using or plan to use |
Level 9
There are a few features that a monk obtains.
| Feature | Description |
|---|---|
| Can freely walk through |
There is an unmentioned upgrade, the monk ![]() Martial Arts: Deft Strikes at level 9 gains 1d8 rolls, instead of 1d6. When using flurries, this is an additional 2~ points of damage per flurry.
Martial Arts: Deft Strikes at level 9 gains 1d8 rolls, instead of 1d6. When using flurries, this is an additional 2~ points of damage per flurry.
Level 10
Here are other features that level 10 gives:
| Feature | Description |
|---|---|
| A decent immunity, but overall nothing of high importance. | |
| Improved Unarmored Movement | Your movement speed gets additionally improved by 6 meters. |
Obtaining Resonance Stone
At this level, you will most likely reach ![]() Mind Flayer Colony, the goal here is to obtain
Mind Flayer Colony, the goal here is to obtain ![]() Resonance Stone. This will prove vital later on, once you get
Resonance Stone. This will prove vital later on, once you get ![]() Shadow Strike, as it will directly double the damage.
Shadow Strike, as it will directly double the damage.
For now, I recommend putting this item into the stash, so that you would avoid the negative aspects of ![]() Steeped In Bliss for the upcoming fights.
Steeped In Bliss for the upcoming fights.
Levels 11-12
This is where you will spend most of the time in Act 3. There will be an immense amount of content, and you can finish your builds and unlock extremely powerful gear.
Level 11
The capstone feature of the Shadow Monk is unlocked.
| Action | Description |
|---|---|
| This action only works when hidden or invisible; the damage bonus will be doubled using |
|
This level is when I recommend to switch to the Weapon setup. Using ![]() Shadow Blade or spears like
Shadow Blade or spears like ![]() Shar's Spear of Evening or
Shar's Spear of Evening or ![]() Nyrulna with
Nyrulna with ![]() Shadow Strike will be a huge damage boost.
Shadow Strike will be a huge damage boost.
You can easily reset your stats by visiting Withers and committing to the Weapon Monk/Shadow Blade setup.
Using Shadow Strike
So the core idea of this build is to use the iconic ![]() Shadow Strike from Shadow Monk. With all of the setup that I talk about in this build, this is what it culminates to. However, there are a few caveats that I would like to cover:
Shadow Strike from Shadow Monk. With all of the setup that I talk about in this build, this is what it culminates to. However, there are a few caveats that I would like to cover:
- It should be used only on enemies that are affected by
 Steeped In Bliss from
  Resonance Stone. If not, then don't use Shadow Strike as the double damage will not activate. So if you are attacking from a higher ground, check the enemy statuses. If there is no Steeped In Bliss, you will not get double damage.
 - You need to be in stealth or invisible. So I recommend either entering combat from stealth or using Shadow Arts: Hide to enter stealth and use the striking ability.
Level 12 - Multiclass into Warlock 1
The last level is there to optimize the build and to unlock additional armor proficiency (this will enable to wear armors like ![]() Bhaalist Armour) and a specific cantrip. First, you will need to multiclass into Warlock. Here is how it is done:
Bhaalist Armour) and a specific cantrip. First, you will need to multiclass into Warlock. Here is how it is done:
Class
| Overview | |
|---|---|
 Warlock Warlock |
|
| Features | |
 Warlock Spell Slots Warlock Spell Slots |
These spell slots can be used to cast spells and refill each Short Rest. |
Cantrips
| Cantrip | Description |
|---|---|
| The new cantrip can be used with a normal attack without any cost. When enemies move while under its effect, they receive thunder damage. In later levels, it gives a direct damage boost. So no reason not to use it every turn. | |
| Although risky to use, it can help immensely with dialogue checks, which are important. Do not cancel the cantrip near the target NPC, as they will attack you. Move away before doing that. |
Subclass
| Overview | |
|---|---|
| Features | |
| This action allows you to bind any melee weapon and makes you proficient in it. This also results in using Charisma modifier instead of Strength or Dexterity. It also has a 20% chance to apply |
|
| Using the bonus action, you can improve your damage and increase your crit chance. | |
| This passive is responsible for the multiple bonuses you get, specifically armor and shield proficiencies. | |
Spells
| Spell | Description |
|---|---|
| Extremely valuable spell, that helps avoid attacks. You can now replace |
|
| Any | Using other spells would be a waste of spell slots, as their effects are minimal. Just take anything. |
So Warlock ends up being used for:
- Armor proficiencies
 Shield
 Booming Blade
Generally, people take it for ![]() Bind Hexed Weapon, but here this is done for different reasons.
Bind Hexed Weapon, but here this is done for different reasons.
Equipment Recommendations
Here are some recommendations on how to follow the gear picks:
- I recommend checking the Item Checklists or Interactive Map, depending on which is easier to use for you. This will help you track which items and when you should pick them.
- Gear for each slot is listed Best -> Worst. Generally, this means that you would start with lower gear recommendations (as they are available earlier) and upgrade to higher ones. However, in some cases, the best items can be obtained early, like
 Titanstring Bow, and some others.
 - I mention Stat Sticks in caster and ranged builds. These are items that you do not use directly (like
 Club of Hill Giant Strength,
  Knife of the Undermountain King, The Dead Shot, etc.), but their bonuses still apply to other weapon attacks or actions.
 - If an item is taken by another character, use the one with lower priority or even those from previous acts. If you want to have the best items for all builds, this will require planning, which is not for everyone.
Act 1
This covers the earliest part of the game, which generally spans ![]() Nautiloid,
Nautiloid, ![]() Wilderness,
Wilderness, ![]() Underdark and the semi Act 1, or to be precise Act 1.5 -
Underdark and the semi Act 1, or to be precise Act 1.5 - ![]() Rosymorn Monastery Trial.
Rosymorn Monastery Trial.
Build ID: 25
Mode: Full Equipment
Sets: Act 1, Act 1.5 - Creche, Good Items
Act 2
The main goal for this act is to obtain the ![]() Resonance Stone, which is available pretty late. So don't be in a hurry and enjoy all the stuff that you can encounter here.
Resonance Stone, which is available pretty late. So don't be in a hurry and enjoy all the stuff that you can encounter here.
Build ID: 25
Mode: Full Equipment
Sets: Act 2
Act 3 - Final Build setup
This is where you will unlock the strongest weapons and armors for most of the builds. It is split into two major parts, starting with ![]() Rivington and later reaching the huge area -
Rivington and later reaching the huge area - ![]() Lower City itself.
Lower City itself.
Build ID: 25
Mode: Full Equipment
Sets: Act 3
Build Mechanics
In this section, I would like to dive deep into how to play the Shadow Monk. This will help you utilize it to the fullest and correctly use various actions and spells throughout the game.
Important Mechanics and Combos
Let's go through key mechanics and tips on how to effectively use the build.
Act 2 - Githzerai Mind Barrier
To have good resistances for some time against Intelligence checks, you can do a special mechanic late in Act 2 (illithid colony). This requires you to finish a puzzle and find a specific mind. First, go and complete the puzzle:
 Once the doors are unlocked, go inside and pick up the Waking Mind:
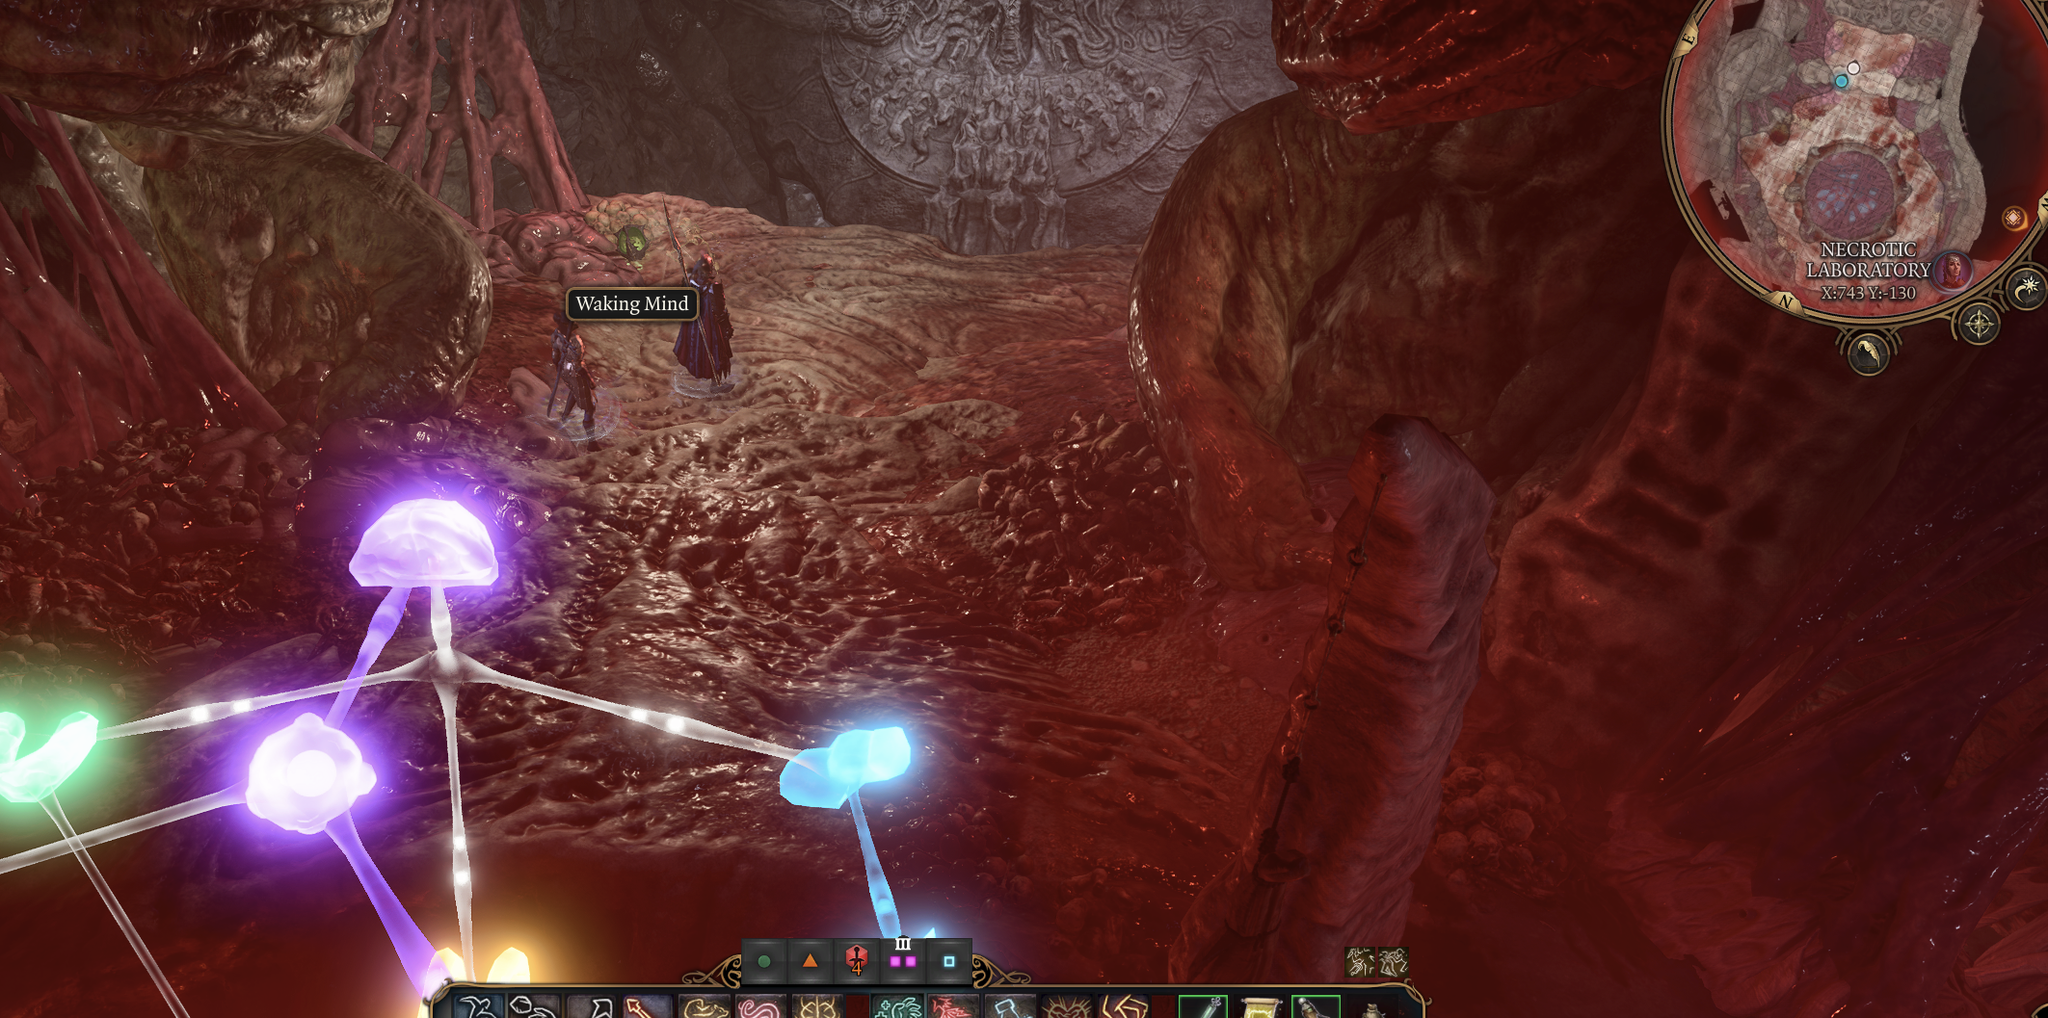
Now, go back to the interface and place the mind. After that, you will be able to get the Githzerai Mind Barrier effect.
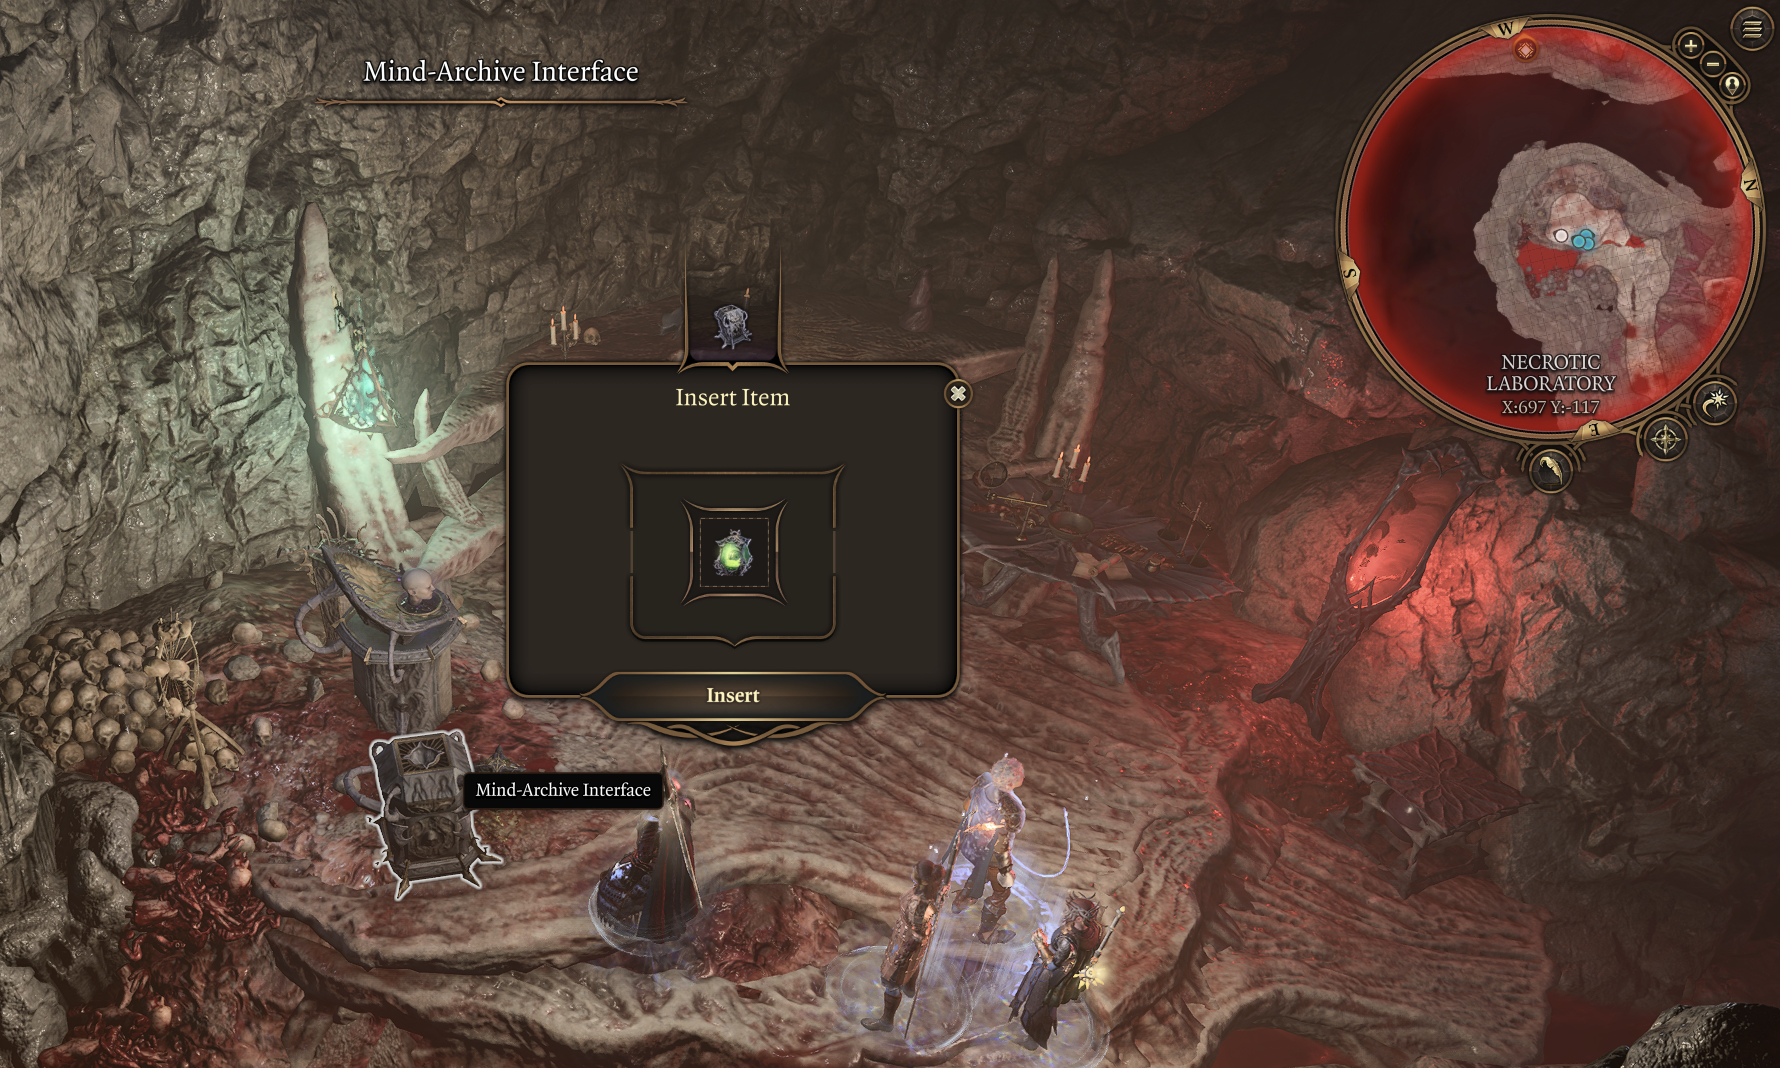
This is a great buff that will improve your saving throws, giving an ![]() Advantage on Intelligence. This will be extremely valuable in the upcoming fight. Sadly, it will disappear if you die, so try to avoid that.
Advantage on Intelligence. This will be extremely valuable in the upcoming fight. Sadly, it will disappear if you die, so try to avoid that.
Invisibility options
So this build does shine when using Invisibility. First, it allows starting with a Surprise round, giving you 1 turn ![]() Advantage which you can use to either kill or weaken enemies. Second, there are multiple ways of getting it:
Advantage which you can use to either kill or weaken enemies. Second, there are multiple ways of getting it:
- Potion of Invisibility - I think the most obvious one. If you can pickpocket or have plenty of gold, this option can be cheesy but effective.
 Invisibility - can be cast by various casters or activated via items.
- Cloak of Shadows - the iconic Shadow Monk feature, that allows one to become invisible at will.
 The Deathstalker Mantle - one of the key items that you obtain during the Dark Origin playthrough. You enter invisibility after each kill.
 Greater Invisibility - this is the most lucrative option. However, to use it you will want both proficiency and expertise in stealth, high dexterity, and stealth Advantage. With this effect, you can outright clean enemies without them even understanding what is happening. This requires a high-level caster like Bard, Sorcerer, or Wizard.
Combat Tactics and Rotation
- Use
 Flurry of Blows to inflict heavy damage with bonus actions.
 - You can use
 Shadow Arts: Pass Without Trace in case you want to move through a gorup of enemies in stealth.
 - Shadow Arts: Darkness can be situationally good if you can position it over the top of the enemies. Then you can attack them by standing outside and avoiding
 Blinded condition. Later you can get items that allow to see in Darkness
- Cloak of Shadows can be used to get into the perfect position and attack with Advantage. On the other hand you can use it to run away from a combat encounter or even reset it. For example, go into a fight, use Flurry of Blows and leave combat with Cloak of Shadows by running away.
- Shadow Step can be an excellent pre-combat setup option, so that you do not waste a precious bonus action
- Use
 Stunning Strike (Unarmed) to disable foes that could be dangerous like casters or bosses.
This is where I cover the Shadow Monk build with all its glory - ![]() Resonance Stone. You can use both
Resonance Stone. You can use both ![]() Shadow Blade from
Shadow Blade from ![]() Shadow Blade Ring or weapons like
Shadow Blade Ring or weapons like ![]() Shar's Spear of Evening or
Shar's Spear of Evening or ![]() Nyrulna. The latter benefit a lot from
Nyrulna. The latter benefit a lot from ![]() Bhaalist Armour.
Bhaalist Armour.
- Try to enter combat with Invisibility, to activate Surprise Round. If you can, use Greater Invisibility, to inflict more than one hit.
- Shadow Strike is your bread-and-butter attack that should be used to eliminate foes. if you cannot use it, move away from enemy vision cones and activate Shadow Arts: Hide. Then follow up with the attack.
- Use Shadow Step when the situation requires you to move to a faraway position so that enemies would have to use Dash to catch up to you. This way you can protect yourself from damage.
- Be careful of Resonance Stone effects. If you fight Illithid enemies, 90% of them will use psychic damage and could be lethal to you and your party.
- Try to maintain the initiative, Resonance Stone will apply a
 Disadvantage on mental rolls, so either have someone
  Counterspell or kill them before they can cast a spell.
 Hexblade's Curse can be used situationally, when utilizing weapons. The damage boost can apply multiple times on various damage riders.
Maximizing the Build - Abilities, Illithid, Consumables
This section I would like to dedicate to various optimizations that you can do to further empower your build. Various things like Illithid Powers, consumables can make the build from powerful to totally overpowered, trivializing the hardest game encounters
Maximizing Ability Scores
Ability Scores play an important role both in terms of how your attacks and spells land. Moreover, these can help to also reach extremely high skill rolls needed for a few checks.
- Act 1 -
 Auntie Ethel's Hair - you will want to get +1 Dexterity if you pick this choice.
 - Feat - Ability Improvement - +2 Dexterity
- Act 3 - Mirror of Loss - pick +2 Dexterity.
This will allow you to reach 22 natural Dexterity. This is the maximum value. Without ![]() Auntie Ethel's Hair, you will reach 20.
Auntie Ethel's Hair, you will reach 20.
Illithid Powers
This special mechanic in Baldur's Gate 3 allows you to consume tadpoles and unlock special Illithid Powers.
At first, you can only use the base powers. As you move to Act 3, you will be able to unlock the outer ring powers.
| Illithid Power | Type | Description |
|---|---|---|
| Base | Beneficial power to take as it does not have any costs and provides only benefits on the first hits. | |
| Base | Guarantees a critical hit, use it on important targets that you want to make sure are killed. | |
| Base | As this is Psychic damage, you will double it to 2d4 thanks to Resonance Stone. | |
| Base | A decent use for reaction to deal some bonus psychic damage. | |
| Base | As you will be using Dexterity, this can help you to reduce enemy Armor Class and give an increased hit chance on the next attack. | |
| Base | Can help to kill an enemy faster if it is left with a few HP. | |
| Elite | As you are not a charisma-based character, these proficiencies help with dialogue checks. | |
| Elite | Can be used to save yourself from a deadly spell. This is especially relevant as you will have a |
|
| Elite | Remove the cost of spell slots or charges. |
Potions, Elixirs and Consumables
Let's take a look at what consumables you can use to further empower the build.
Potions
These are general consumables, and most of them are activated for a few turns. Potions are separate from Elixirs and can be active together.
| Consumable | Description |
|---|---|
| You can chug this potion before combat, or during combat using a bonus action. It gives another action point that gives an additional attack or one more spell cast. Sadly, its duration is only 3 turns. | |
| Can be used to enhance your hit chance on a weapon. The +2 bonus is pretty significant, especially when using |
|
| Gives a bonus attack roll and damage. It is a good coating if you can apply it before combat to improve hit chances and get a slight damage boost. | |
| Although not something powerful, it is worth stocking up and saving a spell slot. | |
| Can be used to get a perfect position before the encounter starts. It can also help trigger Surprise rounds. |
Elixirs
Unfortunately, only one Elixir can be active at a time. However, the good thing is that they last until a long rest, making them very useful and economical.
Be sure to activate them before combat, as otherwise, you will need to use a Bonus Action.
| Consumable | Description |
|---|---|
| As you will be able to easily kill at least the weakest foe, this ensures additional attacks per turn. This is one of the most powerful options that you can use for a Shadow Monk build. | |
| For some encounters, you will want to go first. This elixir will ensure that it overcomes even surprise mechanics. | |
| Sets strength value to 21 until the Long Rest. I recommend this elixir in the early game, while you are punching with fists and using |
Conclusion and Credits
Thank you for reading the Way of the Shadow Monk build for Baldur's Gate 3. This is a truly unique build utilizing one of the late-game items to deal huge numbers of Psychic damage. I hope you enjoyed reading it!
Cheers!
Like, Dislike, comment, or share!
Join the Discussion
0 commentsNo comments yet.
Be the first one to leave a comment!