

Best Lae'zel Build - Lore Friendly - Vlaakith's Champion - Baldur's Gate 3 (BG3)
Contents
Lae'zel Build - Vlaakith's Champion
The idea of this build is that Lae'zel becomes one of the dedicated followers of Vlaakith and embraces everything to reach the goal of becoming one of her champions. To be fair, only one minor detail shows her dedication, and without it, the build can be used in whatever decisions you make in the game.
In essence, this is a Fighter build that goes all in on fighting enemies head-on. This might sound very simple, but the Battle Master subclass is extremely satisfying giving multiple options on how to engage in combat. This is enabled thanks to various manoeuvres - ![]() Disarming Attack (Melee),
Disarming Attack (Melee), ![]() Precision Attack,
Precision Attack, ![]() Riposte, etc.
Riposte, etc.
To further optimize the build there will be a small multiclass dip, with War Domain cleric. This will show your dedication towards Vlaakith when you pick her as Deity (or any other) and also get access to the ![]() War Priest feature enabling you to get additional attacks via bonus action.
War Priest feature enabling you to get additional attacks via bonus action.
The build will also use Two-Handed weapons as there are some very powerful options throughout the game for the Githyanki.
So let's go into the build!
Class Contribution
The build goes in Fighter and Cleric classes, with the former being the primary one.
11 Battlemaster Fighter
- Access to 3 attacks per action point thanks to
 Improved Extra Attack.
 - One of the most well-known features -
 Action Surge enabling additional attacks on each short rest.
 - Access to an additional Feat at level 6.
 Indomitable allows succeeding a failed saving throw. Although this is only once per long rest it can be a lifesaver against deadly spells that might disable the fighter.
- Unique fighting style options like
 Defence,
  Great Weapon Fighting, etc.
 - Superiority Dice, that unlock unique manoeuvres -
 Disarming Attack (Melee),
  Menacing Attack (Melee),
  Precision Attack, etc.
1 War Cleric
- Access to additional bonus action attacks via the
 War Priest feature.
 - Domain spells, that help with protection, mainly -
 Shield of Faith,
  Sanctuary.
 - Additional cantrips like
 Guidance which is useful during world interactions and various dialogue checks.
 - A change in spellcasting modifier that will be useful for some damage min-maxing in the late game.
Leveling Overview
Here is a concise table with all the main picks during your leveling progression. For more detailed reasoning, I go further in the article. Also, do not forget to check the recommended gear as it is crucial.
| Level | Class | Selection |
|---|---|---|
| 1 | Fighter 1 | Fighting Style: |
| Abilities: STR - 17, DEX - 16, CON - 14, INT - 8, WIS - 10, CHA - 8 | ||
| Skills: Acrobatics, Perception | ||
| 2 | Fighter 2 | - |
| 3 | Fighter 3 | Subclass: Battle Master |
| Manoeuvre: |
||
| 4 | Fighter 4 | Feat: |
| 5 | Fighter 5 | - |
| 6 | Fighter 6 | Feat: Ability Improvement - +2 Strength |
| 7 | Fighter 7 | Manoeuvres: |
| 8 | Fighter 8 | Feat: |
| 9 | Fighter 9 | - |
| 10 | Fighter 10 | Manoeuvres: |
| Spells: |
||
| 11 | Fighter 11 | - |
| 12 | Cleric 1 | Cantrips: |
| Subclass: War Domain | ||
| Deity: Vlaakith | ||
| Prepared Spells: |
To be fair there are a lot of variations with this build and options that you can do. For example, maximizing spellcasting modifiers with fixed stat items to get bonus damage via Arcane Synergy. Or getting cleric multiclass at level 7 to maximize the number of attacks for the mid-game.
Starting the Game - Level 1
This section covers the creation screen and what would go into the best Races, Abilities, and Skills for the Lae'zel Fighter build. If you have Lae'zel as a companion I recommend doing a respec at Withers and following along. This will fix the initial ability allocation which is not optimal and misses some important thresholds.
Origin
So the obvious pick for this build is Lae'zel. The whole setup is aimed at creating a Battlemaster that uses some of the Githyanki-specific items.
Races
As this is Lae'zel setup, the race is picked by default:
| Race | Features | Description |
|---|---|---|
 Githyanki Githyanki |
|
The default pick for the character. The race comes with all weapon proficiencies and medium armor. Moreover, it gets some good actions like |
Class
| Overview | |
|---|---|
 Fighter Fighter |
|
| Features | |
| You can use this to heal yourself in tight encounters, to get a little bit more of survivability. | |
Fighting Style
You can pick one:
| Cantrips | Description |
|---|---|
| My go-to recommendation, as it will give a significant boost to survivability. | |
| An alternative choice if you are into maximizing damage. Overall this bonus is insignificant, and more AC is better. |
Background
Backgrounds are mostly for role-playing and you can pick whatever you prefer. However, as Wyll you will start with a specific one that cannot be changed:
| Background | Skills | Description |
|---|---|---|
| Soldier | Athletics Intimidation |
A somewhat good background which also gives proficiency in one of the dialogue ability checks. |
Abilities
Now let's take a look at the abilities of the Lae'zel build. Correct allocation will allow you to maximize the early gameplay and get good modifier bonuses.
The core mechanic to understand for ability points is that they give "ability modifiers" that apply to various skill checks. For example, Charisma works on Intimidation and persuasion checks. Wisdom on Survival or Animal Handling and so on.
You get a higher ability modifier on even values - 10, 12, 14, etc. So keeping it on odd may be useless. However, there are various +1/2 modifiers in the game, specifically ![]() Auntie Ethel's Hair or Feats that help round this up.
Auntie Ethel's Hair or Feats that help round this up.
| Ability | Value | Description |
|---|---|---|
 |
17 (15+2) | The maximum strength will allow to maximize the weapon damage. The value can be 16 if you do not plan on getting the |
 Dexterity Dexterity |
16 (15+1) | This is a debatable stat and could be set to 14 while going for 16 in the Constitution. I prefer higher initiative roles, which allow Lae'zel to go earlier in combat. |
 Constitution Constitution |
14 | Helps with a higher health pool. Depending on your priorities you can set it to 16. |
 Intelligence Intelligence |
8 | Not a relevant ability for the build |
 Wisdom Wisdom |
10 | This will remove the negative modifier against Wisdom Saving Throws. |
 Charisma Charisma |
8 | Not relevant for the build |
Skills and Expertise
Overall, the skills should be impacted by your roleplaying and background decisions. However, you would still want those that will give you the best benefits. There are only a few relevant ones:
- Acrobatics
- Perception - helps detect ambushes
- Survival - helps detect chests.
Leveling Progression - Levels 2-12
Here is the detailed progression for the Lae'zel build to get you started. You can use it as a guideline because early games can be daunting and overwhelming. Later on, once you get a feel for the class you can start picking your options
Level 2
This is where you will have left the tutorial area, and will start exploring the world. The fighter instantly gains a powerful feature:
| Action | Description |
|---|---|
| For each short rest, you can get an additional action point. This enables the fighter to unleash additional attacks. |
Optional Progressing with Elixir of Hill Giant Strength
Some players prefer using the Elixir of Hill Giant Strength to gain fixed 21 strength. This allows circumventing some limitations with melee builds and gains a huge boost to damage early on. I think someone like Lae'zel would not use this, and I will continue the progression and gear recommendations with this in mind.
However, if you decide to use them, it is pretty easy. Early in Act 1, after you reach the first settlement - Druid's Grove. There you can stock up on some really powerful potions for Acts 1, and 2 - Elixir of Hill Giant Strength.
What do they do? They increase the Strength to 21 until a Long rest. More or less this negates any need to have strength investment if you plan to use them till the late game. This is somewhat gimmicky, however, if you are interested here is a guide on how to farm Elixir of Hill Giant Strength.
So here is the setup once you get these Elixirs and decide to use them. Remember to respec, to get the full utility:
| Ability | Value | Description |
|---|---|---|
|
8 | Strength becomes irrelevant. |
| Dexterity |
16 (15+1) | Helps with initiative and gives a boost to the armor class when wearing medium armor. |
| Constitution |
14 | Helps with a higher health pool. Depending on your priorities you can set it to 16. |
| Intelligence |
16 (14 + 2) | Later, you will obtain |
| Wisdom |
12 | This will remove the negative modifier against Wisdom Saving Throws. |
| Charisma |
8 | Not relevant for the build |
Level 3
Lae'zel gets to choose the Fighter subclass which will have a huge impact. The build will be going with Battlemaster as it is the default pick for her.
| Overview | |
|---|---|
 Battle Master Battle Master |
|
| Features | |
 Superiority Dice Superiority Dice |
These dice give bonus 1d8 damage, can be used 4 times, and are reset each short and long rest. Easy damage increase and improved battlefield control. |
Manoeuvre
You get to pick 3 distinct Battle Master actions:
| Manoeuvre | Description |
|---|---|
| One of the key options to make a fighter very powerful in early games. Once you obtain the |
|
| Very powerful action, that allows them to disarm foes, and force them to drop their weapons. | |
| Gives an easy way to obtain |
Level 4
Level 4 brings the first feat option. There are some options that you can pick so let me give recommendations
Feat
| Feat | Description |
|---|---|
| This is the strongest feat if you are using two-handed weapons. First, it gives a bonus attack using a bonus action if you kill an enemy or land a critical hit. Second, it gives a big 10 damage boost, that comes with a -5 penalty to attack rolls. This is problematic in the early game but fighters can overcome it with |
Level 5
This is a huge upgrade for Battle Master Fighter.
| Feature | Description |
|---|---|
| This allows attacking two times instead of one, theoretically doubling the Battle Master's damage output. |
The next big upgrade like this will be at level 11.
Level 6
And we get another Feat choice
Feats
| Feat | Description |
|---|---|
| Ability Improvement - +2 Strength | Let's pump that strength to maximize the Fighter build pure combat prowess. |
Level 7
Temporary multiclass into War Domain Cleric.
In my opinion, this level offers a unique opportunity if you are willing to do a respec at level 11. I am leaving this an optional choice for those who want to maximize the build for levels 7-11. After that, you would still go back to full fighter at level 11. Remember, the last level of the build will be War Domain Cleric, so this is additional optimization for those who want maximum damage in Act 2 and early Act 3.
So the idea here is that you can get War Domain Cleric and enjoy the ![]() War Priest effect. There are also some useful buffs like
War Priest effect. There are also some useful buffs like ![]() Shield of Faith for additional survivability.
Shield of Faith for additional survivability.
So instead of taking Fighter at Level 7, multiclass into Cleric with these picks:
- Cantrips:
 Thaumaturgy, Guidance,
  Blade Ward
 - Subclass: War Domain
- Deity: Vlaakith, well obvious with the build theme, otherwise take what you prefer
- Abilities: any
- Prepare Spell: Sanctuary,
 Protection from Evil and Good, anything
At level 11, you would go back to 11 levels of fighter as you want that ![]() Improved Extra Attack which is a huge damage boost through the whole day, every turn. Let's continue with the base progression
Improved Extra Attack which is a huge damage boost through the whole day, every turn. Let's continue with the base progression
Fighter features
The Battle Master gets substantial improvements to its subclass. Still there is one point I would like to cover.
| Feature | Description |
|---|---|
| Superiority Dice: 1 |
An additional dice is unlocked, allowing even more maneuvers per short rest. |
Manoeuvres
| Manoeuvres | Description |
|---|---|
| In essence, this gives an additional attack with reaction. Of course, this does compete with Attack of Opportunity, but it might not get always activated. | |
| Sometimes this can guarantee an instant kill if the enemy is pushed to a chasm. Also, this allows to force enemies onto difficult terrain or spells like |
Level 8
The third feat is unlocked which is the earliest option for any class.
Feats
There are a few good options, so here are some recommendations from my side:
| Feat | Description |
|---|---|
| If you are looking for maximum damage, this would be my pick. It will improve any of the damage rolls and damage riders when you hit. | |
I would not overlook this feat. It gives multiple benefits:
|
|
| A very popular pick, as it allows for avoiding surprise rounds and getting a huge boost to initiative, making Lae'zel go earlier in combat. I would only get this on 1 character in the group, in case you get a surprise round and need to disable key enemies. |
Level 9
Besides the boost in HP, a new class feature of fighter is unlocked:
| Feature | Description |
|---|---|
| Greatly improves chances of succeeding in Saving Throws, minimizing the impact of crowd control actions. |
Unfortunately, it is not as important for a fighter, compared to something like a Caster, which would be using a lot of ![]() Concentration spells.
Concentration spells.
Level 10
A decent progression level that improves the Battle Master subclass further.
| Feature | Description |
|---|---|
| Makes the Manoeuvres more potent as the additional dice roll now has a higher upper value. |
Manoeuvres
| Manoeuvres | Description |
|---|---|
| A great tool to have in the arsenal in case you need to help a downed party member. | |
| Can help you to force some stronger enemies to attack the Fighter. |
Level 11
This is big, very big. You gain a very important class feature from Fighter
| Feature | Description |
|---|---|
| Now a third attack can be used, tripling your base damage. Especially in the late game, where you have multiple sources of additional damage, this will stack up for easy kills against most foes. |
Level 12 - Level 1 Cleric
So this level is left for the Cleric Multiclass. The main goal is to obtain the ![]() War Priest effect which will offer additional attacks per long rest.
War Priest effect which will offer additional attacks per long rest.
There is also a unique opportunity here to do some optimizations. For example, if you have ![]() Amulet of Greater Health you could respec, drop all the constitution, and pump up Wisdom. This way you will have higher resistance against spells targeting Wisdom. However, this opens the opportunity to increase damage when wearing
Amulet of Greater Health you could respec, drop all the constitution, and pump up Wisdom. This way you will have higher resistance against spells targeting Wisdom. However, this opens the opportunity to increase damage when wearing ![]() Diadem of Arcane Synergy.
Diadem of Arcane Synergy.
You can also lower Dexterity to something like 14, and further improve Wisdom, resulting in +3 to each attack which stacks up well with the number of Fighter attacks. Overall, I leave this decision in your hands.
Class
| Overview | |
|---|---|
 Cleric Cleric |
|
| Features | |
 Spell Slots Spell Slots |
These can be used to cast spells and are restored each long rest. |
| Gives access to some additional spells. | |
Cantrips
There are a few useful ones, however, late in the game, they don't matter much.
| Cantrip | Description |
|---|---|
| Useful for some dialogue ability checks, however, Lae'zel will not be doing many of them if she is a companion. | |
| Gives +1d4 to ability checks to an ally. | |
| Can be cast before combat to get some damage resistance. |
Subclass
| Overview | |
|---|---|
 War Domain War Domain |
|
| Features | |
| The additional charges allow for attacks with bonus action. These also work while in |
|
| Gives +1d4 radiant damage rider. This also works in |
|
| Provides additional Armour Class, and the spell works until long rest. This also moves to |
|
Deity
The main and obvious pick would be - Vlaakith. Of course, if you are rejecting her, any other diety can be taken.
Prepare Spells
Depending on your Wisdom, you will have a few options:
| Spell | Description |
|---|---|
| Can be used to avoid combat in a dire situation. | |
| Gives additional protection against fiends, undeads, etc. |
Maximizing Ability Scores
Now, as the build progression is covered there are a few aspects and important decisions you will have to make throughout the game. These will decide your final score for abilities.
- 17 Strength - the base from character creation.
- Act 1 -
 Auntie Ethel's Hair - you will want to get +1 Strength if you pick this choice.
 - Feat - Ability Improvement - +2 Strength.
- Act 2 - Potion of Everlasting Vigour - +2 Strength
- Act 3 - Mirror of Loss - pick +2 Strength.
This results in the highest natural strength value of 24. To be fair this fits the Lae'zel build especially as she would not be using something like Strength Elixirs.
Potions, Elixirs and Consumables
Let's take a look at what consumables you can use to further empower the build.
Potions
These are general consumables, and most of them are activated for a few turns. Potions are separate from Elixirs and can be active together.
| Consumable | Description |
|---|---|
 Potion of Speed Potion of Speed |
In case you or your other casters have a |
 Potion of Animal Speaking Potion of Animal Speaking |
Although not something powerful, it can be used to enable dialogues with animals. |
 Potion of Invisibility Potion of Invisibility |
Can be used to get a perfect position before the encounter starts or leave the encounter if it comes to worst. |
 Oil of Accuracy Oil of Accuracy |
Gives +2 to attack rolls, which minimizes the negative impact from |
 Diluted Oil of Sharpness Diluted Oil of Sharpness |
Gives a bonus attack roll and damage. It is a good coating if you can apply it before combat. |
Elixirs
Unfortunately, only one Elixir can be active at a time. However, the good thing is that they last until a long rest, making them very useful and economical.
Be sure to activate them before combat as otherwise, you will need to use Bonus Action.
| Consumable | Description |
|---|---|
 Elixir of Bloodlust Elixir of Bloodlust |
Very effective elixir that gives another action point if you kill an enemy. I would say this is the best one to use to maximize your output through the turn. |
 Elixir of Heroism Elixir of Heroism |
Very valuable elixir especially in the early game to counteract the |
 Elixir of the Colossus Elixir of the Colossus |
Makes you bigger, and a bit stronger with a 1d4 damage boost. |
 Elixir of Vigilance Elixir of Vigilance |
For some encounters, you will want to go first. This elixir will ensure that it overcomes even surprise mechanics. |
Illithid Powers
This special mechanic in Baldur's Gate 3 allows you to consume tadpoles and unlock special Illithid Powers.
To be fair, Lae'zel is one character that I never give tadpoles. She is fully against it most of the game, and it feel unfair to use them on her. However, if you want some options:
| Illithid Power | Type | Description |
|---|---|---|
| Base | Beneficial power to take as it does not have any costs, and provides only benefits on the first hits with attack rolls. | |
| Base | An easy way to ensure you land critical hits. | |
| Base | Can help to kill an enemy faster if it is left with a few HP. | |
| Base | A great way to weaponize your reaction before obtaining |
|
| Elite | Can be used to maximize the effectiveness of charisma-based skills, especially relevant to the main character. | |
| Elite | Can be used to save yourself from a deadly spell. This is especially relevant as you will have a |
Equipment Recommendations
Now I would like to go through some gear recommendations to maximize the Lae'zel Fighter Build. Items are especially important as they take the build to the next level thanks to their unique effects.
Now, as this is a somewhat lore-friendly build I will be offering Githyanki-related items wherever possible. Most of them include additional psychic damage, which relates to their prowess when fighting Illithid enemies.
Act 1
| Slot | Item | Description |
|---|---|---|
 Melee (Two-Handed) Melee (Two-Handed) |
Solid choice as it increases the critical chance and provides an |
|
| The first strong githyanki themed weapon, which offers the psychic damage bonus. | ||
| It's one of the best greatswords that you can get in Act 1. The bonus to attack rolls is great for counteracting |
||
| A solid greatsword, that gives bonus armour class with |
||
 Ranged Ranged |
Gives bonus initiative, allowing one to go earlier in combat. I recommend this for the early games, as you will have low dexterity. | |
| Equip two of these so that you can attack with your bonus action. | ||
 Head Head |
Gives immunity to critical hits, greatly improving survivability. | |
| This is a very powerful headwear, however, it does require some investment in the Spellcasting modifier. For this reason, I only recommend it if you are using Elixir of Hill Giant Strength to maximize its effectiveness. | ||
| Inflicts bonus 1d4 psychic damage and gives additional bonuses for githyanki wearers. | ||
| I think the melee aspect of the build greatly benefits from this helmet, so I recommend it. | ||
 Cloak Cloak |
- | Nothing really of note here. |
 Armor Armor |
A heavy armor version of Adamantine gear. It is one of the best armors until the middle of Act 2. | |
| The starting armor that is surprisingly good worn by Lae'zel. It gets +2 Armor Class from at least 14 Dexterity. | ||
 Gloves Gloves |
Very strong gloves as they give |
|
| These gloves have a niche use between late Act 1, and part of Act 2. The 18 DEX allows you to ditch any dexterity investment, which could be used on Intelligence to activate |
||
| Defensive gloves to reduce the damage of incoming ranged attacks. | ||
 Boots Boots |
One of the best boots, giving a total advantage for movement on difficult surfaces. It also gives |
|
| Good boots that allow moving without slowing down on difficult terrain. | ||
 Amulet Amulet |
This is a good amulet that can double your damage with a cost of bonus action. For example, it would work perfectly against bosses where |
|
| The only amulet in the game that gives direct damage increase, can be activated with a single health potion before combat. | ||
| Gives mobility improvement thanks to the |
||
 Rings Rings |
For now, I recommend just getting the item, as the fighter cannot cast spells. However, later, when you obtain Cleric and cast something like |
|
| The best option for Act 1. The bonus Armour Class is a great boost for survivability. | ||
| A solid ring with a +2 acid damage bonus on your weapon attacks. | ||
| A good movement boost makes it easier to reach those targets. |
Act 2 - mid-game
For Act 2, you will be dropping that heavy armor for some great medium ones. Some of the items will still be the best ones even if they are from Act 1.
| Slot | Item | Description |
|---|---|---|
| Melee (Two-Handed) |
Comes with +2 enchantment and bonus force damage. | |
| You can imbue a weapon with any element 1d4 damage and gain a +1 to attack rolls. You can get the bonus elemental damage on any weapon. For example, drop another weapon on the ground, cast the spell with this glaive, and equip the said weapon. This is a very powerful combo, although it may be a bug. | ||
| Ranged |
It is an amazing bow that allows you to precast |
|
| Head |
Improves Saving Throws for Constitution and against spells. | |
| This is the recommended headwear if you have a way to set your spellcasting modifier (intelligence - FIghter, wisdom - cleric) to at least 14. This can be done by using fixed stat items like |
||
| Cloak |
Improves survivability and Saving Throw success. You want to equip this cloak to maintain that good Armour Class. | |
| Armor |
The best heavy armor in Act 2. | |
| Gloves |
As you will deal psychic damage with the build, these will allow for additional mental fatigue debuff. | |
| These have a niche use, specifically when you have a nova round, and plan on attacking enemies in close proximity or jumping on a boss. Use |
||
| It gives a bonus of 1d4 damage, which is a good boost to melee damage. | ||
| Boots |
Gives +1 to the armor class. | |
| The boots are still the best ones you can equip. | ||
| Amulet |
Allows casting a |
|
| Rings |
The ring can be a good replacement for |
|
| Still a good ring to use, for easy +2 damage. | ||
| Improves armor class by 1. |
Act 3 - Final Build setup
This is the last act of the game, where you will get access to the most powerful items. To get them as early as possible you will need some planning, but overall, it should not be a problem.
Generally, you would want ![]() Bhaalist Armour, for the piercing vulnerability. However, as this build aims to use a two-handed sword and reflect a lore-friendly setup of Lae'zel, I leave it out of item recommendations.
Bhaalist Armour, for the piercing vulnerability. However, as this build aims to use a two-handed sword and reflect a lore-friendly setup of Lae'zel, I leave it out of item recommendations.
| Slot | Item | Description |
|---|---|---|
| Melee (Two-Handed) |
This is my recommended pick for the Lae'zel build. It is the strongest githyanki-themed weapon in the game with a strong damage rider and additional offensive action. | |
| An alternative weapon with a solid offensive action option and additional damage based on the strength modifier. | ||
| Ranged |
Improves critical range for attack rolls. | |
| I would pick this bow if you are using Heavy Armour. The bonus initiative would be a huge boost to do some damage early in the turn. | ||
| Very powerful bow, that gives additional damage on critical hits with weapon attacks. I would use this if you often use effects like |
||
| Head |
Gives an easy way to get +2 Necrotic damage. | |
| This is the recommended headwear if you have a way to set your spellcasting modifier (intelligence - FIghter, wisdom - cleric) to at least 14. This can be done by using fixed stat items like |
||
| Gives bonuses to attack and initiative rolls. | ||
| This helmet synergizes well with |
||
| A decent headwear option that increases the critical hit chance. | ||
| Cloak |
Great way to avoid attacks and reduce the chance of enemy attacks landing. | |
| The bonus armor class is great for better survivability. | ||
| Armor |
One of the best armors in the game, gives 21 Armour Class, and various buffs. | |
| Reduces incoming damage and provides |
||
| Gloves |
The best gloves in terms of melee damage potential. | |
| The gloves fit well with the githyanki theme. You will deal psychic damage from various sources like |
||
| As you will be attacking a lot of Battle Master Manoeuvres, these gloves will improve the success chances. Moreover, they come with +1 attack roll boost. | ||
| A decent gloves giving 1d6 fire damage rider. | ||
| Boots |
An alternative boot to |
|
| Mentioning these, as they fit the githyanki theme. However, I do think they are inferior to other boot options, especially as the fly costs bonus action and results only in 1d4 bonus damage. | ||
| Amulet |
The only amulet that gives a direct damage boost. | |
| It could be used to improve the survivability of the build. If using it remember to set your constitution to 8 using respec. | ||
| Rings |
Once you take the Cleric multiclass you can get |
|
| An excellent ring to fit the githyanki theme. Battle Master uses plenty of actions like |
||
| An easy way to activate |
||
| Gives a slight armor class boost. |
Build Mechanics
In this section, I would like to dive deep into how to play the Wyll Build. This will help you utilize it to the fullest and correctly use various actions and spells throughout the game.
Important Mechanics and Combos
Let's go through key mechanics and tips on how to use the build effectively. Warlock has very interesting combos if you are willing to invest some time in the setup.
The Fighter's simplicity - its number of Attacks
So in general, Fighter is considered a simple build, you mostly hit with your weapon and that's it. I think Battle Master does give an interesting and tactical approach with Manoeuvres where you can also apply control on enemies.
However, the main thing is that Fighter can hit more times than most of the other classes:
- Extra Attack + Improved Extra Attack - 3 attacks with first action point
- Action Surge - 3 attacks per short rest
 Great Weapon Master: Bonus Attack - 1 additional attack with bonus action. An alternative will be the War Priest effect, which can be activated if Great Weapon Master is not procced.
 Haste or Potion of Speed - 1 additional attack.
- Elixir of Bloodlust - 1 additional attack if an enemy is killed
So on the initial turn, it is possible to land 9 attacks, and not many enemies can stand after this onslaught.
Managing Great Weapon Master
One of the more important feats of the build is ![]() Great Weapon Master: All In. It gives a flat damage boost at the cost of decreased attack rolls. Generally, it is best to take this later in the game at level 8+, when you have higher attack bonuses and better gear.
Great Weapon Master: All In. It gives a flat damage boost at the cost of decreased attack rolls. Generally, it is best to take this later in the game at level 8+, when you have higher attack bonuses and better gear.
However, if you can effectively use it at level 4, you will be able to easily kill most of the enemies you encounter, especially as it is easy to die in Act 1. So if you are up for putting in additional effort the benefits are immense. Here are the main ways to increase your attack rolls:
 Bless from Cleric or Paladin, for a 1d4 bonus.
- Spells like
 Faerie Fire, and
  Blindness give an
  Advantage to attackers.
 - Oil of Accuracy or Diluted Oil of Sharpness, for 1 and 2 attack roll bonus.
 Gloves of the Growling Underdog - can be obtained in Goblin Camp, and gives an Advantage for attack rolls.
 Svartlebee's Woundseeker - early game greatsword that you can get before engaging in any of the major battles of Act 1.
Now, if you want more in-depth information, I have a guide covering how to increase attack rolls, which lists a lot of options and combinations. You can then pick the bonuses based on your party setup.
Using appropriate Manoeuvres
Battle Master's main draw is its unique Manoeuvre actions. These give various bonuses by consuming Superiority Dice. These get reset each short and long rest, giving plenty of uses.
For example, use ![]() Trip Attack (Melee) to make the enemy prone on the first attack. This then leaves them lying on the ground, guaranteeing constant
Trip Attack (Melee) to make the enemy prone on the first attack. This then leaves them lying on the ground, guaranteeing constant ![]() Advantage. Follow up with attacks from yourself and your allies.
Advantage. Follow up with attacks from yourself and your allies.
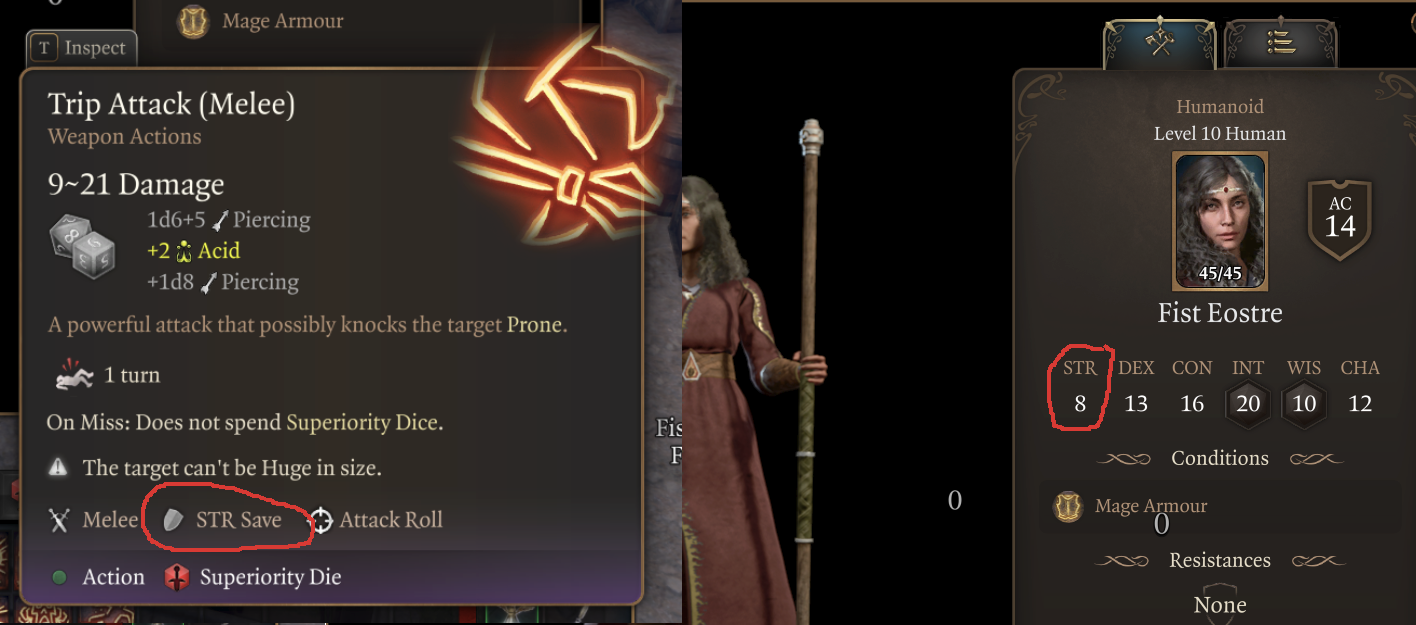
However, you should not use them blindly. Always evaluate what Saving Throw the action targets, and whether the enemy will succeed against it or not. This way you can impose significant crowd control and damage on the foes.
For example, if you have a low hit chance, especially with ![]() Great Weapon Master: Bonus Attack you can use
Great Weapon Master: Bonus Attack you can use ![]() Precision Attack to add an additional attack roll bonus and greatly improve the chance of landing a hit.
Precision Attack to add an additional attack roll bonus and greatly improve the chance of landing a hit.
Stacking Psychic effects
So this is Lae'zel build, and as Gith, they use various psychic effects to strike down their foes. From the lore, their main enemy is illithid mindflayers, which are their sworn enemies. For this reason, many of their items include psychic damage effects. Here are a few ways that I use in the build to stack these:
 Silver Sword of the Astral Plane or
  Soulbreaker Greatsword - 1d6 or 1d4 psychic damage rider
 Strange Conduit Ring - 1d4 psychic damage rider
 Ring of Mental Inhibition - applies mental fatigue
 Braindrain Gloves - applies mental fatigue
- Resonance Stone - doubles the psychic damage.
 Boots of Psionic Movement - can grant an additional 1d4 psychic damage rider, but it's kind of limited in terms of activation unless you precast
  Fly
Fly
This is of course not "optimal" in terms of damage, but does give a unique playstyle with interesting damage options and debuff effects on top of what Battle Master can do.
Considerations for different item and ability setups
Okay, so Fighter has plenty of options for maximizing its stats with different items and ability setups. In the build, I did list a few of them, but overall it all depends on how much effort you are willing to put in.
- Using
 Amulet of Greater Health drastically improves the health pool and allows you to dump Constitution. It then can be allocated to the spellcasting modifier - Wisdom (last level 1 class cleric) or Intelligence (last level 1 class fighter).
  Gloves of Dexterity can be a decent mid-game choice, to improve Dexterity and get bonus initiative and improved attack rolls. This also allows dumping DEX, pumping Intelligence, and using
  Diadem of Arcane Synergy for bonus damage. For the later part of the game, these gloves take a valuable equipment spot and lose their importance.
- When multiclassing into Cleric your spellcasting modifier becomes Wisdom, so remember that if you will be wearing Diadem of Arcane Synergy.
- There is an option of using
 Gauntlets of Frost Giant Strength to set the strength to 23 in Act 3. This then allows us to again pool those points into something like Wisdom/Intelligence and get bonus damage from Diadem of Arcane Synergy
Early Game Combat
Let's cover how you should progress combat levels 1-6.
- It's pretty simple, bonk the weakest enemy, and kill them.
- Use Action Surge to get an extra attack and use this action once per short rest to maximize the build effectiveness. Perfect for taking down a specific foe or a boss.
- Once you get
 Great Weapon Master: All In I do recommend comboing it with Precision Attack for an easy way to improve attack rolls.
 - Use different Manoeuvres based on what enemies are weak. Using
 Trip Attack (Melee) is an easy way to guarantee an Advantage in melee attacks.
  Second Wind is perfect for restoring a small amount of HP.
- Utilize the Githyanki actions like
 Misty Step to get in a better position.
Mid to Late Game Combat
Overall the combat stays the same - hit many times, destroy your foes, rinse and repeat.
- In case Great Weapon Master: Bonus Attack doesn't proc you can use War Priest effect to land a bonus action attack.
- If you are using psychic damage riders, be sure to get Resonance Stone in late Act 2 to maximize your damage.
- With Improved Extra Attack and Action Surge you can easily release 6 attack on initial turn, removing or weakening critical targets.
- That's it more or less...
Conclusion
Thank you for reading the best Lae'zel Fighter Build for Baldur's Gate 3. This is a lore-friendly setup that takes into account her default class and subclass picks. Moreover, I recommend various githyanki friendly items and maximize psychic effects. So enjoy the game with your favourite Bae'zel
Cheers!
Like, Dislike, comment, or share!
Join the Discussion
0 commentsNo comments yet.
Be the first one to leave a comment!