
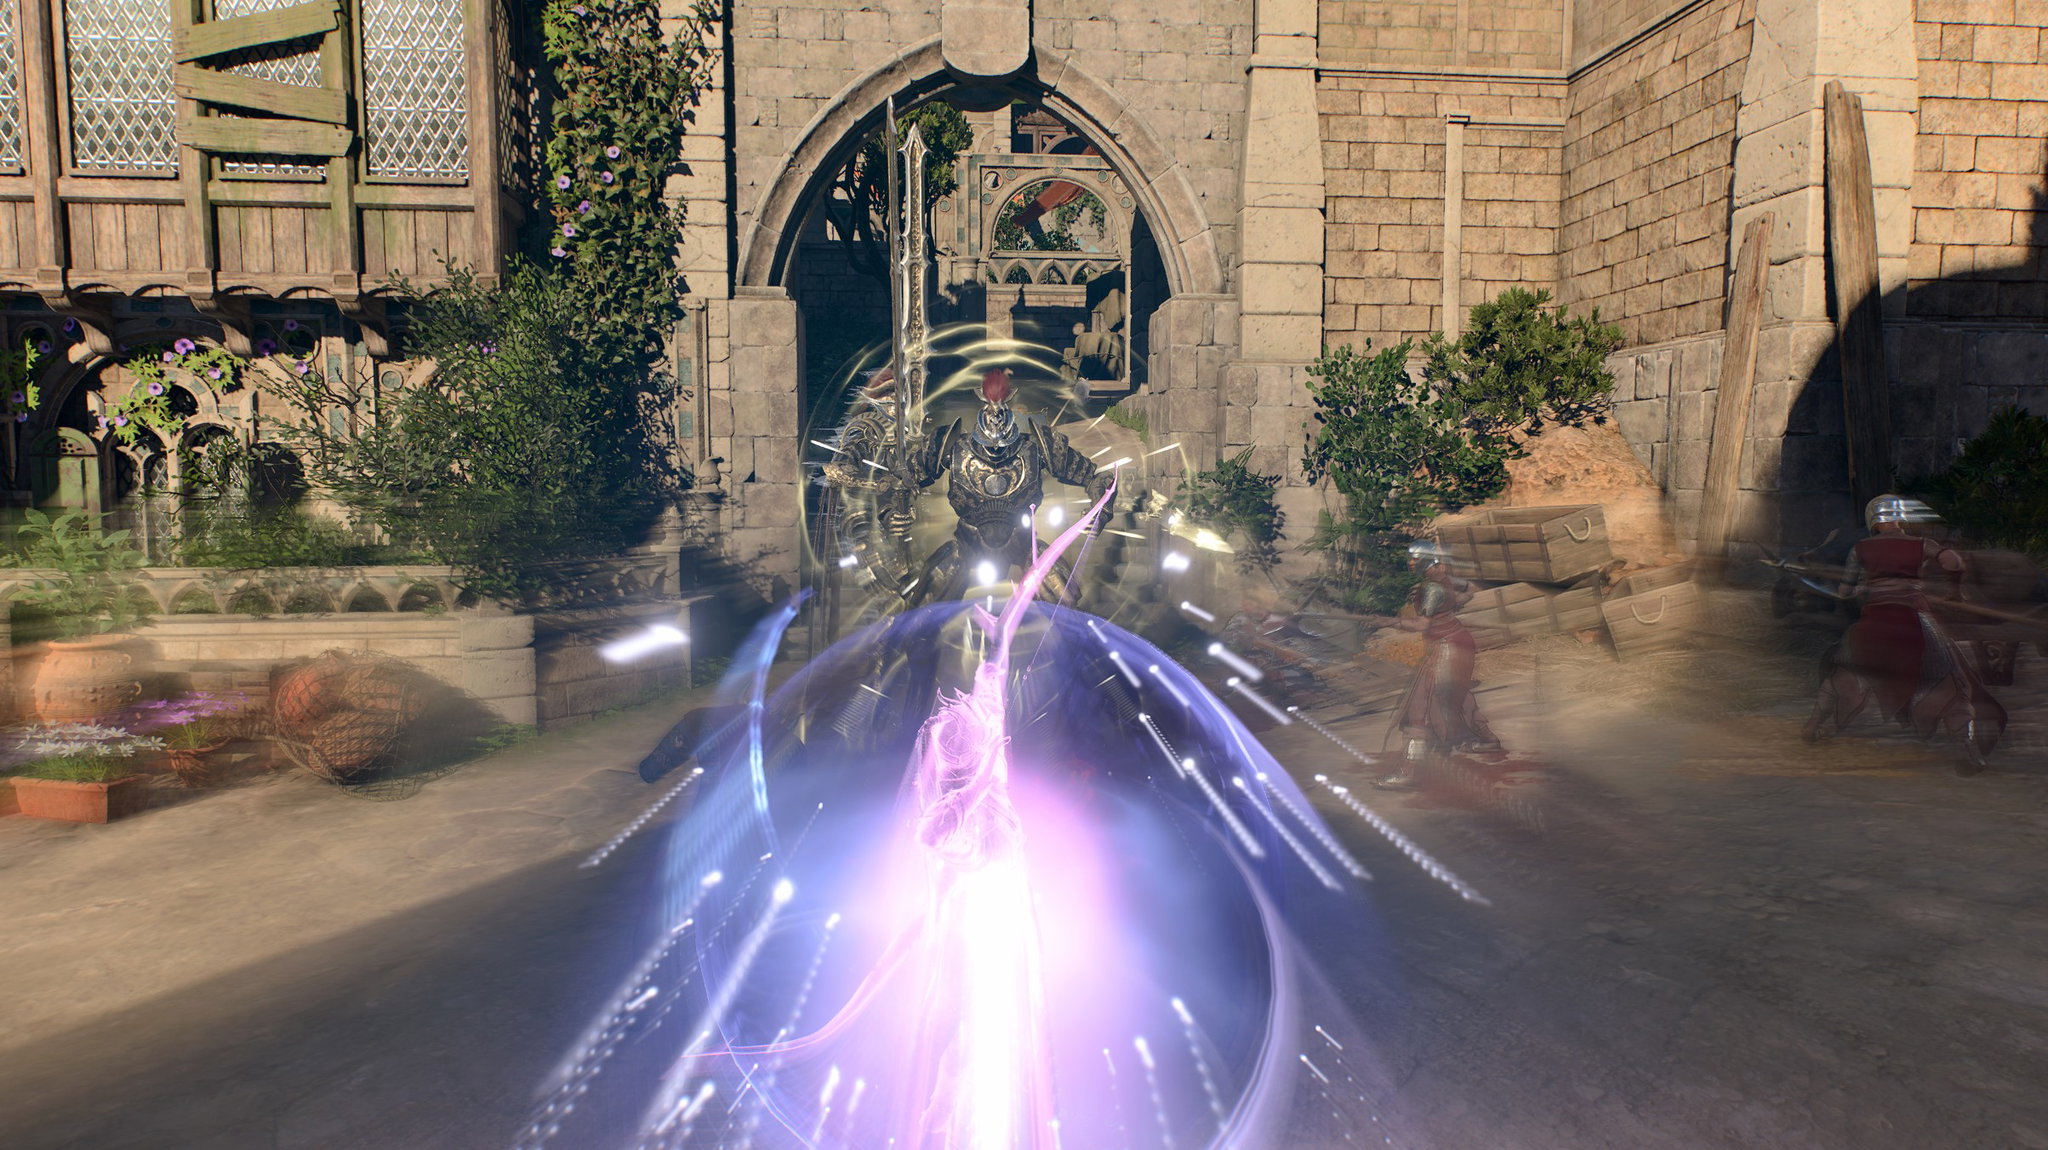
Eldritch Knight Archer Build - Baldur's Gate 3 (BG3)
Contents
Eldritch Knight Archer Build
Eldritch Knight and Fighter in general is one of the best picks if you want a powerful archer setup. The core kit of  Action Surge just gives a huge power spike for nova rounds, and
  Improved Extra Attack as a capstone, enables you to reach 3x attack per main action point.
So with the core kit covered, what does Eldritch Knight do? It's like a cherry on top, providing a few nice features that synergize into an excellent combination. The main point is that you get access to a few spells; they are not game-changers, but still nice helpers.
The cool aspects are  War Magic and
  Eldritch Strike. The former is what will allow you to reach 4 attacks without any buffs. This is a very powerful option and enables very high damage per round. To activate War Magic you need a cantrip, and for this my pick would be
  Booming Blade. This means that we will engage in melee combat, and for that
  Shadow Blade will be used to maximize that single-target damage.
The Eldritch Strike plays into the spellcaster role, giving enemies a  Disadvantage to
  Saving Throw. Even without dedicating items to Spell Save DC, you can technically be a full spellcaster.
As you are following this, you might have caught on a few things. The first one is that for the archer part to be powerful, you will need lots of consumables, mainly items like  Arrow of Fiend Slaying, Arrow of Undead Slaying, Arrow of Humanoid Slaying and others. These double your damage to the target.
Another part is that your spellcasting is pretty limited, to only level 2 spell slots. So what can you do? Well, the answer is scrolls -  Scroll of Confusion,
  Scroll of Hold Monster, etc. Stocking up on these will allow you to cast very strong spells, disable enemies, and finish them off with hundreds of damage per hit.
Hope you like the idea of the build, and enjoy reading it!
How to effectively use and read the build? Here are a few tips:
- Build Overview gives a high-level overview of each level
- Go into the leveling progression to understand why these picks were made, which also offers variations and mechanics explanations
- The equipment section offers gear progression and gives an in-depth explanation of what each piece offers to the build
- Check the Mechanics section to fully understand how the build falls into place
Class Contribution
This shows the class contribution of the build
12 Eldritch Knight
So this is the core of the build that you will use the most:
- Whooping 4 feats, to customize the build based on your preferences.
 Second Wind for an easy heal when the situation requires, works well in the early game, where bonus action usage is limited.
- One of the simplest and most powerful actions in the game - Action Surge, giving a full action point that works with Extra Attack.
 Weapon Bond is a nice feature that forces the weapon to return to hand if dropped.
- Access to up to level 2 wizard spell list. These are great spell options, like
 Shield or
  Mirror Image, to improve defensive capabilities.
 - Extra Attack and Improved Extra Attack for 3 attacks on the main action point, this is the highest number of any class.
- A free action
 Indomitable, which allows you to reroll a saving throw in case you fail it.
 - The main highlight is the ability to attack with a bonus action using Booming Blade + War Magic, without needing much effort.
- Semi-spellcaster setup, with the passive Eldritch Strike, you can cast spells (be it normal ones or scrolls) to highly increase your chances of landing them.
Build Variations
For this build, there are a lot of options, both from a progression perspective and the level splits
| Setup | Description |
|---|---|
|
This variation allows you to activate a bonus action attack with  War Priest charges, so you are not required to use a cantrip to activate War Magic. This is limited to 3 times per long rest, but could be a very powerful choice for boss fights, where you want to land as much damage as possible on the first turn. War Priest charges, so you are not required to use a cantrip to activate War Magic. This is limited to 3 times per long rest, but could be a very powerful choice for boss fights, where you want to land as much damage as possible on the first turn. |
Build Overview
Here is a concise table with all the main picks during your leveling progression. For more detailed reasoning, I go further in the article. Also, do not forget to check the recommended gear as it is crucial.
This will require you to get  Auntie Ethel's Hair with +1 Dexterity and use
  Titanstring Bow. This setup skips
  Elixir of Hill Giant Strength and goes all in on
  Elixir of Bloodlust or
  Elixir of The Colossus when the former one is not available
| Level | Class | Selection |
|---|---|---|
| 1 | Fighter 1 | Fighting Style:  Archery Archery |
| Background: Soldier, Noble | ||
| Abilities: STR - 16 (15+1), DEX - 17 (15+2), CON - 10, INT - 14, WIS - 8, CHA - 8 | ||
| Skills: Intimidation, Athletics, Acrobatics | ||
| 2 | Fighter 2 | - |
| 3 | Fighter 3 | Subclass: Eldritch Knight |
Cantrips: Booming Blade,  Minor Illusion Minor Illusion |
||
Spells: Shield,  Mage Armour Mage Armour |
||
Expanded:  Longstrider Longstrider |
||
| 4 | Fighter 4 | Spells:  Thunderwave Thunderwave |
Feat:  Sharpshooter: All In Sharpshooter: All In |
||
| 5 | Fighter 5 | - |
| 6 | Fighter 6 | Feat: Ability Improvement +2 Dexterity |
| 7 | Fighter 7 | Spells:  Darkness, Darkness,  Shatter Shatter |
| 8 | Fighter 8 | Expanded: Shadow Blade |
| Replace Spell: Shatter -> Mirror Image |
||
| Feat: Ability Improvement - +2 Strength | ||
| 9 | Fighter 9 | Replace Spell: Thunderwave ->  Misty Step Misty Step |
| 10 | Fighter 10 | Cantrips:  Ray of Frost Ray of Frost |
Spells:  Arcane Lock Arcane Lock |
||
| 11 | Fighter 11 | Spells:  Gust of Wind Gust of Wind |
Replace Spell: Arcane Lock ->  Hold Person Hold Person |
||
| 12 | Fighter 12 | Replace Spell: Gust of Wind ->  Enlarge/Reduce Enlarge/Reduce |
| Feat: Ability Improvement - +2 Strength or +2 Intelligence |
The setup is best suited:
- Interested in using other bows besides Titanstring Bow
- Want a safer option in terms of survivability
- Have a slightly higher spellcasting modifier
| Level | Class | Selection |
|---|---|---|
| 1 | Fighter 1 | Fighting Style: Archery |
| Background: Soldier, Noble | ||
| Abilities: No Auntie Ethel's Hair: STR - 8, DEX - 16 (14+2) , CON - 14, INT - 16 (15 + 1) , WIS - 12, CHA - 8+1 DEX Auntie Ethel's Hair: STR - 8, DEX - 17 (15+2), CON - 14, INT - 16 (15+1), WIS - 10, CHA - 8 |
||
| Skills: Intimidation, Athletics, Acrobatics | ||
| 2 | Fighter 2 | - |
| 3 | Fighter 3 | Subclass: Eldritch Knight |
| Cantrips: Booming Blade, Minor Illusion |
||
| Spells: Shield, Mage Armour |
||
| Expanded: Longstrider |
||
| 4 | Fighter 4 | Spells: Thunderwave |
| Feat: Sharpshooter: All In |
||
| 5 | Fighter 5 | - |
| 6 | Fighter 6 | Feat: Ability Improvement +2 Dexterity |
| 7 | Fighter 7 | Spells: Darkness, Shatter |
| 8 | Fighter 8 | Expanded: Shadow Blade |
| Replace Spell: Shatter -> Mirror Image |
||
| Feat: Ability Improvement - +2 Intelligence | ||
| 9 | Fighter 9 | Replace Spell: Thunderwave -> Misty Step |
| 10 | Fighter 10 | Cantrips: Ray of Frost |
| Spells: Arcane Lock |
||
| 11 | Fighter 11 | Spells: Gust of Wind |
| Replace Spell: Arcane Lock -> Hold Person |
||
| 12 | Fighter 12 | Replace Spell: Gust of Wind -> Enlarge/Reduce |
Feat: Ability Improvement +2 Intelligence/Dexterity,  Alert, Alert,  Dual Wielder Dual Wielder |
Synergy with other builds
This section will give a few ideas on how to utilize other builds to maximize the combat potential of the group. There are usually various synergies that make the group play more enjoyable. However, this should not be the main factor. With full game knowledge, any party composition will work freely.
Piercing Damage
| Synergetic Builds | Enabler | Description |
|---|---|---|
 Bhaalist Armour for the Bhaalist Armour for the  Aura Of Murder Aura Of Murder |
As a ranged build, you will greatly benefit from other characters that would use Bhaalist Armour in Act 3. This means you are not required to go into close range and risk getting  Threatened effect. The Aura Of Murder will double piercing damage, making you extremely powerful. Threatened effect. The Aura Of Murder will double piercing damage, making you extremely powerful. |
Darkness Setup
You do get access to Darkness spell, but it's also easy to be able to see inside it via items likes  Eversight Ring.
| Synergetic Builds | Enabler | Description |
|---|---|---|
| Beast Master Ranger (level 11) |  Dire Raven Companion Dire Raven Companion |
From level 11, when using  Fly, the raven will create Darkness fields for free. Fly, the raven will create Darkness fields for free. |
| Shadow Magic Sorcerer |  Eyes of the Dark: Darkness Eyes of the Dark: Darkness |
The Sorcerer has an easy way of creating Darkness fields, and see inside of it thanks to  Eyes of the Dark Eyes of the Dark |
| Sorlock |
|
Sorlock can create and also see inside the Darkness thanks to the  Devil's Sight Devil's Sight |
Psychic Damage
| Synergetic Builds | Enabler | Description |
|---|---|---|
|
All of these builds have access to Shadow Blade spell, making this an extremely good synergy with Shadow's Monk  Shadow Strike. Shadow Strike. |
|
| Open Hand Monk |  Manifestation of Mind Manifestation of Mind |
Open Hand Monk also can deal psychic damage, it's not as big as having full  Shadow Blade, but still works well for a slight damage boost. Shadow Blade, but still works well for a slight damage boost. |
Starting the Game - Level 1
This section covers the creation screen and what would go into the best Races, Abilities, and Skills for the EK Archer build. Some of these choices are impactful as you cannot respec them.
Races
Picking a race provides various benefits - abilities, dialogue options, looks, etc. Specifically for the Eldritch Knight Archer build, they will give important armor proficiencies or advantages on stealth checks to better utilize the assassin playstyle.
| Race | Features | Description |
|---|---|---|
 Halfling Halfling |
One of the better races, when the number of attacks is high, with the ability to reroll 1s. | |
 Deep Gnome Deep Gnome |
|
The main attractiveness of Gnomes is that they have  Gnome Cunning, which will allow you to negate some of the Gnome Cunning, which will allow you to negate some of the  Resonance Stone effects, thus improving your survivability. Resonance Stone effects, thus improving your survivability. |
 Dwarf Duergar Dwarf Duergar |
|
One of the best race picks overall. The  Invisibility action allows you to enter combat with the best possible position and always activate the Invisibility action allows you to enter combat with the best possible position and always activate the  Surprised round. This way you can use Minor Illusion to group up enemies before combat. Surprised round. This way you can use Minor Illusion to group up enemies before combat. |
 Wood Half-Elf Wood Half-Elf |
|
A higher movement speed is always welcome. The build also utilizes melee attacks to some degree, so it's great to have the speed boost. |
 Wood Elf Wood Elf |
|


Class
| Overview | |
|---|---|
 Fighter Fighter |
|
| Features | |
 Second Wind Second Wind |
You can use this to heal yourself in tight encounters, to get a little bit more of survivability. |
Fighting Style
| Style | Description |
|---|---|
 Archery Archery |
As an Archer build, this fighting style is a must for an easy boost to your hit chance. |
Background
Backgrounds are mostly for role-playing, and you can pick whatever you prefer. If you want to optimize, then it would be good to pick backgrounds that are based on your high-value ability points - Strength, Intelligence.
| Background | Skills | Description |
|---|---|---|
| Soldier | Athletics Intimidation |
My preferred choice for background, as it fits thematically and also gives useful proficiencies, even if your Charisma is low for intimidation. |
| Noble | History Persuasion |
History is an intelligence-based skill, and this background can fit almost any build in terms of role play. |
| Sage | Arcana History |
Both of these skills will utilize high Intelligence well. |
| Outlander | Athletics Survival |
An option, with Athletics skill. |
Abilities
Build ID: 12660
Skills and Expertise
Overall, the skills should be impacted by your roleplaying and background decisions. However, you would still want those that will give you the best benefits. My recommendation would be to go for these, most relevant to the theme of the build:
- Acrobatics
- History
- Intimidation
Leveling Progression 2-12
Here is the detailed progression for the Eldritch Knight Archer to get you started. You can use it as a guideline because early games can be daunting and overwhelming. Later on, once you get a feel for the class, you can start picking your options
Levels 2-6
By this time, you should have landed on the  Ravaged beach already and started exploring the initial area. You might need 1 additional encounter if you did not obtain enough XP in the Nautiloid.
This part of the progression covers 3 main areas. They are important both from an exploration and experience perspective. This is a huge swath of content, so missing any of the regions can negatively impact the game experience if you especially enjoy finding all the places
- Wilderness that encompasses - Druid's Grove, Goblin Camp, Sunlit Wetlands and The Risen Road
- Underdark - covering Ebonlake Grotto, Arcane Tower, Selûnite Outpost
- Grymforge - Underdark - Duergar Encampment and Adamantite Forge
Again, exploring them will give both awesome gear and a lot of experience, and of course, content with interesting quests.
For most of the builds, early levels are pretty simple, as there are minimal spell options and features that you can use. However, there are notable spikes at levels 5-6:
- Extra Attack
- Level 3 spells
- Major class and subclass features
With these, you will feel how the game combat opens up, and with correct preparations, you can start eliminating foes with minimal preparations.
Level 2
| Feature | Description |
|---|---|
 Action Surge Action Surge |
The iconic action of a fighter is extremely popular for its simplicity and effectiveness. You get additional action with full bonuses from Extra Attack. |
This level brings the important choice of subclass
Subclass
| Overview | |
|---|---|
 Eldritch Knight Eldritch Knight |
|
| Features | |
 Weapon Bond Weapon Bond |
Your weapon cannot be knocked out from the hand and returns when thrown. |
You can choose two Cantrips. Here are my suggestions:
| Cantrips | Description |
|---|---|
 Booming Blade Booming Blade |
One of the core cantrips that later will deal additional damage, and provides an easy way to activate War Magic each turn. |
 Minor Illusion Minor Illusion |
A ridicilously powerful cantrip, that at least one party member should have. With a correct knowledge of the game, you can pull enemies into a neat group which is then easier to eliminate. |
Lastly, you can pick spells
I recommend concentrating on utility spells rather than offensive or control ones, which will have limited effectiveness.
| Spells | Description |
|---|---|
 Shield Shield |
One of the best level 1 spells, giving a high boost to armour class to help with avoiding attacks. |
 Mage Armour Mage Armour |
Can be used to get an armour class boost if all items are clothing, especially while you are wearing  The Graceful Cloth The Graceful Cloth |
Expanded
| Spells | Description |
|---|---|
 Longstrider Longstrider |
At least one member in the party should have it to apply it to everyone. It's free to cast outside of combat, and greatly enhances the party mobility during combat |
Using Minor Illusion
On the other hand, you can also use something like Minor Illusion to pull enemies together, change their vision cones, and attacking with the same spell but hitting all of them. This is a very powerful cantrip that can be overlooked.
First, it does not break Invisibility or stealth (unless you get seen). Second, enemies, when not in combat, will chase it, meaning they will change their vision direction. Third, on most occasions, they will come closer to investigate the illusion.
This creates various opportunities like landing a powerful Area of Effect spell from the caster or scrolls, or hitting with wide attacks.
Level 4
Level 4 brings the first feat, it will be a huge improvement. Here you can select from a few choices, based on your playstyle and what kind of playthrough you are doing.
First, select a spell:
| Spells | Description |
|---|---|
 Thunderwave Thunderwave |
A solid spell in the arsenal that can be used to push off enemies from the ledges. |
For the feat:
| Feat | Description |
|---|---|
 Sharpshooter: All In Sharpshooter: All In |
My recommendation, especially if you can handle the penalty to attack rolls. I recommend checking the increased Attack Roll guide to make it easier to land your attacks. |
Correctly using Sharpshooter
For many people Sharpshooter: All In feat can be a nightmare, especially if you are less experienced. However, it can play a big role in turning the bow user into a full powerhouse with a flat +10 damage boost. However, it comes with a drawback: -5 to attack rolls. This, of course, can be circumvented via various tricks:
- Archery fighting style bonuses
 Guided Strike - War Domain channel divinity action.
 Oil of Accuracy and
  Diluted Oil of Sharpness
- High Ground bonuses
I have a full article on increasing attack rolls. That goes into depth on various mechanics that work especially well in the early game, when the -5 attack roll hurts the most. You can also disable its effect via the Passives tab in hotbar:
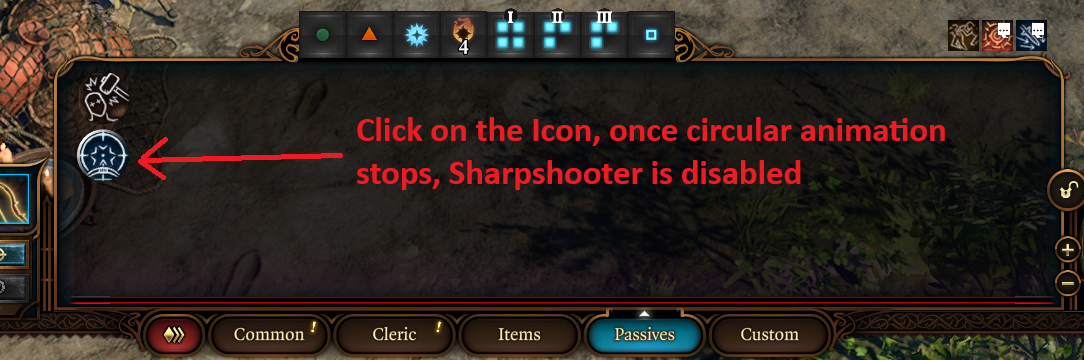
You can also move it into your main hotbar, so that it's easier to enable/dsiable when needed based on your hit chance.
My rule of thumb is this: if the hit chance is lower than 65-70%, I disable Sharpshooter: All In.
Level 5
The level gives an important feature for the build:
| Feature | Description |
|---|---|
 Extra Attack Extra Attack |
Can make an additional free attack after making a hit with your main action point. |
Level 6
Fighters get a special feature that gives them an additional feat at level 6. We can use this to gain a boost to combat potential:
| Feat | Description |
|---|---|
| Ability Improvement - +2 Dexterity | Gives an improvement to the main stat of the Archer, improving both hit success chance and damage. |
Levels 7-10
Generally, this covers the Act 2 part of the game. This unlocks items that give a slight boost to a few builds, and you uncover a really interesting part of the story.
Level 7
A new subclass feature is unlocked:
| Feature | Description |
|---|---|
 War Magic War Magic |
This is a pretty powerful feature that lets you easily weaponize bonus action. It does come with a few caveats which the build will try to circumvent. As an Archer, you have limited options of activating it. Either you have to use something like Ray of Frost or a more welcome alternative - Booming Blade. So the idea is, that you use one of your attacks as a melee hit with Booming Blade and activate War Magic giving you a free attack. You end up with 3 attacks at level 7, which is a very powerful setup. |
Overall the spell selection is not great. There are uses in certain party setups:
| Spells | Description |
|---|---|
 Darkness Darkness |
In case you have a darkness party that has  Blinded immunity, this spell can be a decent option for covering more of the field. Still, you are more motivated to hit with a weapon, so only use this either before combat or when Blinded immunity, this spell can be a decent option for covering more of the field. Still, you are more motivated to hit with a weapon, so only use this either before combat or when  Hastened. Hastened. |
 Shatter Shatter |
Taking this as a progression spell |
Level 8
There are a few nice additions at this level, and an expanded list of spells is unlocked, and we also gain a 3rd feat.
Let's start with the expanded spell list:
| Expanded | Description |
|---|---|
 Shadow Blade Shadow Blade |
This will be one of the weapons that we will use to activate Booming Blade. The result is much higher damage than using something like Ray of Frost or other cantrips, without sacrificing a full action point or needing Haste. |
Now I also recommend replacing a spell:
| Remove Spell | Add Spell | Description |
|---|---|---|
| Shatter |
 Mirror Image Mirror Image |
A solid spell that can be precast and gives an armour class boost to bolster survivability. |
For feats, my recommendation would be:
| Feat | Description |
|---|---|
| Ability Improvement - +2 Strength | Pick this option if you are going for Titanstring minmax setup |
| Ability Improvement - +2 Intelligence | Improves spellcasting modifier, making it easier to land spells |
 Alert Alert |
I think this is the perfect time you get this feat, as there will a few major fights, where going early can be a game-changer. |
| Feat | Description |
|---|---|
| Ability Improvement - +2 Dexterity | This will help you round up to 20, if not using Auntie Ethel's Hair |
Level 9
An additional feature is unlocked for the Fighter class:
| Feature | Description |
|---|---|
 Indomitable Indomitable |
Greatly improves chances of succeeding in Saving Throws, minimizing the impact of various actions and spells. |
Replace Spell
| Remove Spell | Add Spell | Description |
|---|---|---|
| Thunderwave |
 Misty Step Misty Step |
I think the spell has served its purpose and there is not much use for it. |
Level 10
This level unlocks another Eldritch Knight feature:
| Feature | Description |
|---|---|
 Eldritch Strike Eldritch Strike |
This is a powerful feature, especially on archer builds, where they can hit multiple targets using  Arrow of Many Targets. Eldritch Strike applies Disadvantage, meaning that your spells have a high chance of landing. You or an ally can follow up with something like Hold Person, to disable specific targets. Arrow of Many Targets. Eldritch Strike applies Disadvantage, meaning that your spells have a high chance of landing. You or an ally can follow up with something like Hold Person, to disable specific targets. |
For cantrips, here are a few suggestions:
| Cantrips | Description |
|---|---|
 Ray of Frost Ray of Frost |
This is one of the alternatives to use if you want to activate War Magic. The great thing is you will deal double damage if the target is  Wet. However, you should only use this cantrip with a Hastened action point, as otherwise you will waste three attacks. In my opinion Shadow Blade + Booming Blade is a superior option. Wet. However, you should only use this cantrip with a Hastened action point, as otherwise you will waste three attacks. In my opinion Shadow Blade + Booming Blade is a superior option. |
 Friends Friends |
A solid cantrip, especially if you are the main character. Makes it easier to succeed on dialogue checks. Be careful when using it; if you cancel it near a target NPC, they will attack. |
Spells
| Spell | Description |
|---|---|
 Arcane Lock Arcane Lock |
Taking anything, which we will replace for a better spell next level |
Obtaining Resonance Stone
At this level, you will most likely reach Mind Flayer Colony, the goal here is to obtain Resonance Stone. The item doubles psychic damage with  Steeped In Bliss effect, which can be a huge damage boost both for you and your party.
You will mainly benefit as Shadow Blade use. Moreover, items like  Strange Conduit Ring also benefit from it. It does come with a few negative effects, and does not bring value for the end of Act 2 fights, so you can send it to the stash
Levels 11-12
This is where you will spend most of the time in Act 3. There will be an immense amount of content, and you can finish your builds and unlock extremely powerful gear.
Level 11
Now the capstone feature of the fighter is unlocked:
| Feature | Description |
|---|---|
| Improved Extra Attack |
Now, a third attack can be used, tripling your base damage. Especially in the late game, where you have multiple sources of additional damage, this will stack up for easy kills against most foes. |
For spells:
| Spell | Description |
|---|---|
 Gust of Wind Gust of Wind |
Taking anything, to replace later |
Replace Spell:
| Remove Spell | Add Spell | Description |
|---|---|---|
| Arcane Lock |
 Hold Person Hold Person |
A powerful spell that can hold an enemy in place and if attacking from close range, guarantee critical hits. |
Level 12
For the last level, we can choose another feat, but overall, no major changes to the build.
First, replace Spell:
| Remove Spell | Add Spell | Description |
|---|---|---|
| Gust of Wind |
 Enlarge/Reduce Enlarge/Reduce |
Easy source of  Concentration and slight damage boost. Concentration and slight damage boost. |
Lastly, for the feats:
| Feat | Description |
|---|---|
| Ability Improvement - +2 Strength | Pick this option if you are going for Titanstring minmax setup |
 Dual Wielder Dual Wielder |
You might want to wear caster weapons like  Staff of Spell Power or Staff of Spell Power or  Markoheshkir to boost your Spell Save DC, so this allows you to dual-wield these weapons. Markoheshkir to boost your Spell Save DC, so this allows you to dual-wield these weapons. |
| Ability Improvement - +2 Intelligence | Further boosts your spellcasting modifier. |
| Alert |
If not yet picked, a pretty good choice for maximum initiative. |
Equipment Recommendations
Here are some recommendations on how to follow the gear picks:
- I recommend checking the Item Checklists or Interactive Map, depending on which is easier to use for you. This will help you track which items and when you should pick them.
- Gear for each slot is listed Best -> Worst. Generally, this means that you would start with lower gear recommendations (as they are available earlier) and upgrade to higher ones. However, in some cases, the best items can be obtained early, like Titanstring Bow, and some others.
- I mention Stat Sticks in caster and ranged builds. These are items that you do not use directly (like
 Club of Hill Giant Strength,
  Knife of the Undermountain King, The Dead Shot, etc.), but their bonuses still apply to other weapon attacks or actions.
 - If an item is taken by another character, use the one with lower priority or even those from previous acts. If you want to have the best items for all builds, this will require planning, which is not for everyone.
Act 1
This covers the earliest part of the game, which generally spans Nautiloid, Wilderness, Underdark and the semi-Act 1, or to be precise, Act 1.5 - Rosymorn Monastery Trial.
Build ID: 12660
Mode: Full Equipment
Sets: Act 1, Act 1.5
Act 2
Build ID: 12660
Mode: Full Equipment
Sets: Act 2
Act 3 - Final Build setup
This is where you will unlock the strongest weapons and armors for most of the builds. It is split into two major parts, starting with Rivington and later reaching the huge area - Lower City itself.
Build ID: 12660
Mode: Full Equipment
Sets: Act 3
Alternative Setups
The setup is pretty simple, you hit an enemy with ice damage riding on your normal bow attacks, and various ice related effects get applied:
Build ID: 12660
Mode: Full Equipment
Sets: Ice Archer Setup
This setup uses  Oil of Combustion and
  Heat mechanic to maximize fire damage and create explosions. Apply the oil on your bow.
To group up enemies you have a few options:
- Minor Illusion
 Void Bulb hit with Arrow of Many Targets
 Black Hole
Build ID: 12660
Mode: Full Equipment
Sets: Fire Archer Setup
Build Mechanics
In this section, I would like to dive deep into how to play the Shadow Monk. This will help you utilize it to the fullest and correctly use various actions and spells throughout the game.
Important Mechanics and Combos
Let's go through key mechanics and tips on how to effectively use the build.
Utilizing Consumable Arrows
One key thing to understand about archers is that they become extremely powerful not just from various buffs, and items, but also the consumable arrows -  Arrow of Fire, Arrow of Fiend Slaying, Arrow of Aberration Slaying,
  Arrow of Lightning, etc. You get plenty of these throughout the game, and you can pickpocket vendors to stock up on these.
For example, you can use  Arrow of Darkness to build Darkness fields before combat and shoot the enemies from within, without them having a way to reach you. Arrow of Fire or
  Arrow of Ice are great for a slight damage boost and additional conditions.
Arrow of Aberration Slaying, Arrow of Dragon Slaying or any other with the "slaying" in their name deal double damage. In the late game, this can be a huge damage boost, allowing you to take out bosses with just a few shots. But you do need to buy these from vendors and use the correct type for specific monsters.
Arrow of Many Targets is another special that I would like to dedicate a full section to next...
Correctly using Arrow of Many Targets
Arrow of Many Targets allows you to technically double your damage, as you hit 4 enemies for half damage. This is already better than you expect bonus. But it gets even better. It only rolls one attack roll, against the first enemy. So if you hit them and get a critical hit, this gets applied to the remaining 4 enemies.
Now imagine a boss is under the effect of  Hold Monster, you use Arrow of Many Targets on it, and the rest of the minions get hit with critical hits. The damage stacks up exponentially very fast.
Another neat trick is that you can shoot consumables with this arrow. For example, if you hit Void Bulb that you have dropped on the ground, enemies get pulled, and you can continue hitting the stacked enemies. This is one of the main ways to control enemy positioning. Other items can be  Potion of Speed, where you don't need to use a bonus action and still get Hastened effect.
The power of Scrolls
Eldritch Knight is a perfect build for using all the scrolls that you get. By itself, you are pretty limited with spellslots. Only level 2, and minor spell selection. However, you do have a very high spell success chance - Eldritch Strike with  Arcane Acuity makes you as strong as any other caster.
By using  Band of the Mystic Scoundrel you can freely use scrolls like Scroll of Confusion, Scroll of Hold Monster,
  Scroll of Fear etc. with just your bonus action, having minimal impact on your combat damage.
You can also use spells like  Scroll of Chain Lightning,
  Scroll of Cone of Cold, etc if enemies are Wet, or have resistance to piercing damage. Eldritch Knight makes it a perfect choice to use all of these high-level scrolls with great success.
  Scroll of Globe of Invulnerability is a true lifesaver and can be used in the late game fights to have a safe spot for negating damage.
Bhaalist Armor and Aura of Murder
The build can get a huge damage boost in Act 3 with Bhaalist Armour. It has a unique effect - Aura Of Murder, which doubles piercing damage. As you use a bow, your base damage is piercing, meaning that you can outright double it.
This does come with some caveats; you have to be close to enemies for the effect to take place, so in many cases, you will get Threatened status, which will decrease your hit chance. This can be mitigated in 2 ways:
- Find the sweet spot of being far/close to the enemy where the effect applies, but no threatened status is present.
- Have another melee party member wear it and apply the effect.
Still, even with Threatened status, you will have plenty of late-game boosts to negate the negative attack roll impact.
Act 2 - Githzerai Mind Barrier
To have good resistances for some time against Intelligence checks, you can do a special mechanic late in Act 2 (illithid colony). This requires you to finish a puzzle and find a specific mind. First, go and complete the puzzle:
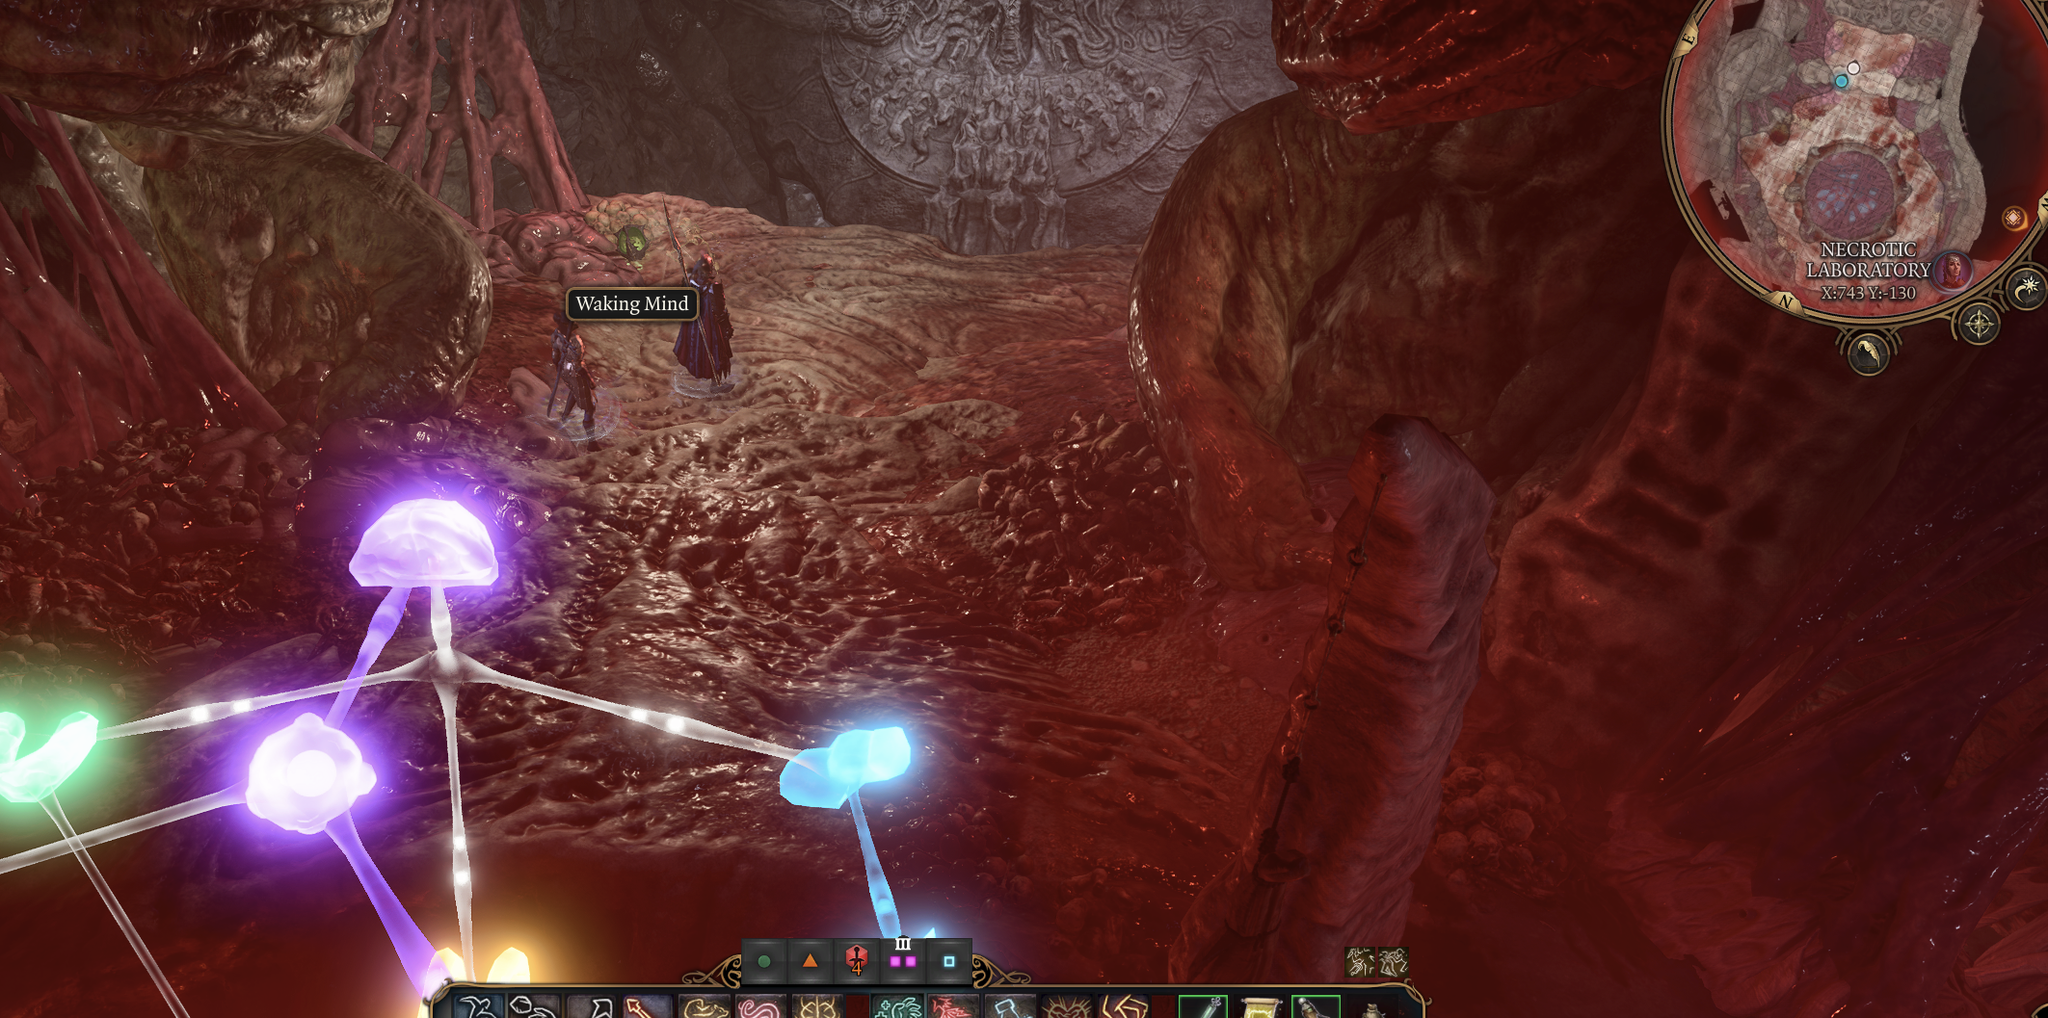
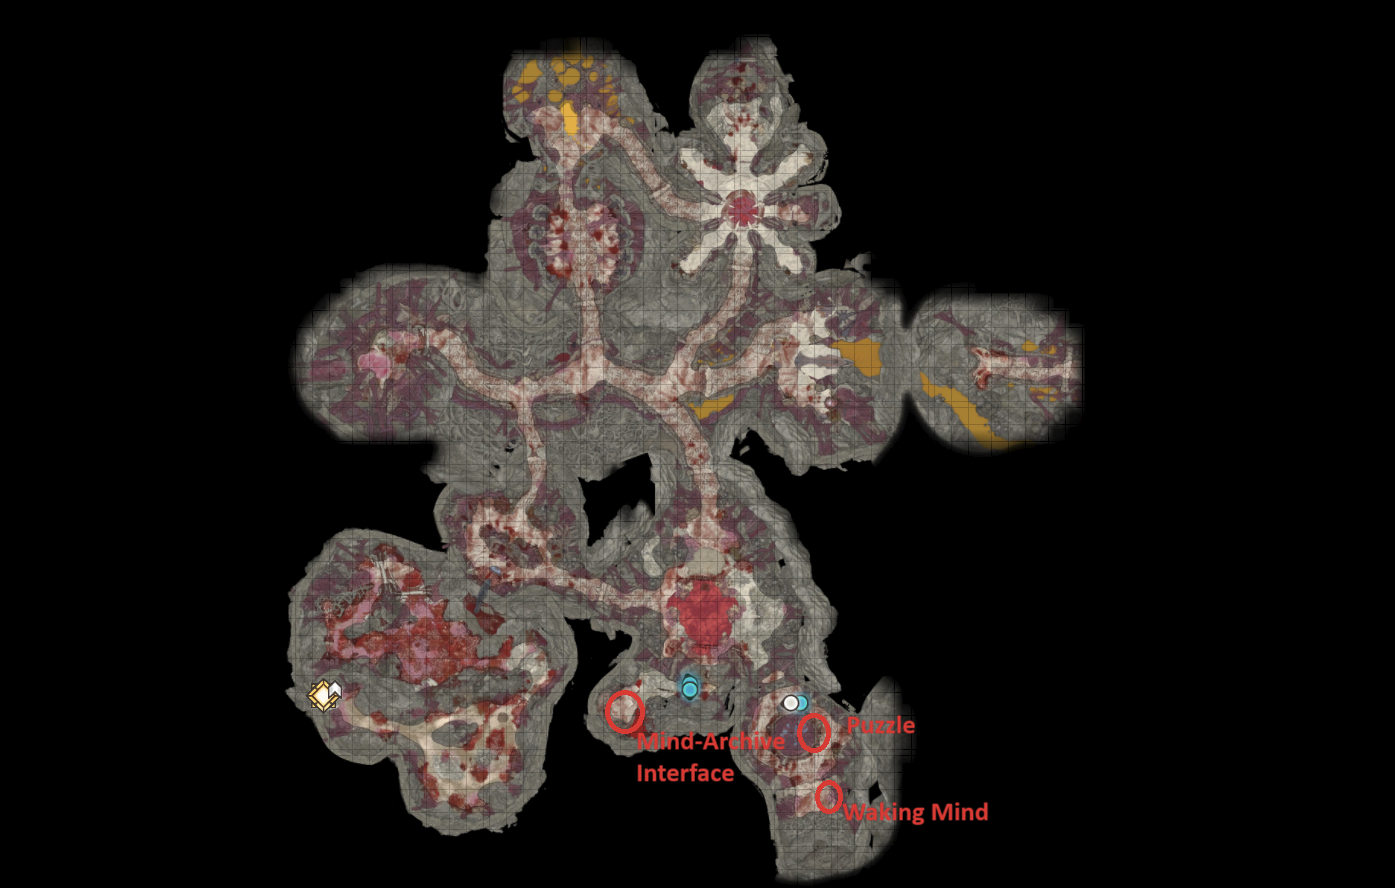 Once the doors are unlocked, go inside and pick up the Waking Mind:
Now, go back to the interface and place the mind. After that, you will be able to get the Githzerai Mind Barrier effect.
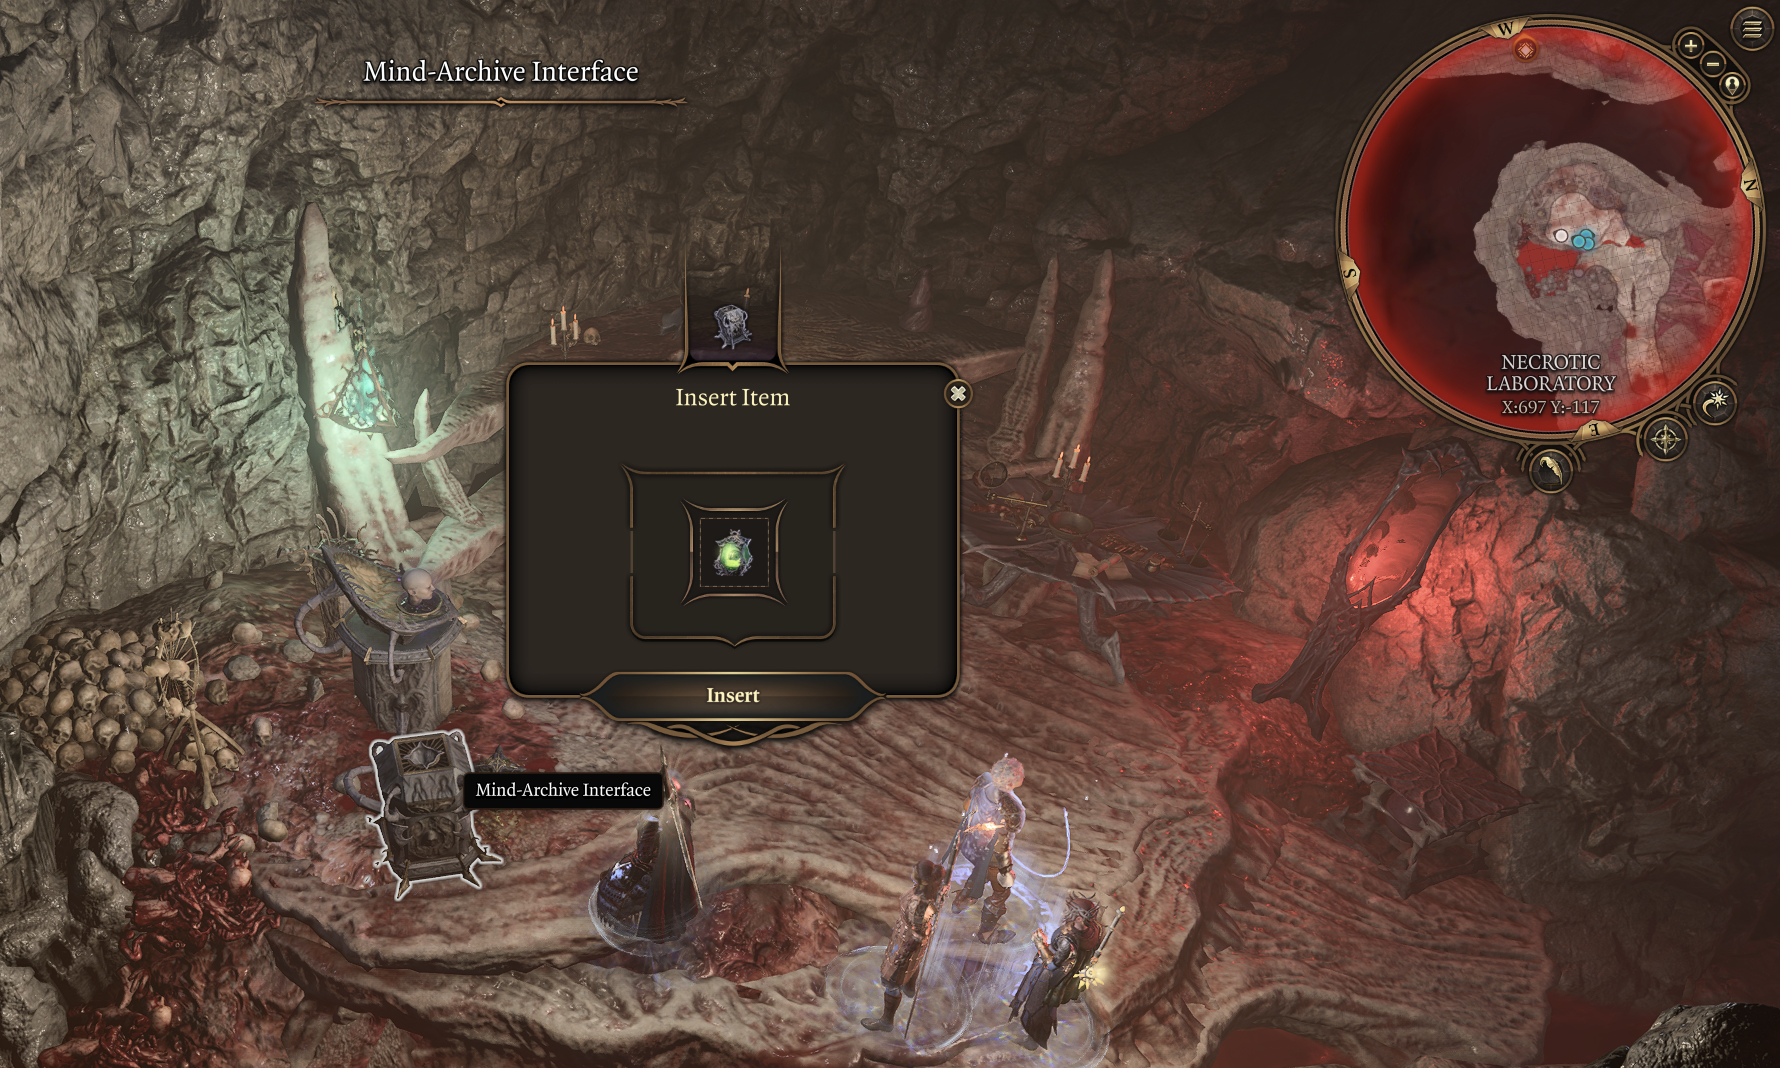
This is a great buff that will improve your saving throws, giving an  Advantage on Intelligence. This will be extremely valuable in the upcoming fight. Sadly, it will disappear if you die, so try to avoid that.
Combat Tactics and Rotation
As an Archer build you will mostly have a standard playstyle throughout the early game. Shoot, and try to kill enemies. There are a few points that are helpful:
- Overall, try to use
 Ranged Attack with the highest hit chance
 - When possible, opt in to use consumable arrows - Arrow of Fire, Arrow of Lightning, etc.
- Action Surge for when you are dead set on inflicting maximum damage and want to surely eliminate or heavily damage a target.
- After each long rest use Longstrider on yourself and party members.
- The most difficult part is managing Sharpshooter: All In. Try to get various bonuses, use coatings and when possible Advantage to increase your hit chance. The damage boost is huge for the early game.
- The major change here is that you now get access to War Magic. This enables you to use Booming Blade attack to activate a full bonus action Ranged Attack. My recommendation is to use Shadow Blade from level 8 as the weapon option
- You can upcast Shadow Blade by using
 Superior Elixir of Arcane Cultivation to get a level 3 spell slot.
 - You should also be able to get Arrow of Many Targets. Use it to inflict higher damage, and hit multiple enemies.
- Now you have a solid rotation. If an enemy is close you can use Booming Blade to activate War Magic. Then you can either move away, or if you have high hit chance, use Arrow of Many Targets to hit multiple targets. Rinse and repeat.
- Mirror Image is a nice spell to precast
- From level 10, each hit that you will land will apply
 Stricken with Eldritch Inertia. This is a very powerful debuff that will prove valuable later on.
Act 3, is where the build reaches its full combat potential:
- By getting Band of the Mystic Scoundrel you can start by attacking, building Arcane Acuity with Arrow of Many Targets and casting a control spell from scrolls - Scroll of Hold Monster, Scroll of Confusion, Scroll of Fear, etc. Use Action Surge to finish off any foes that you deem necessary.
- For high single-target damage use slaying arrows - Arrow of Fiend Slaying, Arrow of Undead Slaying, etc. They deal double damage against specific enemy types.
- If you have no need to cast a spell with bonus action, use Booming Blade to activate War Magic.
- Eldritch Strike and Resonance Stone are ultimate debuff options making it very easy to land spells.
- You can also use bonus action to apply various coatings like
 Crawler Mucus,
  Drow Poison, Oil of Accuracy and others.
Maximizing the Build - Abilities, Illithid, Consumables
This section, I would like to dedicate to various optimizations that you can do to further empower your build. Various things like Illithid Powers and consumables can make the build from powerful to totally overpowered, trivializing the hardest game encounters
Maximizing Ability Scores
Ability Scores play an important role both in terms of how your attacks and spells land. Moreover, these can help to also reach extremely high skill rolls needed for a few checks.
- Act 1 - Auntie Ethel's Hair - you will want to get +1 Dexterity if you pick this choice.
- Feat - Ability Improvement - +2 Dexterity
- Act 3 - Mirror of Loss - pick +2 Dexterity.
This will allow you to reach 22 natural Dexterity. This is the maximum value. Without Auntie Ethel's Hair, you will reach 20.
Illithid Powers
This special mechanic in Baldur's Gate 3 allows you to consume tadpoles and unlock special Illithid Powers.
At first, you can only use the base powers. As you move to Act 3, you will be able to unlock the outer ring powers.
| Illithid Power | Type | Description |
|---|---|---|
 Favourable Beginnings Favourable Beginnings |
Base | Beneficial power to take as it does not have any costs and provides only benefits on the first hits. |
 Luck of the Far Realms Luck of the Far Realms |
Base | Guarantees a critical hit, use it on important targets that you want to make sure are killed. |
 Psionic Overload Psionic Overload |
Base | As this is Psychic damage, you will double it to 2d4 thanks to Resonance Stone. |
 Psionic Backlash Psionic Backlash |
Base | A decent use for reaction to deal some bonus psychic damage. |
 Ability Drain Ability Drain |
Base | As you will be using Dexterity, this can help you to reduce enemy Armor Class and give an increased hit chance on the next attack. |
 Cull the Weak Cull the Weak |
Base | Can help to kill an enemy faster if it is left with a few HP. |
 Illithid Expertise Illithid Expertise |
Elite | As you are not a charisma-based character, these proficiencies help with dialogue checks. |
| Psionic Dominance |
Elite | Can be used to save yourself from a deadly spell. This is especially relevant as you will have a Disadvantage on mental saving throws. |
 Freecast Freecast |
Elite | Remove the cost of spell slots or charges. |
Potions, Elixirs and Consumables
Let's take a look at what consumables you can use to further empower the build.
Potions
These are general consumables, and most of them are activated for a few turns. Potions are separate from Elixirs and can be active together.
| Consumable | Description |
|---|---|
 Potion of Speed Potion of Speed |
You can chug this potion before combat, or during combat using a bonus action. It gives another action point that gives an additional attack or one more spell cast. Sadly, its duration is only 3 turns. |
 Potion of Animal Speaking Potion of Animal Speaking |
Although not something powerful, it is worth stocking up and saving a spell slot. |
 Potion of Invisibility Potion of Invisibility |
Can be used to get a perfect position before the encounter starts. It can also help trigger Surprise rounds. |
 Terazul Terazul |
Gives Hastened and stacks with other sources of it. This is a late-game consumable. |
Coatings
These are applied directly on weapons, and usually have a 10-turn duration:
| Consumable | Description |
|---|---|
 Oil of Accuracy Oil of Accuracy |
The attack roll bonus is pretty good, which improves your chances of hitting. |
 Diluted Oil of Sharpness Diluted Oil of Sharpness |
Helps with attack and damage rolls. |
 Crawler Mucus Crawler Mucus |
This is a very powerful debuff that applies  Paralysed on an enemy if they fail a Saving Throw. This then guarantees critical hits. Paralysed on an enemy if they fail a Saving Throw. This then guarantees critical hits. |
 Drow Poison Drow Poison |
Has a chance to put an enemy to  Sleeping condition, giving a guaranteed critical hit option. Sleeping condition, giving a guaranteed critical hit option. |
 Oil of Combustion Oil of Combustion |
Extremely powerful item that is quite easy to activate. You only need a damage rider that you can get through  Drakethroat Glaive, Drakethroat Glaive,  Flawed Helldusk Gloves or Flawed Helldusk Gloves or  Helldusk Gloves. Pull enemies together, hit them with Arrow of Many Targets and then follow up again with an attack, to create an explosion that increases its damage by the number of affected targets. Helldusk Gloves. Pull enemies together, hit them with Arrow of Many Targets and then follow up again with an attack, to create an explosion that increases its damage by the number of affected targets. |
 Arsonist's Oil Arsonist's Oil |
This is an alternative coating that can be used on enemies that have fire resistance. This removes the effect and enables your casters to deal full damage against these foes. |
Elixirs
Unfortunately, only one Elixir can be active at a time. However, the good thing is that they last until a long rest, making them very useful and economical.
Be sure to activate them before combat, as otherwise, you will need to use a Bonus Action.
| Consumable | Description |
|---|---|
 Elixir of Hill Giant Strength Elixir of Hill Giant Strength |
The strength elixirs enable a pretty simple setup with Titanstring Bow. This does lock you out of other elixirs, but offers a pretty simple option at least in the early game |
 Elixir of Cloud Giant Strength Elixir of Cloud Giant Strength |
|
 Elixir of Bloodlust Elixir of Bloodlust |
The elixir gives an easy option to get an additional action point - just kill a foe. This can then be used to attack one more time or cast a full spell. |
 Elixir of Vigilance Elixir of Vigilance |
For some encounters, you will want to go first. This elixir will ensure that it overcomes even Surprised mechanics. |
 Elixir of The Colossus Elixir of The Colossus |
Provides bonus damage of 1d4 and some other good bonuses. |
 Elixir of Heroism Elixir of Heroism |
Boosts attack rolls by 1d4; this is a good boost to increase the likelihood of landing attacks. |
Arrows
| Consumable | Description |
|---|---|
 Arrow of Many Targets Arrow of Many Targets |
One of the strongest arrow options in the game. Allows hitting multiple targets; its success depends on the first hit, and it can do powerful things, like activating consumables, while also hitting enemies. |
 Arrow of Fire Arrow of Fire |
Allows to detonate enemies affected by the Oil of Combustion. |
| Arrow of Aberration Slaying, Arrow of Humanoid Slaying, Arrow of Fiend Slaying, other Slaying arrows |
These arrows are very powerful when used against the correct target, as they double the damage. This can result in huge damage numbers, with various optimizations and critical hits. |
Grenades
| Consumable | Description |
|---|---|
 Void Bulb Void Bulb |
A very powerful consumable that can be used together with Arrow of Many Targets to pull enemies together. It can also just be thrown by any other party member. You can stock up at Omeluum. |
Conclusion and Credits
Thank you for reading the Eldritch Knight Archer build for Baldur's Gate 3. This is a ridiculously powerful build, especially if you are ready to funnel the key items. It uses both ranged attacks and spellcasting.
- C4B - the first one to share this amazing build with the world - The Rivington Rat
- BG3 Builds Discord members - Quag, Machina, shared many insights on optimizing the build to reach extremely high damage numbers.
Cheers!
Like, Dislike, comment, or share!


Join the Discussion
0 commentsNo comments yet.
Be the first one to leave a comment!