

Shadow Magic Sorcerer Build - Baldur's Gate 3 (BG3)
Contents
- Shadow Magic Sorcerer Build
- Build Overview
- Synergy with other builds
- Level 1 - Character Creation
- Act 1 - Levels 2-6 - Wilderness
- Act 1.5 - Level 7 - Rosymorn Monastery
- Act 2 - Level 8-10 - Shadow Lands
- Act 3 - Level 11-12 - Rivington and Lower City
- Maximizing - Abilities, Illithid Powers, Consumables
- Conclusion
Shadow Magic Sorcerer Build
This has been on my to-do list for a very long time. As many people know, Shadow Magic is that perfect sounding theme, which gives the dark vibes, a cool summon and easily accessible ![]() Darkness. The reality?
Darkness. The reality?
Well, it's a bit nuanced. The ![]() Hound of Ill Omen is cool, but it has limited HP, and its effects have fixed Spell Save DC, so plenty of optimisation will be needed. However, what I really liked is that it can safely stay in the
Hound of Ill Omen is cool, but it has limited HP, and its effects have fixed Spell Save DC, so plenty of optimisation will be needed. However, what I really liked is that it can safely stay in the ![]() Darkness which gives him a safe haven and an easy source of
Darkness which gives him a safe haven and an easy source of ![]() Advantage.
Advantage.
To top it off, it has a cool gimmick - ![]() Splinter Shadow, allowing it to create multiple versions of Nimbus for a few turns. They are not strong, but 2-3 of these also start splitting from themselves, and each of them casts
Splinter Shadow, allowing it to create multiple versions of Nimbus for a few turns. They are not strong, but 2-3 of these also start splitting from themselves, and each of them casts ![]() Umbral Tangle for a little damage. Besides damage, it can also root enemies in place, making their movement more difficult, and your allies get
Umbral Tangle for a little damage. Besides damage, it can also root enemies in place, making their movement more difficult, and your allies get ![]() Advantage.
Advantage.
With this build I really want to lean on the "shadow" aspect. For this, not only will we use ![]() Shadow Blade extensively, but also Oathbreaker subclass, to gain more proficiencies, a few powerful spells and
Shadow Blade extensively, but also Oathbreaker subclass, to gain more proficiencies, a few powerful spells and ![]() Divine Smite for extra power when you hit with your blade.
Divine Smite for extra power when you hit with your blade.
Of course, this is a sorcerer, so you are very powerful caster, and whether you choose to lean more into a shadowy playstyle, or just use up spell slots for high damage spells, you will always be satisfied by the results and what the build can do.
Following the guide and a few tips:
- Build Overview covers the quick aspects and choices for the build - gear, levelling, etc.
- The progression by Acts cover the build in great detail, from spell selection to how utilize various features. Be sure to check the equipment sections for gear options and explanations. The mechanics section explains how to fully utilize the build in combat
- I also add additional section for build maximizing like consumables, illithid powers and others. This can help to make the build even more powerful and optimised if needed.
Class Contribution
The build consists mainly of 2 classes:
9 Shadow Magic Sorcerer
The main class of the build:
- Constitution saving throw proficiency to help maintain spell
 Concentration when being hit.
 - Access to good defensive spells, like
 Shield to improve survivability.
 - Access to cold and lightning spells -
 Lightning Bolt,
  Cone of Cold,
  Chain Lightning, etc.
 - Access to a variety of cantrips like
 Friends, which are especially useful if you are the main character, as you can win over the dialogues
 - Metamagic mechanic and Sorcery points. You will be able to cast full spells using
 Metamagic: Quickened Spell, giving a unique advantage over normal cleric builds.
  Metamagic: Extended Spell is another beast with lots of interesting mechanics.
  Eyes of the Dark helps seeing in the dark (if your race does not give this benefit and
  Strength of the Grave enables instant resurrection if you lose all HP.
 Eyes of the Dark: Darkness which creates a
  Darkness field and provides
  Eyes of the Dark enabling you to see in magical darkness.
- The highlight of the subclass -
 Hound of Ill Omen (also called Nimbus), a doggo companion, that works well in Darkness field and has special features, like
  Splinter Shadow and
  Ominous Bite with a special omen effect, to harvest sorcery points
3 Oathbreaker Paladin
- Bonus proficiencies, enabling the wearing of a wider variety of equipment
 Divine Sense - an easy
  Advantage in case you fight these specific enemies.
 Lay on Hands - a healing action, which I found is best used outside of combat for curing diseases.
- The iconic Paladin action -
 Divine Smite. With optimizations and some preparations, this can land very powerful strikes and obliterate enemies.
 - Fighting Style choice, for a small stat boost
 Divine Health helps resist diseases.
- Paladin spells like -
 Command,
  Wrathful Smite, etc.
 - The Channel Oath abilities, like
 Spiteful Suffering, which can be situationally useful, but are expensive to cast using the full action.
  Dreadful Aspect to apply
  Frightened on enemies
- Charisma based
 Inflict Wounds from Oathbreaker
Build Variations
Here are some variations that work similarly and utilise the same classes at their core.
| Setup | Description |
|---|---|
|
One of the variations if you want access to |
|
Gives access to |
|
"Shadow Sorlock" build that has access to |
Build Overview
Here is a concise table with all the main picks during your levelling progression. For more detailed reasoning, I go further in the article. Also, do not forget to check the recommended gear, as it is crucial.
This is a general overview of the build that contains item and leveling choices. I go deeper into the setup, combat approach and gear selection reasons for the progression of each act.
Leveling
| Level | Class | Selection |
|---|---|---|
| 1 | Sorcerer 1 | Cantrips: |
| Spells: |
||
| Subclass: Shadow Magic | ||
| Abilities: STR - 8, DEX - 16 (15+1), CON - 14, INT - 8, WIS - 10, CHA - 17 (15+2) | ||
| Skills: Deception, Intimidation, Persuasion | ||
| 2 | Sorcerer 2 | Spells: |
| Metamagic: |
||
| 3 | Sorcerer 3 | Spell: |
| Metamagic: |
||
| 4 | Sorcerer 4 | Cantrips: |
| Spells: |
||
| Feat: |
||
| 5 | Sorcerer 5 | Spells: |
| 6 | Sorcerer 6 | Spells: |
| 7 | Paladin 1 | Subclass: any (Oath of Devotion is probably easiest to break for Oathbreaker) |
| 8 | Paladin 2 | Fighting Style: |
| 9 | Paladin 3 | - |
| 10 | Sorcerer 7 | Spells: |
| 11 | Sorcerer 8 | Spells: |
| Feat: |
||
| Replace Spell: |
||
| 12 | Sorcerer 9 | Spells: |
Gear Choices
Build ID: 995
Mode: Paper Doll
Sets: Act 1, Act 2, Act 3
Synergy with other builds
The build mostly benefits from others who can freely stay in ![]() Darkness. This is the main synergy. Of course, other builds will work, but they might have their combat potential minimized, or become unwatend targets of the enemies.
Darkness. This is the main synergy. Of course, other builds will work, but they might have their combat potential minimized, or become unwatend targets of the enemies.
Having a Cleric in the party
This is a very important contributor to the Shadow Magic Sorcerer. Why is that? The main reason is ![]() Hound of Ill Omen which does need a lot of survivability, to be able to effectively soak damage and proc
Hound of Ill Omen which does need a lot of survivability, to be able to effectively soak damage and proc ![]() Splinter Shadow to create copies of itself. For this reason
Splinter Shadow to create copies of itself. For this reason ![]() Aid and
Aid and ![]() Warding Bond (and maybe
Warding Bond (and maybe ![]() Heroes' Feast) is almost a necessity.
Heroes' Feast) is almost a necessity.
Here are some build recommendations:
- Light Cleric
- Tempest Cleric
- Revorb Blender - cleric-like build
- War Domain Cleric
- etc.
Being able to see or create Darkness
Another excellent addition to this build are those builds, which can effectively fight in ![]() Darkness. This can be done mainly through these means:
Darkness. This can be done mainly through these means:
 Devil's Sight - available to warlocks - Hexblade, Eldritch Sorlock, etc
- Beast Master Ranger - thanks to
 Ranger's Companion that enables summon
  Dire Raven Companion. It starts shining at level 11, when it can create Darkness fields just by flying.
  Eversight Ring or
  Steel Watcher Helmet - can be put on almost on any character that does not have ability to see in Darkness.
 Shar's Spear of Evening - users of this spear can also create a Darkness field, and are immune to
  Blinded.
- Shadow Monk and Ninja Builds are not able to see, but they can be used to create Shadow Arts: Darkness. The ability to see in it, can be obtained via mentioned items or 2 level warlock dip for Devil's Sight.
Psychic damage users with Resonance Stone
As the build utilizes ![]() Shadow Blade you can get a huge damage boost from the
Shadow Blade you can get a huge damage boost from the ![]() Resonance Stone for each weapon hit. This means that other builds that have access to the same damage source can benefit from it:
Resonance Stone for each weapon hit. This means that other builds that have access to the same damage source can benefit from it:
These pair extremely well together and can result in ridiculous amounts of damage. Of course, some enemies, especially in Act 3, are invulnerable to psychic damage, so keep that in mind.
Level 1 - Character Creation
This section covers the creation screen and what would go into the best Races, Abilities, and Skills for the Shadow Magic Sorcerer build. If you have already started playing, feel free to do a respec at Withers and follow along. This will make it easy to follow the build step by step.
Races
Picking a race provides various benefits - abilities, dialogue options, looks, etc.
| Race | Features | Description |
|---|---|---|
 Dwarf Duergar Dwarf Duergar |
|
It's one of the most powerful races. At level 5, they gain |
 High Half-Elf High Half-Elf |
|
Comes with a selection of additional cantrips and shield proficiency. Overall, it's a list of solid features. |
| Wood Half-Elf |
|
Almost any build can benefit from the extra movement speed. I think the same is here, so I definitely recommend this option |
 Wood Elf Wood Elf |
|
|
 Halfling Halfling |
General good race, with multiple rerolls helping to avoid failing various checks, spells and saving throws. | |
 Deep Gnome Deep Gnome |
|
With a general |
 Half-Orc Half-Orc |
|
As you have |
 Asmodeus Tiefling Asmodeus Tiefling |
|
They come with |
Class Choices
This section will cover what class-related choices you should pick for the optimal setup
Class
| Overview | |
|---|---|
 Sorcerer Sorcerer |
|
| Features | |
 Spell Slots Spell Slots |
These can be used to cast spells and are restored each long rest. |
Cantrips
| Cantrips | Description |
|---|---|
| This will play an important role later on with |
|
| A powerful cantrip that can help lure enemies to one place before combat. Then you can exploit this for area of effect spells or attacks to inflict large amounts of damage or control. | |
| An offensive cantrip giving ranged cold damage and slowing enemies down. | |
| This can be situationally useful, especially as the main character. The main problem is that if it is cancelled near the target NPC, they will attack. So, only do that once you are further away. |
Spells
| Spells | Description |
|---|---|
| A good spell to have in the arsenal, in the early game, as it has a 100% hit chance and is perfect for eliminating specific targets. The missiles can target enemies that you cannot see. | |
| Easily guarantees 13 Armour Class while wearing robes. With 16 Dexterity, this will result in 16 Armour Class, on par with Heavy armour users. Later on, you will have light and medium armour options, so the spell loses its value. |
Subclass
| Overview | |
|---|---|
| Features | |
| Can be a helpful passive if the race does not provide native |
|
| Great survival passive, enabling you to avoid death by resurrecting with 1 HP. | |
Background
Backgrounds are generally for roleplay and skill proficiency, so in a generally well-made party, they will serve minimal purposes.
- They give a role-playing option of your previous history, if you are into that.
- It gives skill proficiencies, meaning that you get an additional bonus when you roll that skill check in which you are proficient. This depends on your proficiency bonus, which increases as you level up.
Here are my recommendations based on this build
| Background | Skills | Description |
|---|---|---|
| Guild Artisan | Insight Persuasion |
Gives persuasion proficiency, for better dialogue checks. |
| Entertainer | Acrobatics Performance |
Improves Acrobatics skills and gives bonuses to Performance for some dialogue checks. |
| Noble | History Persuasion |
Although you will have low intelligence the Persuasion check improvement is good. But it's an inferior option to Guild Artisan in my opinion. |
Abilities
Now, let's take a look at the abilities of the Shadow Sorc build. Correct allocation will allow you to maximise the early gameplay and get good modifier bonuses.
Here are some key points to know about ability points:
- They give "ability modifiers" that apply to various skill checks. For example, Charisma works on Intimidation and persuasion checks. Wisdom on Survival or Animal Handling, and so on.
- You get a higher ability modifier on even values - 10, 12, 14, etc. So keeping it on odd may be useless. However, there are various +1/2 modifiers in the game, specifically
 Auntie Ethel's Hair or Feats that help round this up.
 - Weapons can benefit from either Dexterity or Strength, depending on their type
- You also have a spellcasting modifier, which can be Wisdom, Charisma, or Intelligence, depending on your class.
Build ID: 995
Skill Proficiencies
Overall, skill selection should be influenced by your role-playing and background decisions. However, you generally still want options that offer the best benefits. I recommend picking skills for which you have a high ability modifier or those that are useful in general:
- Deception
- Intimidation
- Persuasion
Act 1 - Levels 2-6 - Wilderness
By this time, you should have landed on the ![]() Ravaged beach already and started exploring the initial area. You might need 1 additional encounter if you did not obtain enough XP in the Nautiloid.
Ravaged beach already and started exploring the initial area. You might need 1 additional encounter if you did not obtain enough XP in the Nautiloid.
Leveling Progression
Level 2
You already get a pretty good source of features:
| Actions | Description |
|---|---|
| Spend Spell Slots to gain Sorcery Points. Once you get some more metamagic options, you could sacrifice spell slots to cast two spells in one turn or increase your range. | |
| Spend Sorcery Points to unlock a Spell Slot. You could create a higher-tier spell slot to increase the damage over what you can at the current level |
Now the key is to choose appropriate spells, as Sorcerers are very limited in their choices:
| Spells | Description |
|---|---|
| A very valuable spell, that can give an instant +5 Armour Class for a cost of reaction to avoid enemy hits. |
The last choice is metamagic:
| Metamagic | Description |
|---|---|
| Enables you to twin-cast single-target spells, enabling very powerful setups. For example, double |
|
| Doubles the duration of spells, but also has hidden gimmicky mechanics that enable stacking of |
Stacking Sorcery Points
The main point that you will want to utilise from Sorcerer is Sorcery Points. They play a big role in the whole combat loop and allow you to utilise Metamagic (I will cover its options in the next section).
The points can be pretty limited if you heavily utilize them. You can work around this by using ![]() Create Sorcery Points and consuming spell slots. They are important for spellcasting, so using all of them is quite expensive for Sorcery Points. However, 2 items in particular give free spell slots:
Create Sorcery Points and consuming spell slots. They are important for spellcasting, so using all of them is quite expensive for Sorcery Points. However, 2 items in particular give free spell slots:
 Pearl of Power Amulet - restores up to a level 3 spell slot, so 3 sorcery points, obtained in Act 1.
 Spellcrux Amulet - allows restoring up to a level 6 spell slot, but
  Create Sorcery Points only works max on a level 5 spell slot. Available in Act 2.
So with these, you can get 8 Sorcery points every long rest, which is substantial and can help you use something like ![]() Metamagic: Quickened Spell or
Metamagic: Quickened Spell or ![]() Metamagic: Extended Spell multiple times per long rest.
Metamagic: Extended Spell multiple times per long rest.
Of course, in Act 2 and Act 3, you can go crazy and use ![]() Potion of Angelic Reprieve, which allows you to restore level 1-2 spell slots. Use those with
Potion of Angelic Reprieve, which allows you to restore level 1-2 spell slots. Use those with ![]() Create Sorcery Points, where you can end up with 20 or even more points. This is kind of a glitch, so I leave this to your discretion.
Create Sorcery Points, where you can end up with 20 or even more points. This is kind of a glitch, so I leave this to your discretion.
Metamagic
This one is pretty important and is the main feature that allows sorcerers to stand out from other casters. At first, you get two metamagic options, and as you progress 2 more will be available. Let me cover their main usages:
 Metamagic: Twinned Spell - this one can be very powerful, especially if used correctly, with weaker spells. For example, in the early game, you can twin
  Chromatic Orb which gives a huge damage boost for a very cheap cost. Same for other spells, like
  Haste or
  Blindness. The major caveat is the Act 3 staff
  Markoheshkir. When activating
  Bolts of Doom you can twin Chain Lightning, specifically from this weapon.
- Metamagic: Extended Spell - is another very powerful tool. First, some encounters might be longer so extending spells like Command,
 Hypnotic Pattern or others is beneficial. However, it also has interesting interactions with
  Booming Blade +
  Gloves of Battlemage's Power where you can double the amound of
  Arcane Acuity stacks.
 - Metamagic: Quickened Spell - gives the ability to cast a full spell with a bonus action. This means you can cast very powerful spell options and greatly increase your damage and combat potential for the cost of 3 sorcery points.
Level 3
This level is mainly for unlocking the new level 2 spells. First, you get additional spells by default:
| Spell | Description |
|---|---|
| Gives free spell, which saves you spell choice for levelling. This can be used to create a |
|
| This will be your go-to spell for creating |
And you can now choose another spell:
| Spell | Description |
|---|---|
| This will be one of the core spells of the build. It will allow you to summon a very powerful melee weapon - |
The last choice is metamagic:
| Metamagic | Description |
|---|---|
| This is a very powerful option as it enables you to cast a full spell using the bonus action. |
Playing with Darkness
So ![]() Darkness is one of those very powerful spells that can break the enemy AI, and make many encounters a breeze. There are a few sources that you can get it from:
Darkness is one of those very powerful spells that can break the enemy AI, and make many encounters a breeze. There are a few sources that you can get it from:
- Darkness or Eyes of the Dark: Darkness spells
 Arrow of Darkness
- Shar's Spear of Evening with it's special Shar's Darkness and
 Edge of Darkness actions.
 - Dire Raven Companion at level 11 from Beast Master Ranger, with its flying mechanic.
The created field is special because it will cancel out most of the arrow projectiles, protecting anyone inside it. Of course, it can be buggy, and enemies can still throw stuff, or used ranged attack if they are elevated. There are a few sources of being able to see in the "Magical" Darkness:
- Devil's Sight
- Eyes of the Dark from Eyes of the Dark: Darkness
- Eversight Ring, Steel Watcher Helmet allow to see through magical darkness
With all of the requirements and conditions in mind, you can now use Darkness to your advantage. My recommendation is to position the Darkness field in two ways:
Cover enemies with the field - this is an excellent strategy when enemies are clumped together, and you are the one starting the combat. Cast ![]() Darkness on them, so that they would get
Darkness on them, so that they would get ![]() Blinded and use the character that can see in it, move together with them. Now you have an easy way on avoiding enemies, they also cannot freely move, or you will hit them with
Blinded and use the character that can see in it, move together with them. Now you have an easy way on avoiding enemies, they also cannot freely move, or you will hit them with ![]() Opportunity Attack.
Opportunity Attack.
The second option is to use it as a cover field. This is perfect for those situations where you want to take it slowly, there are no enemies that can see in the dark, and you might be overwhelmed by them otherwise. You can then stay in the ![]() Darkness field and once your turn starts, move out, hit enemies with spells or weapons, and go back. The NPCs will have to make a choice - should they go inside and gain disadvatnage or stay outside and skip their turn
Darkness field and once your turn starts, move out, hit enemies with spells or weapons, and go back. The NPCs will have to make a choice - should they go inside and gain disadvatnage or stay outside and skip their turn
![]() Darkness comes with a plethora of caveats, so have this in mind when using:
Darkness comes with a plethora of caveats, so have this in mind when using:
- Some enemies can see in Magical Darkness, so check their features in the explanation window
- Other enemies can throw projectiles like
 Javelin and hit you inside the field
 - Sometimes it can be buggy as hell and not work at all.
Another cool thing is that you can use ![]() Darkness strategically, with characters that cannot see inside of it. For example, enemies that are inside the field have
Darkness strategically, with characters that cannot see inside of it. For example, enemies that are inside the field have ![]() Blinded condition. Position your melee characters outside, so that enemies would have to attack with
Blinded condition. Position your melee characters outside, so that enemies would have to attack with ![]() Disadvantage. They might also try to run away, which would allow you to use
Disadvantage. They might also try to run away, which would allow you to use ![]() Opportunity Attack for an additional hit against them.
Opportunity Attack for an additional hit against them.
So the mechanic is very powerful, and I just grazed the surface of it here.
Level 4
This level gives additional spell selection and a new feat
| Cantrips | Description |
|---|---|
| This cantrip is taken for an intricate mechanic that you will unlock at level 6. For now, it is a placeholder, so if you will respec, you can take something like |
Now you can also choose a spell
| Spell | Description |
|---|---|
| This spell is pretty good, as it can use different elements. Moreover, the |
The main improvement of this level is Feat, which unlocks a few potential options:
| Feat | Description |
|---|---|
| This is my go-to option for spellcaster in Act 1. You can use two good weapons to boost your stats, check the combos in the equipment section. For example you cna use |
|
| Ability Improvement - +2 Dexterity | You can go for this option if you are already dedicated to |
Level 5
Level 3 spells are unlocked
| Spells | Description |
|---|---|
| This would be my recommendation. It's not a really fancy spell, but when you need to cancel an incoming big attack or something that can disable your whole group, this can be a lifesaver. |
Level 6
This level is huge step up, as you will unlock the main Shadow Sorcerer feature:
| Feature | Description |
|---|---|
| The doggo is a signature feature of Shadow Sorcerer. It's not overwhelmingly powerful, but it can inflict damage and really confuse enemies and their AI with |
The last option is spells. To be fair, you can go in various directions here. For example, damage spells - ![]() Lightning Bolt,
Lightning Bolt, ![]() Fireball, control -
Fireball, control - ![]() Hypnotic Pattern,
Hypnotic Pattern, ![]() Fear and others. The main problem is that if you are heavily using
Fear and others. The main problem is that if you are heavily using ![]() Eyes of the Dark: Darkness, you
Eyes of the Dark: Darkness, you ![]() Concentration slot is taken, and you want something that does not use it.
Concentration slot is taken, and you want something that does not use it.
Here is what I would pick:
| Spells | Description |
|---|---|
| Having a powerful spell in the arsenal, enables you to wipe enemies, especially if they are |
Again, you are not required to take this spell, and there are excellent alternatives, depending on your playstyle.
Nimbus - the trusty doggo
So Shadow Magic sorcerer's main highlight feature is ![]() Hound of Ill Omen which summons Nimbus. It is a permanent summon that can really be effective if utilised correctly. First, you will want to buff it up, it needs good survivability, to be able to effectively create clones of itself via
Hound of Ill Omen which summons Nimbus. It is a permanent summon that can really be effective if utilised correctly. First, you will want to buff it up, it needs good survivability, to be able to effectively create clones of itself via ![]() Splinter Shadow:
Splinter Shadow:
 Aid from cleric
 Warding Bond also can be activated with cleric to give resistance to damage.
 Heroes' Feast late game buff, which further boosts total HP
With these in mind you can now move Nimbus on the frontlines and use enemies to bait him into attacking. This will then activate ![]() Splinter Shadow, which creates a weaker copy. The trick here is that these copies can then split from themselves if being hit, creating like a small avalanche, constantly distracting enemies.
Splinter Shadow, which creates a weaker copy. The trick here is that these copies can then split from themselves if being hit, creating like a small avalanche, constantly distracting enemies.
However, the goal is to further empower your summon, which would make it easier to land ![]() Hound's Omen or
Hound's Omen or ![]() Umbral Tangle. Both of these have a saving throw. For this reason, there are a few ways to improve your chances of success:
Umbral Tangle. Both of these have a saving throw. For this reason, there are a few ways to improve your chances of success:
 Gloves of Baneful Striking - gives
  Baneful Strike
 Gloves of Power - gives
  Bane
Bane Harold is another source of Bane
- Reverberation also decreases enemy strength and constitution saving throws
So all of this makes the doggo and it's splinters much stronger, giving both more damage and better success of their special abilities. I would also prioritize so that they stay in ![]() Darkness where they have full visibility and also can avoid more hits (so that they do not get overwhelmed).
Darkness where they have full visibility and also can avoid more hits (so that they do not get overwhelmed).
All of these give Shadow Magic Sorcerer a really unique playstyle where you utilize ![]() Darkness and special
Darkness and special ![]() Hound of Ill Omen to safely stay in cover, overwhelm enemies with numbers and land a few spells.
Hound of Ill Omen to safely stay in cover, overwhelm enemies with numbers and land a few spells.
Nimbus and getting Sorcery points from Omen's
I briefly mentioned ![]() Hound's Omen that Nimbus can apply when attacking with
Hound's Omen that Nimbus can apply when attacking with ![]() Ominous Bite. This is a special action that helps you farm those precious Sorcery Points. I would not put much optimisation into this mechanic. However, there are a few recommendations that I would like to give.
Ominous Bite. This is a special action that helps you farm those precious Sorcery Points. I would not put much optimisation into this mechanic. However, there are a few recommendations that I would like to give.
From bg3.wiki in most cases you will land ![]() Omen of Acid and
Omen of Acid and ![]() Omen of Cold. This is the reason why we have taken two cantrips -
Omen of Cold. This is the reason why we have taken two cantrips - ![]() Acid Splash and
Acid Splash and ![]() Ray of Frost. So in case Nimbus lands one of these omens, you can use these cantrips to get free sorcery points.
Ray of Frost. So in case Nimbus lands one of these omens, you can use these cantrips to get free sorcery points.
Of course, you can also use archer allies with their special arrows - ![]() Arrow of Acid,
Arrow of Acid, ![]() Arrow of Ice,
Arrow of Ice, ![]() Arrow of Fire, etc. to harvest this point, but it's not mandatory in my opinion.
Arrow of Fire, etc. to harvest this point, but it's not mandatory in my opinion.
Improving Nimbus stats
So the cool thing is that the summons that you can control, also can consume potions and Elixirs. This is pretty simple:
- Select the summon from the character icons
- Open the whole party inventory or have the elixir dropped on the ground
- Right click on the elixir that you will want the summon to consume and click "Drink". Make sure it shows the summon name
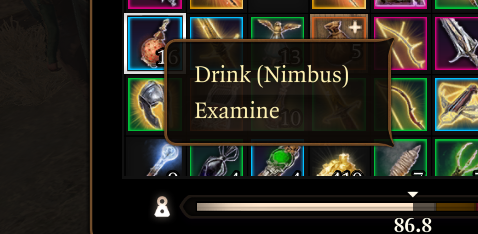
This is a very powerful feature. You can now drink elixirs like:
 Elixir of Hill Giant Strength or
  Elixir of Cloud Giant Strength which improves strength, resulting in higher hit chance and more damage
 Elixir of Battlemage's Power for improved Spell Save DC to have a higher chance of landing conditions and spells
- and others
With this in mind, you can really boost the combat potential of your buddy.
Gear Recommendations
Here are some recommendations on how to follow the gear picks:
- I recommend checking the Item Checklists or Interactive Map, depending on which is easier to use for you. This will help you track which items and when you should pick them.
- Gear for each slot is listed Best -> Worst. Generally, this means that you would start with lower gear recommendations (as they are available earlier) and upgrade to higher ones. However, in some cases, the best items can be obtained early, like
 Titanstring Bow, and some others.
 - I mention Stat Sticks in caster and ranged builds. These are items that you do not use directly (like
 Club of Hill Giant Strength,
  Knife of the Undermountain King, The Dead Shot, etc.), but their bonuses still apply to other weapon attacks or actions.
 - If an item is taken by another character, use the one with lower priority or even those from previous acts. If you want to have the best items for all builds, this will require planning, which is not for everyone.
Build ID: 995
Mode: Full Equipment
Sets: Act 1
Gameplay and mechanics
Using Minor Illusion
On the other hand, you can also use something like ![]() Minor Illusion to pull enemies together, change their vision cones, and attacking with the same spell but hitting all of them. This is a very powerful cantrip that can be overlooked.
Minor Illusion to pull enemies together, change their vision cones, and attacking with the same spell but hitting all of them. This is a very powerful cantrip that can be overlooked.
First, it does not break Invisibility or stealth (unless you get seen). Second, enemies when not in combat will chase it, meaning they will change their vision direction. Third, on most occasions, they will come closer to investigate the illusion.
This creates various opportunities like landing a powerful Area of Effect spell from caster or scrolls, or hitting with wide attacks.
The recommended combat loop
Sorcerer is pretty straightforward to play, especially if you do plenty of long rests to restore spell slots. Here are some tips:
 Magic Missile is one of the best picks for early games. You get a 100% hit chance and get bonus damage via
  The Spellsparkler +
  Psychic Spark.
- Shield is perfect for avoiding early-game wipes. Just make sure to have a free level 1 spell slot to activate it.
- Cast
 Mage Armour to ensure you have good Armour Class, if possible, wear a shield.
 - You can use Metamagic: Twinned Spell on Chromatic Orb to deal hefty damage. The thunder variant has 3d8, and lightning can get its damage doubled via
 Wet.
Wet.  Minor Illusion can be used to lure enemies into one place before combat. This is perfect for setting up Darkness or other area of effect spells.
- You can do a nova round with Metamagic: Quickened Spell + Haste/
 Potion of Speed, to unleash up to 3 spells per turn, in most scenarios, easily beating the encounter.
Once you get to level 3 and have both ![]() Shadow Blade, and
Shadow Blade, and ![]() Eyes of the Dark: Darkness you can do this:
Eyes of the Dark: Darkness you can do this:
- After each long rest, activate
 Shadow Blade
 - If possible, before combat, cast Eyes of the Dark: Darkness on a group of enemies. This does require knowledge of the game encounters.
- If you enter combat without precasting, then I see two choices - either cast Eyes of the Dark: Darkness on group of enemies if you are able to reach them. If not, use it defensively on yourself or allies
- In the Darkness, you have an Advantage with
 Shadow Blade, which deals hefty damage even with a caster. However, you are still free to use non-Concentration spells, to safely take out enemies one by one.
Act 1.5 - Level 7 - Rosymorn Monastery
I will assume that you have reached level 7 as you reach the ![]() Rosymorn Monastery Trail. It has plenty of stuff to explore and some important story bits. The whole map also contains significant gear that you should be on the lookout for.
Rosymorn Monastery Trail. It has plenty of stuff to explore and some important story bits. The whole map also contains significant gear that you should be on the lookout for.
Leveling Progression
Level 7 - Multiclass into Paladin Lv 1
So here we take the first multiclass into Paladin. The main question would be why? Let's go through a few points:
- As the game has 12 levels, going for all of them in Sorcerer, specifically Shadow Magic, will not give you much.
 Shadow Walk is pretty disappointing, unless you lean heavily into it.
 - Paladin comes with good weapon and armor proficiencies, unlocking better gear options
- Paladin, has a nice selection of Prepared spells which help and work well with the Sorcerer, namely Command.
- The Oathbreaker subclass will also provide some nice spell additions
So, now in the level-up screen, you can start multiclassing:
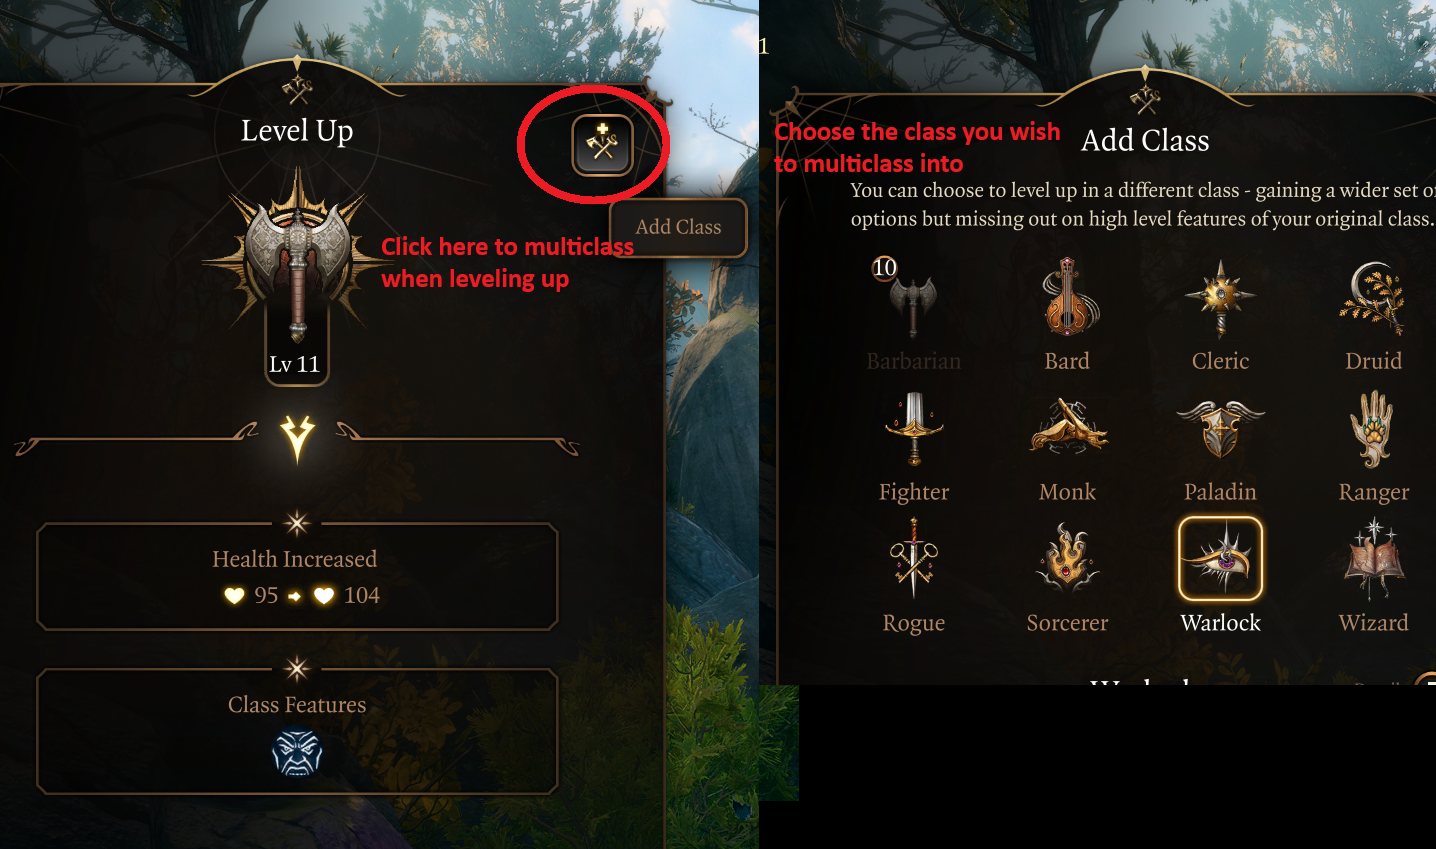
Let's go through the Paladin choices now:
| Overview | |
|---|---|
 Paladin Paladin |
|
| Features | |
| Use your blessed touch to heal a creature or cure it of all diseases and poisons. | |
| Gain |
|
 Channel Oath Charges Channel Oath Charges |
You gain the ability to channel the power contained in your Paladin Oath, which you can use to fuel certain actions. |
For the subclass you can take any of them. To be fair, I would go for Devotion as your goal is to Break an Oath in the easiest possible way. The Devotion subclass should break it for killing any random NPC.
| Overview | |
|---|---|
| Features | |
| With steep casting cost, the effect is pretty disappointing. | |
| The main requirements to uphold the oath. | |
After you break your Oath you will become an Oathbreaker with these features:
| Overview | |
|---|---|
| Features | |
| The ability has a pretty steep cost of full action point, so I would say its usage is pretty limited, especially in the later parts of the game. | |
Once you become Oathbreaker, doing a respec requires you to restore your Oath from the Oathbreaker Paladin in the camp for 1000 Gold.
Gear Recommendations
There are a couple of items that I would take a look here; otherwise, the previous Act ones are already enough
Build ID: 995
Mode: Full Equipment
Sets: Act 1.5
Gameplay and mechanics
The recommended combat loop
Overall, the gameplay stays the same as in Act 1, but with the doggo unlocked here are few additions:
- Try to keep the Hound of Ill Omen in your Darkness field. This gives him better survivability and also unlocks movement speed. For example, you can move it outside of Darkness, hit enemies, provoke
 Opportunity Attack activate Splinter Shadow and go back into the darkness again.
 - If enemy gets
 Hound's Omen use one of cantrips or your allies to activate appropriate element: acid -
  Acid Splash, cold -
  Ray of Frost, etc. Or use your archers for elemental arrows. This will make it easy to harvest sorcery points
Act 2 - Level 8-10 - Shadow Lands
Depending on your choices, you might even reach Act 2 at level 7, so check the previous recommendations. In most cases, people will enter Act 2 via ![]() Path to Rosymorn Monastery Trail
Path to Rosymorn Monastery Trail
Leveling Progression
Level 8 - Paladin Lv 2
The second level is another banger for Paladin, which unlocks good features:
| Feature | Description |
|---|---|
| A very powerful action unique to Paladins. It will allow you to empower weapon attacks at the cost of spell slots. Use it when you need high damage to take out a foe as fast as possible or land a critical hit. Using higher-level spell slots will improve |
You can also choose a fighting style:
| Fighting Style | Description |
|---|---|
| Gives +1 Armour Class, which results in a decent increase in survivability. I would say this is the only pick that has a significant impact on the build performance. |
Now the last part is selecting prepared spells. Here are the mandatory spells to take:
| Prepare Spell | Description |
|---|---|
| This will be one of the core control spells for the build. It does use Concentration so you can use it together with other spells. For example you can use |
|
| Can be used to push enemies off ledges. Moreover, the |
The other slots can be filled with anything, as I think the alternative spells are not that useful.
Effectively using Divine Smites
The key aspect of any build that involves at least 2 levels of Paladin is ![]() Divine Smite. It is one of the coolest actions, punishing your targets with a ray of light. It can play a crucial role in maximizing your damage output. Let's go through some steps
Divine Smite. It is one of the coolest actions, punishing your targets with a ray of light. It can play a crucial role in maximizing your damage output. Let's go through some steps
First, open up your reactions window and make sure ![]() Divine Smite is set to "Ask". First you can do this for both normal and Critical hits
Divine Smite is set to "Ask". First you can do this for both normal and Critical hits
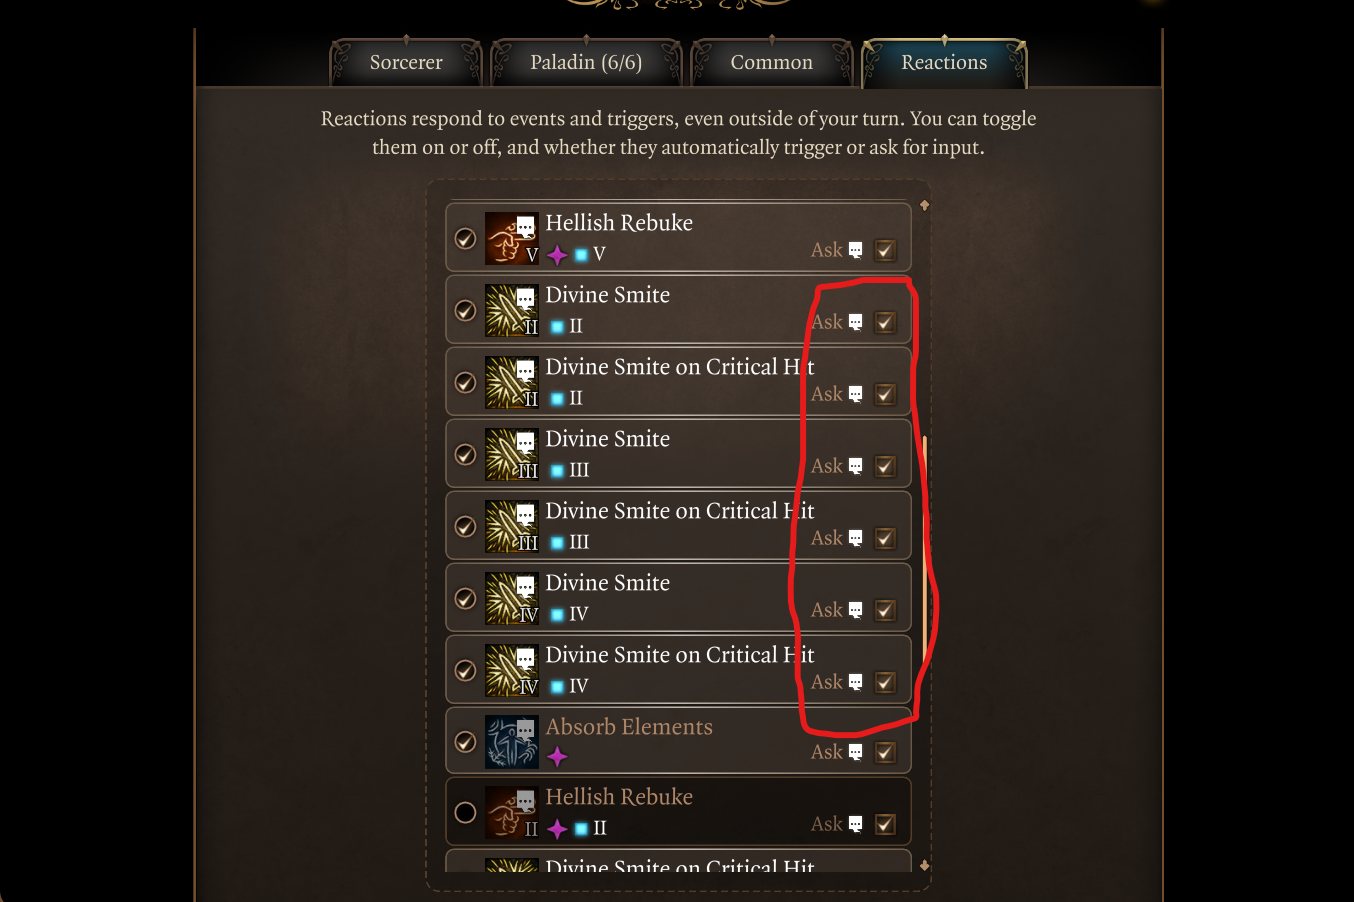
This can become somewhat irritating, as all of your attacks will pop a reaction window. However, in case enemy ends up with 7 HP, you can just use ![]() Divine Smite to finish them off. If it is a Critical Hit, you really want to choose the highest level as it will technically double your
Divine Smite to finish them off. If it is a Critical Hit, you really want to choose the highest level as it will technically double your ![]() Divine Smite damage.
Divine Smite damage.
Overall, critical hits are extremely important for these attacks as the large number of dice rolls gets doubled. You can also guarantee them with spells like ![]() Hold Person,
Hold Person, ![]() Hold Monster,
Hold Monster, ![]() Glyph of Warding: Sleep, etc.
Glyph of Warding: Sleep, etc.
Another option, if you want, a big nova damage, is to use one of the special smites - ![]() Blinding Smite,
Blinding Smite, ![]() Thunderous Smite, and use
Thunderous Smite, and use ![]() Divine Smite as a reaction on the same attack. This can deal huge damage, but burns through spell slots very fast.
Divine Smite as a reaction on the same attack. This can deal huge damage, but burns through spell slots very fast.
As I mentioned, other types of smites - ![]() Thunderous Smite,
Thunderous Smite, ![]() Searing Smite, come with unique effects and can apply various effects like
Searing Smite, come with unique effects and can apply various effects like ![]() Blinded,
Blinded, ![]() Frightened, etc. However, they might activate Concentration (and break your current spell) or use up bonus action, that is extremely valuable on Sorcerer with
Frightened, etc. However, they might activate Concentration (and break your current spell) or use up bonus action, that is extremely valuable on Sorcerer with ![]() Metamagic: Quickened Spell.
Metamagic: Quickened Spell.
Level 9 - Paladin Lv 3
For this level, you could also go for Sorcerer Lv 7, which unlocks level 4 spells, for the upcoming major fights. I personally prefer finishing Paladin and then dedicating all the levels to Sorc.
The level 3 Paladin brings nice additions for the setup we are going for:
| Feature | Description |
|---|---|
| Prevents diseases from affecting the Paladin. | |
| A situationally useful action that helps control an undead. This works until long rest. | |
| This will be another control action in your arsenal. It does not use Concentration, so you can use it freely against a group of enemies to force them to stay in place. | |
| Use reaction to cast a fire spell. Not that good in the late parts of the game, so I would disable the reaction. | |
| This is the only source of Charisma based |
Level 10 - Sorcerer Lv 7
You unlock level 4 spells, there are definitely a few good choices here.
| Spell | Description |
|---|---|
| As you will be able to stack |
Gear Recommendations
Build ID: 995
Mode: Full Equipment
Sets: Act 2
Gameplay and mechanics
This is an important section, as the build gains major changes in how it plays, thanks to various unlocked items.
Working with Arcane Acuity
In Act 2, you will finally get access to the core mechanic of this build - ![]() Arcane Acuity. This is what will enable you to reach almost 100% spell success chance on most of the enemies. This makes you a powerhouse controller, fully disabling enemies.
Arcane Acuity. This is what will enable you to reach almost 100% spell success chance on most of the enemies. This makes you a powerhouse controller, fully disabling enemies.
The goal is to get at least one of these items. Two would be better if your party does not require the same gear:
The last two require a specific damage rider when doing weapon attacks (or using specific spells like ![]() Scorching Ray,
Scorching Ray, ![]() Thunderwave, etc.). You can use
Thunderwave, etc.). You can use ![]() Drakethroat Glaive to apply the damage riders depending on whether you use
Drakethroat Glaive to apply the damage riders depending on whether you use ![]() Hat of Storm Scion's Power or
Hat of Storm Scion's Power or ![]() Hat of Fire Acuity
Hat of Fire Acuity
Resonance Stone for double psychic damage
Generally, ![]() Shadow Blade weapon users want
Shadow Blade weapon users want ![]() Resonance Stone that you obtain late in Act 2. However, it has one major caveat that has negative synergy with Shadow Sorcerer setup -
Resonance Stone that you obtain late in Act 2. However, it has one major caveat that has negative synergy with Shadow Sorcerer setup - ![]() Hound of Ill Omen.
Hound of Ill Omen.
The doggo effects - ![]() Umbral Tangle and
Umbral Tangle and ![]() Hound's Omen target's enemy Strength and Constitution Saving throws. With
Hound's Omen target's enemy Strength and Constitution Saving throws. With ![]() Resonance Stone enemies, get an
Resonance Stone enemies, get an ![]() Advantage on these making it harder to land them. I don't think this is a huge problem, but something to have in mind.
Advantage on these making it harder to land them. I don't think this is a huge problem, but something to have in mind.
Overall, if you have another party member that uses ![]() Shadow Blade going for
Shadow Blade going for ![]() Resonance Stone is no brainer, for the sheer damage output that it offers.
Resonance Stone is no brainer, for the sheer damage output that it offers.
The recommended combat loop
The goal is to obtain two items - ![]() Gloves of Battlemage's Power and
Gloves of Battlemage's Power and ![]() Helmet of Arcane Acuity. If you are running other gish (spellblade) characters, the first one is mandatory, and the second one can be passed to them.
Helmet of Arcane Acuity. If you are running other gish (spellblade) characters, the first one is mandatory, and the second one can be passed to them.
With all of this in place, your playstyle will evolve into semi melee setup, where you try to get close to enemies and keep them in your ![]() Darkness.
Darkness.
- Booming Blade will be your go to attack. The goal is to use it with Metamagic: Extended Spell to instantly stack 4-8 stack of Arcane Acuity
- Now you have a very high Spell Save DC and have a few options, for example, follow up with Metamagic: Quickened Spell + spell to inflict damage, or further control spells.
- Try to keep enemies in Darkness with Command and Dreadful Aspect.
- Once you have 10 stacks of Spell Save DC, you can use spell like
 Confusion or Hypnotic Pattern to outright disable enemies in a wide area. This, in most cases, will result in them skipping their turns, and you can clean up enemies with your party one by one.
 - You can use
 Thunderous Smite to push off enemies or push them into Darkness. Of course, this eats up your bonus action, so be mindful of that.
Act 3 - Level 11-12 - Rivington and Lower City
You are close to reaching the game finale, or so you think. The last part of the game is huge and can be both intimidating and overwhelming.
Here are some recommendations from me:
- You don't need to do all the side quests here; they can take up to 40 hours or more, depending on what you decide to do
- Leave some quests for other runs. As you reach the maximum level, the game might become less satisfying. This will give a new perspective for your next playthroughs, to find novelty and discovery.
- There is a lot of good gear that improves the build, so be sure to get it.
Leveling Progression
Level 11 - Sorcerer Lv 8
So the spell options are really wide now, and you can choose various options. For example, ![]() Ice Storm is an extremely good spell for creating Ice surfaces and inflicting Cold damage.
Ice Storm is an extremely good spell for creating Ice surfaces and inflicting Cold damage. ![]() Fear can be used to disable a group of enemies using weapons, and so on. I would give priority to this one:
Fear can be used to disable a group of enemies using weapons, and so on. I would give priority to this one:
| Spell | Description |
|---|---|
| I think this can be a useful spell to move around and give mobility in case you lose |
Now, 2nd feat is also available
| Feat | Description |
|---|---|
| Great time to take this feat if not picked before, as you will enjoy a wide selection of weapon options in Act 3 for dual-wielding. | |
| Ability Improvement - +2 Dexterity | This is a great option. As you are using |
| Another option, that almost guarantees that you go first, and cannot be |
Lastly, I recommend making one change and replacing an old spell, which you most likely will not use anymore:
| Remove Spell | Add Spell | Description |
|---|---|---|
| This is a perfect time to replace the old spell. The new one can be used to apply |
You can also delay the spell replacement to the next level where you will get access to new level 5 spells
Level 12 - Sorcerer Lv 9
This is the last level of the build:
| Spell | Description |
|---|---|
| In some cases, this spell can disable a powerful foe, then you can follow up with guaranteed critical hits against it. |
Gear Recommendations
Build ID: 995
Mode: Full Equipment
Sets: Act 3
Gameplay and mechanics
In general, Act 3 does not bring much in terms of how the gameplay changes. It's just optimisations to your gear and higher-level spell unlocks
The recommended combat loop
As I mentioned, the combat loop stays more or less the same from the previous Act 2 (check that out if you missed it).
- Continue using Eyes of the Dark: Darkness to build Darkness field and be able to see inside of it.
- Remember to get Sorcery points via Spellcrux Amulet,
 Potion of Angelic Reprieve, etc.
 - Use Booming Blade + Metamagic: Extended Spell to get multiple stacks of Arcane Acuity which enables you to follow up with control of offensive spells
- Use Scrolls -
 Scroll of Chain Lightning,
  Scroll of Cone of Cold, etc. These are plentiful in Act 3, and gives you a free use without expending spell slots
 - Metamagic: Quickened Spell is the option for when you really want to go heavy on spellcasting.
- You also have options for spells and actions to apply control that don't use Concentration - Command and Dreadful Aspect. The latter does not use spell slots, and can force enemies to stay in place, while making them Frightened.
- After taking out an enemy if using
 Staff of Cherished Necromancy you can use
  Consume Life Essence to use Inflict Wounds for free.
 - Use
 Hold Monster to disable many of the bosses and gang up with your allies for guaranteed crits.
 - Try to keep your Hound of Ill Omen in the Darkness. This ensures that it does not get overwhelmed, as it is limited to Splinter Shadow once per turn.
Maximizing - Abilities, Illithid Powers, Consumables
Maximising Ability Scores
Now, as the build progression is covered, there are a few aspects and important decisions you will have to make throughout the game. These will decide your final score for abilities.
Dexterity
It plays an important role for initiative and improving your hit chances when using ![]() Shadow Blade:
Shadow Blade:
- 16 Dexterity - the base from character creation
- Feat - Ability Improvement - +2 Dexterity
- Act 3 - Mirror of Loss - pick +2 Dexterity.
Charisma
- 17 Wisdom - the base for character creation.
- Act 1 - Auntie Ethel's Hair - you will want to get +1 Charisma if you pick this choice.
- Act 3 - Mirror of Loss - Patriar's Memory - +1 Charisma if you did not take Auntie Ethel's Hair
Illithid Powers
This special mechanic in Baldur's Gate 3 allows you to consume tadpoles and unlock special Illithid Powers.
At first, you can only use the base powers. As you move to Act 3, you will be able to unlock the outer ring powers, also called Elite.
| Illithid Power | Type | Description |
|---|---|---|
| Base | Beneficial power to take as it does not have any costs, and provides only benefits on the first hits with attack rolls. | |
| Base | An easy way to ensure you land critical hits. | |
| Base | Can help to kill an enemy faster if it is left with a few HP. | |
| Base | A great way to weaponise your reaction before obtaining |
|
| Base | Excellent option for bonus temporary HP. It can also apply |
|
| Elite | Can be used to maximise the effectiveness of charisma-based skills, especially relevant to the main character. | |
| Elite | Very powerful spell that can be used to pull enemies together. You can then follow up with area-of-effect spells or attacks. In general, it is a very effective action in the hands of any character. | |
| Elite | Can be used to save yourself from a deadly spell. This is especially relevant as you will have a |
|
| Elite | Remove the cost of spell slots or charges. | |
| Elite | You can now use action and bonus action interchangeably, giving two full spell casts each turn. It's not as important for you, but it will help other casters in the group. | |
| Elite | Weakens enemies by reducing their Armour Class. Now it's easier to hit them. |
Potions, Elixirs and other Consumables
Let's take a look at what consumables you can use to further empower the build.
Potions
These are general consumables, and most of them are activated for a few turns. Potions are separate from Elixirs and can be active together.
| Consumable | Description |
|---|---|
| This is a very powerful potion. It gives an additional action point, which can be used to cast a spell or attack. The activation is generally by drinking using a bonus action. However, you can stack together with party members and make one member |
|
| It can be used in two ways - the first one is to enter combat with a |
|
| An easy way to get the |
|
| Gives |
|
| Restores level 1 and 2 spell slots. This can be used to turn spell slots into Sorcery points via |
|
| Acts as a Long Rest, restoring all spell slots. Can be used with |
Elixirs
Unfortunately, only one Elixir can be active at a time. However, the good thing is that they last until a long rest, making them very useful and economical.
Be sure to activate them before combat, as otherwise, you will need to use Bonus Action.
| Consumable | Description |
|---|---|
| The elixir gives an easy option to get an additional action point - just kill a foe. This can then be used to attack one more time or cast a full spell. | |
| Sets the strength value to 21 until the Long Rest. This is a perfect option for your summons, as they can drink it when you control them by right-clicking on the elixir. Here is a farming guide for Elixir of Hill Giant Strength. Why use this for this build? Early on, you might be limited on other elixirs, and this enables you to have a very high hit chance using |
|
| Improves Spell Save DC, making it easier to land spells. | |
| Makes it easier to maintain spell Concentration | |
| For some encounters, you will want to go first. This elixir will ensure that it overcomes even |
Scrolls
This is one of the most overpowered mechanics in the game. At first, it might seem that you earn those old, boring spells that you can learn yourself. However, as you play more and more, and get higher-level spells, you can see - wait, I can save a spell slot casting this.
Yeah, and this is where their power comes. During the whole playthrough, you will probably collect a lot of these, so I recommend using them whenever you can.
Conclusion
Thank you for reading the Shadow Sorcerer Build for Baldur's Gate 3. It took a while to release this one, as the goal was to come with something that extensively utilizes the "shadow" themed spells and subclass mechanics like ![]() Hound of Ill Omen. Hope you will enjoy this
Hound of Ill Omen. Hope you will enjoy this
Cheers!
Credits
- Builds Backroom - appreciate sharing of ideas for splits and various useful mechanics
- David - appreicate the review of the build
Like, Dislike, comment, or share!
Join the Discussion
0 commentsNo comments yet.
Be the first one to leave a comment!