
Best Sorlock Build - the Ultimate Guide - Baldur's Gate 3 (BG3)
Contents
Sorlock Build - Sorcerer Warlock Multiclass
This build is the epitome of highest-tier spellcasting, able to handle almost any situation that the game throws at it. It can be support, control, damage, and anything else the caster wants to do.
Sorcerer - provides a wide array of spells up to level 5 like ![]() Fireball,
Fireball, ![]() Cone of Cold,
Cone of Cold, ![]() Sleet Storm, etc. Moreover, you get access to metamagic. This will allow you to cast spells with bonus action or double their amount - yes you heard that right. Moreover, Sorcerer gives interesting features based on the subclass you pick.
Sleet Storm, etc. Moreover, you get access to metamagic. This will allow you to cast spells with bonus action or double their amount - yes you heard that right. Moreover, Sorcerer gives interesting features based on the subclass you pick.
Warlock is another side of the coin, with the main highlight - ![]() Eldritch Blast. This will be the bread and butter of your control - Radiating Orbs, Reverbation, and damage without spell slot usage. Based on the gear you can get it will also deal decent damage against most grunts.
Eldritch Blast. This will be the bread and butter of your control - Radiating Orbs, Reverbation, and damage without spell slot usage. Based on the gear you can get it will also deal decent damage against most grunts.
However, you can also check pure Eldritch Blast Spammer Build, which concentrates on as many blasts as possible with a very high critical chance. It is not as versatile, but could satiate that wish - just to blast everything.
Build Variations
There are a few variations that the build could be changed about. I think it is more for advanced players who are likely doing some deeper optimizations.
| Setup | Description |
|---|---|
Fire Sorlock:
|
This is one of the strongest control builds, that relies on fire spells and |
Crit Eldritch Blast Spammer:
|
The build is made to capitalize on |
Lore Bard Sorlock:
|
Credits to Salmonaru from BG3 Discord. The build gets access to |
First-turn Eldritch Spammer:
|
Want to kill a boss in one turn with as many blasts as possible? Well here is a variation for you. It is meant to be a one-turn wonder that lights up like fireworks and exhausts its resources instantly. |
Leveling Overview
| Level | Class | Selection |
|---|---|---|
| 1 | Sorcerer 1 | Subclass: Draconic Bloodline/Storm Sorcerer |
| STR - 8, DEX - 16 (15+1), CON - 14, INT - 8, WIS - 10, CHA - 17(15+2) | ||
| Cantrips: |
||
| Spells: |
||
| 2 | Sorcerer 2 | Spells: |
| Class Passives: |
||
| 3 | Sorcerer 3 | Spells: |
| Class Passives: |
||
| 4 | Sorcerer 4 | Cantrips: |
| Spells: |
||
| Feat: Ability Improvement +2 CHA | ||
| 5 | Sorcerer 5 | Spells: |
| 6 | Sorcerer 6 | Spells: |
| Replace Spell: |
||
| 7 | Warlock 1 | Cantrips: |
| Subclass: The Fiend/The Great Old One |
||
| Spells: |
||
| 8 | Warlock 2 | Spells: |
| Eldritch Invocations: |
||
| 9 | Sorcerer 7 | Spells: |
| 10 | Sorcerer 8 | Spells: |
| Feat: |
||
| 11 | Sorcerer | Spells: |
| 12 | Sorcerer | Cantrips: |
| Spells: any spell | ||
| Class Passives: |
Starting the Game - Level 1
We start with the early game. I would go into what are the best Races, Abilities, and Skills for Sorlock. Some of these choices are impactful as you cannot respec them.
Races
Picking a race provides various benefits - abilities, dialogue options, looks, etc. Also, keep in mind whether your picked race has Shield proficiency as this can improve survivability or give benefits for offensive.
| Race | Features | Description |
|---|---|---|
 Halfling Halfling |
Although they cannot wear a shield, they are the perfect choice for builds that aim to land critical hits. | |
 High Half-Elf High Half-Elf |
|
I think this is the "optimal" choice. High Half-Elfs get a cantrip, |
 Human Human |
This is one of the rare occasions where I would recommend going with a human. You can get Shield proficiency that will be valuable throughout the game for various bonuses and increased Armour class. |
Class
We start the build with Sorcerer. First, it will give us Constitution Saving Throw proficiency. Second, we want to get level 3 spells as soon as possible. They have very powerful options like Fireball, Haste, etc. After that, you can pick Warlock.
| Overview | |
|---|---|
 Sorcerer Sorcerer |
|
| Features | |
 Spell Slots Spell Slots |
These can be used to cast spells and are restored each long rest. |
Cantrips
The sorcerer gets 4 cantrips. This is a lot, allowing us to make some good choices:
| Cantrips | Description |
|---|---|
| If you are the main character and do most of the dialogues, this is also a good choice as it gives an |
|
| Use this cantrip to deal moderate damage or light up barrels with oil. Perfect if you want to save spell slots. Note: Take this Fire Bolt even if you have the one from Elf or half-elf. The other scales with Intelligence and you need Charisma | |
| A very handy spell, especially in Act 2. | |
| Lure enemies together from stealth with the cantrip. Then use |
Spells
Sorcerers cannot prepare spells. This means that what they choose during the level-up screen - is what they can use. This can easily cause decision paralysis especially if you are new to the game. Here are my recommendations for what to pick early:
| Spells | Description |
|---|---|
| I recommend this spell. It is not very powerful, but it can hit multiple enemies and does not miss. You can easily finish off a straggler with a few HP and damage the second foe. The missiles scale with higher spell slots, and are useful throughout the game. | |
| This is a very versatile spell, that can be used to create various surfaces and deal different elemental damage. later you can use |
|
| This spell will give 13 Armour Class. Pair this with a dexterity bonus and you have 16 Armour Class at the start of the game. It's more than a heavy armor user. Moreover, getting a shield will also net 18. Only take this with Storm Sorcerer, Draconic Bloodline does not need it |
Subclass
You can generally go for any subclass, here is an overview of what each does:
| Subclass | Description |
|---|---|
 Draconic Bloodline Draconic Bloodline |
This is a great option, especially if you will add something like |
 Storm Sorcerer Storm Sorcerer |
You get an additional |
For this build progression, I will be taking the one below. however, there is nothing wrong with picking another subclass.
| Overview | |
|---|---|
 Draconic Bloodline Draconic Bloodline |
|
| Features | |
| An excellent passive for early game which saves you Mage Armor spell every long rest. Later on, as spell slots become readily available it loses its significance. | |
| Gain bonus maximum HP for each Sorcerer level. | |
Dragon Ancestor
This is a unique choice for the Draconic Bloodline subclass. It is important as a level 6 Sorcerer you will obtain a special ![]() Elemental Affinity: Damage that will increase related element damage. I recommend concentrating on two choices, based on what kind of magic you want to use mostly later on - fire, lightning, or Ice.
Elemental Affinity: Damage that will increase related element damage. I recommend concentrating on two choices, based on what kind of magic you want to use mostly later on - fire, lightning, or Ice.
All of them are amazing. Fire is straightforward, just blast things with high damage. Ice - gives good crowd control capabilities, but lacks in the damage department, at least before level 9. Lightning, is ridiculously powerful, especially on Wet enemies. However, if you do not have anyone who could apply Wet, I would just go with Storm Sorcerer altogether.
For this build, I would take any that has Fire. My preferred choice would be ![]() Draconic Ancestry: Brass (Fire) as it gives
Draconic Ancestry: Brass (Fire) as it gives ![]() Sleep which can be useful early in the game.
Sleep which can be useful early in the game.
Background
Backgrounds are mostly for role-playing and you can pick whatever you prefer with Sorlock. If you want to optimize, then it would be good to pick backgrounds that are based on your ability points of Charisma.
| Background | Skills | Description |
|---|---|---|
| Charlatan/ Criminal | Deception Sleight of Hand/Stealth |
Both of these are very similar, however, I think there will be no need for Sleight of Hand or Stealth as these will be handled by others in the group. Unless you are doing a solo run. |
| Noble | History Persuasion |
Persuasion is a good choice to pick as it will be very useful in multiple dialogue choices. |
| Guild Artisan | Insight Persuasion |
Another relevant choice as it covers Persuasion and gives bonus proficiency to Insight. |
| Entertainer | Acrobatics Performance |
Improves Acrobatics skills and gives bonuses to Performance for some dialogue checks. |
Abilities
Here are some key points to know about ability points:
- They give "ability modifiers" that apply to various skill checks. For example, Charisma works on Intimidation and persuasion checks. Wisdom on Survival or Animal Handling, and so on.
- You get a higher ability modifier on even values - 10, 12, 14, etc. So keeping it on odd may be useless. However, there are various +1/2 modifiers in the game, specifically
 Auntie Ethel's Hair or Feats that help round this up.
 - Weapons can benefit from either Dexterity or Strength, depending on their type
- You also have a spellcasting modifier, which can be Wisdom, Charisma, or Intelligence, depending on your class.
This is the base setup for most of the sorcerer builds - high charisma and dexterity, followed by constitution. This makes sure that you can go early in combat and have all the charisma bonuses the build needs. ![]() Auntie Ethel's Hair is optional, as you can also obtain Patriar's Memory in Act 3 for +1 Charisma to round it up.
Auntie Ethel's Hair is optional, as you can also obtain Patriar's Memory in Act 3 for +1 Charisma to round it up.
Skills and Expertise
Overall, the skills should be impacted by your roleplaying and background decisions. However, you would still want those that will give you the best benefits. My recommendations are to pick those at which you have a high ability modifier Charisma:
- Intimidation
- Persuasion
Leveling Progression - Level 2-12
Here is the detailed progression for the build to get you started. You can use it as a guideline because early games can be daunting and overwhelming. Later on, once you get the feel for the class you can start picking your options
Level 2
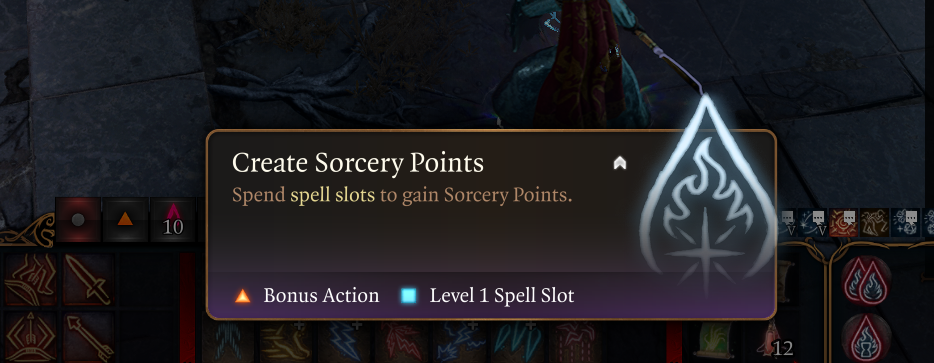
Instantly at level 2, we get a lot of improvements. First, the Sorcerer gets an additional level 1 spell slot, and 2 Sorcery points are added. They can be used for creating spell slots, additional spellcasting, etc.
| Actions | Description |
|---|---|
| Spend Spell Slots to gain Sorcery Points. Once you get some more metamagic options, you could sacrifice spell slots, to cast two spells in one turn or increase your range | |
| Spend Sorcery Points to unlock a Spell Slot. You could create a higher tier spell slot, to increase the damage over what you can at the current level |
Spells
My recommendation for the spells to be included in the spellbook:
| Spells | Description |
|---|---|
| I cannot stress enough how powerful this spell is. You can use the level 1 spell slot, to increase your armour class by 5. The result is that you can avoid most of the attacks during the turn. However, I would recommend delaying it to level 4 if you are playing on tactician or balanced as the usage cost is very steep this early in the game. | |
| Do you see an enemy close to the ledge? Or they are close to you? Use Thunderwave to knock them back and deal thunder damage. It can instantly kill foes that are thrown from the ledge. |
Class Passives
Sorcerers get access to unique actions - metamagic. They allow to consumption of sorcery points to enhance spellcasting. New metamagic options will be unlocked as we level up as you have more and more Sorcery Points. Pick two:
| Passives | Description |
|---|---|
| Spells that only target 1 creature can target an additional creature. Later on, you can use this to apply Haste on two allies or a Command spell to disable two targets. | |
| This is especially useful if you will cast spells with short duration like |
|
| Get a huge distance boost, allowing you to take out enemies before they see you. |
Replace Spell
Nothing to replace.
Level 3
The level-up unlocks the level 2 spell slots and spells. You also gain another option for metamagic, this time much better
Spells
Because we get level 2 spells it gets interesting. Although there is no "all-powerful" spell at this level, there are multiple ones that are decent. I would like to recommend:
| Spells | Description |
|---|---|
| This can be used to target multiple enemies and is very good in passages or choke points. The spell deals damage when it's cast and when the enemy's turn begins. This means you do 2x damage by default. |
Class Passives
We are getting another metamagic selection. The good thing is that two new options are introduced. Here is my recommendation:
| Passives | Description |
|---|---|
| By consuming 3 Sorcery points a spell can be cast using bonus action instead of action points. You can cast two damage spells one after another. Or later, you could use Haste and then two spells at the same turn. This unlocks tactical possibilities. |
Replace Spell
I do not recommend replacing any spells yet, as all of them still serve a purpose.
Level 4
We get our first Feat selection that will greatly improve both offense and defense. The Sorcerer also unlocks another level 2 spell slot and can select an additional spell.
Cantrips
We can choose another cantrip. Nothing important here but you can get this one:
| Cantrips | Description |
|---|---|
| A cantrip that deals ice damage, slows enemies, and can double its damage on wet foes. |
Spells
As now you have a decent amount of spell slots getting this option makes sense:
| Spells | Description |
|---|---|
| This spell is okay for now. However, it can become invaluable if you take |
|
| This spell will get very powerful as you level up, Specifically for |
Replace Spell
Nothing to replace.
Feat
For the first Feat, there is nothing much to recommend. You only want to improve your ability score for a higher spell success chance and more damage
| Feat | Description |
|---|---|
 Ability Improvement Ability Improvement |
Allocate 2 ability points to Charisma. This will increase the modifier by 1 resulting in higher spell success. |
| If you don't have any other caster you could run |
Level 5
And you finally reach level 3 spells, which makes Sorcerer much stronger from now on.
Spells
There are a lot of good spells at this tier, so it's hard to choose what to pick. You should choose one hard hitter that will be your bread and butter for damage dealing:
| Spells | Description |
|---|---|
| A very powerful and trustworthy fire spell. You can hit enemies in a decent area of effect for 8d6 damage. With Draconic Bloodline Fire ancestry, each enemy hit will get bonus damage based on the charisma modifier | |
| A lightning spell that hits all enemies in a direct line. Try to get the best position possible to hit as many foes as you can. Moreover, try to wet enemies with party members for double damage. Get this for the Storm Sorcerer subclass. |
Replace Spell
My recommendation would be to get ![]() Haste. However, at this stage in-game, the other spells still serve a purpose. So I would not do anything yet.
Haste. However, at this stage in-game, the other spells still serve a purpose. So I would not do anything yet.
Level 6
Reaching Level 6 Sorcerer gives bonus subclass features. For example, going as Storm Sorcerer unlocks ![]() Call Lightning,
Call Lightning, ![]() Create Water, etc. Draconic Bloodline would unlock
Create Water, etc. Draconic Bloodline would unlock ![]() Elemental Affinity: Damage giving a bonus to elemental damage based on ancestry and charisma modifier.
Elemental Affinity: Damage giving a bonus to elemental damage based on ancestry and charisma modifier.
| Features | Description |
|---|---|
| The ability will activate every time we use relevant elemental spells. In your case, this will be bonus Fire damage, when using Scorching Ray or Fireball. | |
| Somewhat situational feature, I have not used it much as I would rather spend sorcery points on metamagic. |
Spells
| Spells | Description |
|---|---|
| A very powerful spell that gives an additional action point. In a sense, you can cast two spells. Add |
|
| Excellent spell that can be used for crowd controlling and making foes slip on ice. Take this if you do not care about doubling action points. |
Replace Spell
I recommend removing ![]() Cloud of Daggers for:
Cloud of Daggers for:
| Spell | Description |
|---|---|
| A powerful spell that can counter almost any spell that foe casts. Even if you don't use it often, it is good to have it as it will notify you of what enemies are casting and let you decide the next steps | |
| An extremely good crowd-control spell should be used at the start of the combat. It will remove enemies from combat for two turns. Cast it with |
Level 7 - Warlock Lv 1
This is the first dip into the Warlock multiclass. Unfortunately, you do not get the most important bonuses yet, however, it will still be helpful
Class
| Overview | |
|---|---|
 Warlock Warlock |
|
| Features | |
 Warlock Spell Slots Warlock Spell Slots |
These spell slots can be used to cast spells and refill each Short Rest. |
Cantrips
We only need the Eldritch Blast cantrip. For the other choose, what you prefer.
| Cantrip | Description |
|---|---|
| One of the cornerstones of this build. We will be using Eldritch Blast to shred enemies to pieces and knock them down. It will become very powerful on the next Warlock level | |
| A utility spell, that can summon a spectral hand. It can help with puzzles and shove enemies. |
Subclass
Now for subclasses, each Warlock option brings something to the table. One has more defensive capabilities, another is perfect for controlling, etc. So let's do a short overview of each of them
| Subclass | Description |
|---|---|
 The Great Old One The Great Old One |
This is a more offensive option. This subclass can apply Freighten to nearby enemies with - |
 The Fiend The Fiend |
You can get temporary HP for each enemy killed - |
| Overview | |
|---|---|
 The Great Old One The Great Old One |
|
| Features | |
| As the build uses spells with multihits, this ensures that you can easily land critical hits and make enemies Frightened. | |
Spells
| Spells | Description |
|---|---|
| By using Bonus Action, you can weaken the enemy. Moreover, each hit will deal an additional 1-6 Necrotic damage on top. However, it is not as strong as you can use |
|
| This spell is useful as later on you can use it to improve |
|
| This is a very powerful spell, that we can empower with Sorcerer metamagic. Only can be selected with The Fiend subclass. It works as crowd control without the need for |
Level 8 - Warlock Lv 2
Level 2 will unlock the full potential of ![]() Eldritch Blast and you can fully utilize the sorcerer warlock build synergy.
Eldritch Blast and you can fully utilize the sorcerer warlock build synergy.
Spells
Take whatever spell you prefer, for this level we are mainly interested in Eldritch Invocations.
| Spell | Description |
|---|---|
| I think this can be useful as you get additional cast on the enemy's turn. |
Eldritch Invocations
You can only pick two, so here are the options.
| Invocation | Description |
|---|---|
| Improves Eldritch Blast damage by including your Charisma ability modifier in the damage calculation. | |
| Eldritch Blast now knocks back. This is very powerful as you can throw enemies from ledges. That is more or less the main reason to take the Warlock multiclass for Sorlock. | |
| This invocation is very powerful if you utilize the |
Level 9 - Sorcerer Lv 7
We finally unlock level 4 spells. These will be a great addition to the spellbook, but nothing that will have drastic changes
Spells
| Spell | Description |
|---|---|
| I recommend having this spell. It can provide instant crowd control by applying Ice surfaces, making enemies fall. Moreover, using it on wet enemies will deal bonus damage. Another important aspect is that half of its damage comes as Bludgeoning, making it very effective against particular enemies. |
Replace Spell
Feel free to replace anything if you feel you have no use for it.
Level 10 - Sorcerer Lv 8
This is a big step, as we fully unlock the potential of ![]() Eldritch Blast. From level 10 it gains 3 shots. This means you could potentially knock back three enemies from Chasm or into some detrimental effect.
Eldritch Blast. From level 10 it gains 3 shots. This means you could potentially knock back three enemies from Chasm or into some detrimental effect.
Spells
Pick one of the spells. Just keep in mind that your ![]() Concentration slots may be already constantly in use:
Concentration slots may be already constantly in use:
| Spell | Description |
|---|---|
| Makes enemies lose control of themselves and do unexpected things. They may skip a turn, attack allies, run around, etc. This lasts for 3 turns and can be an effective way to control a large area. | |
| It is a powerful spell that can be deadly in a choke point. I would not say that it is mandatory as you already have important spells that utilize Concentration. So I put it more as an option. | |
| It is a powerful single-target spell with 8d8 rolls and can one-shot most medium enemies. It's a good spell to have alternative spell damage |
Replace Spell
I did not replace anything.
Feat
| Feat | Description |
|---|---|
| With this, you can wear two staves at the same time. It is a perfect option for going all in on the offense. You can use something like |
|
| Ability Improvement | +2 Charisma if you have not picked it previously. |
| This feat will ensure that you almost go first and with the deadly spell arsenal Sorlock will be able to take out or weaken at least a few enemies. I suggest only taking this if you have multiple casters, and are limited on weapon options with |
Level 11 - Sorcerer Lv 9
Level 5 Spells are unlocked, but more importantly, we get 1 of each spell slot for levels 4 and 5. These can be used to turn them into sorcery points or cast/upcast spells
Spells
| Spell | Description |
|---|---|
| It is a cold spell that can be used from the melee range in a large cone. Make enemies wet before using it for double damage. It also freezes the wet ground. |
Replace Spell
I leave the replacement options for you to decide.
Level 12 - Sorcerer Lv 10
We are at the last level of the build, and get some cool picks from level 10 Sorcerer. Moreover, you unlock an additional level 5 spell slot.
Cantrips
You are free to take any cantrip that you find useful. More or less the build has been finished, so this is just a good addition:
| Cantrips | Description |
|---|---|
| Gives a melee spell option and disables enemy reactions, so you can run away. |
Spells
Now this is your last spell pick, so here are my recommended options to make the final decision:
| Spell | Description |
|---|---|
| A useful spell that can choke control an entry point that slows down and damages foes. | |
| This is an amazing spell, that you can use together with other spells to create Ice terrains and immobilize groups of enemies. | |
| If you have a rogue or other stealth character in the group, this can be used to make it easy for them to land attacks without revealing themselves. |
Class Passives
| Passives | Description |
|---|---|
| Targets of spells that require Saving Throws have a |
Replace Spell
Again, I leave this decision in your hands.
Maximizing Ability Scores
Now, as the build progression is covered there are a few aspects and important decisions you will have to make throughout the game. These will decide your final score for abilities.
- Act 1 - Auntie Ethel's Hair - you will want to get +1 Charisma if you pick this choice.
- Ability Improvement - +2 Charisma
 Birthright - add +2 Charisma.
- Act 3 - Mirror of Loss - pick +2 Charisma.
This will allow you to reach 24 natural Charisma, and result in a +7 ability modifier on your spells and rolls. You can sacrifice Ability Improvement feat, for something like ![]() Alert. Even with 22 (+6 Abiliti modifier) this will be a very powerful build.
Alert. Even with 22 (+6 Abiliti modifier) this will be a very powerful build.
Potions, Elixirs and Consumables
Let's take a look at what consumables we can use to further empower the Sorcerer Warlock multiclass build.
Potions
These are general consumables, and most of them are activated for a few turns. Potions are separate from Elixirs and can be active together.
| Consumable | Description |
|---|---|
 Potion of Speed Potion of Speed |
In case you or your other casters have a Concentration spell slot taken and cannot cast Haste, use this potion. It acts similarly, but the effect is just for 3 turns. |
 Potion of Animal Speaking Potion of Animal Speaking |
Although not something powerful, it is worth stocking up for some dialogues in the game. |
 Potion of Invisibility Potion of Invisibility |
Can be used to get a perfect position before the encounter starts. |
Elixirs
Unfortunately, only one Elixir can be active at a time. However, the good thing is that they last until a long rest, making them very useful and economical.
Be sure to activate them before combat as otherwise, you will need to use Bonus Action.
| Consumable | Description |
|---|---|
 Elixir of Bloodlust Elixir of Bloodlust |
Very effective elixir that gives another action point if you kill an enemy. I would say this is the best one to use to maximize your output through the turn. |
 Elixir of Battlemage's Power Elixir of Battlemage's Power |
Gain 3 stacks of Arcane Acuity. I would say this should be the most used elixir for higher spell success. |
 Superior Elixir of Arcane Cultivation Superior Elixir of Arcane Cultivation |
Grant's a single level 3 spell slot. Could be useful in case you are preparing for a longer encounter. |
 Supreme Elixir of Arcane Cultivation Supreme Elixir of Arcane Cultivation |
Grant's a single level 4 spell slot. Could be useful in case you are preparing for a longer encounter. |
 Elixir of Vigilance Elixir of Vigilance |
For some encounters, you will want to go first. This elixir will ensure that it overcomes even surprise mechanics. However, if you have |
 Elixir of Peerless Focus Elixir of Peerless Focus |
Another good choice that allows to better maintain spell Concentration. |
Illithid Powers
This is a special mechanic in Baldur's Gate 3, that allows you to consume tadpoles and unlock special Illithid Powers. These range from somewhat useful, to extremely deadly. I would like to leave a few recommendations:
Base Illithid Powers
| Order | Illithid Power | Description |
|---|---|---|
| 1 | Very useful power to take as it does not have any costs, and provides only benefits on the first hits. | |
| 2 | Guarantees a critical hit, it's not mandatory, but would give a bit more damage for |
|
| 3 | Mainly taking for progression | |
| 4 | A good ability to have if you decide to take |
|
| 5 | Taking this for progression |
Elite Illithid Powers
These become unlocked later in the game as you progress. They are extremely powerful additions to the build.
| Order | Illithid Power | Description |
|---|---|---|
| 0 | Automatically unlocked. You can use this to initiate attacks of opportunity without spending any movement. | |
| 1 | Amazing power, that pulls enemies together and slows them. After that, it can be followed up with any area-of-effect damage spell. | |
| 2 | Extremely valuable power that can also help other casters to use up their Bonus action effectively. | |
| 3 | Removes any cost of spell slots or consumable resources. | |
| 4 | This can be used to save spell slots instead of using |
Equipment Recommendations
Now I would like to go through some gear recommendations to maximize the Sorlock build effectiveness. Items are especially important as they take the build to the next level thanks to their unique effects.
Dual Wielding or One-Handed with a Shield
This is an important aspect of this build as you can go both ways. Generally, dual wielding will give much higher damage output as weapons in Act 3 come with very powerful additions. However, if you have multiple casters, in the group, you will need to make some sacrifices.
Shields are also very good early in the game, where there are not many options for mage to dual-wield. However, especially in Act 3, some amazing weapons get unlocked, and Sorlock skyrockets with ![]() Dual Wielder feat.
Dual Wielder feat.
Act 1
The early game can be hard, as you do not know where to find items. Picking the correct spells should cover most of the needs.
| Slot | Item | Description |
|---|---|---|
 Melee Melee |
Each hit generates Lightning Charges that later detonate for bonus lightning damage. This staff should also support you in Act 2. | |
| Gives +1 to spell attack rolls or DC. An alternative to |
||
 Ranged Ranged |
The higher initiative bonus will allow you to start your turn earlier. | |
| Equipping two of these will allow you to attack with off-hand. This is important as you may not have used for bonus action if your Sorcery points have been expended, so this will allow some bonus damage. | ||
 Shield Shield |
It provides a substantial defensive boost by reducing critical hit damage. | |
| Gives a bonus to saving throws, easily accessible early in the game. | ||
 Head Head |
Increases Spell Save Difficulty Counter, while obscured. Very easy to activate, use Shift, to see the sun icon, it should be half or full empty. | |
| The best defensive option in Act 1. Works well with |
||
 Cloak Cloak |
- | Anything will work as Act 1 does not have any good options. |
 Armor Armor |
Works well with |
|
 Gloves Gloves |
Applies Reverbation when dealing thunder or lightning damage. With 5 stacks, this will deal a bonus 1d4 damage and can make enemies Prone. This can be easily achieved once you have |
|
| Gives bonus spell attack rolls, making |
||
| Gives whooping +2 Armour Class. This is the perfect option especially if you do not have shield proficiency. | ||
| Defensive gloves that allow to negate enemy ranged attack. | ||
 Boots Boots |
Avoids slipping on various terrains and most importantly, unlocks Misty Step each short rest. | |
| These shoes are in high demand, but give an option to apply |
||
 Amulet Amulet |
A good amulet that allows restoring level 3 or lower spell slots. This way you could get additional sorcery points. | |
| This amulet can be used to improve the damage of spells like |
||
| A good amulet to obtain mobility via Misty Step. | ||
 Rings Rings |
Gives defensive bonuses to Armour Class and Saving Throws. | |
| Allows Casting invisibility for free once per long rest. | ||
| Bonus thunder damage to thunder spells. |
Act 2 - mid-game
This is the mid-game, where most of the areas will be covered by dark. Radiant equipment will shine here and having ![]() Darkvision is recommended.
Darkvision is recommended.
| Slot | Item | Description |
|---|---|---|
| Melee |
These items are still relevant in Act 2 and provide very good bonuses. | |
| Ranged |
This bow allows casting Haste without using a spell slot. However, if you do not care about that, continue using the items from Act 1. | |
| Shield |
The only shield that improves the Spell Difficulty class and attack rolls. | |
| The extra level 1 spell slot can be used for Sorcery Points. | ||
| Head |
The best choice in Act 2 for any caster. Gives bonus initiative and Spell Save Difficulty Counter. | |
| This headwear unlocks a very effective synergy. Where you can use |
||
| Increases the chance of a critical hit. This only works while obscured, which can be activated by standing in dark areas. (Use Shift to see if the area is obscured) | ||
| Cloak |
Improves survivability and Saving Throw success. | |
| Use this Cloak if you will still be using Reverbation items like |
||
| Armor |
One of the main items that makes the build as powerful as it is. This requires to make some specific decisions during Act 1. However, the boost to |
|
| Gloves |
You can continue using the same items from Act 1. | |
| Boots |
Although these boots could be used in Act 1, as we did not have a decent way to apply statuses consistently, we delayed them till Act 2. | |
| Gives armor class an increase. Best choice if you are not using Shield | ||
| Amulet |
An awesome amulet that allows applying Reverbation with Each spell attack. This will reduce the success of some Saving Throws. I would say this is the second-best amulet for this build. | |
| Very interesting choice. Because the build will deal a decent amount of critical hits, this will allow it to paralyze many humanoid enemies. Give this one a try. | ||
| Rings |
When creatures are illuminated you deal bonus damage to them, this should not be hard, as your cleric will probably be carrying something like |
|
| It is fairly easy to cast any light spell on yourself or have an ally do that. The Radiating Orb effect will debuff enemies, making it harder for them to hit targets. | ||
| Because it is easy to be obscured this allows to gain bonus armour class. Very useful in Act 2. |
Act 3 - Final Build setup
This is the last act of the game, where you will get access to the most powerful items. To get them as early as possible you will need some planning, but overall, it should not be a problem.
| Slot | Item | Description |
|---|---|---|
| Melee |
(BiS) |
The most powerful stave in the game. You can imbue it with different elements - fire, for bonus fire damage, lightning - for higher lightning charge generation. So if going all in on Eldritch Blast, set Bolts of Doom. |
(BiS) |
The unique effect that gives +1 damage for each Scarlet Remittance stack. This requires you to kill enemies (previously you could destroy barrels), but this should be easy in late game where normal grunts will be dead from your blasts in a few hits. | |
| Gives a bonus to Spell Attack Rolls and Spell Save DC. Also allows casting a spell without using a spell slot per long rest. You can also get Dual Wielder feat and use this together with |
||
| A perfect choice in case you want additional critical chances and other options are taken by other characters. Synergizes well with |
||
| Ranged |
(BiS) |
The best bow to increase critical hit roll range. Although it may be taken by other characters in the group. |
| Improved bow of |
||
| Shield |
This is still the top contender for the build if you will opt out for a shield instead of dual wielding weapons. | |
| Head |
(BiS) |
I think this is the best choice as it gives higher Charisma and allows reaching the maximum of 24. It also improves every aspect of Sorcerer Warlock - spellcasting, ability checks, attack rolls, etc. |
| This headwear unlocks a very effective synergy. Where you can use |
||
| Provides +2 to spell attack rolls leading to higher hit chance and overall better damage output. | ||
| Improves damage output by rerolling low damage rolls. | ||
| Cloak |
(BiS) |
This is the best cloak for this build as it gives a direct boost to attack rolls. The result is more successful spells. |
| Improves the chances of attacks missing the wearer until getting hit for that turn. | ||
| Armor |
(BiS) |
This continues to be the best robe for Sorlock if you will heavily rely on |
| A very good overall robe that improves spell effectiveness and success rate. | ||
| Gives advantages to Constitution Saving Throws, increases Spell Save DC, and an additional spell. | ||
| Gloves |
(BiS) |
The gloves are even better with all the bonuses that you can get with lightning and radiant damage. |
| Ridiculously powerful gloves that are bugged, and create a separate instance of damage with |
||
| Amazing gloves, that work with spells that use attack rolls. If they are taken by other characters, use the ones from previous acts. However, they will lower attack rolls, so be sure to have |
||
| One of the best gloves in the game. They would improve your attack rolls and Spell Save DC. | ||
| Boots |
(BiS) |
The boots become even more powerful as your critical chance increases and you can apply conditions more easily from |
| Optimal choice if you are wearing a robe and go all in on the dual-wielding, this way you get bonus armor class. | ||
| Amulet |
(BiS) |
You can use this amulet to get more bonuses for Reverbation activation. |
| Gives whooping +2 Spell Save DC. However, this item will be a contender for any other caster builds in the group, specifically clerics. | ||
| Rings |
(BiS) |
This ring can be used to hit multiple foes with |
(BiS) |
Deals bonus 2 damage against illuminated enemies. Although it is not much, this also works with spells. Just be sure to cast Light on yourself. I recommend using the ring together with |
|
| The ring gives +1 Sepll Save DC even if it is not listed. | ||
| Provides an |
How to use the Build
In this section, I would like to dive deep into how to play the Sorlock. This will help you utilize it to the fullest and correctly use various actions and spells throughout the game.
Important Mechanics and Combos
Let's go through key mechanics and tips on how to effectively use the build.
Use Spell slots to create Sorcery Points
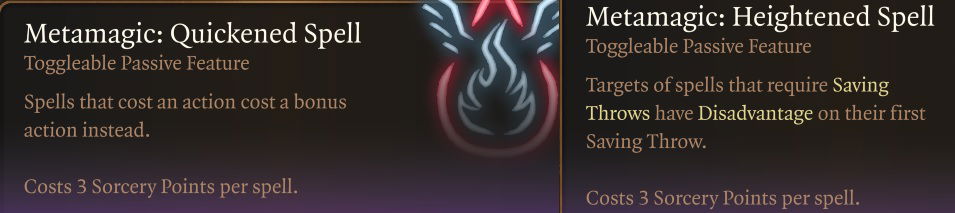
Once you expend your Sorcerer Spell slots, you still have Warlock ones. They can be used to cast spells, but more importantly, you can use them to make Sorcery Points. For example, using constant ![]() Eldritch Blast will easily drain them with
Eldritch Blast will easily drain them with ![]() Metamagic: Quickened Spell.
Metamagic: Quickened Spell.
Moreover, keeping Level 2 spell slots is useless in the late game. So use them as fuel to restore your Sorcery Points via the Create Sorcery Points action. Then use these to continue multiple casts with ![]() Metamagic: Quickened Spell or improve success rates via
Metamagic: Quickened Spell or improve success rates via ![]() Metamagic: Heightened Spell in late-game fights.
Metamagic: Heightened Spell in late-game fights.
The same thing could be said about level 1 spell slots, but they will be used for ![]() Shield, so keep at least two of them for the encounter.
Shield, so keep at least two of them for the encounter.
Attacks with Damage Riders - Hex, Lightning Charges, etc.
When using multihit attacks like Scorching Ray and Eldritch Blast, be sure to utilize Damage Riders. These are bonus damage effects that go with the main damage source. The perfect example of this is ![]() The Spellsparkler which can be obtained in Act 1, in Waukeen's Rest. The staff gives bonus lightning charges for each time a cantrip hits. In addition, include Hex and you get some good damage per single target
The Spellsparkler which can be obtained in Act 1, in Waukeen's Rest. The staff gives bonus lightning charges for each time a cantrip hits. In addition, include Hex and you get some good damage per single target
Later you can also get ![]() Markoheshkir and dual-wield it together with
Markoheshkir and dual-wield it together with ![]() The Spellsparkler for double the amount of lightning charges. So if you are fighting a strong enemy, be sure to use Hex on them, as this will provide a ton of additional damage. There are more damage sources like this -
The Spellsparkler for double the amount of lightning charges. So if you are fighting a strong enemy, be sure to use Hex on them, as this will provide a ton of additional damage. There are more damage sources like this - ![]() Phalar Aluve,
Phalar Aluve, ![]() Callous Glow Ring, etc.
Callous Glow Ring, etc.
Elemental Torment
This is the last improvement to do to maximize your ![]() Eldritch Blast damage. In Act 3 you can obtain
Eldritch Blast damage. In Act 3 you can obtain ![]() Amulet of Elemental Torment. With it, you can further add 1d4 fire damage to each missile.
Amulet of Elemental Torment. With it, you can further add 1d4 fire damage to each missile.
The setup can be done in multiple ways:
- Walk on a fire surface from a spell like
 Fireball or some explosive grease.
 - Use Alchemist's Fire consumable. First, drop it on the ground and then destroy it with offhand attack.
If you are not lazy with this setup this is another 2.5 average damage bonus on each missile.
Twinned Spell and Haste
Even if you did not plan this, Sorcerer can be extremely powerful support. At level 5 you gain access to level 3 spell slots and Haste. This spell gives 2 action points per turn, meaning you could double your damage output.
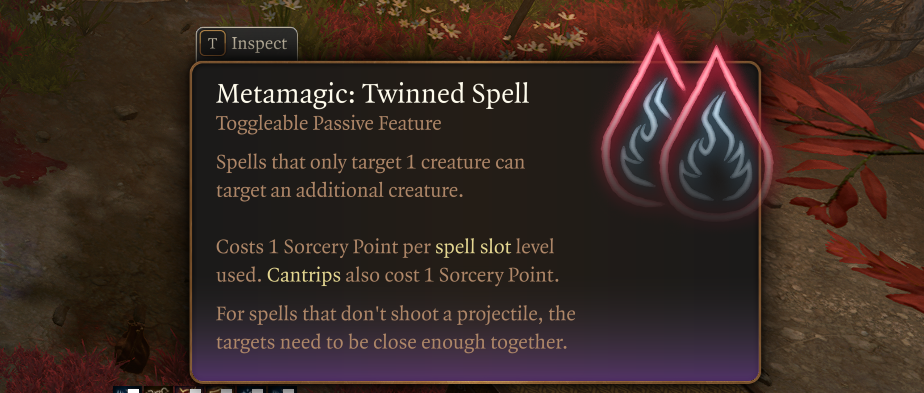
To do this you need to activate ![]() Metamagic: Twinned Spell and then cast Haste. You can now target two targets. I recommend doing this on yourself and another group member. This way two members in your party have double amount of actions. This will make your combat encounters much easier.
Metamagic: Twinned Spell and then cast Haste. You can now target two targets. I recommend doing this on yourself and another group member. This way two members in your party have double amount of actions. This will make your combat encounters much easier.
Use metamagic to empower your first turn
You can use the Metamagic mechanic to create some powerful spell combos. My favorite would be ![]() Metamagic: Quickened Spell. It allows casting a spell via bonus action. Moreover, you can use
Metamagic: Quickened Spell. It allows casting a spell via bonus action. Moreover, you can use ![]() Metamagic: Heightened Spell to create a
Metamagic: Heightened Spell to create a ![]() Disadvantage on Saving Throws on enemies. This means your spells have a much higher chance of success. Here are some good combos:
Disadvantage on Saving Throws on enemies. This means your spells have a much higher chance of success. Here are some good combos:
- Cast Haste on yourself and then cast two spells on the first turn and three on the second by using
 Metamagic: Quickened Spell. Or have an ally apply it on you via
  Darkfire Shortbow for instant multiple casts on the first turn.
 - Activate
 Metamagic: Heightened Spell and use Hypnotic Patterns, Fear, and Confusion to debilitate and fully control groups of enemies.
 - Hold Person or Monster, and then cast spells for guaranteed critical hits.
Darkness and Eldritch Invocations
With Warlock at level 2, you can gain access to ![]() Devil's Sight invocation. I briefly mentioned it a few times in the build, but how to use this correctly? You will want to have someone cast
Devil's Sight invocation. I briefly mentioned it a few times in the build, but how to use this correctly? You will want to have someone cast ![]() Darkness spells.
Darkness spells.
Once you have the dark area set up, you can freely stay in it and cast from it without enemies being able to hit with ranged attacks. If they decide to enter they will become blinded, greatly reducing their combat potential.
This also pairs well with other builds like Bladelock and Shadow Monk, which can utilize dark areas for combat advantage.
Wet + Lightning and Cold Spells
I think this is the most important mechanic to learn in Baldur's Gate 3 for the caster. It is very easy to set up and can guarantee you easy wins for most encounters.
The first step is to apply water here are some options for how to do that:
- Have a Cleric, Druid, or yourself cast
 Create or Destroy Water
 - Throw Water bottle
- Have someone
 Conjure Elemental to summon Water Myrmidon and apply
  Healing Vapours.
 - The easiest, drop the water bottle on the ground and destroy it with an attack (an offhand attack with a bonus action is perfect for that). Once the enemy is wet, they will become vulnerable to Ice and Lightning damage. This means you deal double the amount. After this follow up with your favorite spell -
 Chain Lightning (with
  Markoheshkir),
  Lightning Bolt,
  Cone of Cold, etc.
Early Game Combat
Let's cover how you should progress combat levels 1-6. overall, you will be a simple Sorcerer, so there are no huge secret combos yet.
- Very early in the game, you play as a normal caster. use
 Magic Missile,
  Cloud of Daggers on grouped enemies, and
  Chromatic Orb on wet foes.
  Sleep is perfect for disabling them.
 - You can use
 Metamagic: Twinned Spell to deal some great damage by double-casting your single-target spells. This will double your damage at the cost of only one Sorcery point.
 - To further improve your damage output you can also use Metamagic: Quickened Spell for bonus cast using bonus action.
- Fireball and Lightning Bolt are very powerful spells from level 5. For the latter one, I also recommend applying Wet status via Water Bottle or Create Water to double damage.
 Haste is amazing. Use it together with Metamagic: Twinned Spell to buff up yourself and an ally. Doing this before a combat will give a huge edge over the foes.
Late Game Combat
This is where you will start utilizing Sorcerer Warlock builds fully.
- You can turn level 2 spell slots into Sorcery Points using
 Create Sorcery Points. This way you can use improved spellcasting on almost every turn. I would leave level 1 spells for spells like
  Shield.
  Eldritch Blast is your main action for dealing damage when you have control spells in action or want to save spell slots. With correct equipment like
  Potent Robe and
  Spellmight Gloves they will deal substantial damage.
- Eldritch Blast also applies various conditions if you are equipped with
 Spineshudder Amulet,
  Boots of Stormy Clamour, etc. These include Radiating Orbs, Freighten, and Reverbation. The conditions are perfect for controlling without any Concentration spell usage.
  Ice Storm and
  Sleet Storm are great spells to create ice surfaces. Cone of Cold is another good spell, that deals more damage, but creates Ice Surfaces only if the floor is wet. These can be cast on the first rounds before you start using Eldritch Blast.
 Darkness can be used to create a safe zone from which you can cast spells.
 Confusion is an amazing spell, that can be cast on the first turn. I recommend using it if you see multiple enemies bunched up together. This way most of them will get affected, and make encounters easy.
Conclusion
Thank you for reading the Sorlock Build for Warlock Sorcerer Multiclass. The build was created with a lot of effort and tons of testing. The gear section and leveling progression should cover all the needs so you could progress through the game smoothly
Credits
Big thank you to Sensha from BG3 Discord, she mentioned some flaws and recommended better equipment setup to maximize the build.
Like, Dislike, comment, or share!
Join the Discussion
0 commentsNo comments yet.
Be the first one to leave a comment!