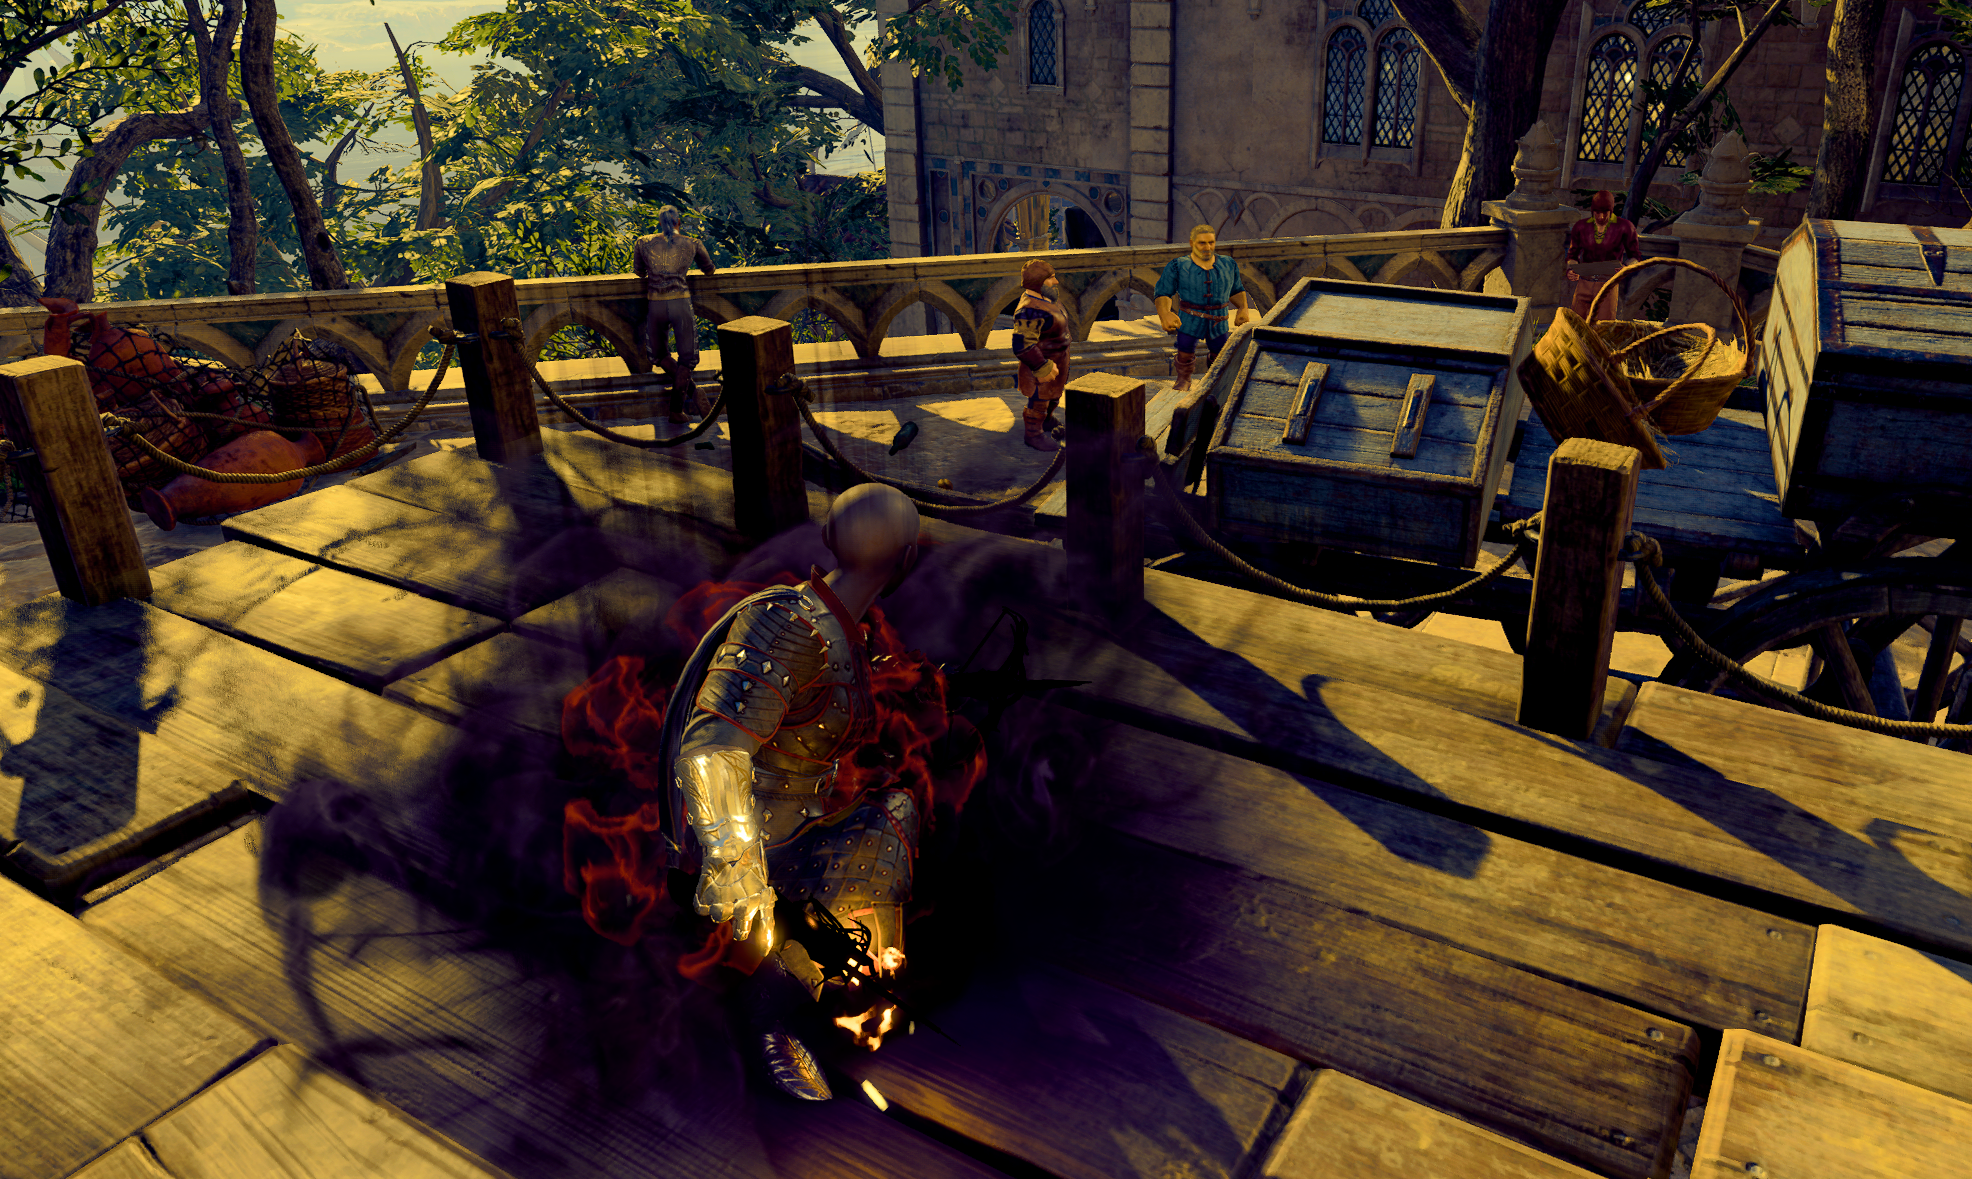
Thief Build - Master of Hands - Baldur's Gate 3 (BG3)
Contents
Thief Build - Master of Hands
The Thief subclass is generally taken as a 3-level dip for its ![]() Fast Hands features, which, when used correctly, can be very powerful. Builds like Open Hand Monk, Berserk Thrower, take this to a maximum. Sitll I did want to have an option of a setup, where you can use Thief as the main cornerstone of the build
Fast Hands features, which, when used correctly, can be very powerful. Builds like Open Hand Monk, Berserk Thrower, take this to a maximum. Sitll I did want to have an option of a setup, where you can use Thief as the main cornerstone of the build
So with this in mind, there are already perfect weapons that the build can utilize, namely dual-wielding crossbows like ![]() Ne'er Misser,
Ne'er Misser, ![]() Hand Crossbow +1, which offer both main-hand and offhand attacks. Of course, you can also dual-wield, but this becomes relevant only in the later parts of the game.
Hand Crossbow +1, which offer both main-hand and offhand attacks. Of course, you can also dual-wield, but this becomes relevant only in the later parts of the game.
Rogue also offers good proficiencies in almost all skills. This is a perfect option for the main character if you are looking for a unique flavour. On top of that, with some optimisations, ![]() Sneak Attack (Ranged) can deal respectable damage both in the early and late game.
Sneak Attack (Ranged) can deal respectable damage both in the early and late game.
Another unique aspect of this build is that it can become your main Pickpocket build, with minor changes. Not only are you useful in combat, but also when in the city, and can take, steal, and rob merchants of their stock.
So let's jump into the build!
Class Contribution
The build consists of two classes, which both help immensely to build up your thieving arsenal.
11 Thief Rogue
- Use a unique
 Sneak Attack (Ranged) mechanic, which is good early on but falls behind in the late game.
 - Additional
 Expertise, which will be used to improve Sleight of Hand.
  Evasion that drastically reduces incoming spell damage.
- The ultimate pickpocket feature -
 Reliable Talent. This will make stealing all consumables like scrolls, arrows, and potions too easy!
  Uncanny Dodge can help with survivability if you get attacked, by reducing incoming damage, useful both in combat and when stealing.
- Special bonus action use -
 Cunning Action: Dash,
  Cunning Action: Hide, which help with engaging and running away for pickpocketing.
  Supreme Sneak - can be used to become invisible and escape a situation where you are caught.
 Fast Hands is a very important feature, giving an additional bonus action. This can also be used to leave combat, improve mobility, or attack one more time.
1 Fighter
- Quite unlikely, but Constitution Saving Throw proficiency can be beneficial if you use scrolls to cast
 Concentration spells -
  Scroll of Magic Weapon,
  Scroll of Haste, etc.
  Archery fighting style to increase your hit chance and minimize
  Sharpshooter: All In effect.
Alternative option - Trickery Cleric 1
I liked Trickery Cleric dip here. With additional bonus action, you can freely use ![]() Sanctuary if need arises. And this neatly fits into the "Thief" theme:
Sanctuary if need arises. And this neatly fits into the "Thief" theme:
 Disguise Self - this serves a great purpose of hiding your true identity. Why not? This will not impact your relations with NPCs if you get caught, and plays well into the flavour of this build.
 Sanctuary - if all comes to worst, and you are losing combat, just cast
  Sanctuary and watch as everyone is looking at you without unable to do anything.
Leveling Overview
Here is a concise table with all the main picks during your leveling progression. For more detailed reasoning, I go further in the article. Also, do not forget to check the recommended gear, as it is crucial.
| Level | Class | Selection |
|---|---|---|
| 1 | Rogue 1 | Abilities: STR - 8, DEX - 17 (15+2), CON - 14, INT - 16 (15+1), WIS - 10, CHA - 8 |
| Skills: Sleight of Hand, Stealth, Deception, Persuasion, Performance, Intimidation | ||
| 2 | Rogue 2 | - |
| 3 | Rogue 3 | - |
| 4 | Rogue 4 | Feat: Ability Improvement - +2 Dexterity |
| 5 | Fighter 1 | Fighting Style: |
| 6 | Rogue 5 | - |
| 7 | Rogue 6 | Skills: Deception/Persuasion/Performance/Acrobatics |
| 8 | Rogue 7 | - |
| 9 | Rogue 8 | Feat: |
| 10 | Rogue 9 | - |
| 11 | Rogue 10 | Feat: Ability Improvement - +2 Dexterity OR |
| 12 | Rogue 11 | - |
Starting the Game - Level 1
This section covers the creation screen and what would go into the best Races, Abilities, and Skills for the Thief build. If you have already started playing, feel free to do a respec at Withers and follow along. This will make it easy to follow the build step by step.
Races
As the Thief build is somewhat limited, I do think some races can prove very valuable here. Of course, this does lose potential, but if you also want to make this Pickpocket Build, a few choices will prove valuable.
| Race | Features | Description |
|---|---|---|
 Dwarf Duergar Dwarf Duergar |
|
The Duergar gives |
 Lightfoot Halfling Lightfoot Halfling |
|
Somewhat inferior race pick. |
 Deep Gnome Deep Gnome |
|
Helps with various mental checks, but also gives a stealth |
Class
| Overview | |
|---|---|
 Rogue Rogue |
|
| Features | |
| Exploit a foe's distraction to deal an additional 1d6 damage. Damage increases by 1d6 for every uneven Rogue Level gained. | |
| Exploit a foe's distraction to deal an additional 1d6 damage. Damage increases by 1d6 for every uneven Rogue Level gained. | |
Background
There are plenty of good backgrounds here. You can, of course, prioritize those that give Stealth and Sleight of Hand. However, you do have options for others. Intelligence-related ones are perfect to maximize their effectiveness; however, Charisma options are great for improved dialogue success:
| Background | Skills | Description |
|---|---|---|
| Charlatan | Deception Sleight of Hand |
All of these are great as they give either Stealth or Sleight of Hand and additional proficiency like Deception, for dialogue checks. |
| Urchin | Sleight of Hand Stealth |
|
| Criminal | Deception Stealth |
|
| Entertainer | Acrobatics Performance |
These are great, as they give some intelligence-related options but also charisma ones for dialogues. |
| Guild Artisan | Insight Persuasion |
|
| Noble | History Persuasion |
Abilities
Now, let's take a look at the abilities of the Thief build. Correct allocation will allow you to maximize the early gameplay and get good modifier bonuses.
Here are some key points to know about ability points:
- They give "ability modifiers" that apply to various skill checks. For example, Charisma works on Intimidation and persuasion checks. Wisdom on Survival or Animal Handling, and so on.
- You get a higher ability modifier on even values - 10, 12, 14, etc. So keeping it on odd may be useless. However, there are various +1/2 modifiers in the game, specifically
 Auntie Ethel's Hair or Feats that help round this up.
 - Weapons can benefit from either Dexterity or Strength, depending on their type
- You also have a spellcasting modifier, which can be Wisdom, Charisma, or Intelligence, depending on your class.
Build ID: 15
Skills and Expertise
Overall, the skills should be impacted by your roleplaying and background decisions. However, you would still want those that will give you the best benefits. Maximize these:
- Stealth
- Sleight of Hand
After that, you can take these:
- Intelligence
- Deception
- Intimidation
- Performance
- Persuasion
Leveling Progression - Levels 2-12
Here is the detailed progression for the Hexblade build to get you started. You can use it as a guideline because early games can be daunting and overwhelming. Later on, once you get a feel for the class, you can start picking your options.
Level 2
By this time, you should have landed in the Wilderness area already. A few good bonuses from Rogue are received here:
| Action | Description |
|---|---|
| Easily enter sneak with a bonus action. | |
| Cover more distance this turn: double your movement speed, using a bonus action. | |
| Retreat safely: moving won't provoke Opportunity Attacks. |
Level 3
This level unlocks a Rogue subclass, which gives a little boost in terms of action economy:
Subclass
| Overview | |
|---|---|
 Thief Thief |
|
| Features | |
| A very powerful feature, giving a full attack for some builds utilizing offhand attacks. | |
| Nothing special for this type of build. | |
Level 4
This is an important level as you gain access to a feat, which is a significant improvement:
Feat
| Feat | Description |
|---|---|
| In terms of damage, this is the best pick. The problem is to manage the negative modifier to attacks. | |
| Ability Improvement - +2 Dexterity | This is a safer pick, and especially relevant if you are doing the Pickpocket build setup on this character. |
Level 5 - Fighter Lv 1
During this level, I recommend multiclass into Fighter. This gives some good features, and provides you with two options:
Respec first level as Fighter - for Constitution Saving throw proficiency. This helps to maintain spells if you will use any scrolls (this is more advanced playstyle in my opinion):
- Level 1 - Fighter
- Level 2-5 - Rogue Thief
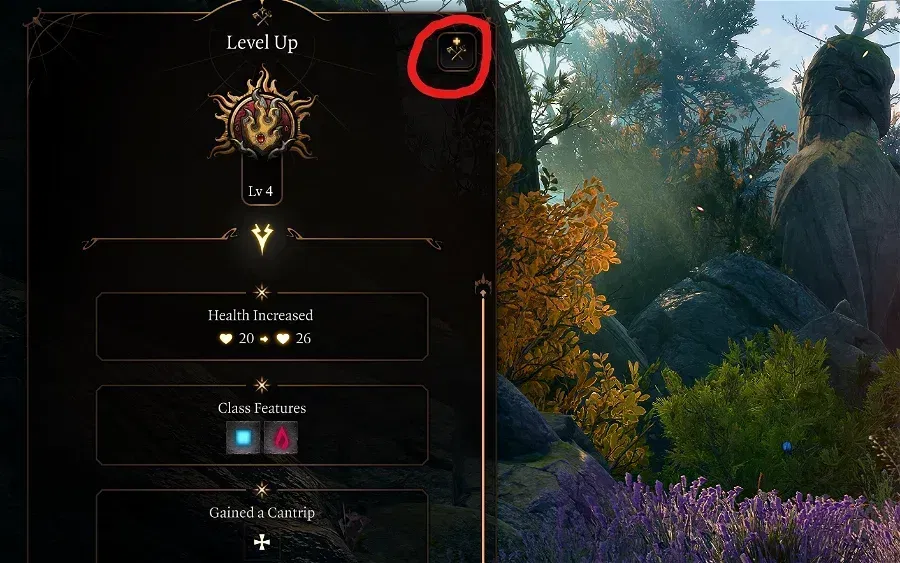
If you are not interested in that, continue multiclassing into a fighter, via the level-up screen, without a respec:
Class
| Overview | |
|---|---|
 Fighter Fighter |
|
| Features | |
| You can use this to heal yourself in tight encounters, to get a little bit more survivability. | |
Fighting Style
| Style | Description |
|---|---|
| This is an important passive feature as it will improve hit chance and make it easier to land shots with |
Level 6 - Rogue Lv 5
Nothing fancy, more features:
| Feature | Description |
|---|---|
| A solid survivability improvement. |
Level 7 - Rogue Lv 6
A few boosts to skill proficiencies.
Skills
You gain additional skill expertise picks:
- Deception/Persuasion/Performance - helps with persuading your pickpocket targets
- Acrobatics
Level 8 - Rogue Lv 7
Nothing fancy here, just a new feature:
| Feature | Description |
|---|---|
| Improves your damage resistance to spells. |
Level 9 - Rogue Lv 8
Another feat is unlocked to give a boost to the build.
Feat
| Feat | Description |
|---|---|
| Take this if you did not pick it previously. | |
| Ability Improvement - +2 Dexterity | Improve your hit chance and other dexterity-related stats. |
Level 10 - Rogue Lv 9
A new feature is unlocked. You will also enter Act 3 Rivington either at the start or mid-level.
| Feature | Description |
|---|---|
| This is an alternative to |
Level 11 - Rogue Lv 10
The main highlight of this level is another feat, which depends on your decision whether you took ![]() Auntie Ethel's Hair.
Auntie Ethel's Hair.
Feat
| Feat | Description |
|---|---|
| Ability Improvement - +2 Dexterity | If you did not take |
| Can go very early in combat, and allows avoiding |
|
| Can be used to round up Dexterity to 20 if you have 19 (this means you did not take |
|
| A somewhat flavour-related option, especially if you want to embrace more of a dual-wielder setup. |
Level 12 - Rogue Lv 11
The last level gives the main feature of rogue, it is especially useful for pickpocketing:
| Feature | Description |
|---|---|
| This is the ultimate pickpocket feature, giving dice rolls a minimum value of 10. With all the bonuses, you can now still anything with almost 0% chance of getting caught. |
That's it, the build is done!
Maximizing Ability Scores
Now, as the build progression is covered, there are a few aspects and important decisions you will have to make throughout the game. These will decide your final score for abilities.
Dexterity
- 17 Dexterity - the base from character creation.
- Feat 1 - Ability Improvement - +2 Dexterity.
 Auntie Ethel's Hair or
  Athlete feat - +1 Dexterity
- Act 3 - Mirror of Loss - +2 Dexterity
These will allow you to reach 22 natural Dexterity, which helps with lockpicking, stealing, and ranged attacks.
Potions, Elixirs, and Consumables
Let's take a look at what consumables you can use to further empower the build.
Potions
These are general consumables, and most of them are activated for a few turns. Potions are separate from Elixirs and can be active together.
| Consumable | Description |
|---|---|
| This is a very powerful potion. It gives an additional action point which can be used to cast a spell or attack. The activation is generally by drinking using a bonus action. However, you can stack together with party members and make one member |
|
| One of the best potions to have. Can be used to escape combat, enter combat in a perfect position, start surprise rounds, etc. Extremely powerful and mandatory resource to have. | |
| Although not something powerful, it is worth stocking up and saving casting time. | |
| Gives +2 to attack rolls, which is great for negating the |
|
| Gives +1 to attack rolls, which is great for negating the |
Elixirs
Unfortunately, only one Elixir can be active at a time. However, the good thing is that they last for a long rest, making them very useful and economical.
Be sure to activate them before combat, as otherwise, you will need to use Bonus Action.
| Consumable | Description |
|---|---|
| The elixir gives an easy option to get an additional action point - just kill a foe. This can then be used to attack one more time or cast a full spell. | |
| For some encounters, you will want to go first. This elixir will ensure that it overcomes even surprise mechanics. | |
| Provides bonus damage of 1d4 and some other good bonuses. | |
| Boosts attack rolls by 1d4; |
Arrows
Overall, all arrows are useful and can be used whenever. Here are some recommendations:
| Consumable | Description |
|---|---|
| The base arrow that you will find plenty of, and gives an easy source of additional damage. | |
| Can make enemies |
|
| The core arrow for this build. It will help you apply |
|
| These arrows are very powerful when used against the correct target, as they double the damage. With |
|
| Other same-name arrows... |
Illithid Powers
This special mechanic in Baldur's Gate 3 allows you to consume tadpoles and unlock special Illithid Powers.
At first, you can only use the base powers. As you move to Act 3, you will be able to unlock the outer ring powers, also called Elite.
| Illithid Power | Type | Description |
|---|---|---|
| Base | Beneficial to take as it does not have any costs, and provides only benefits on the first hits with attack rolls. | |
| Base | It's an easy way to ensure you land critical hits. | |
| Base | It can help to kill an enemy faster if it is left with a few HP. | |
| Base | A great way to weaponize your reaction before obtaining |
|
| Base | Decreases enemy ability score. | |
| Elite | It can be used to maximize the effectiveness of charisma-based skills, especially those relevant to the main character. | |
| Elite | Potent spell that can be used to pull enemies together. You can then follow up with area-of-effect spells or attacks. In general, it is a very effective action in the hands of any character. | |
| Elite | It can be used to save yourself from a deadly spell. This is especially relevant as you will have a |
|
| Elite | Remove the cost of spell slots or charges. |
Equipment Recommendations
This section covers how to maximize the Thief build's effectiveness during combat
Act 1
| Slot | Item | Description |
|---|---|---|
 Melee (One-Handed) Melee (One-Handed) |
The best stat stick weapon for ranged builds in Act 1. Does not require any special features or activations. | |
| It provides a substantial defensive boost by reducing critical hit damage. | ||
| Gives bonuses to Saving Throws if you have Absolute's brand from the Priestess in the Goblin Camp | ||
| Gives a bonus to saving throws, easily accessible early in the game. | ||
 Ranged Ranged |
These are the best weapons for the Thief in Act 1. Due to |
|
 Head Head |
Provides a significant damage boost with high intelligence and |
|
| Provides a bonus Saving Throw while obscured, which is great for avoiding the effects of some spells. | ||
| Improves movement speed, allowing one to reach important targets easily, early in the game. | ||
 Cloak Cloak |
Accessible if you are Dark Urge. | |
 Armor Armor |
Gives +2 Dexterity (up to a maximum of 20). This will improve your rolls and damage. As this is Cloth, it provides only 10 Armour Class. | |
| As there are not many good choices for light armour, this is somewhat decent. | ||
 Gloves Gloves |
Gives an easy way to apply |
|
| Best gloves for Ranged attacks. | ||
| Gives a bonus to Sleight of Hand for better picklock chances. Moreover, applies |
||
| Gives additional armour class for survivability. | ||
| Defensive gloves against ranged attacks. | ||
 Boots Boots |
One of the best boots in the game with all the bonuses and easy use of |
|
| Allows movement without limits on |
||
 Amulet Amulet |
If you can acquire it, this can be the best amulet option for most of the game. | |
| Gives a free |
||
 Rings Rings |
Act 1 doesn't offer that many good ring options. So use these when you acquire them. | |
| Allows casting |
Act 2 - mid-game
| Slot | Item | Description |
|---|---|---|
 Melee (One-Handed) Melee (One-Handed) |
Still, the main stat stick improving crit range and damage rolls. | |
 Ranged Ranged |
The best Hand crossbow in Act 2 comes with +2 Enchantment. | |
| Excellent hand crossbow that comes with force damage. Only a handful of enemies can resist it, and it will be useful up until the middle of Act 3. | ||
| What makes this shield amazing is that by wearing it, you will be going first most of the time during encounters. This is a great way to apply control over key enemies. | ||
 Head Head |
Provides a significant damage boost with high intelligence and |
|
| A solid headwear to slightly help with hit chance. | ||
| Increases the likelihood of a critical chance while obscured. This means that you should stand in lightly dimmed places. | ||
| Increases the likelihood of a critical chance while obscured. This means that you should stand in lightly dimmed places. | ||
 Cloak Cloak |
A very good cloak, with a good bonus to Armour Class. | |
| You can use |
||
 Armor Armor |
One of the best-looking armors in the game. You can wear them with a stealth build, and they provide useful bonuses like |
|
| Gives an |
||
| This medium armor does not impose any |
||
 Gloves Gloves |
The improved version of |
|
| Provides bonus 1d4 fire damage with weapon attacks and can inflict bleeding. The best choice is early in Act 2. | ||
| Gives a bonus of 1d4 Necrotic damage with weapon attacks. | ||
| Excellent gloves for enemy debuffs via |
||
 Boots Boots |
Excellent boot choice | |
| Gives bonus Armour Class. A good survivability choice, but not mandatory in my opinion. | ||
 Amulet Amulet |
The amulet will be a good option until endgame, as the 1d6 poison damage is a good boost. However, it does not allow coatings, so be sure to check for alternatives if you plan on using them. | |
 Rings Rings |
This is a bit more powerful than the ring below, but it requires your foes to be at least lightly obscured. | |
| The ring is still a powerful choice to ensure consistent bonus damage. But you will need a source of |
||
| The bonus damage is a good choice even in Act 2. | ||
| The ring is somewhat useful, as it gives an easy way for |
Act 3 - Final Build setup
Here you have some options for dual-wielding, especially as you have 2 bonus actions. This allows for some great options.
Ranged Setup
Here, the main goal is to wear good stat sticks in melee slots and dual-hand crossbows in ranged slots. Equip both stat stick weapons for maximum effectiveness.
| Slot | Item | Description |
|---|---|---|
 Melee (One-Handed) Melee (One-Handed) |
One of the best stat stick weapons in the whole game. It is in high demand by multiple builds. | |
| The dagger effect of additional critical damage also applies to ranged attacks. | ||
| Still a relevant stat stick weapon from Act 1. | ||
 Ranged Ranged |
This is an improved version that you can dual-wield with another hand crossbow, for an offensive option using a bonus action. | |
| As you can get |
||
| Uses force damage, which many enemies can't resist. | ||
| If stat stick weapon access is limited, due to other builds, use any shields that you can get your hands on. |
Dual Wielding Setup
For this setup, the goal is to wear the strongest daggers/shortswords for maximum damage. The ranged slots kind of become stat sticks to boost their damage:
| Slot | Item | Description |
|---|---|---|
 Melee (One-Handed) Melee (One-Handed) |
(BiS) |
Gives a flat 7-piece damage boost. Together with |
| The dagger's critical damage bonuses also apply main weapon. | ||
| As you have multiple ways of getting an |
||
(BiS) |
Can use bonus action attacks to inflict the same damage as the main hand weapon, with all bonuses. | |
| The additional effect of True Strike Riposte can be handy, and provides bonus damage. | ||
 Ranged Ranged |
(BiS) |
The bow is the best pick in terms of damage boost as it gives +7 on all critical weapon attacks. The only goal is to ensure that your party can apply |
| Gives +3 Initiative, almost guaranteeing that you go first. | ||
| Decreases the roll requirement for Critical Hit by 1. |
Other Equipment:
| Slot | Item | Description |
|---|---|---|
 Head Head |
Provides additional attack via bonus action, so you can shoot for additional time. Use |
|
| Provides a significant damage boost with high intelligence and |
||
| If using |
||
 Cloak Cloak |
Ensures good survivability by imposing a |
|
| You can use |
||
 Armor Armor |
(BiS) |
This armor is particularly powerful for melee-piercing weapon wielders - these include daggers and short swords. It makes them vulnerable to piercing damage unless they have resistance to it. Moreover, it gives bonus initiative, ensuring that you will go first most of the time. |
| This medium armor perfectly works with stealth as it does not impose any disadvantages. Moreover, it has a decent armor class for protection. | ||
| The armour is still somewhat good. You get various bonuses, and it provides a hefty +2 to Dexterity. Still, it gets outclassed by other options in terms of Armour Class and unique effects. | ||
 Gloves Gloves |
(BiS) |
One of the best gloves in the game, however, could have limited access based on your decisions in the game. |
| These gloves are an extremely powerful choice if you have a caster who can apply |
||
| These gloves provide bonuses for every attack. You will be doing many of them, so the bonus fire damage stacks up | ||
| Incur 6d6 damage, but gain additional attack points. This neatly fits into the Stealthy playstyle as you can deal damage bonuses on the first turn. | ||
 Boots Boots |
These boots have a wide array of uses - allowing succeeding Saving Throws while using Reaction, a teleportation spell, and ignoring difficult terrain. | |
| Gives |
||
 Amulet Amulet |
(BiS) |
Bonus poison damage on each hit with the weapon is a great improvement |
| A huge health boost. Especially good with |
||
 Rings Rings |
A great ring for bonus damage, but requires your foes to be lightly obscured. | |
| The ring is still a powerful choice to ensure consistent bonus damage. You can get a |
||
| Amazing choice till the end of the game as each attack will apply this bonus acid damage. | ||
| Slight boost to survivability. |
Build Mechanics
In this section, I would like to dive deep into how to play the Thief Build. This will help you utilize it to the fullest and correctly use various actions and spells throughout the game.
Combat Mechanics
I wanted to have a separate section for combat as it is quite extensive, but also not that relevant if you are only doing the pickpocketing part of the build
Managing Sharpshooter
The core feat of this build - ![]() Sharpshooter: All In gives a solid 10 damage boost per hit. However, it comes with a drawback: -5 to attack rolls. This, of course, can be circumvented via various tricks:
Sharpshooter: All In gives a solid 10 damage boost per hit. However, it comes with a drawback: -5 to attack rolls. This, of course, can be circumvented via various tricks:
 Oil of Accuracy and
  Diluted Oil of Sharpness
- High Ground bonuses
 Hiding
I have a full article on increasing attack rolls. That goes into depth on various mechanics that work especially well in the early game, when the -5 attack roll hurts the most.
You also have another option, if it comes to worst, and you can't get your hit chance above 60%, just disable ![]() Sharpshooter: All In for the time being.
Sharpshooter: All In for the time being.
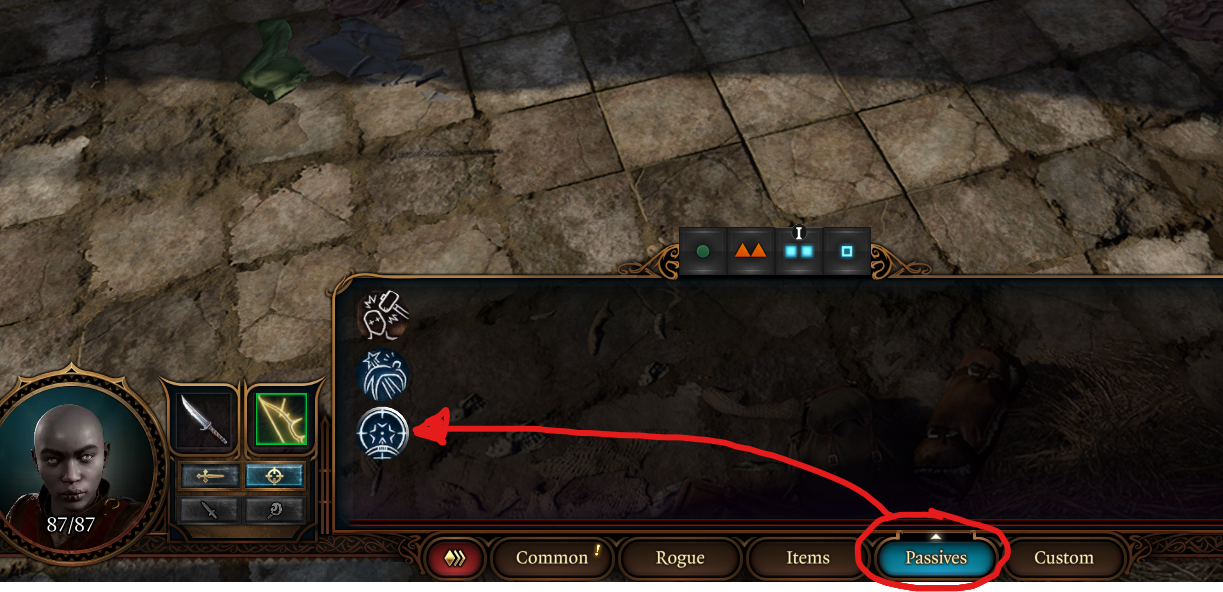
I do not recommend doing this, as this way, the root cause ofthe low hit chance is not addressed. Maybe your party does not apply debuffs or controls, and enemies, rather than dying fast, are damaging your party members unnecessarily.
Attack as many times as you can
So this build from the early game stands out with the ability to attack multiple times, especially on the first turn. So this is how you can maximize it:
 Haste - +1 attack with the action point
 Off-Hand Attack (Ranged) - +1 with the main bonus action.
 Elixir of Bloodlust - +1 attack after killing an enemy
 Fast Hands - +1 attack from additional bonus action.
 Helmet of Grit - +1 attack with additional bonus action
Utilize Sneak Attack for additional bonus damage
Taking a dip in Rogue gives ![]() Sneak Attack (Ranged) action. It usually shines for high-level rogues, as the damage rolls get increased. Still, 2d6 additional damage per turn can mean a dead or alive enemy.
Sneak Attack (Ranged) action. It usually shines for high-level rogues, as the damage rolls get increased. Still, 2d6 additional damage per turn can mean a dead or alive enemy.
Activating ![]() Sneak Attack (Ranged) is pretty simple. You attack from a
Sneak Attack (Ranged) is pretty simple. You attack from a ![]() Hiding position, with
Hiding position, with ![]() Advantage, or have an ally stand close to an enemy so that
Advantage, or have an ally stand close to an enemy so that ![]() Threatened status appears on them.
Threatened status appears on them.
One tip that I have is that I would recommend attacking the enemy using a Sneak attack when out of combat. The game registers this as a separate attack, and when you enter combat, you will still be able to attack with ![]() Sneak Attack (Ranged) again. This sometimes works, sometimes doesn't, and it's one of the things that is not fully fixed.
Sneak Attack (Ranged) again. This sometimes works, sometimes doesn't, and it's one of the things that is not fully fixed.
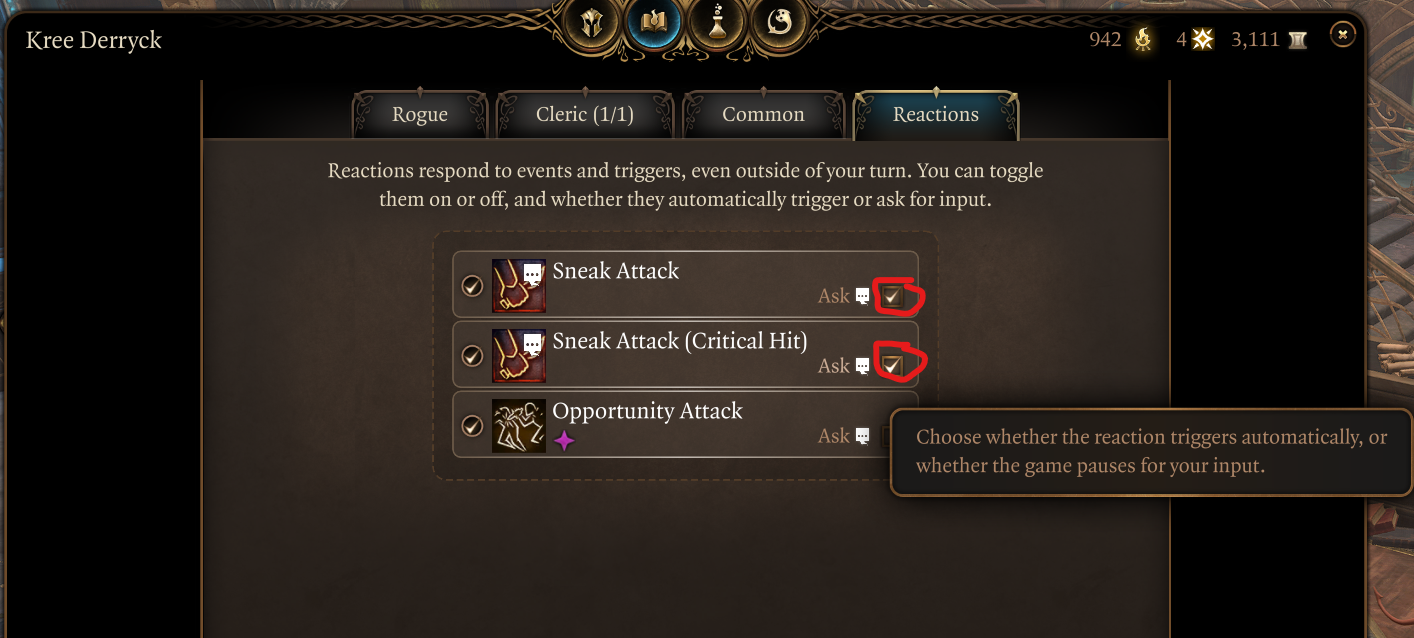
I also recommend setting ![]() Sneak Attack (Ranged) to Ask in the Reactions window. This way you can also proc it separately with a bonus action attack if needed:
Sneak Attack (Ranged) to Ask in the Reactions window. This way you can also proc it separately with a bonus action attack if needed:
Understand stealth mechanics
The main point of this build is that it is extremely deadly when you utilize stealth mechanics well. I have prepared a complete stealth guide that covers them all. There are plenty of stealth options:
- Attacking and creating surprise rounds
- Leaving combat while in the middle of the fight, to reset it
- Become invisible at will
- Gain attack roll bonuses when in stealth
- And many others.
I would like to emphasize the Surprise rounds. Here are the general steps to activate them:
- You have to be undetected before doing this; best to be outside the red vision cones. If you need to enter the vision cone, make sure that they don't have
 Darkvision, and it's either a
  Lightly Obscured or
  Heavily Obscured area. Or you can just be
  Invisible via effects like
  Potion of Invisibility, Duergar
  Invisibility,
  Supreme Sneak, etc. This almost guarantees a surprise round.
 - You can start the combat by attacking with melee, ranged weapons, or casting offensive spells. The main prerequisite is that you should be "seeable" and in the line of sight of the enemy once the attack lands. So they would have a clear vision of you, and you are not too far away. This is important, as being far away does not trigger
 Surprised.
 - You can move in other party members if they were ungrouped, so they could also land attacks during this free round.
Disable Dual Wield attacks
You may notice that often when you shoot with your main hand, your offhand also attacks. This can be irritating, especially when the enemy is close to death and you waste your bonus action on a dead foe.
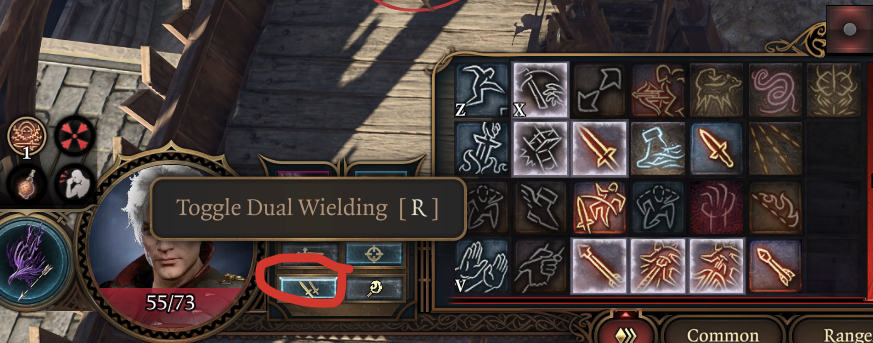 There is an easy fix: just click on the Toggle Dual Wielding button, and now your main hand and offhand attacks attack separately. This does get reactivated sometimes, so be mindful of that.
Special Arrows and their significance
With this build, you can steal all the arrows in the world from any merchant - ![]() Arrow of Fey Slaying,
Arrow of Fey Slaying, ![]() Arrow of Many Targets,
Arrow of Many Targets, ![]() Arrow of Fire, etc. These are great, as you can greatly empower your main action attack. Some of them are situationally useful, others help you build up damage, and so on.
Arrow of Fire, etc. These are great, as you can greatly empower your main action attack. Some of them are situationally useful, others help you build up damage, and so on.
The Slaying arrows are especially deadly, as they double your damage. With the next trick, using ![]() Bhaalist Armour, you can quadruple it.
Bhaalist Armour, you can quadruple it.
As you have plenty of arrows, don't save them, use them on every shot, to make the combat more exciting and easier!
Bhaalist Armor and Aura of Murder
So, one of the main items for any kind of piercing weapon build is ![]() Bhaalist Armour. This is one of the strongest armors in the game, giving double damage on piercing attacks. If you think about it, this is ridiculous, and with correct preparation, you can destroy most of the bosses in the game.
Bhaalist Armour. This is one of the strongest armors in the game, giving double damage on piercing attacks. If you think about it, this is ridiculous, and with correct preparation, you can destroy most of the bosses in the game.
Still, the ![]() Aura Of Murder effect only works in a 3-meter radius. So if you are using it on a Ranged build, you lose some of the advantage, and enemies are very close to you. One consideration is to have other martial characters wear it. This can be Paladin, Fighter, melee Ranger, etc. This way, you can safely attack from a long distance.
Aura Of Murder effect only works in a 3-meter radius. So if you are using it on a Ranged build, you lose some of the advantage, and enemies are very close to you. One consideration is to have other martial characters wear it. This can be Paladin, Fighter, melee Ranger, etc. This way, you can safely attack from a long distance.
Still, if that is not possible, you can move close to the enemies, find that sweet spot, where Threatened status does not appear, and ![]() Aura Of Murder still works. Double damage with 4+ attacks will be a sight to behold.
Aura Of Murder still works. Double damage with 4+ attacks will be a sight to behold.
Turn your thief into Pickpocket
With various bonuses to Sleight of Hand, access to high dexterity, and some invisibility options, this build is perfect to be a Pickpocket Build alternative. It's pretty easy, you need to swap a few items, and feel free to rampage on the trader's inventories.
This is extremely important if you are playing Tactician and Honour Mode, as consumables can turn the tide of any combat encounter.
Early Game Combat
Let's cover how you should progress through combat levels 1-6.
- I recommend going alone for the first attack before taking your group members if you see a guaranteed combat encounter.
- You can initiate combat with
 Invisibility to make enemies
  Surprised and gain a free round for damage.
 - You have 2 bonus actions, so use them for
 Off-Hand Attack (Ranged),
  Cunning Action: Hide,
  Sanctuary, etc.
 - If your hit chance is low, you can disable
 Sharpshooter: All In for the moment.
 - Generally, you would want to attack while in
 Hiding; this way, you get an
  Advantage on Attack Rolls.
 - Use consumable arrows. You will have pickedpocketed a lot of them.
- Cast
 Sanctuary if the situation is dire and you need to escape combat. This can also be applied to allies.
  Sneak Attack (Ranged) acts as your extra attack, so make sure to use it every turn.
Mid to Late Game Combat
The late game is more or less the same loop, maybe with more arrow options.
- More or less the same as from the previous section.
- Use arrows of slaying like
 Arrow of Fey Slaying,
  Arrow of Undead Slaying, etc. These deal huge amounts of damage, and will give an excellent utility for your main hand attack.
 - You can use
 Arrow of Many Targets +
  Gloves of Baneful Striking to debuff enemies, so that your casters would have an easy time applying spells.
Build Variations
Here are some variations that work similarly and utilize the same classes at their core.
| Setup | Description |
|---|---|
|
Gives access to |
Conclusion
Thank you for reading the Thief Build for Baldur's Gate 3. This build tries to maximize all the features that Thief gives, and creates a semi-efficient build. You are inferior to other ranged setups like Gloomstalker Assassin, but it does offer excellent roleplay flavour.
Cheers!
Like, Dislike, comment, or share!

Discussion
No comments yet.
Be the first one to leave a comment!