
Best Abjuration Wizard build - Ultimate Tank - Baldur's Gate 3 (BG3)
Contents
Abjuration Wizard Build - Ultimate Tank
This subclass's main draw is its ![]() Arcane Ward effect. You will be able to easily stack it by casting Abjuration spells. With various buffs, this can ensure that you negate large amounts of damage both for yourself and your allies.
Arcane Ward effect. You will be able to easily stack it by casting Abjuration spells. With various buffs, this can ensure that you negate large amounts of damage both for yourself and your allies.
With big defense covered, there is another side of the coin - reflective damage. Here it will get ridiculous, where enemies, just for attacking you, will inflict 100+ damage to themselves, but you will get 0. This is thanks to a few items and spells like ![]() Armour of Agathys and
Armour of Agathys and ![]() Fire Shield.
Fire Shield.
The Wizard is also capable of learning and casting all the amazing offensive spells like ![]() Lightning Bolt,
Lightning Bolt, ![]() Fireball, etc. To empower this Ultimate Tank Build, I also recommend multiclassing into Sorcerer and Cleric. They will bring amazing synergies that you can exploit for an even more powerful version of the build.
Fireball, etc. To empower this Ultimate Tank Build, I also recommend multiclassing into Sorcerer and Cleric. They will bring amazing synergies that you can exploit for an even more powerful version of the build.
Class Contribution
10 Abjuration Wizard
- Spell Scribing is the main highlight of Wizards, allowing them to learn any spell from scrolls and put it into their spellbook. Later, it can be assigned to Prepared spells and used during exploration or combat.
 Arcane Recovery - a special feature that allows restoring spell slots, and prolongs your combat potential until long rest.
 Arcane Ward - the main highlight of this subclass, allowing you to soak damage depending on the number of
  Arcane Ward stacks.
 Projected Ward - a defensive reaction, to soak damage for an ally using your own Arcane Ward stacks.
- Excellent quality of life improvement with
 Improved Abjuration, where it's easier to maintain a high amount of Arcane Ward stacks via short resting.
1 Tempest Cleric
- Proficiencies with shields and medium armor, allowing for more equipment options
- Can apply
 Wet status for other casters with
  Create or Destroy Water, to empower your Lightning/cold spells.
 - Access to
 Guidance, which is a great all-around cantrip for exploration and dialogue part of the game.
  Wrath of the Storm reaction for additional damage when getting hit with damage..
1 Draconic Sorcerer
- Constitution saving throw proficiency for better maintainability of spells during combat
- Defensive spell
 Shield to improve survivability from enemy normal attacks.
 - The
 Armour of Agathys spell, which will enable very powerful reflective damage stacking
 - Access to additional cantrips like
 Friends,
  Booming Blade, etc.
Build Variations
There are a few variations that the build could be changed about. I think it is more for advanced players who are likely doing some deeper optimizations.
| Setup | Description |
|---|---|
|
This setup is useful if you plan on using the "bugged" |
Infinite Ward setup:
|
The build uses the infinite Arcane Ward trick to stack. This then kinda opens up options for spells, and you are not so reliant on Abjuration spells. Sorcerer is there to activate special interaction via |
Synergy with other builds
This build does have a few options that make the Abjuration wizard shine as an excellent member.
Lightning/Cold themed
So the build revolves around two key aspects dealing cold damage with reflects like ![]() Armour of Agathys and doubling its damage using
Armour of Agathys and doubling its damage using ![]() Wet. So anything that applies the status or deals cold/lightning damage is an excellent synergy option, and there are many:
Wet. So anything that applies the status or deals cold/lightning damage is an excellent synergy option, and there are many:
- Generally, any standard Cleric build will work as they can cast Create Water. However, for maximum efficiency, Tempest Cleric is the best pick. They get
 Call Lightning and more theme-related spells.
 - Druids are also a good choice as they come with Create Water and some lightning spells. The main highlight would be Land Druid. A very popular variation of it is Thundersnow Herald, which comes with both Cold and Lightning spells for total annihilation.
- Sorcadin with access to
 Lightning Bolt.
 - And.... Many of the Sorcerer variations - Storm Sorcerer, Talos Dragonling Build, etc.
Damage Resistances
Another aspect that the Abjuration Wizard needs is to resist damage so that their temporary HP is not reduced while having ![]() Armour of Agathys. With this in mind, your goal is to get
Armour of Agathys. With this in mind, your goal is to get ![]() Warding Bond. Almost any cleric can do this, but there is one specific build that I can recommend, which specializes in damage absorption - Life Cleric.
Warding Bond. Almost any cleric can do this, but there is one specific build that I can recommend, which specializes in damage absorption - Life Cleric.
Leveling Overview
Here is a concise table with all the main picks during your leveling progression. For more detailed reasoning, I go further in the article. Also, do not forget to check the recommended gear as it is crucial.
| Level | Class | Selection |
|---|---|---|
| 1 | Sorcerer | Skills: Arcana, History, Investigation, Nature |
| Cantrips: |
||
| Spells: |
||
| Subclass: Draconic Bloodline | ||
| Dragon Ancestor: |
||
| Abilities: STR - 8, DEX - 14, CON - 16, INT - 17, WIS - 10, CHA - 8 | ||
| 2 | Cleric | Subclass: Tempest Domain |
| Cantrips: |
||
| Prepared Spells: |
||
| 3 | Wizard | Spells: |
| Cantrips: |
||
| Scribe Spells: |
||
| 4 | Wizard | Subclass: Abjuration |
| Spells: |
||
| 5 | Wizard |
Spells: |
| Scribe Spells: |
||
| 6 | Wizard | Cantrips: any |
| Spells: |
||
| Feat: Ability Improvement - +2 Intelligence or |
||
| 7 | Wizard | Spells: |
| Scribe Spells: |
||
| 8 | Wizard | Spells: |
| 9 | Wizard | Spells: Any, make sure you have - |
| Scribe Spells: |
||
| 10 | Wizard | Spells: |
| Feat Level 8: Ability Improvement +2 Intelligence. | ||
| 11 | Wizard | Spells: |
| Scribing Spells: |
||
| 12 | Wizard | Cantrips: anything |
| Spells: anything |
Starting the Game - Level 1
This section covers the creation screen and what would go into the best Races, Abilities, and Skills for the Abjuration Wizard build. Some of these choices are impactful as you cannot respec them.
Races
Picking a race provides various benefits - abilities, dialogue options, looks, etc. Also, keep in mind whether your picked race has Shield proficiency as this can improve survivability, especially in the early game.
| Race | Features | Description |
|---|---|---|
 Wood Half-Elf Wood Half-Elf |
|
Amazing choice, thanks to its increased movement speed. Moreover, it gets Shield proficiency and boosts Armour Class. |
 Wood Elf Wood Elf |
|
The bonus movement speed is amazing, everything is very similar to Wood Half-Elf. |
 Githyanki Githyanki |
|
Get's some amazing bonus features - |
 Halfling Halfling |
|
Any subrace will work. What matters is the |
Class
The first thing, that may be counterintuitive is that you will start with Sorcerer. The main reasons are:
- Get proficiency in Constitution Saving Throws. This is important as it allows you to sustain
 Concentration on spells with a higher chance.
 - Have the correct spellcasting modifier, which depends on the last level 1 class taken via multiclassing (it will be Wizard).
- You will get some Abjuration spells, which will save Wizard Prepared spell slots.
- Obtain Armour of Agathys - the main pillar of the build.
| Overview | |
|---|---|
 Sorcerer Sorcerer |
|
| Features | |
 Spell Slots Spell Slots |
These can be used to cast spells and are restored each long rest. |
Cantrips
Take only those cantrips that are utility or support, and avoid damaged ones. The reason is that they will use the Charisma spellcasting modifier, but we only care about Intelligence. So you will get them from the Wizard.
| Cantrips | Description |
|---|---|
| If you are the main character and do most of the dialogue, this is mandatory as it gives an |
|
| Light dark areas. For now, it is nothing spectacular, but later this spell will play a big role. | |
| Later, once you get |
|
| Use this to attract NPCs or enemies to one point. It needs to be used outside of combat for the effect to be worth it. |
Spells
| Spell | Description |
|---|---|
| Right from the start this spell is awesome. Although it does not deal huge damage, you can easily kill enemies with low HP in case you don't wish to miss it. This spell will get better as higher-tier spell slots are unlocked. | |
| This is a great spell to have on hand. Although later you will want to be always hit, in certain situations, +5 Armour Class can be a lifesaver. |
Subclass
| Overview | |
|---|---|
 Draconic Bloodline Draconic Bloodline |
|
| Features | |
| This negates the need for |
|
| Just a bonus 1 HP for this build, so nothing fancy. | |
Dragon Ancestor
| Ancestor | Description |
|---|---|
| The build relies on the |
Background
Backgrounds are mostly for role-playing and you can pick whatever you prefer. If you want to optimize, then it would be good to pick backgrounds that are based on your ability points of Intelligence.
| Background | Skills | Description |
|---|---|---|
| Acolyte | Insight Religion |
Provides proficiency in religion that is impacted by high Intelligence. |
| Sage | Arcana History |
The most relevant background for Wizard in my opinion as both skills greatly benefit from intelligence. |
| Noble | History Persuasion |
This option is great as it also improves Persuasion which can then be used in various dialogues. |
Abilities
Now, let's take a look at the abilities of the best Abjuration Wizard build. Correct allocation will allow you to maximize the early gameplay and get good modifier bonuses.
| Ability | Value | Description |
|---|---|---|
 Strength Strength |
8 | The build only requires strength if you will use |
 Dexterity Dexterity |
14 | This plays an important role in improving armor class and increasing initiative. Going early will allow you to land damage or control spells. If you have plenty of experience with the game, you might switch this with Constitution to get better initiative and stay with lower HP. |
 Constitution Constitution |
16 (15+1) | The Constitution plays a very important role in this build, at least until Act 3. It will improve your survivability in case |
 |
17 (15+2) - With 16 (14+2) - No Hair |
The main spellcasting modifier of the build, which will improve spell success chance. It also |
 Wisdom Wisdom |
10 - with 12 - no hair |
Additional Wisdom to avoid any negative modifiers, as many spells target this ability. |
 Charisma Charisma |
8 | If you want a few points here, you could subtract them from Wisdom; otherwise, I would rely on bonuses from |
Skills and Expertise
Overall, the skills should be impacted by your roleplaying and background decisions. However, you would still want those that will give you the best benefits. My recommendations are to pick those at which you have a high ability modifier, and these are Intelligence-related.
- Arcana
- History
- Investigation
- Nature
- Religion
Leveling Progression - Levels 2-12
Here is the detailed progression for the Abjuration Wizard to get you started. You can use it as a guideline because early games can be daunting and overwhelming. Later on, once you get a feel for the class, you can start picking your options
Sadly, you will not take Wizard yet, and instead multiclass into Cleric, which will give some more benefits that will be needed later in the playthrough.
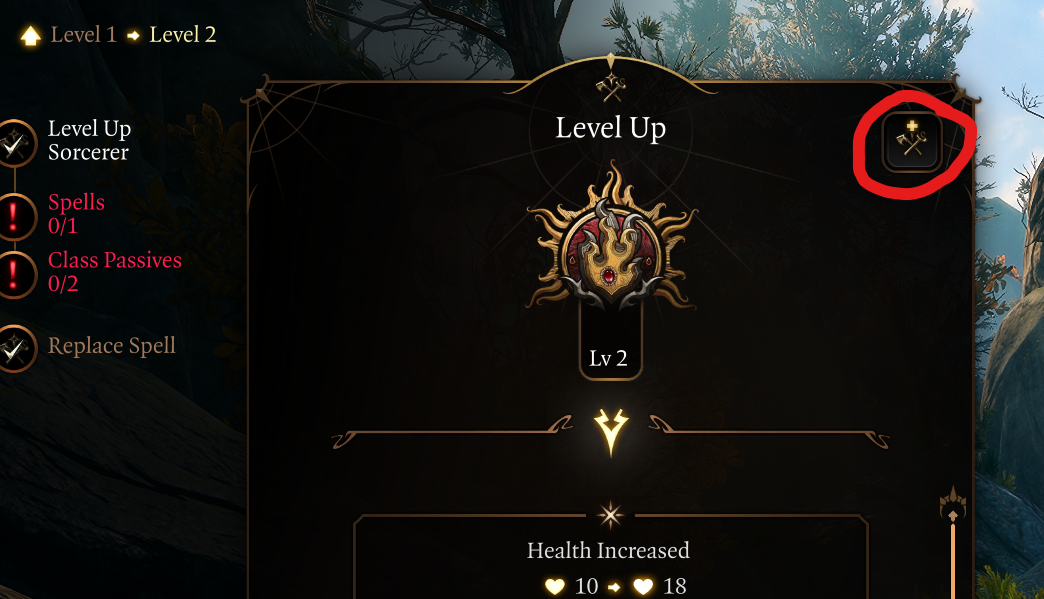
Level 2 - multiclass into Cleric Lv 1
By this time, you should have landed on the ![]() Ravaged beach already. First step is to multiclass into cleric, which can be done in the level up screen:
Ravaged beach already. First step is to multiclass into cleric, which can be done in the level up screen:
Why do we do this? Here are a few benefits:
- You obtain Shield and Heavy armor proficiency, which helps in early and late games with survivability.
- Obtain Create or Destroy Water to improve Lightning and Ice spell damage.
- Obtain Wrath of the Storm for bonus damage via reactions
Class
| Overview | |
|---|---|
 Cleric Cleric |
|
| Features | |
| These bonus spells save some slots. | |
| Spell Slots |
These can be used to cast spells and are restored each long rest. |
Cantrips
Here, only take those cantrips that are support or utility, do not take the damage ones.
| Cantrip | Description |
|---|---|
| Generally, I do not recommend this perk. However, the build benefits a lot from the reduced damage later on. For now, it is good to have. | |
| Gives a higher chance of succeeding in intimidation dialogues. | |
| It can be useful in some encounters; otherwise, use it before combat. | |
| One of the best cantrips in terms of out-of-combat utility, helping with dialogue or any other rolls. |
Subclass
| Overview | |
|---|---|
 Tempest Domain Tempest Domain |
|
| Features | |
| This will be useful together with |
|
Deity
Pick anything based on roleplay or other choices.
Prepare Spells
Pick one of these options:
- Create or Destroy Water - this one is mandatory as it will give a huge improvement once you start using Armour of Agathys a lot.
 Sanctuary - great spell for those "oh shit" moments, where you can instantly protect yourself.
Level 3 - Wizard Lv 1
Finally, this is the first level that we will be multiclassing into Wizard. Because you now have both level 1 and level 2 spell slots, there are a lot of spell-scribing opportunities.
Class
| Overview | |
|---|---|
 Wizard Wizard |
|
| Features | |
| Provides a way to restore spell slots with Arcane Recovery Charges. | |
| Spell Slots |
These can be used to cast spells and are restored each long rest. |
Cantrips
Here you can now finally take damage cantrips, as they will scale off Intelligence:
| Cantrip | Description |
|---|---|
| Although the build will go more into Lightning and Frost, having a fire cantrip can be useful to light up surfaces or exploding barrels. | |
| This is a melee range spell, that also disables enemy reactions. | |
| Long-range spell, that deals double damage on wet enemies. |
Level 1 Spells for Leveling and Scribing
As a Wizard, you can obtain spells in a few ways, so it is hard to recommend the progression:
- Picking them in the leveling screen
- Scribing from the scrolls that you find or buy in the game.
Based on what you need or lack in the combat, you can prioritize these for different uses
| Spell | Description |
|---|---|
| Situationally useful spell, that can instantly kill targets if they are thrown off the ledge. | |
| I recommend adding this spell, in case no one in your group has it. Outside combat it is free to cast and greatly improves the mobility of the whole group. | |
| Almost mandatory exploration spell, which enables you to jump very long distances. | |
| Useful in some exploration scenarios, to remove the damage from high falls. | |
| It is a very popular spell that can hit with different elements. This way, you can double-damage wet targets or pick different elements based on the situation. | |
| Creates an ice surface, which can make enemies prone. Good spell early on, but loses potential at later levels. |
Level 2 Spells for Leveling and Scribing
Because you already have level 2 spell slots, this means that you can start scribing these spells already (although you cannot learn them via the leveling screen).
- Picking them in the leveling screen
- Scribing from the scrolls that you find or buy in the game.
Based on what you need or lack in the combat, you can prioritize these for different uses.
| Spells | Description |
|---|---|
| Gives a boost to mobility and allows you to move around the battlefield with a bonus action. | |
| The biggest damage spell at level 2. It damages twice - first when you cast, and second after it is the enemy's turn. You could also use this as a replacement for any spells you do not use. | |
| Excellent spell that gives crowd control capabilities, just be sure that your allies don't step on it. | |
| A control spell that makes ranged foes useless, and it does not use a |
|
| This can be especially useful if you have characters that can utilize the 100% critical hit chance in close range - melee martial, ranged, throwers, etc. | |
| A great spell to have in certain encounters. |
Prepared Spells
I would prioritize ![]() Misty Step and
Misty Step and ![]() Cloud of Daggers to be included.
Cloud of Daggers to be included.
Wizard Mechanics Disclaimer
As this build will heavily rely on Wizard, there are a few special mechanics to know before using it.
Scribing spells
One important aspect is that any spell scrolls you find can be learned. This consumes a scroll and some additional gold. As a result, the spell is added to the spellbook:
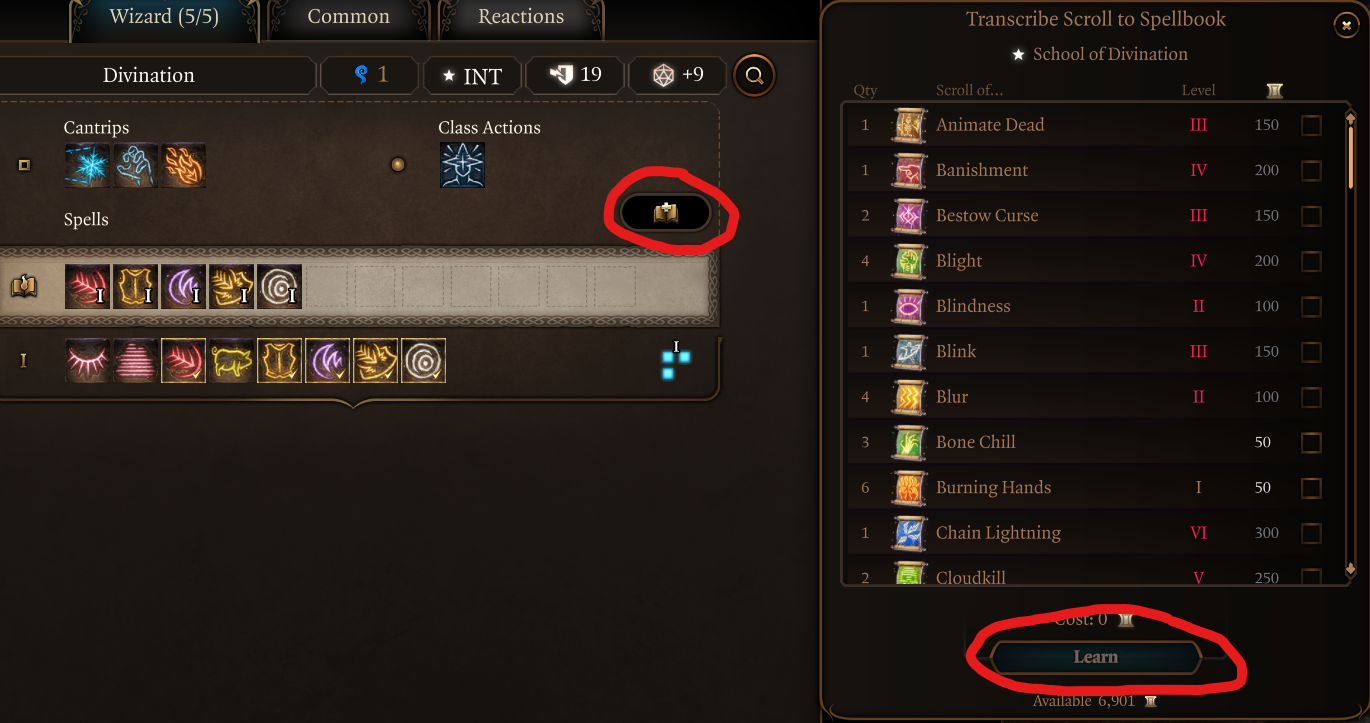
This means that you get those spells that you do not learn by leveling. Just wanted to tell you so that you would not be surprised in case the spells are talked about, and I did not suggest taking it.
Preparing Spells
The second stage, after you learn or scribe spells, is that you can then "prepare" them. This means that you have a limited number of spells active at a time.
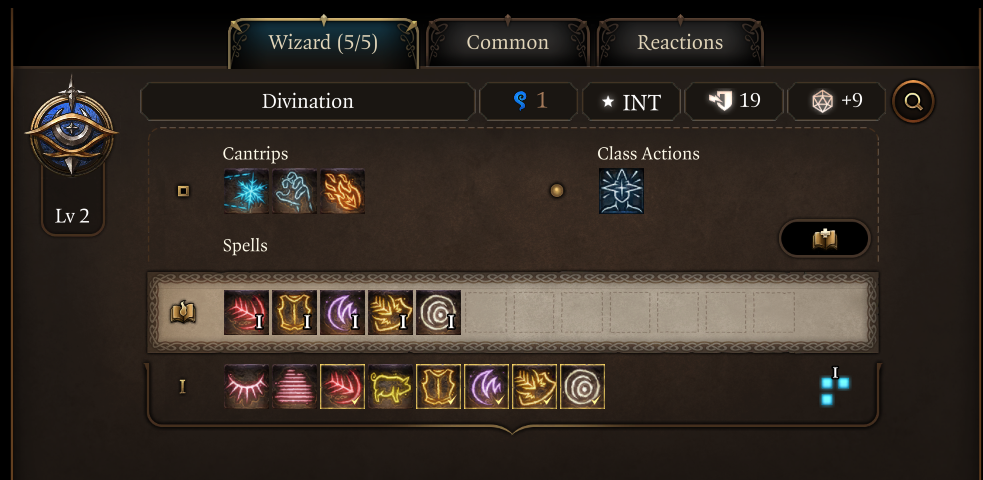
This is a good thing as you can change them based on the situation outside of combat. For example, you will be fighting enemies that are weak to Fire. Just add ![]() Fireball or
Fireball or ![]() Wall of Fire. Fighting a large group of enemies, maybe include
Wall of Fire. Fighting a large group of enemies, maybe include ![]() Glyph of Warding or
Glyph of Warding or ![]() Confusion to disable them.
Confusion to disable them.
Level 4 - Wizard Lv 2
You will now get access to the Wizard subclass.
Subclass
| Overview | |
|---|---|
 Abjuration Abjuration |
|
| Features | |
| The protective ward is very powerful once you can have multiple stacks in later levels. For now, it is a slight boost to survivability. | |
| Abjuration Savant | Abjuration spells are cheaper to learn. |
Spells
Pick two spells from the recommended list on the previous level.
Level 5 - Wizard Lv 3
You can learn level 2 spells, and scribe level 3 spells, which unlocks huge combat potential.
Level 3 Spells for Leveling and Scribing
So, these spells I would say are game changers in terms of power play. Some of them can single-handedly change the encounter to your side, disable a group of foes, or instantly delete them.
Core Spells:
| Spell | Description |
|---|---|
| This spell is good on the Balanced and Tactician difficulties and mandatory on Honour Mode. It can save your run from a deadly enemy spell by fully cancelling it. | |
| The lightning element spells are always mandatory in my spell arsenal. If enemies align perfectly and you have |
|
| The spell is generally overlooked cause it doesn't deal any damage. But do not be fooled, it instantly |
Additional Spells:
| Spell | Description |
|---|---|
| On one hand, this is a very powerful spell, on the other hand, it does have problems, like using Concentration and |
|
| Versatile spell that can apply different elemental damage. The main problem is that its range is somewhat short. |
|
| Very popular spell with straightforward effect - large radius fire damage. I do recommend it, if you have a slot for it, but I think |
|
| This spell can be useful in some boss fights later down the road. It lowers their number of actions, reduces AC giving, so needed bonuses for longer fights. | |
| Another powerful control spell that is especially effective against foes that use weapons. This leaves them outright defenseless and makes them flee. |
Prepare Spells
With access to new spells, make sure to include ![]() Counterspell in the spellbook
Counterspell in the spellbook
Level 6 - Wizard Lv 4 - reflect setup
This is the level where I would say you can start using the tanking setup with ![]() Arcane Ward. 4 levels give 8 stacks, which is plenty to absorb damage, while also being able to reflect a good amount of damage
Arcane Ward. 4 levels give 8 stacks, which is plenty to absorb damage, while also being able to reflect a good amount of damage
Now, you get some other great choice picks - the first feat is unlocked.
Cantrips
| Spells | Description |
|---|---|
| Any | Feel free to take any relevant cantrip |
Spells
Pick an additional 2 spells from the recommended lists
Feat
| Feat | Description |
|---|---|
| My go-to recommendation if you would like to use |
|
| Ability Improvement - +2 Intelligence | The safe pick, which improves Spell Save DC for a better spell success chance. |
Level 7 - Wizard Lv 5
I would say this is the level where the Abjuration Wizard can start its main rotations with full throttle. You have plenty of spell slots, access to level 3 and level 4 spells, and decent gear.
Spells
Be sure to learn ![]() Counterspell as it is the only way to get it.
Counterspell as it is the only way to get it.
Level 4 Spells for Leveling and Scribing
There are a few situationally good spells; otherwise, pick the ones that may look relevant to you
| Spell | Description |
|---|---|
| The main spell to take from level 4 spells. |
|
| I have a soft spot for this spell. It deals two types of damage, creates ice fields, applies control - everything that you need for many Act 2 encounters. | |
| My favourite spell in the game with how it functions. It can disable large groups of enemies, but it does not target allies. | |
| A very valuable spell to have on hand. It can help you and a companion move a long distance and reach targets or escape them. | |
| A somewhat good spell that can hit multiple times per turn, if enemies are forced to pass through it. | |
| Mainly mentioning it here, as I don't think it is valuable alone. However, if you have something like a Gloomstalker Assassin build it can allow it to kill enemies even without entering combat. | |
| The spell can prove useful in some encounters, especially the |
Prepared Spells
![]() Fire Shield is mandatory to add once you scribe it.
Fire Shield is mandatory to add once you scribe it.
Level 8 - Wizard Lv 6
This level gives an awesome feature, that will improve survivability not just for yourself but for your allies.
| Features | Description |
|---|---|
| This is a lifesaver as you can help your allies and reduce the damage they take with your reaction. |
Spells
Add any of the spells that I have already recommended
Prepared Spells
Adjust based on your needs
Level 9 - Wizard Lv 7
This level allows scribing level 5 spells, and you can start picking additional level 4 spells that you have not yet learned.
Level 5 Spells for Leveling and Scribing
Good spell options are introduced. Learn them via leveling or through Scroll scribing.
| Spell | Description |
|---|---|
| If you have been using |
|
| These are good summons that can both cause real damage and act as distractions for enemies. The really powerful one is |
|
| This spell is an alternative to |
Prepared Spells
Add any of the relevant spells.
Level 10 - Wizard Lv 8
The Wizard Tank build gets access to the second feat
Spells
Pick any of the spells that I have recommended previously.
Prepare Spells
Add any relevant spells
Feat
There are multiple good feats to pick from. Here are a few favorites of mine:
| Feat | Description |
|---|---|
| Ability Improvement - +2 Intelligence | The safe pick, which improves Spell Save DC for better spellcasting |
| This option gives access to |
|
| I would take this option only if you are using |
|
| Great feat for improving your success chance of Saving Throws against incoming enemy spells. Moreover, if enemies are using ranged attacks, you could use this to avoid those and save |
Level 11 - Wizard Lv 9
Now you can also learn any level 5 spells that you skipped and start scribing those Level 6 spells - and they are powerful.
Level 6 Spells for Leveling and Scribing
There are a lot of good spells, but for now, pick two. The rest can be learned via scribing.
| Spells | Description |
|---|---|
| This one spell can make you invincible during its effect. It's excellent against numerous game bosses, where you can safely turtle away and chip them with your characters. After that, return to the globe. | |
| The strongest spell in the game in terms of damage. It hits 4 times, and with |
|
| It can be perfect to hit a well-stacked group of enemies with the wall effect and the ice particles. The problem is that it uses Concentration, limiting your other control spells. | |
| The initial effect cannot be resisted. Enemies can only try to avoid it on the next turn via a Saving Throw. |
Prepared Spells
I would urge you to add ![]() Globe of Invulnerability the moment you get it, as it's one of the best spells for the endgame encounters.
Globe of Invulnerability the moment you get it, as it's one of the best spells for the endgame encounters.
Level 12 - Wizard Lv 10
And the Abjuration Wizard build the last level. This is a huge improvement on what has already been done, but the main highlight is:
| Feature | Description |
|---|---|
| Thanks to this, it will be much easier to maintain |
Cantrips
To be honest, by now you can take anything as all the things the build needs are already covered.
Spells
Pick any of the previously recommended spells
Maximizing Ability Scores
Now, as the build progression is covered, there are a few aspects and important decisions you will have to make throughout the game. These will decide your final score for abilities.
Intelligence
- Act 1 -
 Auntie Ethel's Hair - you will want to get +1 Intelligence if you pick this choice.
 - Act 3 - Mirror of Loss - pick +2 Intelligence.
This will allow you to reach 20 natural Intelligence, and result in a +5 ability modifier on your spells and rolls.
Potions, Elixirs, and Consumables
Let's take a look at what consumables we can use to further empower the build.
Potions
These are general consumables, and most of them are activated for a few turns. Potions are separate from Elixirs and can be active together.
| Consumable | Description |
|---|---|
| Gives very high mobility, which improves the moved distance. Especially useful for this build to tag more enemies. Best if you pop it before combat. | |
| An alternative to |
|
| Provides resistance to all damage types for 10 turns. It is an alternative to |
|
| Enables you to speak with animals, which unlocks a few interesting dialogue lines. | |
| It can be used in two ways - the first one is to enter combat with a |
|
| An easy way to restore level 1-2 spell slots. These are mainly used for |
|
| Fully restores all spell slots, making it a very powerful consumable without needing a long rest. | |
| Gives |
Elixirs
Unfortunately, only one Elixir can be active at a time. However, the good thing is that they last until a long rest, making them very useful and economical.
Be sure to activate them before combat, as otherwise, you will need to use Bonus Action.
| Consumable | Description |
|---|---|
| Boost the strength to empower your attack rolls for those |
|
| Not that relevant option, unless you are spellcasting offensive spells. The reflective damage kills will not activate this. | |
| Gain 3 stacks of Arcane Acuity. I would say this should be the most used Wizard elixir for higher spell success. | |
| Another good choice that allows for better maintenance of spell Concentration. | |
| Grant's a single level 3 spell slot. It could be useful in case you are preparing for a longer encounter. | |
| Grant's a single level 4 spell slot. It could be useful in case you are preparing for a longer encounter. | |
| For some encounters, you will want to go first. This elixir will ensure that it overcomes even surprise mechanics. However, if you have |
Illithid Powers
This special mechanic in Baldur's Gate 3 allows you to consume tadpoles and unlock special Illithid Powers. These range from somewhat useful, to extremely deadly. I would like to leave a few recommendations:
| Illithid Power | Type | Description |
|---|---|---|
| Base | Beneficial power to take as it does not have any costs, and provides only benefits on the first hits with attack rolls. | |
| Base | An easy way to ensure you land critical hits. | |
| Base | Casting this improves your reflective damage. However, it can additionally eat through your |
|
| Base | Amazing spell that can help with survivability in case your temporary HP gets destroyed. If this happens, you can make nearby enemies |
|
| Base | It can help to kill an enemy faster if it is left with a few HP. The problem is that some of the item effects will not activate, like the |
|
| Base | Deals additional damage with a reaction against enemies that use spells. This is an inferior version of |
|
| Elite | Can be used to maximize the effectiveness of charisma-based skills, especially relevant to the main character. | |
| Elite | Very powerful spell that can be used to pull enemies together. You can then follow up with area-of-effect spells or attacks. In general, it is a very effective action in the hands of any character. | |
| Elite | This can help deal with enemy spells that are lower level, especially if you want to save |
|
| Elite | Remove the cost of spell slots or charges. | |
| Elite | You can now use action and bonus action interchangeably, giving two full spell casts each turn. It's not as important for you, but it will help other casters in the group. |
Equipment Recommendations
Now I would like to go through some gear recommendations to maximize the Best Abjuration Wizard Build. Items are especially important as they take the build to the next level thanks to their unique effects.
Act 1
So, for the majority of Act 1, you will be a standard caster build. The build only becomes reasonably effective from level 6. So, I would like to split the gear recommendation into two parts:
Pre level 6 - caster equipment
| Slot | Item | Description |
|---|---|---|
 Melee (One-Handed) Melee (One-Handed) |
When used with |
|
| Gives +1 to spell attack rolls or DC. An alternative to |
||
| It can be used to apply damage and attack roll buffs in various combat encounters. Wearing it together with other staves will require |
||
 Ranged Ranged |
The higher initiative bonus will allow you to start your turn earlier. | |
| Equipping two of these will allow you to attack with off-hand. This is important as you may not have used for bonus action if your Sorcery points have been expended, so this will allow some bonus damage. | ||
| It provides a substantial defensive boost by reducing critical hit damage. | ||
| Gives a bonus to saving throws, easily accessible early in the game. | ||
 Head Head |
Increases Spell Save Difficulty Counter, while obscured. Very easy to activate, use Shift, to see the sun icon, it should be half or full empty. | |
| The best defensive option in Act 1. Works well with |
||
 Cloak Cloak |
- | Nothing relevant for the build |
 Armor Armor |
The best spellcaster robe in Act 1. Works well with |
|
 Gloves Gloves |
Applies Reverbation when dealing thunder or lightning damage. With 5 stacks, this will deal a bonus 1d4 damage and can make enemies Prone. This can be easily achieved once you have |
|
| Gives whooping +2 Armour Class. This is the perfect option, especially if you do not have shield proficiency. | ||
| Defensive gloves that allow you to negate enemy ranged attacks. | ||
 Boots Boots |
Excellent shoes for applying Reverbation. However, if you have a Cleric or other |
|
| One of the best boots, giving a total advantage for movement on difficult surfaces. It also gives |
||
| Gives additional protection against being Prone. | ||
 Amulet Amulet |
Excellent amulet which improves |
|
| A good amulet that allows restoring level 3 or lower spell slots. This way you could get additional sorcery points. | ||
| A good amulet to obtain mobility via Misty Step. | ||
 Rings Rings |
Gives defensive bonuses to Armour Class and Saving Throws. | |
| Allows Casting invisibility for free once per long rest. | ||
| Bonus thunder damage to thunder spells works with 5 Reverbation stacks from |
Level 6 - reflective damage setup
| Slot | Item | Description |
|---|---|---|
| Melee (One-Handed) |
This is a great staff, both for hitting to apply |
|
| If you don't have a cleric who can use this sword, I would then equip it using |
||
| Ranged |
Gives bonus initiative, allowing one to go earlier in combat | |
| Equip two of these so that you can attack with your bonus action. This is an amazing weapon as you can use a bonus action to break water bottles to apply wet. | ||
 Shield Shield |
The goal here is to remove any critical hit chances so that you have better survivability. | |
| Head |
Improves movement speed, which means that you can provoke more Attacks of Opportunity. | |
| This helmet works the other way around; it reflects damage when enemies miss you. So it's not the best pick, and better used on a full-fledged cleric. | ||
| Armor |
In terms of damage reflection, this armor is the simplest pick and works against two enemy types that you meet in Act 1 and Act 2. | |
| I would say this is the best robe in Act 1. Once you are level 6-7, you can start reflecting damage as an Abjuration Wizard, and this armor allows using |
||
| Reduces incoming damage, but does come with high Armour Class, which would reduce the enemy's hit chances. | ||
| Gloves |
I love these gloves as they pair well with |
|
| If you do melee attacks with your weapon, these gloves are excellent for that, as they will debuff your targets. | ||
| Boots |
All of these boots will help you walk freely on Ice. The |
|
| These can be a great boot choice, especially as you will use |
||
| Amulet |
In case you reach |
|
| Restore up to a level 3 spell slot. Can be unequipped after use. | ||
| Gives mobility improvement thanks to the |
||
| Rings |
Amazing ring that allows moving longer distances. | |
| Reduces lightning damage received, especially useful to combo with |
Act 2 - mid-game
| Slot | Item | Description |
|---|---|---|
| Melee (One-handed) |
- | Weapons from the previous Act. |
| Ranged |
Amazing bow that allows to precast |
|
| Shield |
This gives you |
|
| Gives bonus Spell Save DC, which is amazing for better success when casting spells. | ||
| To effectively use this shield, you need to get |
||
| Head |
If you are more inclined for spellcasting maybe using scrolls, I would go with this, as it improves spell success chance. | |
| This hat can apply additional |
||
| Cloak |
The best cloak in terms of damage reflection | |
| Armor |
For Act 2, this is hands down the best armor for reflection damage. There are plenty of undead enemies that will gladly enjoy this reflected damage. | |
| Another option for armour to stack |
||
| Gloves |
As you are a caster at the core, you can use melee attacks with |
|
| With |
||
| Boots |
- | The Act 1 boots that give |
| Amulet |
Gives mobility improvement thanks to the |
|
| Can be used to restore spell slots, and unequip after that. | ||
| Rings |
This ring can do nice reflection damage as it procs on |
|
| Equip this ring and allow a party member to cast |
||
| Still a good ring for better movement distance. | ||
| An option for creating ice fields. This does give some control options, but enemies that are |
||
| While obscured (which happens when standing in shadows) you get a bonus armor class for survivability. |
Act 3 - Final Build setup
This is the last act of the game, where you will get access to the most powerful items. To get them as early as possible, you will need some planning, but overall, it should not be a problem.
Here you have a few weapon setup options:
- Main hand weapon -
 Markoheshkir,
  Phalar Aluve, etc. with a shield in the offhand
 - Dual wielding with
 Dual Wielder feat - Markoheshkir + Phalar Aluve or Phalar Aluve +
  Rhapsody, etc.
| Slot | Item | Description |
|---|---|---|
| Melee (One-Handed) |
(BiS) |
The best staff for a spellcaster. Even though the build maximizes reflective damage, you are still a full spellcaster wizard, which can utilize spells like |
| Another spellcaster weapon alternative with Spell Save DC boost and access to |
||
| This can be worn both as |
||
| The Act 1 staff is still relevant. In case you do occasional |
||
| Melee (Off-Hand) |
Offhand weapon with Scarlet Remittance effect for substantial spellcasting boost. | |
| Shield |
Allows stacking |
|
| Ranged |
(BiS) |
Gives a big boost to the initiative, guaranteeing that you can go first. However, you will need to get Longbow proficiency from race. |
| Head |
You can use the helmet together with |
|
| The hood gives solid +2 Spell Save DC, greatly improving spell success chance. | ||
| Cloak |
Easy source of reflective damage, which will also proc some other damage riders like |
|
| Armor |
The best reflective armor | |
| While using this armour, you have a source of |
||
| Just a pure caster alternative to better land those spells. | ||
| Gloves |
These can work together with |
|
| Another option in Act 3, also gives a level 3 |
||
| Very good gloves, but might be contested by other builds, specifically martial ones. | ||
| Boots |
(BiS) |
Gives better movement mobility and ignores various surface effects. |
| Continues to be one of the best boot options. | ||
| Amulet |
This amulet not only improves your survivability but also makes it easier to concentrate on spells. Another underlying reason is |
|
| The +2 Spell Save DC is a huge boost, giving a large success improvement for spells. | ||
| Restores up to level 6 spell slots. After using it, you can unequip it for another amulet. | ||
| Rings |
The best ring in terms of damage. It stacks multiple times with various reflection effects. | |
| This is the only ring that gives a bonus Spell Save DC. This may be a bug that might be patched in the future. | ||
| Can be used to activate |
||
| The ring is still a solid choice to maintain optimal Armour Class. | ||
| Equip this ring and allow a party member to cast |
Build Mechanics
In this section, I would like to dive deep into how to play the Abjuration Wizard. This will help you utilize it to the fullest and correctly use various actions and spells throughout the game.
Important Mechanics and Combos
Let's go through key mechanics and tips on how to effectively use the build.
Effectiveness of Arcane Ward
The main selling point of the Abjuration Wizard is its ![]() Arcane Ward. You can easily stack it up, by casting Abjuration spells:
Arcane Ward. You can easily stack it up, by casting Abjuration spells:
- Shield - sadly, this doesn't give Arcane Ward, but maybe in the future it will be fixed.
 Arcane Lock - a perfect spell to build up stacks via locking nearby containers.
 Protection from Evil and Good
- Armour of Agathys
 Glyph of Warding
 Counterspell
- etc.
The level of the spell you cast will determine how many stacks you get. The stack amount cannot go above twice your wizard level. So you can obtain stacks naturally throughout the combat, or prepare yourself in the camp. You can also use scrolls like ![]() Scroll of Arcane Lock,
Scroll of Arcane Lock, ![]() Scroll of Glyph of Warding, etc., to save spell slots. Probably you will collect plenty of these, so that's a great way to use them.
Scroll of Glyph of Warding, etc., to save spell slots. Probably you will collect plenty of these, so that's a great way to use them.
Now, how does this all work? Imagine you have 5 stacks of ![]() Arcane Ward. The enemy hits you for 7 damage. The damage is reduced 7-5=2. And you also lose 1 stack. Now you receive only 2 damage and have 4 stacks left. Pretty neat?
Arcane Ward. The enemy hits you for 7 damage. The damage is reduced 7-5=2. And you also lose 1 stack. Now you receive only 2 damage and have 4 stacks left. Pretty neat?
If you are lazy and want to always have ![]() Arcane Ward running, you can get infinite stacks via the Arcane Ward stacking trick.
Arcane Ward running, you can get infinite stacks via the Arcane Ward stacking trick.
Understanding Damage Reflection
The build is tanky in itself, due to the ![]() Arcane Ward mechanic. However, another major selling point is its ability to reflect damage. This can get to very high numbers, while you only receive 0 damage.
Arcane Ward mechanic. However, another major selling point is its ability to reflect damage. This can get to very high numbers, while you only receive 0 damage.
Remus71 goes much deeper into these reflection mechanics, if you are interested in reaching ridiculous numbers.
Here are the main sources of improving reflective damage:
- Armour of Agathys - the main source that you will use. It will also help stack Arcane Ward stacks. Always cast the highest spell slot. Damage is 30 or 60 if the enemy is Wet with a level 6 spell slot.
 Fleshmelter Cloak - reflects acid damage for 1d4
 Fire Shield, any version, will reflect damage, but you want the
  Fire Shield: Chill - 2d8 ice damage, which gets doubled with Wet.
 The Oak Father's Embrace - excellent Act 1 and 2, armor option against undeads and monstrosities with 1d6 radiant damage
 Bonespike Garb - uses constitution modifier as the damage basis that you reflect.
So all of these are damage sources from reflection. You can take this a step further, and apply even more damage to each of these sources:
 Callous Glow Ring - 2 radiant damage
- Phalar Aluve - the
 Phalar Aluve: Shriek effect gives the 1d4 thunder rider
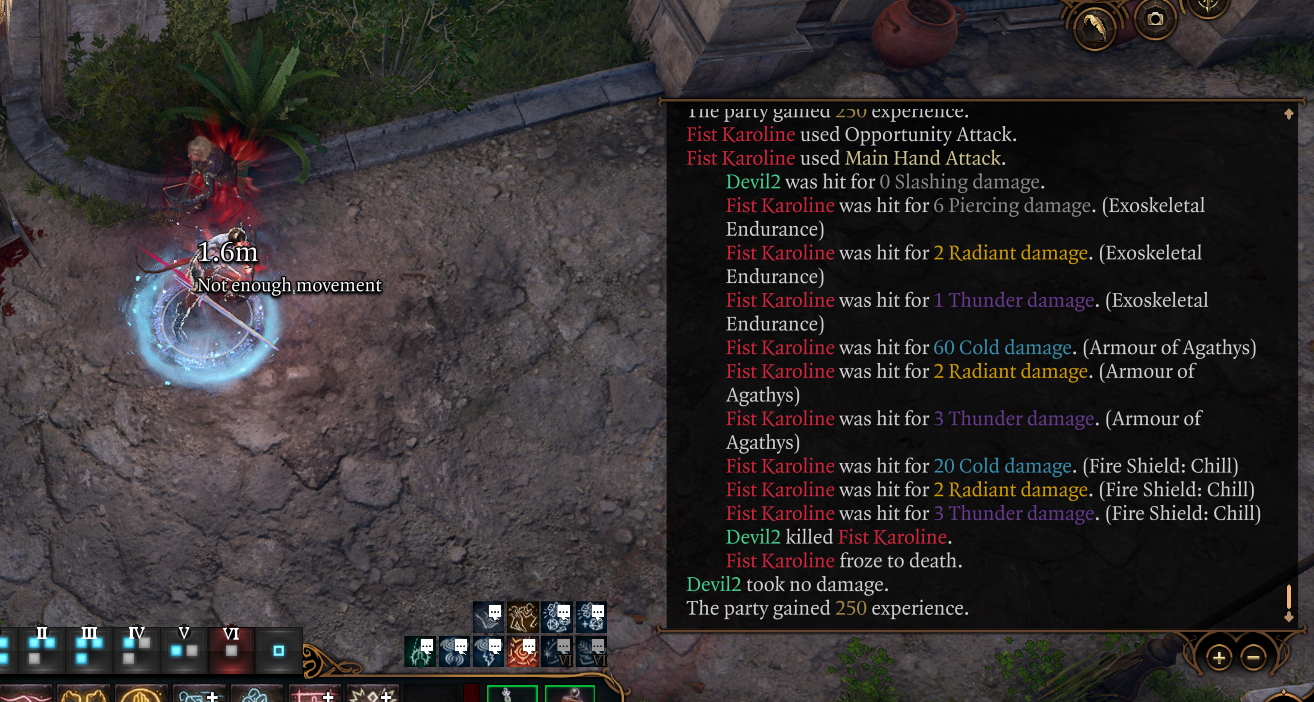
As you can see, the results speak for themselves... and this is just from the attack of opportunity
Ranged attack problem
So the main problem with this build is that Ranged enemies can chip away your ![]() Arcane Ward stacks. Sadly, the damage does not get reflected, and ranged enemies still attack even if the damage will be 0.
Arcane Ward stacks. Sadly, the damage does not get reflected, and ranged enemies still attack even if the damage will be 0.
The main solution I found is either to let your allies take care of them or move in close to those ranged enemies. They will be forced to move, which will allow you to proc Attack of Opportunity.
Another option is to use control spells like ![]() Glyph of Warding: Sleep or
Glyph of Warding: Sleep or ![]() Hypnotic Pattern to disable them.
Hypnotic Pattern to disable them.
Baiting enemies with an Attack of Opportunity
The main problem this build has is that enemies might not attack you even if you are a perfect target. For example, if you have very high ![]() Arcane Ward stacks, they will usually just skip their turns instead of receiving damage from
Arcane Ward stacks, they will usually just skip their turns instead of receiving damage from ![]() Armour of Agathys reflect.
Armour of Agathys reflect.
Of course, you still want to maintain some Concentration spell if you are with a group. This way you are still an attractive target, but again, most likely, enemies will go for other targets.
How to solve this? Well, Attack of Opportunity can be used to provoke enemies to attack you on your turn. This means that if there are 4 enemies, each of them can hit you at least once (2 if dual-wielding).
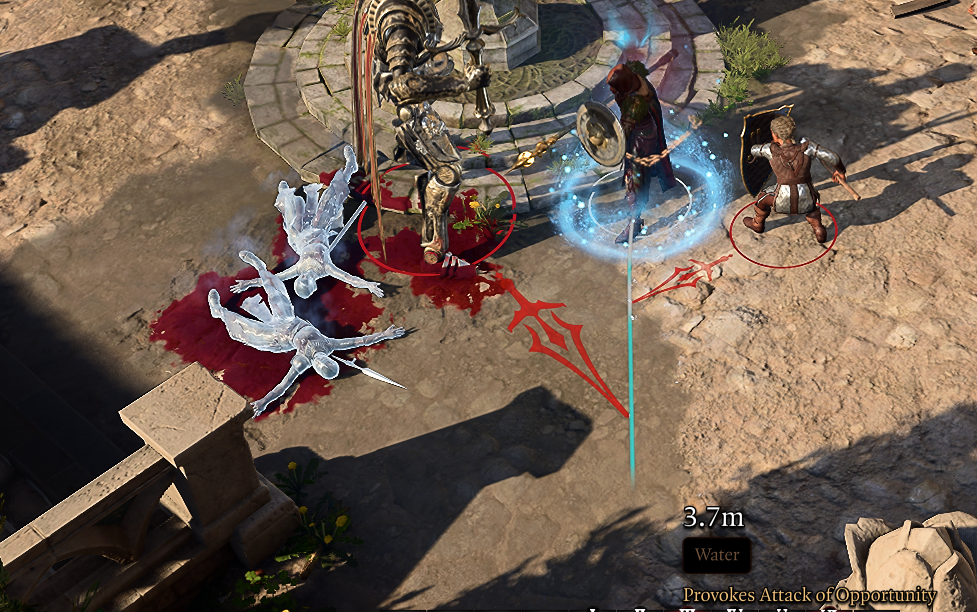
After this, the enemy starts attacking you, and you will reflect damage with all the reflective damage bonuses you have
Maintain a low Armour Class
So once you start using the reflective damage setup at about level 6, your goal is to maintain pretty low Armour Class. The main reason is that you want to be an attractive target for foes and they would not need high rolls to hit you.
My recommendation:
- Act 1 - 13-15 Armour Class
- Act 2 - 14-16 Armour Class
- Act 3 - 15-18 Armour Class
These are my recommendations. You still want to have it somewhat decent, as there are enemy archers, and they could just chip away at your ![]() Arcane Ward if all attacks land.
Arcane Ward if all attacks land.
Although your goal is to get hit you can cast Spells
This abjuration Wizard build objective is to get hit so that you would reflect Cold damage from ![]() Armour of Agathys. However, this should not stop you from preparing and casting spells.
Armour of Agathys. However, this should not stop you from preparing and casting spells.
As a Wizard, you have access to some really powerful spells that can just mop the floor with enemy bodies. You will already be applying ![]() Wet for damage reflection, so following up with
Wet for damage reflection, so following up with ![]() Lightning Bolt or
Lightning Bolt or ![]() Cone of Cold can obliterate groups of enemies.
Cone of Cold can obliterate groups of enemies.
Getting damage Resistance
So even though you have ![]() Arcane Ward to remove damage, some of it can pass through, and this means it will eat away your temporary HP used for
Arcane Ward to remove damage, some of it can pass through, and this means it will eat away your temporary HP used for ![]() Armour of Agathys. This is a problem, and you want to reduce the chances of any damage passing to HP. Here are the main ways of getting resistance:
Armour of Agathys. This is a problem, and you want to reduce the chances of any damage passing to HP. Here are the main ways of getting resistance:
 Warding Bond from another cleric
 True Love's Caress + True Love's Embrace for Warding Bond if you don't have a cleric
 Blade Ward either cast it yourself or from an ally
 The Reviving Hands +
  Helm of Balduran/
 Ring of Regeneration/healing potions
 Force Conduit from
  Swires' Sledboard.
All of these will give some damage resistance, which will further improve your survivability and how long you can sustain your Temporary HP.
Wet + Lightning and Cold Spells
I think this is the most important mechanic to learn in Baldur's Gate 3 for a caster. It is very easy to set up and can guarantee you easy wins for most encounters.
The first step is to apply water. Here are some options for how to do that:
- Have a Cleric, Druid, or yourself cast Create or Destroy Water
- Throw
 Water or drop it and have it destroyed by the enemy's feet.
 - Have
 Conjure Elemental: Water Elemental to hit with its main attack and apply
  Chilled for cold vulnerability.
Once the enemy is wet, they will become vulnerable to Ice and Lightning damage. This means you deal double the amount. After this, follow up with your favorite spell - ![]() Chain Lightning,
Chain Lightning, ![]() Lightning Bolt,
Lightning Bolt, ![]() Cone of Cold, etc.
Cone of Cold, etc.
Early Game Combat - before Reflect setup
This covers how to play before you get at least 4 levels of Abjuration Wizard for ![]() Arcane Ward stacking and damage reduction
Arcane Ward stacking and damage reduction
- Very early in the game, you will not have many big damage-dealing spells.
 Sleep is an effective option for dealing with single targets. Use this until level 4-5.
 - Start with
 Magic Missile for early combat. It becomes very effective after obtaining
  The Spellsparkler. Overall, you should use it if you want a guaranteed finish of the enemy or multiple enemies with a few HP.
 - If out of spell slots, use anything that you have, until long rest - cantrips, melee attacks, etc.
 Cloud of Daggers is a very effective damage spell at level 3. Use it to hit multiple enemies multiple times.
- Wet status from Create Water or Water Bottle + Lightning Bolt almost guarantees a win in the encounter. You can do this from level 5.
- Glyph of Warding can be used to put multiple enemies to
 Sleeping. This is especially effective if you know that your other area of effect spells will not be enough to effectively damage targets.
  Hold Person is a great spell, but I only recommend using it if you have an 80% success chance; otherwise, it is not worth risking the whole action point.
Reflect Setup and Combat
The Abjuration Wizard's full effectiveness comes online at about levels 6+. This is when you can maintain a good amount of ![]() Arcane Ward to reduce incoming damage and reflect back
Arcane Ward to reduce incoming damage and reflect back
- At the start of the day, cast Armour of Agathys to build Arcane Ward stacks and enable the damage reflection.
- You should precast Fire Shield: Chill before combat, as this will save an action point.
- I would also cast
 Light on myself so that Callous Glow Ring would easily proc.
 - Apply Create Water on enemies so that your reflected cold damage would be doubled.
- If the encounter seems to be overwhelming, with lots of enemies, use
 Sleet Storm to disable groups of foes.
 - You can still use melee attacks, especially in Act 2. Use Booming Blade +
 Elixir of Hill Giant Strength, which will inflict decent damage if you want to save spell slots for spellcasting.
 - Use Phalar Aluve and apply Phalar Aluve: Shriek for more damage, both yourself and your allies.
- Go in and provoke enemies for Attacks of Opportunity, until you are out of movement speed.
- Once all of them have been provoked, you can use spells like Lightning Bolt or
 Cone of Cold to finish them off or inflict more damage.
 - Conjure Elemental: Water Elemental is pretty good and can apply Chilled, which doubles cold damage from both spells and Armour of Agathys.
Conclusion
Thank you for reading the Abjuration Wizard build - Ultimate Tank for Baldur's Gate 3. This guide will help to make this Ice wizard effective in combat and cover all the needed mechanics for the build to work.
Cheers!
Like, Dislike, comment, or share!
Join the Discussion
0 commentsNo comments yet.
Be the first one to leave a comment!