
Best Shadowheart Build - The Maiden of Choice - Baldur's Gate 3 (BG3)
Contents
- The Maiden of Choice - Shadowheart Build
- Build Overview
- Synergy with other builds
- Level 1 - Character Creation
- Act 1 - Levels 2-6 - Wilderness
- Act 1.5 - Level 7 - Rosymorn Monastery
- Act 2 - Level 8-10 - Shadow Lands
- Act 3 - Level 11-12 - Rivington and Lower City
- Maximizing the Build - Abilities, Illithid, Consumables
- Conclusion and Credits
The Maiden of Choice - Shadowheart Build
For a pretty long time, I wanted to make a powerful cleric build for Shadowheart. She is one of the "must-have" companions for many people. Moreover, she is a major star both storywise and in character development. So I wanted to make a truly great cleric build specific to her. The build name also somewhat implies her importance to the whole game story, and oh boy, is it impactful!
I also leave the build open to various paths. I do not want to spoil anything, but depending on how you play, you may feel inclined to go with different cleric subclasses, and that's fair. So the core of the build does not depend on the subclass. This will work well with anything, be it Knowledge Domain, Light Domain or even Trickery. This is a flavour that you can choose.
Of course, as always, for cleric build, ![]() Spirit Guardians plays a vital role. If you want to avoid this spell, and maybe go for something more unorthodox, check out the Life Cleric Build - Life Fortress, which can also be used by Shadowheart, and takes more of a "Protector" approach.
Spirit Guardians plays a vital role. If you want to avoid this spell, and maybe go for something more unorthodox, check out the Life Cleric Build - Life Fortress, which can also be used by Shadowheart, and takes more of a "Protector" approach.
Another addition is the Druid, this kinda resembles her peculiar relationships with animals, which is one of her weak points. Of course, to also be a strong build, I pick Stars subclass, which enables ![]() Starry Form: Dragon, with a very powerful feature set. The main one would be
Starry Form: Dragon, with a very powerful feature set. The main one would be ![]() Dazzling Breath and fixed minimum Constitution Saving Throw roll at 10. This might seem like not much, but once you see, that its almost impossible to lose
Dazzling Breath and fixed minimum Constitution Saving Throw roll at 10. This might seem like not much, but once you see, that its almost impossible to lose ![]() Concentration, you will have no fear standing on the frontlines.
Concentration, you will have no fear standing on the frontlines.
I think this build is perfect for those who want a customizable yet very powerful Shadowheart build
Following the guide and a few tips:
- Build Overview covers the quick aspects and choices for the build - gear, levelling, etc.
- The progression by Acts cover the build in great detail, from spell selection to how utilize various features. Be sure to check the equipment sections for gear options and explanations. The mechanics section explains how to fully utilize the build in combat
- I also added an additional section for build maximizing like consumables, illithid powers and others. This can help to make the build even more powerful and optimised if needed.
Let's go!
Class Contribution
The build consists mainly of 2 classes:
10 Cleric
The main class of the build:
- Proficiencies in a wide array of armors and weapons.
- Access to support spells like
 Healing Word,
  Mass Healing Word,
  Sanctuary, etc.
  Aid to empower the ally's survivability with a solid HP boost each long rest.
- Can apply wet status for other casters with
 Create or Destroy Water, helping to make enemies vulnerable to Lightning and Cold damage.
  Spirit Guardians - the ultimate cleric spell, to debuff enemies, making them miss their attacks. To make the most out of it, you will need some gear.
- A solid list of cantrips -
 Thaumaturgy,
  Toll the Dead, etc.
  Divine Intervention - a nice addition for that "oh shit!" moment, once per playthrough
2 Stars Druid
- Enables effective melee weapon hits with
 Shillelagh.
  Starry Form: Dragon gives a huge boost to constitution saving throw rolls, making it very hard for you to lose spell
  Concentration.
 Dazzling Breath - area of effect radiating attack that applies debuffs.
Build Variations
As with all characters, you can set up any kind of build for Shadowheart. So you are not limited to just this one. Let me give you a few examples of other setups:
| Setup | Description |
|---|---|
|
This is a very similar variation to this build. The main difference is that you get Sorcerer, which you will want to take as a first level (usually via respeccing). Sorcerer gives |
|
This variation is I would say for more advanced players. We sacrifice higher level spells from Cleric, but instead this unlocks Metamagic. This is an extremely powerful mechanic that has effects like |
|
This build is more relevant once you reach a "certain story point" in Act 2, and take a specific decision. Will not spoil anything, but the build uses a key item - |
Selune's Silverstar Build:
|
This build uses |
Build Overview
Here is a concise table with all the main picks during your levelling progression. For more detailed reasoning, I go further in the article. Also, do not forget to check the recommended gear, as it is crucial.
This is a general overview of the build that contains item and leveling choices. I go deeper into the setup, combat approach and gear selection reasons for the progression of each act.
Leveling
| Level | Class | Selection |
|---|---|---|
| 1 | Cleric 1 | Cantrips: |
| Subclass: Trickery Domain or any other | ||
| Abilities: STR - 8, DEX - 16 (15+1), CON - 14, INT - 8, WIS - 17 (15+2), CHA - 8 | ||
| Skills: Medicine, Persuasion, Insight | ||
| 2 | Cleric 2 | - |
| 3 | Cleric 3 | - |
| 4 | Cleric 4 | Feat: Ability Improvement - +1 Wisdom, +1 Constitution |
| 5 | Cleric 5 | - |
| 6 | Cleric 6 | - |
| 7 | Druid 1 | Cantrips: |
| 8 | Druid 2 | Subclass: Circle of Stars |
| 9 | Cleric 7 | - |
| 10 | Cleric 8 | Feat: Ability Improvement +2 Wisd, |
| 11 | Cleric 9 | - |
| 12 | Cleric 10 | Cantrips: Any |
Gear Choices
Build ID: 3626
Mode: Paper Doll
Sets: Act 1, Act 2, Act 3
Synergy with other builds
This type of build for Shadowheart is very powerful and I think there are only a few limitations where it has negative synergy. One of the core things is that you can switch up the subclasses, depending on what you need or want to roleplay.
So feel free to use any build you like. I will list out a few options, and caveats that you might like to know, if you really want to utilize the build to the MAX.
Shadow Blade users
So ![]() Shadow Blade gives and easy source of
Shadow Blade gives and easy source of ![]() Advantage if you are fighting in
Advantage if you are fighting in ![]() Lightly Obscured areas. This is a very powerful boost. The main anti synergy is that clerics with
Lightly Obscured areas. This is a very powerful boost. The main anti synergy is that clerics with ![]() Spirit Guardians will apply
Spirit Guardians will apply ![]() Radiating Orb which illuminates the area around it. This means that you lose the
Radiating Orb which illuminates the area around it. This means that you lose the ![]() Advantage.
Advantage.
Is this a big problem? Not really! ![]() Shadow Blade does not need feats like
Shadow Blade does not need feats like ![]() Great Weapon Master: All In and
Great Weapon Master: All In and ![]() Advantage is easily obtained from other sources like
Advantage is easily obtained from other sources like ![]() Prone, which cleric has an easy way of applying.
Prone, which cleric has an easy way of applying.
So feel free to use those ridiculously overpowered builds like Bladesinger, Eldritch Hexknight, etc.
Lightning/Cold Party
A cleric can easily apply ![]() Wet on enemies using
Wet on enemies using ![]() Create or Destroy Water spell. This does impede your own action economy, but opens up your party members for huge damage potential:
Create or Destroy Water spell. This does impede your own action economy, but opens up your party members for huge damage potential:
- The main highlight would be Land Druid. A very popular variation of it is Thundersnow Herald, which comes with both Cold and Lightning spells for total annihilation.
- Sorcadin with access to
 Lightning Bolt.
 - Many of the Sorcerer and Wizard variations - Storm Sorcerer, Talos Dragonling Build, Cold Sorcerer, Abjuration Wizard, etc.
Melee Builds
A cleric with ![]() Spirit Guardians and
Spirit Guardians and ![]() Dazzling Breath can make enemies harmless to most of the party thanks to the
Dazzling Breath can make enemies harmless to most of the party thanks to the ![]() Radiating Orb and
Radiating Orb and ![]() Reverberation which results in
Reverberation which results in ![]() Prone. So any frontliners, get easy source of
Prone. So any frontliners, get easy source of ![]() Advantage and can easily avoid enemy attacks. Here are a few recommendations of builds that you can use:
Advantage and can easily avoid enemy attacks. Here are a few recommendations of builds that you can use:
- Paladins - Sorcadin, Oathbreaker, Ancients, etc
- Fighters - Eldritch Hexknight, Battlemaster, etc
- Others - Open Hand Monk, Bardadin, Hexblade, etc.
Level 1 - Character Creation
This section covers the creation screen and what would go into the best Races, Abilities, and Skills for the Shadowheart build. If you have already started playing or using this on your companion, feel free to do a respec at Withers and follow along. This will make it easy not to miss out on anything that the build needs.
Races
As this is Shadowheart setup, the race is picked by default:
| Race | Features | Description |
|---|---|---|
 High Half-Elf High Half-Elf |
|
This is the default race, that Shadowheart starts. It is a decent pick and allows choosing an additional cantrip. |
High Elf Cantrip
If you have Shadowheart as a companion you will not be able to choose a different cantrip besides ![]() Fire Bolt. If you take her as an origin character here are my suggestions:
Fire Bolt. If you take her as an origin character here are my suggestions:
| Cantrips | Description |
|---|---|
| This is an excellent pick for the main character as |
|
| This is a very powerful cantrip that can trivialize a lot of encounters. If you have Trickery domain, you can use |
|
| This summon is useful in some combat encounters as you can make it throw items. Moreover, it can shove foes giving additional offensive action to the group. |
Class Choices
This section will cover what class-related choices you should pick for the optimal setup
Class
| Overview | |
|---|---|
 Cleric Cleric |
|
| Clerics are representatives of the gods they worship, wielding potent divine magic for good or ill. | |
| Features | |
 Spell Slots Spell Slots |
These can be used to cast spells and are restored each long rest. |
| Unique spell list accessible based on your cleric subclass. | |
Cantrips
| Cantrips | Description |
|---|---|
| The main damage cantrip of clerics deals radiant damage. Early in the game, it is underwhelming, due to low Spell Save DC, but later it can be a decent option when you are saving spell slots. | |
| Especially recommended if you are the main character as it will help with Intimidation checks. | |
| For now, take this with cleric, later on it can be switched out, once you get Druid multiclass. |
Another good option can be ![]() Produce Flame as an alternative to
Produce Flame as an alternative to ![]() Thaumaturgy.
Thaumaturgy.
Subclass
This is one of the usual problems for Shadowheart. She starts with Trickery Domain, which people say is usually "the worst". It's not, all cleric subclasses are powerful, and just the core of the cleric class is already a very powerful kit.
If you are starting from Character creation, leave the Trickery domain. If you wish, you can change it later on via respeccing at Withers. If you are respeccing Shadowheart, feel free to pick your preferred subclass
I personally will stay with Trickery Domain, as I want to keep the vanilla option on her. There is an important section in the story where changing her subclass will feel relevant.
| Overview | |
|---|---|
 Trickery Domain Trickery Domain |
|
| Features | |
| Gives an |
|
| Gives an |
|
| More of a roleplaying spell that can help avoid various situations or pass racial dialogues. For example, Drows have special choices and an easy way to pass through fights in Act 1. | |
Of course, if you decide to go with any other cleric subclass, here is short overview of why each of them are attractive. Each of them offers a slightly different spin on the cleric:
| Subclass | Description |
|---|---|
| A powerful subclass that offers access to a plethora of Fire spells - |
|
| The storm variation offers various features related to lightning and thunder elements. The biggest highlight is |
|
| A new subclass that offers feature-stacked early levels and, to be fair, a nice flavour of necromancy. |
|
| A flavourful and enjoyable subclass with a nature theme. It gets access to plenty of features. From the start, you can be one of the strongest melee hitters thanks to |
|
 Life Cleric Life Cleric |
One of the more controversial subclasses. It's goal is to maximize healing, which by itself sounds nice. Sadly, it does drain you of important resources - actions, that can be used to weaken or even kill foes. Still, when the whole party needs healing |
| A powerful level 1 dip, but as a full class it has much to ask for. It does serve well as a buffer for your martials with |
|
| This is fully roleplay option, that gets a ton of skill proficiencies. Still, it also get's cool control spells - |
|
 Trickery Cleric Trickery Cleric |
In correct hands, this is a very powerful subclass. You gain 2 actions - |
Prepare Spells
Clerics get plenty of good level-1 spells. You might not have enough slots to equip them all but don't worry, more will be available as you level up. Choose your preferred ones.
| Spells | Description |
|---|---|
| The main, long-range damage spell for the cleric in the early game. | |
| Excellent spell to keep on hand. It can be useful when allies will cast Cold or Lightning spells to double their damage. | |
| If enemies are close to you, this is the go-to spell, which a strong damage rolls. It can also crit, inflicting even more damage. | |
| One of the best control spells in the game, if you have a high chance of landing it. What makes it special is that it does not use a |
|
| Use this spell to make the ally untouchable, for example, if they have low HP, or you want to divert the enemy's attention. | |
| The best healing spell, due to its cheap cost and ability to revive downed targets without wasting action points. Moreover, later with |
|
| This is an excellent spell, for the very early game, until you obtain |
Background
Backgrounds are mostly for role-playing and you can pick whatever you prefer. However, as Shadowheart, you will start with Acolyte, which cannot be changed.
Abilities
Now, let's take a look at the abilities of the Shadow Sorc build. Correct allocation will allow you to maximise the early gameplay and get good modifier bonuses.
Here are some key points to know about ability points:
- They give "ability modifiers" that apply to various skill checks. For example, Charisma works on Intimidation and persuasion checks. Wisdom on Survival or Animal Handling, and so on.
- You get a higher ability modifier on even values - 10, 12, 14, etc. So keeping it on odd may be useless. However, there are various +1/2 modifiers in the game, specifically
 Auntie Ethel's Hair or Feats that help round this up.
 - Weapons can benefit from either Dexterity or Strength, depending on their type
- You also have a spellcasting modifier, which can be Wisdom, Charisma, or Intelligence, depending on your class.
Build ID: 3626
Skill Proficiencies
Overall, the skills should be impacted by your roleplaying and background decisions. However, you would still want those stats which will give you the best benefits. For Shadowheart, there are not many choices, so I would go with these:
- Medicine
- Persuasion
- Insight
Act 1 - Levels 2-6 - Wilderness
By this time, you should have landed on the ![]() Ravaged beach already and started exploring the initial area. You might need 1 additional encounter if you did not obtain enough XP in the Nautiloid.
Ravaged beach already and started exploring the initial area. You might need 1 additional encounter if you did not obtain enough XP in the Nautiloid.
Leveling Progression
Level 2
| Action | Description |
|---|---|
| Excellent against undead enemies, making them run away. | |
| A useful talent that can draw enemies' attention but also gives an easy way to obtain an |
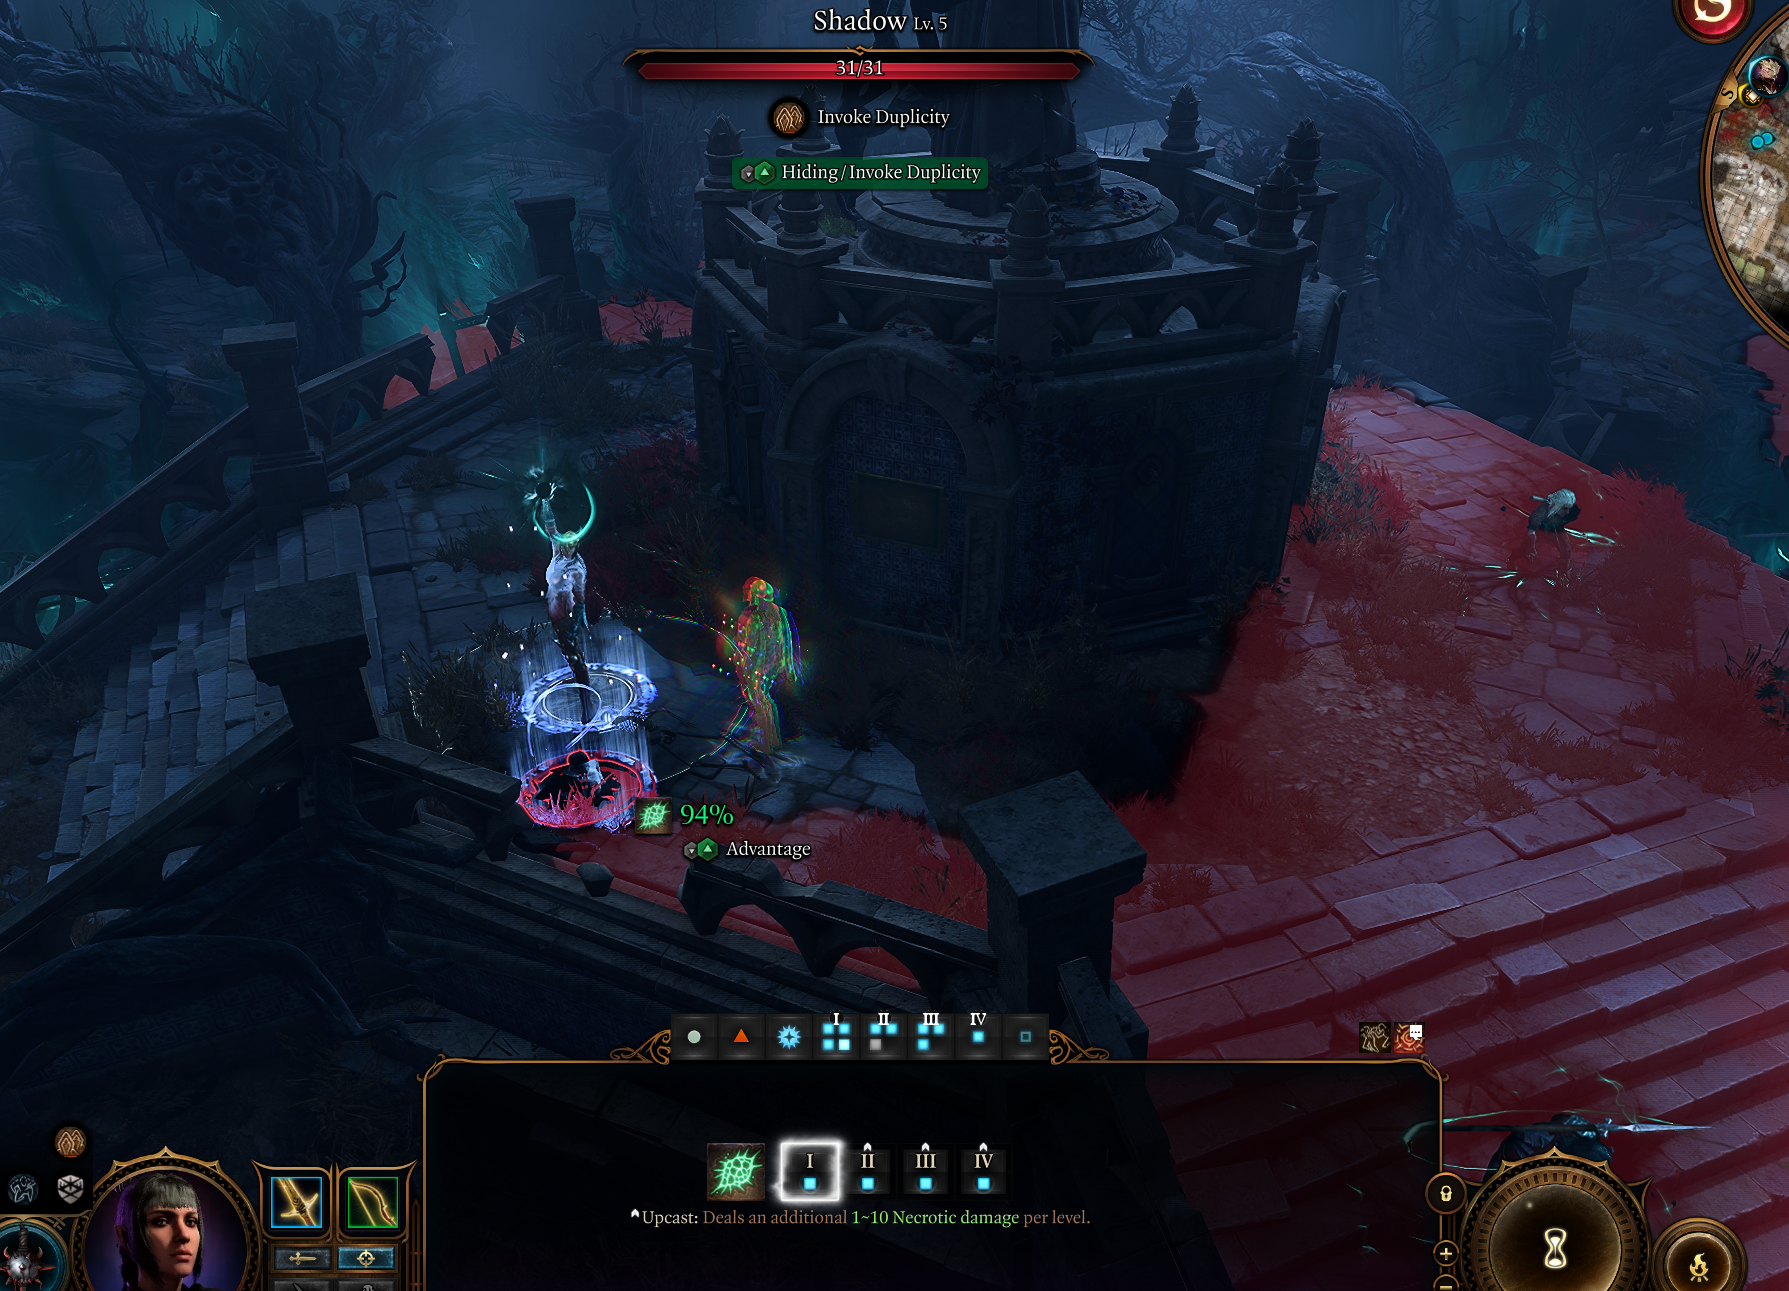
Invoke Duplicity to help with attack rolls
One of the core mechanics that Trickery Domain unlocks is ![]() Invoke Duplicity. This is especially useful in the early game if you have melee martials like Fighter or Paladin. The created illusion enables an easy source of
Invoke Duplicity. This is especially useful in the early game if you have melee martials like Fighter or Paladin. The created illusion enables an easy source of ![]() Advantage on attack rolls. This also works with
Advantage on attack rolls. This also works with ![]() Inflict Wounds spell which is very powerful in the early game.
Inflict Wounds spell which is very powerful in the early game.
It is best to cast before combat (if you know that a combat encounter is coming) and save action points. Then you can attack with an ![]() Advantage on the initial turn.
Advantage on the initial turn.
Level 3
| Spells | Description |
|---|---|
| A truly powerful spell that can almost guarantee the avoidance of 3 attacks. This is great for improving survivability and maintaining |
|
| This can be used in tandem with other characters to give them a boost to stealth checks. You could pair this with builds like Gloomstalker Assassin, to maximize the "out of combat" ranged damage, before enemies even see you. |
There are a few good spells to keep in mind and add/remove them when needed:
| Spells | Description |
|---|---|
| Almost a mandatory spell to have by someone in the group. This can help with various ability checks and turn the tables to your side. | |
| An excellent spell that gives a flat health boost to all party members, even summons, depending on the spell slot level used. In the late game, this can result in hundreds of additional HP applied to all party members. | |
| Excellent spell, that you can use to greatly improve the survivability of one of your party members. However, it does overlap with |
|
| Can be situationally useful, especially if you have an 80%+ chance to land it. This then opens up an easy way for |
|
| This is an excellent spell as it does not use |
|
| Gives a good use for bonus action. The weapon deals okay damage and can act as a distraction. | |
| I recommend being aware that you have this spell, as there are situations where it might be useful. It does not have to be always in the prepared spell list. |
Level 4
Cantrips
| Cantrip | Description |
|---|---|
| It can be used to light the area around you, but also deals 1d8 fire damage. This is a good cantrip to have on hand, especially if enemies have high Wisdom and |
Here is what I recommend for the feat
| Feat | Description |
|---|---|
| Ability Improvement - +1 Wisdom, +1 Constitution | Improves spellcasting and Constitution for better concentration on spells. |
Effectively choosing cantrips
One trick that I first missed is correctly choosing which cantrip to use. This is more important early in the game, as later, it's easy to get a high success chance. The idea is that some spells like ![]() Bone Chill use attack rolls, and
Bone Chill use attack rolls, and ![]() Toll the Dead/
Toll the Dead/![]() Sacred Flame target enemy saving throws.
Sacred Flame target enemy saving throws.
What this means is that enemies that have low armour class are better targets for attack roll spells. However, if the enemy has a low target saving throw stat (Wisdom, Charisma, etc.), you are better off using spells that use Saving throws
As you can see, the difference can be huge. So, try to use the one that is most appropriate against a specific enemy and their stats.
Level 5
This level is a huge milestone, and that is why no multiclassing happened before. Access to level 3 spells makes Cleric an extremely powerful build.
| Feature | Description |
|---|---|
| When you use |
The Trickery Domain subclass also gains special spells:
| Spell | Description |
|---|---|
| Can be used to weaken an enemy. However, it targets only a single foe which makes it a weak option most of the game. | |
| A truly powerful control spell that can disarm foes and force them to run away. It has a short range, so you should be close to the foes. |
Now, this is probably the most important section as you will gain some game-changing spells, allowing you to win many encounters.
| Spell | Description |
|---|---|
| This is one of the strongest cleric spells, that will be your bread and butter throughout the game. It will be used to weaken enemies using the Radiating Orb status effect. | |
| This can be useful throughout the game in case you or a party member gets cursed. | |
| You can use this Glyph to apply various damage types and effects. For example - fire, cold, lightning, etc. The main highlight is Sleep, which works on multiple enemies and can outright win you an encounter. | |
| Using this as a bonus action together with |
Spirit Guardians, the ultimate cleric spell
Now, at level 5, with access to level 3 spell slots you can learn ![]() Spirit Guardians. This spell is probably the most powerful one in the cleric spell list, enabling you to trivialize many of the game encounters. The main trick is to pair it with a few items:
Spirit Guardians. This spell is probably the most powerful one in the cleric spell list, enabling you to trivialize many of the game encounters. The main trick is to pair it with a few items:
 Luminous Armour - can apply multiple
  Radiating Orb via Radiating Shockwave
 Boots of Stormy Clamour - applies
  Reverberation on each enemy hit. Might activate only one time, as it can be inconsistent.
 Gloves of Belligerent Skies - another gloves that will give more Reverberation stacks
- Other items
So now you can become a "Radiant lawnmower" which inflicts radiating damage, weakens enemies and makes them harmless. 10 stacks of ![]() Radiating Orb is like +10 Armour class. While
Radiating Orb is like +10 Armour class. While ![]() Reverberation can result in
Reverberation can result in ![]() Prone which gives an easy
Prone which gives an easy ![]() Advantage.
Advantage.
Level 6
This is pretty big for most of cleric subclasses as you get another mainline feature unlocked:
| Feature | Description |
|---|---|
| As this is bugged, it works even without obscuring. This is a great option to be used in combat, for example, when you need to run away. Or you want to approach enemies and land a spell like |
Gear Recommendations
Here are some recommendations on how to follow the gear picks:
- I recommend checking the Item Checklists or Interactive Map, depending on which is easier to use for you. This will help you track which items and when you should pick them.
- Gear for each slot is listed Best -> Worst. Generally, this means that you would start with lower gear recommendations (as they are available earlier) and upgrade to higher ones. However, in some cases, the best items can be obtained early, like
 Titanstring Bow, and some others.
 - I mention Stat Sticks in caster and ranged builds. These are items that you do not use directly (like
 Club of Hill Giant Strength,
  Knife of the Undermountain King, The Dead Shot, etc.), but their bonuses still apply to other weapon attacks or actions.
 - If an item is taken by another character, use the one with lower priority or even those from previous acts. If you want to have the best items for all builds, this will require planning, which is not for everyone.
Build ID: 3626
Mode: Full Equipment
Sets: Act 1
Gameplay and mechanics
In this section, I would like to cover a few tips on how to use the build and add the main combat steps.
The healing items and heals
The main misunderstanding that people have about clerics, is that they should be concentrating on heals and buffs. Sadly, this is a very inefficient approach to one of the best classes in the game. The problems with healing:
- Generally, enemies will deal more damage with single attack, then the amount you heal
- Healing spells use full action point (there are alternatives, which I will cover below)
- The enemies can still attack the next turn, without being stopped
So more or less, by healing you are hiding a problematic approach to combat strategy, that you should try to find - do you lack initiative? Is the damage lacking? Maybe your party is inefficient?
Overall, healing should be limited and, in my opinion, used sparingly. My recommended spells are ![]() Healing Word and
Healing Word and ![]() Mass Healing Word. These are cheap to use and cost only a bonus action, which does not interfere with your important spells.
Mass Healing Word. These are cheap to use and cost only a bonus action, which does not interfere with your important spells.
Of course, this does not mean that healing should not be used.The two mentioned spell pair well these items ![]() The Whispering Promise and
The Whispering Promise and ![]() Hellrider's Pride. Both of them apply
Hellrider's Pride. Both of them apply ![]() Bless and damage resistance, for the affected targets.
Bless and damage resistance, for the affected targets.
So your main action is free, which you can use for spells, and bonus action buffs allies, all in one turn, without limiting your combat potential
The recommended combat loop
- For early encounters, you can use offensive cantrips like Toll the Dead,
 Sacred Flame or, if you need more damage, spells like
  Inflict Wounds or
  Guiding Bolt.
 - If you can use
 Bless to buff allies before combat. Once you get
  The Whispering Promise, you can forgo the spell and use Healing Word or Mass Healing Word instead to buff your allies.
 - Create or Destroy Water is an excellent spell if you have other casters that use Cold or Lightning spells.
- Use
 Invoke Duplicity to give an easy
  Advantage to melee combatants and significantly improve their hit chances.
 - If you have a high spell success chance
 Command can be a gamechanger.
 - Use Sanctuary for "oh, shit" moments to either protect yourself or allies.
- I recommend precasting Aid after each long rest. This can help improve the total health pool. Same for
 Warding Bond which can be applied to one or a few characters. However, it does overlap with
  Hellrider's Pride if you use them.
From level 5:
- The best option for casting at this stage is radiating Spirit Guardians + Luminous Armour + Boots of Stormy Clamour. This allows for easily debuffing multiple enemies.
 Glyph of Warding can be used to put enemies to sleep without a Concentration slot. It is excellent if you see a few of the targets grouped up.
Act 1.5 - Level 7 - Rosymorn Monastery
I will assume that you will reach level 7 as you explore the ![]() Rosymorn Monastery Trail. It has plenty of stuff to explore and some important story bits. The whole map also contains significant gear that you should be on the lookout for.
Rosymorn Monastery Trail. It has plenty of stuff to explore and some important story bits. The whole map also contains significant gear that you should be on the lookout for.
Leveling Progression
Level 7 - Multiclass into Druid Lv 1
So now we take the first multiclass. I think Druid somewhat fits her if we follow along with the story. She has an innate feature of ![]() Fear of Wolves. Naturally, one of the ways to try to overcome that is by getting closer to the animals. This is all roleplay speculation, but I leave it for you to decide.
Fear of Wolves. Naturally, one of the ways to try to overcome that is by getting closer to the animals. This is all roleplay speculation, but I leave it for you to decide.
Moreover, Druid comes with a stacked feature set, which will make the build outright more powerful, maybe even too powerful, hehe
So, now in the level-up screen, you can start multiclassing:
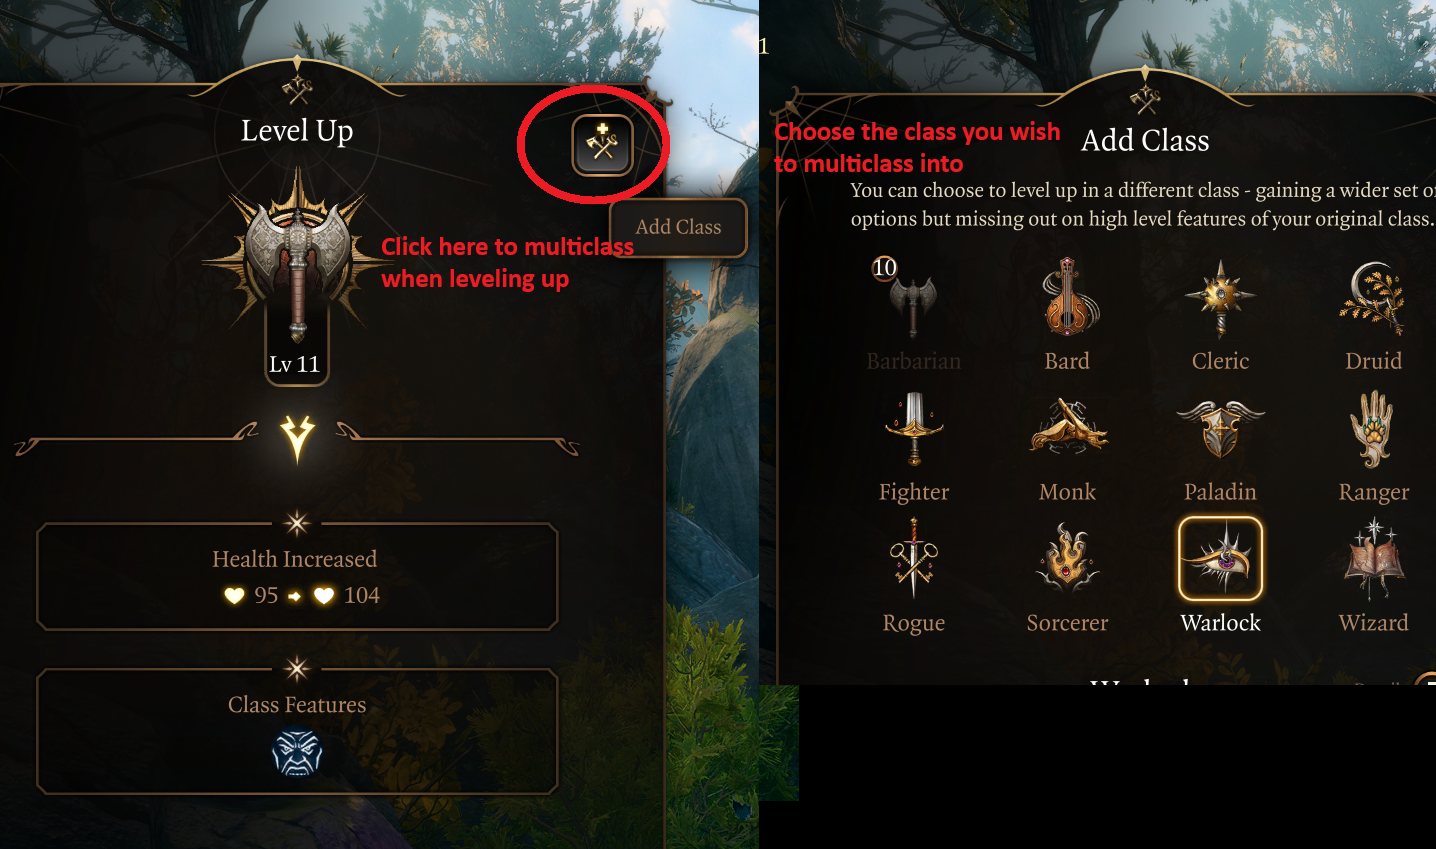
Let's go through the Druid choices now:
| Overview | |
|---|---|
 Druid Druid |
|
| Druids channel the elemental forces of nature and share a deep kinship with animals. Mastery of Wild Shape allows them to transform into beasts from all over the Realms. | |
| Features | |
| Spell Slots |
These can be used to cast spells and are restored each long rest. |
For Cantrips:
| Spells | Description |
|---|---|
| Enables you to effectively use stave weapons using your Wisdom modifier. Although not that important, you might still want to have this cantrip on hand. | |
| You can use this to pull enemies toward yourself. With |
For prepared spells, there are a few overlaps with Cleric. So, for example, you could mix and match various options, like taking ![]() Create or Destroy Water from Druid, so that you could add another spell in the cleric spell list. Here are my recommendations, for Druid:
Create or Destroy Water from Druid, so that you could add another spell in the cleric spell list. Here are my recommendations, for Druid:
| Spells | Description |
|---|---|
| Improves movement speed. It is free to cast outside of combat, and can also be used on allies. One party member should have this spell, and apply it after each long rest. | |
| Enables easier exploration via jumping long distances | |
| A decent utility spell, especially if you forget to stock up on |
|
| You can use this to push enemies from high ground, which can result in instant kills. | |
| Although you get this from cleric, you can still prepare it from Druid, so the cleric could choose another spell to include. |
Gear Recommendations
There are a couple of items that I would take a look here; otherwise, the previous Act ones are already enough
Build ID: 3626
Mode: Full Equipment
Sets: Act 1.5
Gameplay and mechanics
The recommended combat loop
No major changes here, you are still mostly relying on the same rotation with ![]() Spirit Guardians. It is now even stronger if you start using
Spirit Guardians. It is now even stronger if you start using ![]() Gloves of Belligerent Skies, while
Gloves of Belligerent Skies, while ![]() Holy Lance Helm rewards you with damage reflection and more conditions if avoiding attacks.
Holy Lance Helm rewards you with damage reflection and more conditions if avoiding attacks.
So try to provoke enemies with ![]() Opportunity Attack.
Opportunity Attack.
Act 2 - Level 8-10 - Shadow Lands
Depending on your choices, you might even reach Act 2 at level 7, so check the previous recommendations. In most cases, people will enter Act 2 via ![]() Path to Rosymorn Monastery Trail
Path to Rosymorn Monastery Trail
Leveling Progression
Level 8 - Druid Lv 2
This is a huge upgrade to the build and this level is stacked with various features:
| Overview | |
|---|---|
| Features | |
 Wild Shape Charge Wild Shape Charge |
Allows you to turn into one of the |
| Gives charges to cast |
|
| Unlocks new forms that each give different actions or bonuses. The most important one here is |
|
| Similar to a normal |
|
| The base spell from the cleric list. | |
| Gives the spell without needing to choose it as a cantrip. | |
Starry Forms
The highlight of Circle of the Stars druid is his special ![]() Starry Form. This will be the cornerstone of this build, and give a huge versatility to the build. Here is a short overview of their use cases and how powerful they are:
Starry Form. This will be the cornerstone of this build, and give a huge versatility to the build. Here is a short overview of their use cases and how powerful they are:
| Starry Form | Uses | Description |
|---|---|---|
| Close-range debuffing Concentration spell sustain |
First, the most powerful and the most used one is |
|
| Long-range debuffing | Specifically for this build, it does not provide many benefits. Generally, it could be used to provoke |
|
| Support and Buffs | This is perfect to be used with |
Level 9 - Cleric Lv 7
Trickery Cleric spells:
| Features | Description |
|---|---|
| A funny spell to use, however, as it uses |
|
| This is pretty cool spell, that gives a way to teleport. Can be useful in various combat situations and works on yourself and your allies. |
Overall, this level does not bring much, just a few optional spells that might be situationally useful:
| Spells | Description |
|---|---|
| As this spell does not use |
|
| Can be used to protect yourself or allies from dying, especially useful in Honour Mode. |
At this level, you will most likely encounter a major decision regarding Shadowheart. You will choose one of the two paths, and based on that, you could go with one of the more thematic builds:
- Evil path - you might be interested in the Dark Justiciar Build, which also utilizes the unique
 Shar's Spear of Evening for her.
 - Good Path - Selune's Silverstar build that utilizes Selûne's Spear of Night
Still, this is mainly a roleplay option, and you can continue using this build and follow along with further progression.
Level 10 - Cleric Lv 8
The last subclass features are unlocked. These are either types of Divine Strike, like ![]() Divine Strike: Elemental Fury,
Divine Strike: Elemental Fury, ![]() Divine Strike: Necrotic, or just
Divine Strike: Necrotic, or just ![]() Potent Spellcasting depending on the subclass you have. For Trickery Domain:
Potent Spellcasting depending on the subclass you have. For Trickery Domain:
| Feature | Description |
|---|---|
| Poison is pretty weak element, and you will not be hitting much with your weapons, so I would disregard this. |
There are plenty of feats to choose from
| Feat | Description |
|---|---|
| Ability Improvement - +2 Wisdom | Improves your spellcasting modifier further and making it easier to land spells. |
| This is where things can get interesting, especially with Trickery Cleric. Take |
|
| Gives a significant boost initiative, ensuring that you go first in most combat encounters. | |
| Gives |
Gear Recommendations
Build ID: 3626
Mode: Full Equipment
Sets: Act 2
Gameplay and mechanics
This is an important section, as the build gains major changes in how it plays, thanks to various unlocked items.
Working with Arcane Acuity
The main addition and combo that you can do now, is to use ![]() Gloves of Battlemage's Power to build
Gloves of Battlemage's Power to build ![]() Arcane Acuity using
Arcane Acuity using ![]() Spirit Guardians. At first, this might not seem much, but this enables you to get +10 to Spell Save DC. The result is that your spells reach almost 100% spell success chance.
Spirit Guardians. At first, this might not seem much, but this enables you to get +10 to Spell Save DC. The result is that your spells reach almost 100% spell success chance.
For example, you can now use ![]() Command, which does not use
Command, which does not use ![]() Concentration to disable groups of enemies. Another nice option is to use
Concentration to disable groups of enemies. Another nice option is to use ![]() Command: Approach to force enemies to be near you so that they constantly get damaged by
Command: Approach to force enemies to be near you so that they constantly get damaged by ![]() Spirit Guardians.
Spirit Guardians.
Another nice option is ![]() Hold Person, which can guarantee critical hits for your allies. So the build becomes not only good at weakening enemies, but also at outright disabling them.
Hold Person, which can guarantee critical hits for your allies. So the build becomes not only good at weakening enemies, but also at outright disabling them.
The recommended combat loop
- So Spirit Guardians is still your top spell and more or less should be used in most encounters. However, Act 2, contains few enemies with
 Radiant Retort so be careful, these are mainly dark justiciars inside
  Gauntlet of Shar Main Floor
 - If you use
 Gloves of Battlemage's Power, you can easily build
  Arcane Acuity with Spirit Guardians. Once you have a high spell save DC, I recommend following up with a powerful spell like
  Blindness, Command to weaken or disable enemies to a ridiculous degree.
 - Use the Starry Form: Dragon most of the time. It will help maintain Concentration. However, another cool thing is Dazzling Breath which gives a powerful bonus action option, while also resulting in lots of debuffs via Reverberation and Radiating Orb in a cone.
- Try to position yourself close to enemies, this way both Dazzling Breath and Spirit Guardians can be the most effective.
Act 3 - Level 11-12 - Rivington and Lower City
You are close to reaching the game finale, or so you think. The last part of the game is huge and can be both intimidating and overwhelming.
Here are some recommendations from me:
- You don't need to do all the side quests here; they can take up to 40 hours or more, depending on what you decide to do
- Leave some quests for other runs. As you reach the maximum level, the game might become less satisfying. This will give a new perspective for your next playthroughs, to find novelty and discovery.
- There is a lot of good gear in this Act, but you don't need to get it all. I recommend prioritizing the most important ones for your builds. You can plan this with the Act 3 Checklist.
Leveling Progression
Level 11 - Cleric Lv 9
A few more goodies are added for this level, lets go through them
| Features | Description |
|---|---|
| Theoretically, this should be a very powerful spell. In reality, with a well-made party you will be immobilizing humanoid enemies quite easily, before this spell would even become useful. | |
| Not many uses for this spell late in the game, as it uses a level 5 spell slot. |
Now here are a few prepared spells, that I think are good to have:
| Spells | Description |
|---|---|
| A simple yet effective area of effect spell that inflicts both radiating and fire damage. This will activate |
|
| Excellent spell, that deals piercing damage and applies |
|
| Not required spell, but can be useful in certain situations. |
Level 12 - Cleric Lv 10
This is the last level of the build:
| Feature | Description |
|---|---|
| Once per playthrough action that can be used to activate special effects. To be fair, I usually forget to use it, but it can be extremely useful during Honour Mode playthrough. |
You can choose one cantrip:
| Cantrips | Description |
|---|---|
| Any | You can take anything to be fair. By this time in the game, you should have everything covered that is needed for the build to run effectively. |
Gear Recommendations
Build ID: 3626
Mode: Full Equipment
Sets: Act 3
Gameplay and mechanics
In general, Act 3 does not bring much in terms of how the gameplay changes. It's just optimisations to your gear and higher-level spell unlocks
The recommended combat loop
As I mentioned, the combat loop stays more or less the same from the previous Act 2 (check that out if you missed it).
- Spirit Guardians to melt enemies and apply debuffs
- If using Gloves of Battlemage's Power use control spells without Concentration once you have high Arcane Acuity - Command,
 Glyph of Warding: Sleep, etc.
 - Spells like
 Insect Plague can be extremely powerful if placed in a well-targeted position. Use this to cover choke points.
  Flame Strike is an outright "finisher" spell where you want to inflict lots of damage in a small area. It also has two damage types, and one of it is Radiant. This will result in it applying various conditions from your gear.
- Divine Intervention - as oh shit option in case you need an instant resurrection.
Maximizing the Build - Abilities, Illithid, Consumables
Maximising Ability Scores
Now, as the build progression is covered, there are a few aspects and important decisions you will have to make throughout the game. These will decide your final score for abilities.
Wisdom
- First Feat - Ability Improvement - +1 Wisdom. The second point will go to the Constitution.
- Second Feat - Ability Improvement - +2 Wisdom.
- Act 3 - Mirror of Loss - pick +2 Wisdom.
These will allow you to reach 20-22 natural Wisdom, which is enough for a good Cleric setup.
Illithid Powers
This special mechanic in Baldur's Gate 3 allows you to consume tadpoles and unlock special Illithid Powers.
At first, you can only use the base powers. As you move to Act 3, you will be able to unlock the outer ring powers, also called Elite.
| Illithid Power | Type | Description |
|---|---|---|
| Base | Beneficial power to take as it does not have any costs, and provides only benefits on the first hits with attack rolls. | |
| Base | An easy way to ensure you land critical hits, works both with spells and normal attacks. | |
| Base | Can help to kill an enemy faster if it is left with a few HP. | |
| Base | A great way to weaponise your reaction, especially if you do not have access to |
|
| Base | Excellent option for bonus temporary HP. It can also apply |
|
| Elite | Can be used to maximise the effectiveness of charisma-based skills, especially relevant to the main character. | |
| Elite | Very powerful spell that can be used to pull enemies together. You can then follow up with area-of-effect spells or attacks. In general, it is a very effective action in the hands of any character. | |
| Elite | Can be used to nullify lower-level spells which are equal to your proficiency bonus. | |
| Elite | Remove the cost of spell slots or charges. | |
| Elite | You can now use action and bonus action interchangeably, giving two full spell casts each turn. It's not as important for you, but it will help other casters in the group. | |
| Elite | Weakens enemies by reducing their Armour Class. Now it's easier to hit them. |
Potions, Elixirs and other Consumables
Let's take a look at what consumables you can use to further empower the build.
I recommend checking Pickpocketing Guide on how to steal a lot and prepare yourself with almost unlimited consumables. This will allow you to have a dedicated character to steal from merchants and have a consumable for every situation.
Potions
These are general consumables, and most of them are activated for a few turns. Potions are separate from Elixirs and can be active together.
| Consumable | Description |
|---|---|
| This is a very powerful potion. It gives an additional action point, which can be used to cast a spell or attack. The activation is generally by drinking using a bonus action. However, you can stack together with party members and make one member |
|
| It can be used in two ways - the first one is to enter combat with a |
|
| An easy way to get the |
|
| Gives |
|
| Restores level 1 and 2 spell slots. | |
| Acts as a Long Rest, restoring all spell slots. |
Elixirs
Unfortunately, only one Elixir can be active at a time. However, the good thing is that they last until a long rest, making them very useful and economical.
Be sure to activate them before combat, as otherwise, you will need to use Bonus Action.
| Consumable | Description |
|---|---|
| The elixir gives an easy option to get an additional action point - just kill a foe. This can then be used to attack one more time or cast a full spell. | |
| Improves Spell Save DC, making it easier to land spells. | |
| Makes it easier to maintain spell |
|
| For some encounters, you will want to go first. This elixir will ensure that it overcomes even |
Scrolls
This is one of the most overpowered mechanics in the game. At first, it might seem that you earn those old, boring spells that you can learn yourself. However, as you play more and more, and get higher-level spells, you can see - wait, I can save a spell slot casting this.
Yeah, and this is where their power comes. During the whole playthrough, you will probably collect a lot of these, so I recommend using them whenever you can.
Conclusion and Credits
Thank you for reading the Shadowheart Build - The Maiden of Choice for Baldur's Gate 3. This is one of the variations of the companion build, that I think is vanilla, easy to use, and is perfect for those first-time players.
Cheers!
Like, Dislike, comment, or share!
Join the Discussion
0 commentsNo comments yet.
Be the first one to leave a comment!