
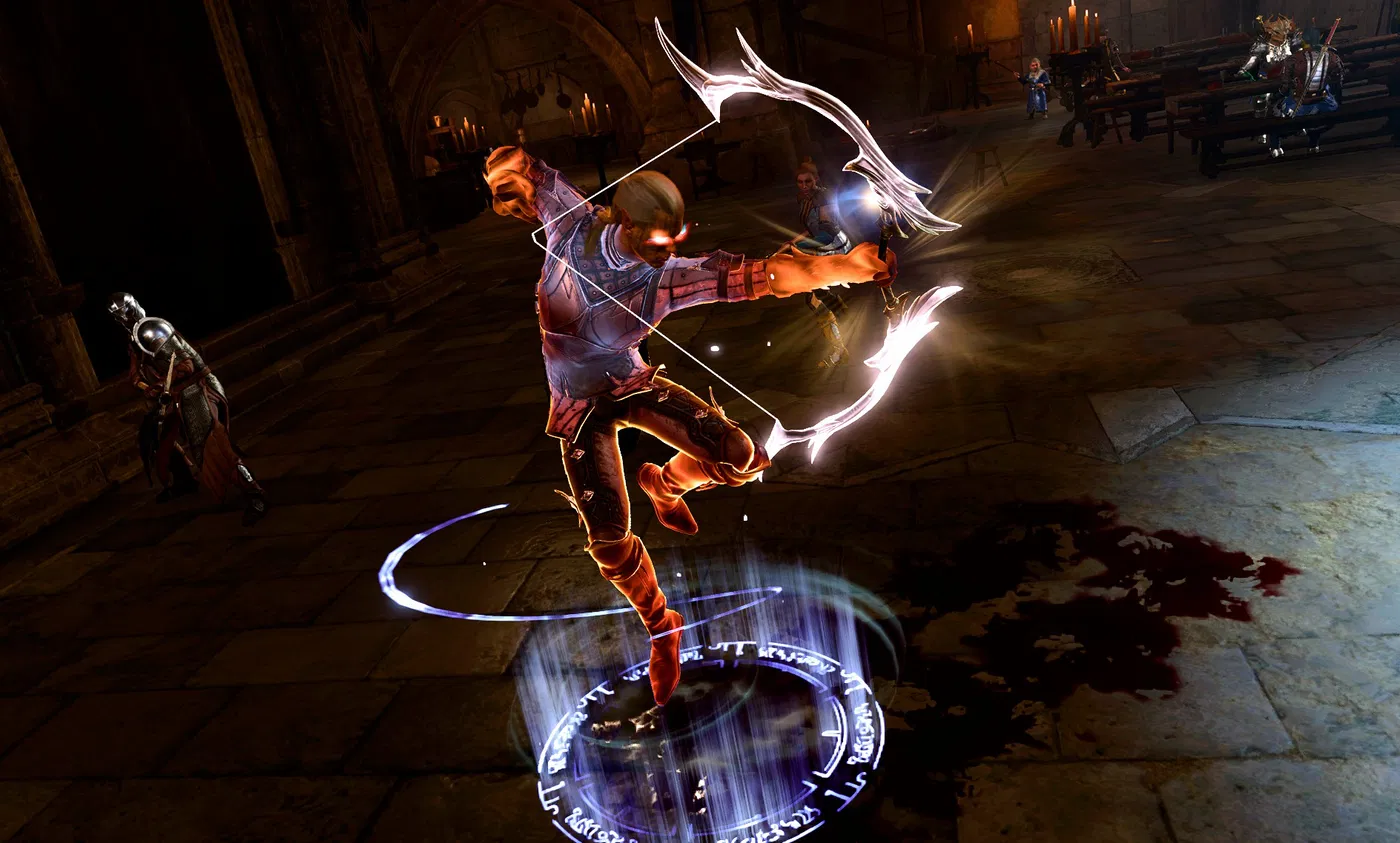
Selune's Holy Archer Build - Baldur's Gate 3 (BG3)
Contents
Selune's Holy Archer
The build idea comes from Sal in the BG3 Discord. This is an Arcane Archer build variation that takes a dip into 1 War Cleric. Overall, this might seem like a small change, but this does offer a few benefits - ![]() Divine Favour and
Divine Favour and ![]() War Priest effect.
War Priest effect.
With this ability, you have an easy and guaranteed source of Radiant damage, which then easily applies ![]() Radiating Orb effect. Not only that, but with additional gear like
Radiating Orb effect. Not only that, but with additional gear like ![]() Boots of Stormy Clamour, you can further weaken foes with
Boots of Stormy Clamour, you can further weaken foes with ![]() Reverberation. Pretty neat? This is not all.
Reverberation. Pretty neat? This is not all.
As Arcane Archer, you can further weaken and apply control on the battlefield via the Arcane shots - ![]() Arcane Shot: Banishing Arrow,
Arcane Shot: Banishing Arrow, ![]() Arcane Shot: Seeking Arrow, etc. If you are able to dedicate some items like
Arcane Shot: Seeking Arrow, etc. If you are able to dedicate some items like ![]() Helmet of Arcane Acuity, this makes you an extremely powerful controller through most of the game. Sadly, you do have lower damage compared to other archer builds, but this can be somewhat mitigated if you have an ally with
Helmet of Arcane Acuity, this makes you an extremely powerful controller through most of the game. Sadly, you do have lower damage compared to other archer builds, but this can be somewhat mitigated if you have an ally with ![]() Bhaalist Armour.
Bhaalist Armour.
So let's jump into the build!
Class Contribution
The core of the build consists of Fighter. Although it may be simple, the reliability of its features is second to none:
11 Arcane Archer Fighter
 Second Wind for instant hp restoration when in a tight spot
- Pick one of the fighting styles, specifically
 Archery, for improved ranged attacks.
 - The almighty
 Action Surge to gain a full action point for a volley of attacks.
  Improved Extra Attack for more attacks per action point
- Arcane Arrows -
 Arcane Shot: Banishing Arrow,
  Arcane Shot: Piercing Arrow, etc. Situationally useful arrow attacks to disable foes or inflict damage.
 - Missed an attack?
 Curving Shot helps with hitting another foe using a Bonus action.
  Magic Arrow allows your shots to overcome various resistances.
- Save yourself from a detrimental spell effect via
 Indomitable.
1 War Domain Cleric
- Access to additional bonus action attacks via the
 War Priest feature.
  Divine Favour for a consistent source of radiant damage to apply
  Radiating Orb effects.
- Some protection in dire moments like
 Sanctuary.
Leveling Overview
Here is a concise table with all the main picks during your leveling progression. For more detailed reasoning, I go further in the article. Also, do not forget to check the recommended gear, as it is crucial.
| Level | Class | Selection |
|---|---|---|
| 1 | Fighter 1 | Fighting Style: |
| Abilities: STR - 8, DEX - 17, CON - 14, INT - 16, WIS - 10, CHA - 8 | ||
| Skills: Athletics, Intimidation | ||
| 2 | Fighter 2 | - |
| 3 | Fighter 3 | Subclass: Arcane Archer |
| Cantrips: |
||
| Arcane Shot: 3 preferred ones, I recommend - |
||
| 4 | Fighter 4 | Feat: |
| 5 | Fighter 5 | - |
| 6 | Fighter 6 | Feat: |
| 7 | Cleric 1 | Cantrips: any 3 |
| Subclass: War Domain | ||
| Deity: Selune | ||
| Prepared Spells: |
||
| 8 | Fighter 7 | Arcane Shot: any arrow, I do recommend having |
| 9 | Fighter 8 | Feat: |
| 10 | Fighter 9 | - |
| 11 | Fighter 10 | Arcane Shot: any arrow |
| 12 | Fighter 11 | - |
Starting the Game - Level 1
This section covers the creation screen and what would go into the best Races, Abilities, and Skills for the Hexblade build. If you have already started playing, feel free to do a respec at Withers and follow along. This will make it easy to follow the build step by step.
Races
Picking a race provides various benefits - abilities, dialogue options, looks, etc.
| Race | Features | Description |
|---|---|---|
 Wood Half-Elf Wood Half-Elf |
|
Although this is a ranged build, the additional movement speed is extremely useful for better positioning of actions like |
 Wood Elf Wood Elf |
|
|
 Zariel Tiefling Zariel Tiefling |
|
One of my favourite races - cool looking, and access to |
 Lightfoot Halfling Lightfoot Halfling |
|
One of the best races overall, and gets an |
 Githyanki Githyanki |
|
Githyanki comes with a wide array of utility actions like |
| High Half-Elf |
|
These subraces are great for getting some bonus cantrips. The highlights would be:
|
 High Elf High Elf |
|
Class
| Overview | |
|---|---|
 Fighter Fighter |
|
| Features | |
| You can use this to heal yourself in tight encounters, to get a little bit more of survivability. | |
Fighting Style
| Style | Description |
|---|---|
| This is an important passive feature as it will improve hit chance and make it easier to land shots with |
Background
Backgrounds are mostly for role-playing, and you can pick whatever you prefer. If you want to optimize, then it would be good to pick backgrounds that are based on your ability points.
| Background | Skills | Description |
|---|---|---|
| Charlatan | Deception Sleight of Hand |
Excellent pick if you want some lockpicking to be done with this character. |
| Entertainer | Acrobatics Performance |
Acrobatics plays well with the high Dexterity of the Arcane Archer. |
| Urchin | Sleight of Hand Stealth |
If you want some stealthy bonuses. |
| Sage | Arcana History |
As Arcane Archer will have pretty good Intelligence, both of these skills will get high rolls. |
| Noble | History Persuasion |
Intelligence and charisma-related bonuses, excellent for the main character. |
Abilities
Now, let's take a look at the abilities of the Holy Archer build. Correct allocation will allow you to maximize the early gameplay and get good modifier bonuses.
The core mechanic to understand for ability points is that they give "ability modifiers" that apply to various skill checks. For example, Charisma works on Intimidation and persuasion checks. Wisdom on Survival or Animal Handling, and so on.
You get a higher ability modifier on even values - 10, 12, 14, etc. So keeping it on odd may be useless. However, there are various +1/2 modifiers in the game, specifically ![]() Auntie Ethel's Hair or Feats that help round this up.
Auntie Ethel's Hair or Feats that help round this up.
| Ability | Value | Description |
|---|---|---|
 Strength Strength |
8 | Not relevant ability for the build. Some weapons will benefit from it, but it can then be increased with some outside sources. |
 |
17 (15+2) - With 16 (14+2) - No Hair |
The main attribute of the build, which will improve damage, initiative, and in some cases provide higher armor bonuses. |
 Constitution Constitution |
14 | This attribute will decide your health pool. Leaving with a sufficient allocation for HP bonuses. |
 Intelligence Intelligence |
16 (15+1) | The main spellcasting ability of Arcane Archer. It will decide the success of your arrows, so we want it as high as possible. Later, we will use some gear to boost it. |
 Wisdom Wisdom |
10 - with 12 - no hair |
Minimum investment to reduce the chance of failing Wisdom saving throws. The 2 points can freely be allocated to Charisma or Strength, if you need. |
 Charisma Charisma |
8 | Semi-relevant ability if you are the main character. Unfortunately, due to limited points, we leave it untouched. |
If you do not get ![]() Auntie Ethel's Hair, then I would set Constitution to 15 and Wisdom to 8. Later, this can be rounded down to 16 Constitution and 18 Dexterity via the Ability Improvement feat.
Auntie Ethel's Hair, then I would set Constitution to 15 and Wisdom to 8. Later, this can be rounded down to 16 Constitution and 18 Dexterity via the Ability Improvement feat.
Skills and Expertise
Overall, the skills should be impacted by your roleplaying and background decisions. However, you would still want those that will give you the best benefits. My recommendations are to pick those at which you have a high ability modifier. Sadly, as a Fighter, you do not have many options:
- Acrobatics
- Athletics
- Intimidation
- Survival
Leveling Progression - Levels 2-12
Here is the detailed progression for the Holy Archer build to get you started. You can use it as a guideline because early games can be daunting and overwhelming. Later on, once you get a feel for the class, you can start picking your options.
Level 2
By this time, you should have landed in the first area already. The level-up gives some welcome improvements for your Fighter.
| Feature | Description |
|---|---|
| The iconic action of a fighter is extremely popular for its simplicity and effectiveness. You get additional action with full bonuses from |
Level 3
The main level that unlocks the new features and the Arcane Archer itself.
Subclass
| Overview | |
|---|---|
| Features | |
| This resource is used to cast arcane arrows like |
|
Cantrips
There are two options; pick the one that seems the most relevant.
| Cantrip | Description |
|---|---|
| I would say one member of the party needs to have this cantrip as it enables improved rolls for all ability checks. It can also work well with some |
|
| Extremely helpful cantrip later in Act 2. It can also serve well to apply the effects of |
Arcane Shot
At first, you can pick 3 shots. Overall, try to take ones with different saving throws, so that you could deal with different types of enemies
| Shots | Description |
|---|---|
| One of my favourite arcane shots. Can disable an enemy for 2 turns without any |
|
| I use this as bread and butter arrow to blind enemies, deal decent damage, and give an easy |
|
| Excellent for when enemies are standing in one line or close together. This applies good damage, but unfortunately does not work with the very important feat |
Level 4
The 4th level unlocks the first feat for the build. This is generally a big improvement as it helps by providing stat improvement or unique effects.
Replace Spell
Can add/remove any of the arrow effects.
Feat
Here you have a few choices, depending on how risky and well-rounded your party is:
| Feat | Description |
|---|---|
| This would be the best pick, especially as you can easily get an |
|
| Ability Improvement - +2 Dex | The safer pick, which will improve attack rolls, damage, initiative, and armour class depending on the armor. |
Level 5
Level 5 plays a pivotal role in most of the builds. Fighter gets 1 simple but very powerful feature:
| Feature | Description |
|---|---|
| Additional attack with all the same stats and damage riders. |
Replace Spell
Feel free to pick any change if you deem it necessary.
Level 6
Nothing much in this level besides a new feat option.
Replace Spell
Feel free to pick any change if you deem it necessary.
Feat
Pick one of the feats that you did not take in level 4:
| Feat | Description |
|---|---|
| This would be the best pick, especially as you can easily get an |
|
| Ability Improvement - +2 Dex | If you did not take this before, now is the best time to do that. |
Level 7 - War Cleric Lv 1
Class
| Overview | |
|---|---|
 Cleric Cleric |
|
| Features | |
 Spell Slots Spell Slots |
These can be used to cast spells and are restored each long rest. |
| Gives access to some additional spells. | |
Cantrips
There are a few useful ones; however, late in the game, they don't matter much.
| Cantrip | Description |
|---|---|
| Great for some dialogue checks, giving an easy |
|
| Can be taken if not picked with the Arcane Archer subclass. | |
| Can be taken if not picked with the Arcane Archer subclass. |
Otherwise pick anything
Subclass
| Overview | |
|---|---|
 War Domain War Domain |
|
| Features | |
| The additional charges allow for attacks with bonus action. | |
| Gives +1d4 radiant damage rider. | |
| Decent |
|
Deity
The main pick here for the roleplay would be Selune. Of course, you can take any other option if you prefer.
Abilities
I would prioritise Persuasion, the second one can be anything.
Prepare Spells
| Spell | Description |
|---|---|
| It can be used to avoid combat in a dire situation. |
Level 8 - Fighter Lv 7
This is a significant level as Arcane Archer gets new features:
| Feature | Description |
|---|---|
| Allows you to overcome resistance as the arrows count as magical damage. | |
| Excellent feature, that allows to "save a shot" in case it misses and hits another enemy by using a bonus action. |
Arcane Shot
There are a few highlights that you can pick if you haven't already:
| Shot | Description |
|---|---|
| In case you did not pick this option previously, having this arrow type is great for killing an enemy that you know you cannot miss. | |
| Excellent option for weakening enemies, once you have other debuffs covered. |
Level 9 - Fighter Lv 8
The main highlight of this level is the additional feat.
Replace Spell
Feel free to change anything that you might find irrelevant.
Feat
There are a few relevant picks here:
| Feat | Description |
|---|---|
| My recommended pick. Late game gives a large variety of stat-stick weapons to boost the damage output. You can also wear |
|
| Ability Improvement - +2 Intelligence | This is a nice way to slightly improve your Spell Save DC, especially if you are not using |
Level 10 - Fighter Lv 9
A new feature is unlocked, otherwise, there is nothing fancy on this level:
| Feature | Description |
|---|---|
| A decent passive that helps avoid failed Saving Throws. |
Replace Spell
I leave this up to you
Level 11 - Fighter Lv 10
This level gives more Arcane arrow shots, otherwise nothing special.
Arcane Shot
By this point in the game, pick anything that you are interested in trying. Core arrows are already obtained, like psychic damage ones for ![]() Resonance Stone or shots targeting different Saving Throws.
Resonance Stone or shots targeting different Saving Throws.
| Shot | Description |
|---|---|
| Can be used to target Strength saves, in case enemies have low ability for it. Sadly, the poison damage can be resisted by many enemies. |
Level 12 - Fighter Lv 11
Level 11 is a major highlight for any Fighter subclass build, and the main reason for that is:
| Feature | Description |
|---|---|
| This is a huge boost to damage as the fighter can now hit three times with the same action. This also gives a third attack for an action point gained via |
Replace Spell
Change anything that you might find irrelevant
That's it, the build is done!
Maximizing Ability Scores
Now, as the build progression is covered, there are a few aspects and important decisions you will have to make throughout the game. These will decide your final score for abilities.
Dexterity
The main offensive stat that decides initiative, armour class, and weapon damage:
- 17 Dexterity - the base from character creation.
- Act 1 -
 Auntie Ethel's Hair - you will want to get +1 Dexterity if you pick this choice.
 - Feat - Ability Improvement - +2 Dexterity. If you did not get Auntie Ethel's Hair, then take +1 Dexterity and put 1 point into Constitution.
- Act 3 - Mirror of Loss - pick +2 Dexterity.
These will allow you to reach 20-22 natural Dexterity, which results in a +5-6 ability modifier bonus.
Intelligence
High intelligence greatly benefits Arcane Archer and allows it to reach higher arcane shot success chance and overall damage bonuses:
- 16 Intelligence - the base from character creation.
- Feat 1 (Optional) - Ability Improvement - +2 Intelligence.
This leads you to 16-18 Intelligence. It's not much. But the Arrow's success chance can be improved with items via ![]() Arcane Acuity effect -
Arcane Acuity effect - ![]() Helmet of Arcane Acuity.
Helmet of Arcane Acuity.
Potions, Elixirs, and Consumables
Let's take a look at what consumables you can use to further empower the build.
Potions
These are general consumables, and most of them are activated for a few turns. Potions are separate from Elixirs and can be active together.
| Consumable | Description |
|---|---|
| In case you or your other casters have a Concentration spell slot taken and cannot cast Haste, use this potion. It acts similarly, but the effect is just for 3 turns. | |
| Although not powerful, it is worth stocking up and chugging them once you see an animal. | |
| Any kind of healing potion | If you use |
| Gives +2 to attack rolls, which is great for negating the |
|
| Gives +1 to attack rolls, which is great for negating the |
Elixirs
Unfortunately, only one Elixir can be active at a time. However, the good thing is that they last until a long rest, making them very useful and economical.
Be sure to activate them before combat, as otherwise, you will need to use Bonus Action.
| Consumable | Description |
|---|---|
| Sets strength value to 21 until the Long Rest. This helps with maximizing |
|
| Sets strength to 27 for the highest possible damage boost on |
|
| Very effective elixir that gives another action point if you kill an enemy. I would say this is the best one to use to maximize your output through the turn. | |
| Gain 3 stacks of |
|
| For some encounters, you will want to go first. This elixir will ensure that it overcomes even surprise mechanics. However, if you have |
|
| Provides bonus damage of 1d4 and some other good bonuses. | |
| Boosts attack rolls by 1d4, excellent to negate the |
Arrows
The Holy Archer does have a slight problem. It's Arcane shots overlap with various consumable arrows that you find in the game. Early in the game, this is not a problem. For the late game, you will have to evaluate which ones to use, as slaying arrows like ![]() Arrow of Humanoid Slaying deal double damage, greatly boosting your possible damage output.
Arrow of Humanoid Slaying deal double damage, greatly boosting your possible damage output.
Still, I would prioritize this build more of a control/debilitator build, and use these once you are out of Arcane Shots.
| Consumable | Description |
|---|---|
| The core arrow for the latter part of the game. Use it to build |
|
| These arrows are very powerful when used against the correct target, as they double the damage. This does conflict with Arcane shots, later in the game. But I do prefer the latter for the control aspect, especially against stronger foes. | |
| Other same-name arrows... |
Illithid Powers
This special mechanic in Baldur's Gate 3 allows you to consume tadpoles and unlock special Illithid Powers.
At first, you can only use the base powers. As you move to Act 3, you will be able to unlock the outer ring powers, also called Elite.
| Illithid Power | Type | Description |
|---|---|---|
| Base | Beneficial power to take as it does not have any costs, and provides only benefits on the first hits with attack rolls. | |
| Base | It's an easy way to ensure you land critical hits. | |
| Base | It can help to kill an enemy faster if it is left with a few HP. | |
| Base | It can help with enemies that cast spells, which can result in disabling or killing an ally. | |
| Elite | It can be used to maximize the effectiveness of charisma-based skills, especially relevant to the main character. | |
| Elite | Very powerful spell that can be used to pull enemies together. You can then follow up with area-of-effect spells or attacks, for example, |
|
| Elite | It can be used to save yourself from a deadly spell at the cost of a reaction. |
Equipment Recommendations
Now I would like to go through some gear recommendations to maximize the Selune Archer Build. Items are especially important as they take the build to the next level thanks to their unique effects.
Act 1
This part of the game is where Arcane Archer shines the most. For this reason, getting good gear and boosting your hit chance will do wonders for your combat performance. The "Radiant" setup will not yet work, so you will be playing just a standard archer.
| Slot | Item | Description |
|---|---|---|
 Melee (One-Handed) Melee (One-Handed) |
Use this together with |
|
| This will probably be a far-fetched fantasy, but if you don't have a caster, this can be used to improve the success chance of landing your Arrow effects. | ||
| A very popular stat stick weapon. I would say this has the lowest priority. It can be dual-wielded with |
||
 Ranged Ranged |
In terms of pure damage, this bow is the top option for the whole game. Use either |
|
| Special crossbow that can debuff enemies with |
||
| This bow can be deadly with |
||
| It provides a substantial defensive boost by reducing critical hit damage. It also applies a reeling effect. | ||
| Decent shield if you got Absolute's Brand from the priestess in the Goblin camp. | ||
| Gives a bonus to saving throws, easily accessible early in the game. | ||
 Head Head |
If you can spare this item, it can be a big damage boost based on the Intelligence modifier. It does conflict with multiclass, but more about that in the Act 3 gear section. | |
| Opens up opportunities for easy ways to improve Spell Save DC and the success of Arcane Shots. | ||
| Improves movement speed, which is great for better positioning to land your shots. | ||
| It can be a useful helmet for its bonuses and access to |
||
| Semi-useful headwear that could be used till level 8. Wearing it allows you to respec, set Intelligence to 8, and put points elsewhere. However, later on, once you get a third feat, you will want to maximize your intelligence in natural ways. | ||
 Cloak Cloak |
- | Nothing relevant for the build. |
 Armor Armor |
Make sure to get this armor. You will not wear it yet, but it will be the core part of the build later on. | |
| To be fair, I would be indifferent to which armor you pick. But the heavy one does give higher bonuses, and you have proficiencies to wear them. | ||
| The best starter medium armor. You can just take it from Lae'zel | ||
 Gloves Gloves |
Be sure to get these gloves. You do not yet need them, but they will be used later once you get War Cleric dip. | |
| I recommend at least getting these gloves. They apply |
||
| Your ranged attacks deal an additional 2 damage, one of the best options for early game gloves. | ||
| Applies |
||
 Boots Boots |
These boots are very powerful with arcane shots and later with |
|
| One of the best boots in the game, giving easy traversal options and avoiding any difficult terrains and their effects. | ||
| Simple yet effective boots, allowing you to avoid attacks of opportunity. | ||
 Amulet Amulet |
In terms of damage, this is one of the best amulets in the game. You can just drink a |
|
| Using a bonus action, you can weaken a foe and deal double damage with your weapon. | ||
| Grants |
||
 Rings Rings |
Adds additional damage to weapon attacks. | |
| The bonus Armour Class is a great boost for survivability. | ||
| Improves movement speed for better positioning. |
Act 2 - mid-game
| Slot | Item | Description |
|---|---|---|
| Melee (One-Handed) |
This is a great weapon that you can wear as a stat stick. It has a special action - |
|
| - | Same as Act 1 | |
| Just used for buffing the main weapon; after that, it can be unequipped. | ||
| Ranged |
Continues to be the best bow for now. | |
| The best shield in terms of utility, as it improves Spell Save DC and Arcane Shot success. | ||
| What makes this shield amazing is that by wearing it, you will be going first most of the time during encounters. This is a great way to apply control over key enemies. | ||
| Head |
This is the best helmet for the build. It is highly in demand by other Gish-type builds. I would say the build even depends on it to be effective. | |
| An alternative to |
||
| Alternative headwear, before |
||
| Gives an additional attack roll bonus, and works perfectly with ranged weapons if you decide to use them. | ||
| Cloak |
Improves survivability and Saving Throw success. You want to equip this cloak to maintain that good Armour Class. | |
| Armor |
The best armor to take is once you get War Cleric with |
|
| A solid armor, with high Armour Class, and other relevant bonuses. | ||
| The best medium armor in Act 2. With high dexterity, it can have the highest Armour Class of all gear options in this stage of the game. | ||
| Gloves |
Both of these are great gloves, use the first ones if they are accessible, as you will already get plenty |
|
| Boots |
The best overall shoes with an easy |
|
| Gives a bonus to armor class. | ||
| As you can get Concentration effect via |
||
| Amulet |
Continues to be the best amulet, if you were able to obtain it. | |
| Allows casting a |
||
| Rings |
Gives an easy way to deal additional radiant damage with each shot. | |
| Applies Mental Fatigue debuff, weakening enemies and increasing further debuffs or spell success chance. | ||
| You can use |
||
| Adds additional damage to weapon attacks. |
Act 3 - Final Build setup
Here is an important disclaimer and about the build in general, depending on the gear you can access:
| Slot | Item | Description |
|---|---|---|
| Melee (One-Handed) |
All of these items are excellent stat sticks. |
|
| It can be used by an ally to buff everyone. If you use it yourself, it will interfere with |
||
| The best shield for casters, as it gives +1 Spell Save DC, increasing spell success. | ||
| One of the best shields in the game. Overall, it serves more of a defensive role, giving advantages on Spell Saving Throws. | ||
| Ranged |
The highlight of this build. Truly a light-themed weapon. It offers various effects, but the main highlight is |
|
| Continues to be the best bow. For Act 3, you can chug |
||
| The lower priority bow, in case you do not have access to the ones above. | ||
| Head |
I would say this is the best headwear for the build if you can afford to use it, and have no other Gish build. The increased Spell Save DC will make it easy to land arrow effects and disable your foes. | |
| An alternative to |
||
| Second-best headwear, as you get additional damage based on the Intelligence modifier. If you are not using |
||
| Cloak |
It provides an increased chance of avoiding enemy attacks with attack rolls. | |
| Armor |
The main armor of this build, on which the build relies. It allows for easy application |
|
| Gloves |
Pick either of these gloves as they give an easy way to apply |
|
| These gloves can be used to get a slight boost to Spell Save DC and bonus fire damage. | ||
| Boots |
The |
|
| Amulet |
In terms of damage, |
|
| Rings |
Gives an easy way to deal additional radiant damage with each shot. | |
| Applies Mental Fatigue debuff, weakening enemies and increasing further debuffs or spell success chance. | ||
| You can use |
||
| Improves Armour Class. |
Build Mechanics
In this section, I would like to dive deep into how to play the Selune Holy Archer Build. This will help you utilize it to the fullest and correctly use various actions and spells throughout the game.
Important Mechanics and Combos
Let's go through key mechanics and tips on how to use the build effectively.
Use the correct Arcane Shot to debuff enemies
What makes the Arcane Archer special is that, from the low level,s you can deal decent damage and apply control. Usually, control is effective with higher-level spellcasters when they have a high Spell Save DC. Here are the main arcane shots to look out for:
- Arcane Shot: Banishing Arrow - targets enemy Charisma Saving Throws, and removes the target from the combat if successful. Use this on bosses or stronger foes that you want to eliminate for a few turns.
 Arcane Shot: Shadow Arrow - targets enemy Wisdom Saving Throws. It applies blindness, which gives an easy
  Advantage for all attacks, even your allies.
- Arcane Shot: Piercing Arrow - use it on a group of enemies, especially if they have a low Dexterity attribute.
 Arcane Shot: Seeking Arrow - can target enemies even if you cannot see them. It also has a guaranteed hit chance, making it perfect for eliminating specific foes.
 Arcane Shot: Enfeebling Arrow - the Feeble effect targets the enemy's Constitution Saving Throws. Great for weakening enemies that use physical attacks.
Managing Sharpshooter
One of the main parts of this build is- ![]() Sharpshooter: All In, which gives a solid 10 damage boost per hit. However, it comes with a drawback: -5 to attack rolls. This, of course, can be circumvented via various tricks:
Sharpshooter: All In, which gives a solid 10 damage boost per hit. However, it comes with a drawback: -5 to attack rolls. This, of course, can be circumvented via various tricks:
- Archery fighting style bonuses
- Attacking from stealth
 Oil of Accuracy and
  Diluted Oil of Sharpness
- Weakening enemies with Arcane Arrows like Arcane Shot: Shadow Arrow.
- High Ground bonuses
I have a full article on increasing attack rolls. That goes into depth on various mechanics that work especially well in the early game, when the -5 attack roll hurts the most. You can also disable its effect. Pull the passives of ![]() Sharpshooter: All In into your hotbar and disable its effect, if your hit chance is very low.
Sharpshooter: All In into your hotbar and disable its effect, if your hit chance is very low.
Problems with damage riders and Arcane Shots
So the major problem with Arcane Shots, that some of them, like ![]() Arcane Shot: Seeking Arrow or
Arcane Shot: Seeking Arrow or ![]() Arcane Shot: Piercing Arrow, don't have attack rolls. Currently, the
Arcane Shot: Piercing Arrow, don't have attack rolls. Currently, the ![]() Sharpshooter: All In implementation does not work if this mechanic is not present. So these arrows lose 10 dmg per target potential.
Sharpshooter: All In implementation does not work if this mechanic is not present. So these arrows lose 10 dmg per target potential.
Still, they are worthwhile to use. If a target has 10-15 hp and you need to eliminate him, there is no better choice than ![]() Arcane Shot: Seeking Arrow. If there are 3 stacked enemies,
Arcane Shot: Seeking Arrow. If there are 3 stacked enemies, ![]() Arcane Shot: Piercing Arrow is the best option to hit all 3 of them for substantial damage.
Arcane Shot: Piercing Arrow is the best option to hit all 3 of them for substantial damage.
Buffing damage with Drakethroat Glaive
One of the stat stick items is ![]() Drakethroat Glaive. It can apply elemental damage effects on your chosen weapon. One of the great combos is cold damage with
Drakethroat Glaive. It can apply elemental damage effects on your chosen weapon. One of the great combos is cold damage with ![]() Snowburst Ring. Now your arrows will create Ice puddles that enemies can slip on. This can force them to skip turns or waste their movement speed.
Snowburst Ring. Now your arrows will create Ice puddles that enemies can slip on. This can force them to skip turns or waste their movement speed.
You can also take Lightning damage as it will combo well with ![]() Gloves of Belligerent Skies for more
Gloves of Belligerent Skies for more ![]() Reverberation stacks.
Reverberation stacks.
Another option is if you cannot use ![]() Helmet of Arcane Acuity you can use
Helmet of Arcane Acuity you can use ![]() Hat of Storm Scion's Power together with
Hat of Storm Scion's Power together with ![]() Drakethroat Glaive and apply
Drakethroat Glaive and apply ![]() Draconic Elemental Weapon: Thunder for an easy way to stack
Draconic Elemental Weapon: Thunder for an easy way to stack ![]() Arcane Acuity. This will make it easy to maintain Spell Save DC for your Arcane Shots.
Arcane Acuity. This will make it easy to maintain Spell Save DC for your Arcane Shots.
Using Special Arrows vs Arcane Shots
Arcane Archer does shine in the early game, but there is a major contradiction, and this is consumable arrows like ![]() Arrow of Acid,
Arrow of Acid, ![]() Arrow of Fire,
Arrow of Fire, ![]() Arrow of Dragon Slaying, etc. The Slaying ones are especially important as they deal double damage to specific enemy types and are one of the strongest damage boosts in the game.
Arrow of Dragon Slaying, etc. The Slaying ones are especially important as they deal double damage to specific enemy types and are one of the strongest damage boosts in the game.
On the other hand, Arcane Arrows like ![]() Arcane Shot: Banishing Arrow,
Arcane Shot: Banishing Arrow, ![]() Arcane Shot: Enfeebling Arrow, cannot use those arrow effects, but they do apply specific statuses or disabling effects.
Arcane Shot: Enfeebling Arrow, cannot use those arrow effects, but they do apply specific statuses or disabling effects.
My recommendation would be to use the first few attacks to make sure you use the most out of Arcane Arrows and start combat with ![]() Arrow of Many Targets. Once key enemies are weakened or disabled, clear or finish them with Slaying arrows -
Arrow of Many Targets. Once key enemies are weakened or disabled, clear or finish them with Slaying arrows - ![]() Arrow of Humanoid Slaying,
Arrow of Humanoid Slaying, ![]() Arrow of Aberration Slaying, etc.
Arrow of Aberration Slaying, etc.
Maximizing Radiant Damage
As this build targets the theme of Holy light, you will want to maximize your Radiant damage. Moreover, it will help with applying ![]() Radiating Orb effects, which weaken foes:
Radiating Orb effects, which weaken foes:
 Callous Glow Ring
- Divine Favour or
 Moonmote from
  Selûne's Spear of Night
  Bolt of Celestial Light
So these items and effects will help with Radiant damage, and make sure that you can effectively debuff enemies.
Numerous amounts of debuffs and conditions
So what this build shines in is the total amount of debuffs that it can apply and how it can weaken foes:
- Radiating Orb reduces enemy attack rolls, which in turn means that your party member's armour class increases
 Reverberation - weakens enemy saving throws and applies
  Prone if the number of stacks reaches 5.
 Banished - thanks to Arcane Shot: Banishing Arrow
 Blinded - from Arcane Shot: Shadow Arrow
- Mental Fatigue - if you equip
 Ring of Mental Inhibition.
 - and many more...
This can destroy enemy combat potential and leave them helpless.
Early Game Combat
Let's cover how you should progress through combat levels 1-6.
- The core aspect is to hit enemies that have low Charisma with Arcane Shot: Banishing Arrow and those with low Wisdom - Arcane Shot: Shadow Arrow. I would also use Arcane Shot: Banishing Arrow multiple times on boss enemies or stronger foes, to remove them from the field until you deal with weaker targets.
- Action Surge for more shots.
- Especially on groups of goblins Arcane Shot: Piercing Arrow can be deadly.
- Don't forget to use consumable arrows. Targets that are wet can be heavily damaged using
 Arrow of Lightning, or if you see an enemy on a ledge, use
  Arrow of Roaring Thunder.
 - Second Wind is great when you need some healing in an urgent situation.
Mid to Late Game Combat
So this is where the "Holy Archer" Playstyle is fully unlocked, as you can get a stable source of radiant damage.
- I would recommend constantly having
 Light on yourself and on allies as you want to have Callous Glow Ring ring to always proc for radiant damage.
 - If possible, prebuff Divine Favour; otherwise, cast it once in combat with your bonus action.
- Use
 Arrow of Many Targets to apply the effects of
  Helmet of Arcane Acuity. This will help with landing Arcane Shot effects.
 - Another option is to use Bolt of Celestial Light to buff your next attacks with radiant damage rider
- Follow up with preferred Arcane Arrow effect - Arcane Shot: Banishing Arrow to remove target from combat, Arcane Shot: Shadow Arrow to blind foes, etc.
- If you need more shots Action Surge to the rescue for more attacks.
- Finish off enemies with slaying arrows -
 Arrow of Monstrosity Slaying, etc.
 - I recommend having an ally with
 Bhaalist Armour this will help to improve your piercing damage significantly
Build Variations
Here are some variations that work similarly and utilize the same classes at their core.
| Setup | Description |
|---|---|
| Pure Arcane Archer, which mixes some control capabilities with highly concentrated Piercing damage. |
Conclusion
Thank you for reading the Holy Archer Build for Baldur's Gate 3. The build is a variation of Arcane Archer and offers a debilitator and holy fighter archetype flavour. Enjoy weak enemies that can barely do anything in combat.
Cheers!
Like, Dislike, comment, or share!
Join the Discussion
0 commentsNo comments yet.
Be the first one to leave a comment!