
Swashbuckler Build - The Hex Duelist - Baldur's Gate 3 (BG3)
Contents
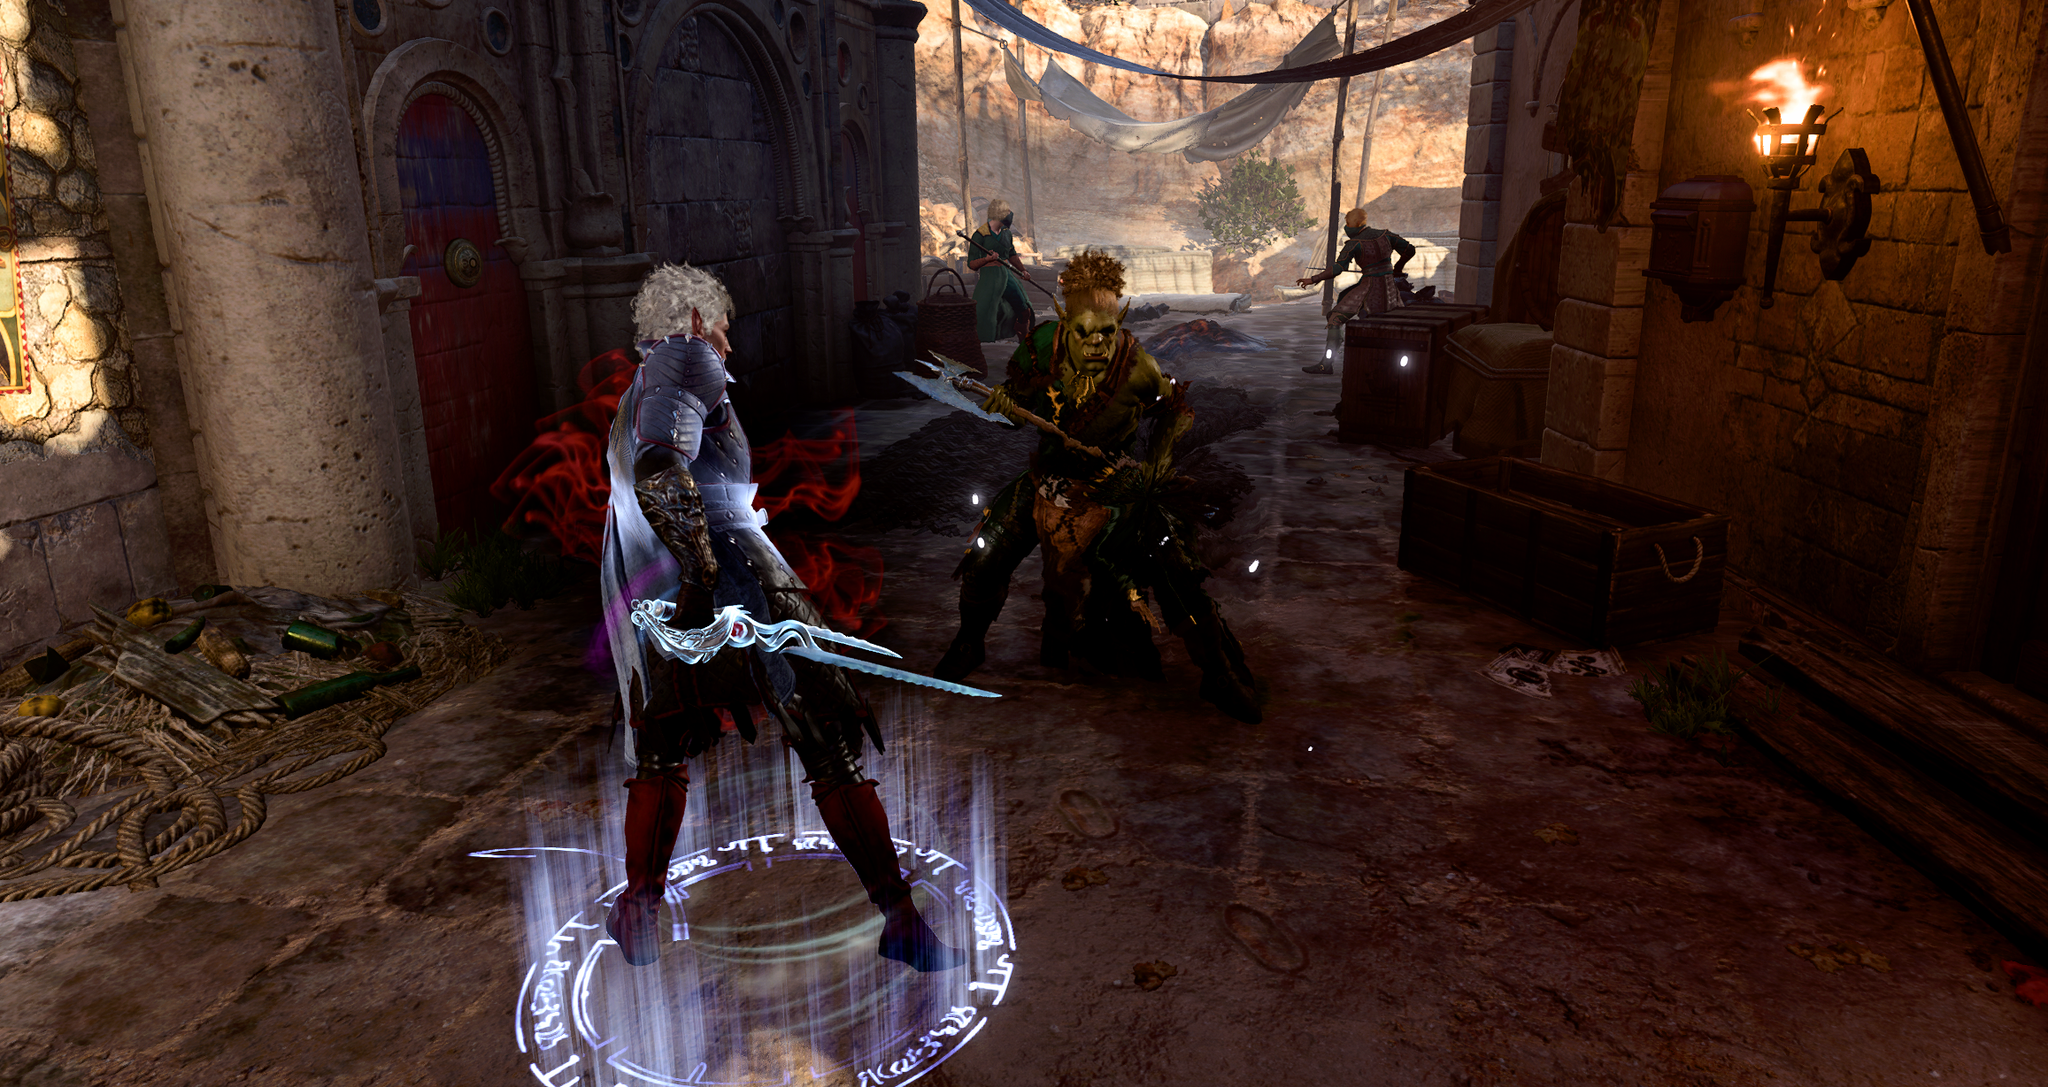
Swashbuckler Build - The Hex Duelist
The Swashbuckler does hypnotize many people's fantasies when you hear it first - a charming and heroic protagonist who uses their wits to always become the winner. Well, Baldur's Gate 3 does offer this fantasy, but there are a few aspects:
- Combat - Swashbuckler shines in the early game. Sadly, it falls off later on.
- Dialogues - being a rogue with access to
 Expertise and requiring high Charisma as a Swashbuckler, dialogues will be your place to shine.
The highlight of this subclass is its special dirty tricks - ![]() Dirty Trick: Flick o' the Wrist,
Dirty Trick: Flick o' the Wrist, ![]() Dirty Trick: Sand Toss, etc. They offer an excellent use of bonus action, and if cards fall right, the combat becomes extremely easy with the debuffs at their disposal.
Dirty Trick: Sand Toss, etc. They offer an excellent use of bonus action, and if cards fall right, the combat becomes extremely easy with the debuffs at their disposal.
The main problem comes from limited main-hand attacks, compared to other martial classes. You do get ![]() Rakish Sneak Attack (Melee), which lands you additional damage rolls, but this does not replace the core problem, which gets exacerbated the more you play.
Rakish Sneak Attack (Melee), which lands you additional damage rolls, but this does not replace the core problem, which gets exacerbated the more you play.
I also thought of using Hexblade dip, to somewhat concentrate on some important aspects like high Charisma, bonus proficiencies, and very strong cantrip - ![]() Booming Blade, which gives a significant damage boost.
Booming Blade, which gives a significant damage boost.
So let's jump into the build!
Class Contribution
The build takes most of the levels in Rogue. There are many variations on how you can do this build. However, I would prioritize
11 Swashbuckler Rogue
- The Expertise is excellent for higher bonuses to some important skills, namely charisma-related ones.
 Evasion that drastically reduces incoming spell damage.
- The ultimate pickpocket feature -
 Reliable Talent. This will make stealing all consumables like scrolls, arrows, and potions too easy!
  Uncanny Dodge can help with survivability if you get attacked by reducing incoming damage, which is useful both in combat and when stealing.
- Special bonus action use -
 Cunning Action: Dash,
  Cunning Action: Hide, which help with engaging and running away for pickpocketing.
  Fancy Footwork is a decent ability that maximizes your mobility, especially if you want your Dirty tricks to be applied on multiple enemies.
 Rakish Audacity gives bonus initiative, and most importantly, upgraded
  Sneak Attack (Melee) -
  Rakish Sneak Attack (Melee), which does not require
  Advantage to work.
- The highlight of Swashbuckler is dirty tricks -
 Dirty Trick: Flick o' the Wrist,
  Dirty Trick: Sand Toss,
  Dirty Trick: Vicious Mockery. These can get enemies
  Disarmed, get them
  Blinded, and weaken their attack rolls. The important thing is that they use bonus actions.
  Panache is a nice feature that can help with dialogue checks. Sadly, during combat, its use is limited, unless you are fighting a specific strong enemy, like a boss.
1 Warlock Hexblade:
 Bind Hexed Weapon - the main level 1 highlight from Hexblade, which makes the weapon use Charisma as the main modifier.
- Warlock Spellslots that reset on short rest.
 Hex Warrior with bonus proficiencies in Medium Armor and Shield. This also lets you use Bind Hexed Weapon to use Charisma as the main weapon stat.
 Hexblade's Curse - not that important for Swashbuckler, as it already has plenty of good uses for bonus action.
 Shield spell for little survivability after each short rest.
 Booming Blade cantrip, which will greatly improve your weapon damage and give some other bonuses.
Synergy with other builds
Swashbuckler is pretty self-sufficient in terms of what it can do. However, if you are looking to get the most out of it, you can go for some synergies:
Controllers
As a Swashbuckler, you get access to ![]() Rakish Sneak Attack (Melee), which at level 11 can deal 6d6 damage. With a critical hit, these become 12d6. This makes it an excellent candidate for control builds that can guarantee a 100% critical chance via
Rakish Sneak Attack (Melee), which at level 11 can deal 6d6 damage. With a critical hit, these become 12d6. This makes it an excellent candidate for control builds that can guarantee a 100% critical chance via ![]() Hold Monster/
Hold Monster/![]() Hold Person. Here are the relevant builds:
Hold Person. Here are the relevant builds:
- Fire Sorcerer - one of the most reliable builds for this type of setup with
 Hat of Fire Acuity +
  Scorching Ray
 - Lorecerer - similar to Fire Sorcerer, can use the same combo and can easily apply total control. Sadly, it is just limited to
 Hold Person.
 - Spellsword build - Sorcadin, Bardadin, Swords Bard Archer, other caster related builds- Lore Bard or even Arcane Trickster with access to unlimited scrolls.
Piercing party
If you opt in to use ![]() Bhaalist Armour late in the game, the build becomes excellent support in terms of applying
Bhaalist Armour late in the game, the build becomes excellent support in terms of applying ![]() Aura Of Murder. These are mostly melee two-handed martials and ranged builds:
Aura Of Murder. These are mostly melee two-handed martials and ranged builds:
- For Archers - Arcane Archer, Swords Bard Archer
- Thrower builds - Eldritch Knigh Thrower, Berserker Thrower
- Melee martials with piercing weapons - Bardadin, Battle Master, Sorcadin, Bladelock
Just having one of these will take your group to the next level and make the late game a breeze.
Leveling Overview
Here is a concise table with all the main picks during your leveling progression. For more detailed reasoning, I go further in the article. Also, do not forget to check the recommended gear, as it is crucial.
| Level | Class | Selection |
|---|---|---|
| 1 | Rogue 1 | STR - 8, DEX - 16 (15+1), CON - 14, INT - 8, WIS - 10, CHA - 17 (15+2) |
| Skills: Acrobatics, Sleight of Hand, Deception, Intimidation, Performance, Persuasion | ||
| 2 | Rogue 2 | - |
| 3 | Rogue 3 | Subclass: Swashbuckler |
| 4 | Rogue 4 | Feat: |
| 5 | Warlock 1 | Cantrips: |
| Subclass: The Hexblade | ||
| Spells: |
||
| 6 | Rogue 5 | - |
| 7 | Rogue 6 | Skills: any |
| 8 | Rogue 7 | - |
| 9 | Rogue 8 | Feat: Ability Improvement - +2 Charisma OR |
| 10 | Rogue 9 | - |
| 11 | Rogue 10 | Feat: |
| 12 | Rogue 11 | - |
Starting the Game - Level 1
This section covers the creation screen and what would go into the best Races, Abilities, and Skills for the Swashbuckler build. If you have already started playing, feel free to do a respec at Withers and follow along. This will make it easy to follow the build step by step.
Races
Picking a race provides various benefits - abilities, dialogue options, looks, etc.
| Race | Features | Description |
|---|---|---|
 Wood Half-Elf Wood Half-Elf |
|
As this is a melee build, the increased movement speed is an excellent and somewhat crucial addition for the build. You will be moving around the battlefield and using your dirty tricks to weaken foes. |
 Wood Elf Wood Elf |
|
|
| High Half-Elf |
|
The main reason to go for these races is that they give access to |
 High Elf High Elf |
|
|
 Half-Orc Half-Orc |
|
The half-orc features are a good addition for the swashbuckler. The small damage boost on critical hits and a survivability boost when you go down will likely be utilized a lot. |
 Githyanki Githyanki |
|
Gives medium armour proficiency, allowing you to wear some good armors from the start. It also gives other useful actions, to help with exploration - |
 Zariel Tiefling Zariel Tiefling |
|
Great race that offers unique looks and a few great features. I recommend |
Class
| Overview | |
|---|---|
 Rogue Rogue |
|
| Features | |
| Exploit a foe's distraction to deal an additional 1d6 damage. Damage increases by 1d6 for every uneven Rogue Level gained. | |
| Exploit a foe's distraction to deal an additional 1d6 damage. Damage increases by 1d6 for every uneven Rogue Level gained. | |
Background
Backgrounds are mostly for role-playing, still you can pick a few that would benefit you the most. My recommendations would be dexterity or charisma based ones:
| Background | Skills | Description |
|---|---|---|
| Charlatan | Deception Sleight of Hand |
All of these are great as they give either Stealth or Sleight of Hand and additional proficiency like Deception, for dialogue checks. |
| Urchin | Sleight of Hand Stealth |
|
| Criminal | Deception Stealth |
|
| Entertainer | Acrobatics Performance |
These give one charisma-based proficiency, while the other skill is not that relevant. Still, the background might be what you are looking for to build your role play. |
| Guild Artisan | Insight Persuasion |
|
| Noble | History Persuasion |
Abilities
Now, let's take a look at the abilities of the Swashbuckler build. Correct allocation will allow you to maximize the early gameplay and get good modifier bonuses.
The core mechanic to understand for ability points is that they give "ability modifiers" that apply to various skill checks. For example, Charisma works on Intimidation and persuasion checks. Wisdom on Survival or Animal Handling, and so on.
You get a higher ability modifier on even values - 10, 12, 14, etc. So keeping it on odd may be useless. However, there are various +1/2 modifiers in the game, specifically ![]() Auntie Ethel's Hair or Feats that help round this up.
Auntie Ethel's Hair or Feats that help round this up.
| Ability | Value | Description |
|---|---|---|
 Strength Strength |
8 | Not that relevant, you can either increase it with |
 |
16 (15+1) | One of the core abilities gives Armour Class, Initiative, and can act as a main weapon ability modifier. |
 Constitution Constitution |
14 | The Constitution will help with maintaining spell |
 Intelligence Intelligence |
8 | This will not be relevant for the build |
 Wisdom Wisdom |
10 | Just enough to remove the negative modifier for Wisdom. |
 Charisma Charisma |
17 (15+2) - with 17 (15+2) - no hair |
Swashbuckler's |
Skills and Expertise
Overall, the skills should be impacted by your roleplaying and background decisions. However, you would still want those that will give you the best benefits. My recommendations are to pick those at which you have a high ability modifier or are useful in general:
- Sleight of Hand
- Intimidation
- Deception
- Performance
- Persuasion
- Acrobatics
Leveling Progression - Levels 2-12
Here is the detailed progression for the Swashbuckler build to get you started. You can use it as a guideline because early games can be daunting and overwhelming. Later on, once you get a feel for the class, you can start picking your options.
Level 2
By this time, you should have landed in the Wilderness area already. A few good bonuses from Rogue are received here:
| Action | Description |
|---|---|
| Easily enter sneak with a bonus action. | |
| Cover more distance this turn: double your movement speed, using a bonus action. | |
| Retreat safely: moving won't provoke Opportunity Attacks. |
Level 3
This level unlocks a Rogue subclass, which gives a little boost in terms of action economy:
Subclass
| Overview | |
|---|---|
 Swashbuckler Swashbuckler |
|
| Features | |
| One of the features that gives the "mobility" feeling for the swashbuckler. It's not game-changing, but it does help limit the offensive potential of enemies. | |
| The initiative bonus is an important factor, but it also gives upgraded |
|
Level 4
This is the most important level for Swashbuckler, and you get the highlight features of this subclass
Features
| Feature | Description |
|---|---|
| The best trick that makes the enemy |
|
| Makes the enemy |
|
| The weakest option in my opinion. It could be used when an enemy is far away, or you have a very high chance of landing it. Still, I would not bet much on this one. |
Feat
Here you have a few options to choose from:
| Feat | Description |
|---|---|
| This would be "the best" choice if you are wearing |
|
| Ability Improvement - +2 Charisma | During the next level, you will get Hexblade and obtain |
Level 5 - Level 1 Hexblade
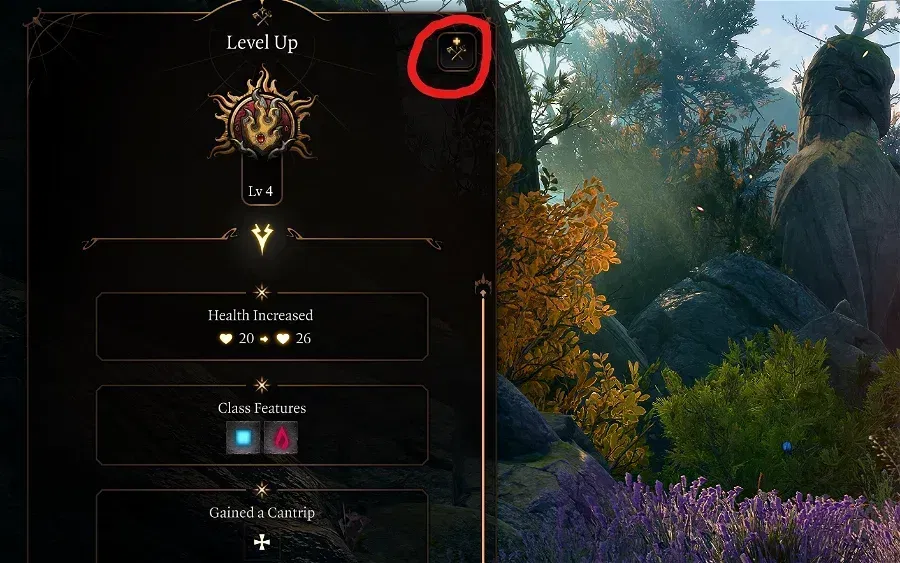
So rogue and Swashbuckler don't get any major features at this level, so I think it is a perfect time to multiclass into Hexblade and get all the sweet benefits it provides. To multiclass, you need to push this button during the level-up screen:
Class
| Overview | |
|---|---|
 Warlock Warlock |
|
| Features | |
 Warlock Spell Slots Warlock Spell Slots |
These spell slots can be used to cast spells and refill each Short Rest. |
Cantrips
| Cantrip | Description |
|---|---|
| The new cantrip can be used with a normal attack without any cost. When enemies move while under its effect, they receive thunder damage. In later levels, it gives a direct damage boost. So no reason not to use it every turn. | |
| Any | Feel free to take any of the cantrips that you find relevant. |
Subclass
| Overview | |
|---|---|
| Features | |
| This action allows you to bind any melee weapon and makes you proficient in it. This also results in using Charisma modifier instead of Strength or Dexterity. It also has a 20% chance to apply |
|
| Using the bonus action, you can improve your damage and increase your crit chance. This is a great alternative to |
|
| This passive is responsible for the multiple bonuses you get, specifically armor and shield proficiencies. | |
Spells
| Spell | Description |
|---|---|
| Extremely valuable spell early in the game. Albeit with limited warlock spell slots, this becomes expensive to use in later levels. So I would only use it for the early game, or if you are in a pinch. | |
| Any | Using other spells would be a waste of spell slots, as their effects are minimal. Just take anything. |
Level 6 - Rogue Lv 5
Nothing fancy, more features:
| Feature | Description |
|---|---|
| A solid survivability improvement to reduce damage. |
Level 7 - Rogue Lv 6
A few boosts to skill proficiencies.
Skills
You gain additional skill expertise picks:
- Deception/Persuasion/Performance - helps with persuading your pickpocket targets
- Acrobatics
Level 8 - Rogue Lv 7
Nothing fancy here, just a new feature:
| Feature | Description |
|---|---|
| Improves your damage resistance to spells. |
Level 9 - Rogue Lv 8
Another feat is unlocked to give a boost to the build.
Feat
| Feat | Description |
|---|---|
| I already covered this feat at level 4. You will most likely continue using |
|
| In general, you do want this feat, but |
Level 10 - Rogue Lv 9
Swashbuckler gets a new feature, which is somewhat decent from role play perspective.
| Feature | Description |
|---|---|
| The action is useful for dialogues, as you can apply |
Level 11 - Rogue Lv 10
This level unlocks another feat, now the third. There are plenty of choices depending on numerous constraints:
Feat
| Feat | Description |
|---|---|
| In terms of pure power, this takes the top. It gives you an additional number of attacks, enabling Swashbuckler to compensate for the lack of |
|
| Ability Improvement - +2 Dexterity | Gives a boost to initiative and armour class. I think the build does need to ensure 20+ Armour Class in the late game. |
Overall, this is needed in two main cases:
|
Level 12
The last level gives a semi-useful feature, which makes ability checks very easy.
| Feature | Description |
|---|---|
| This ensures that you cannot roll less than 10 for ability rolls. For something like |
That's it, the build is done!
Maximizing Ability Scores
Now, as the build progression is covered, there are a few aspects and important decisions you will have to make throughout the game. These will decide your final score for abilities.
Charisma
This is the most important ability, because the build uses ![]() Bind Hexed Weapon from hexblade, and your
Bind Hexed Weapon from hexblade, and your ![]() Dirty Trick: Flick o' the Wrist uses it for success
Dirty Trick: Flick o' the Wrist uses it for success
- 17 Charisma - the base from character creation.
- Act 1 -
 Auntie Ethel's Hair - you will want to get +1 Charisma if you pick this choice.
 - Feat 1 - Ability Improvement - +2 Charisma.
- Act 3 - Mirror of Loss - pick +2 Charisma.
- Act 3 - Mirror of Loss, Patriar's Memory - +1 Charisma
- Feat 2 -
 Actor - +1 Charisma
This will result in hefty 24 Charisma. Of course, if you skip ![]() Actor, you will stay with 23, but it is still plenty. The modifier will be 6-7.
Actor, you will stay with 23, but it is still plenty. The modifier will be 6-7.
Potions, Elixirs, and Consumables
Let's take a look at what consumables you can use to further empower the build.
Potions
As this is a spellsword build, you can use plenty of potion options
| Consumable | Description |
|---|---|
| This is a very powerful potion. It gives an additional action point which can be used to cast a spell or attack. The activation is generally by drinking using a bonus action. However, you can stack together with party members and make one member |
|
| It can be used in two ways - the first one is to enter combat with a |
|
| The attack roll bonus is pretty good, which improves your chances of hitting. | |
| Helps with attack and damage rolls. |
Elixirs
Unfortunately, only one Elixir can be active at a time. However, the good thing is that they last until a long rest, making them very useful and economical.
Be sure to activate them before combat, as otherwise, you will need to use Bonus Action.
| Consumable | Description |
|---|---|
| The elixir gives an easy option to get an additional action point - just kill a foe. This can then be used to attack one more time or cast a full spell. | |
| For the early game, until you get |
|
| For some encounters, you will want to go first. This elixir will ensure that it overcomes even surprise mechanics. | |
| Provides bonus damage of 1d4 and some other good bonuses. | |
| Boosts attack rolls by 1d4; this is a good boost to increase the likelihood of landing attacks. |
Illithid Powers
This special mechanic in Baldur's Gate 3 allows you to consume tadpoles and unlock special Illithid Powers.
At first, you can only use the base powers. As you move to Act 3, you will be able to unlock the outer ring powers, also called Elite.
| Illithid Power | Type | Description |
|---|---|---|
| Base | Beneficial power to take as it does not have any costs, and provides only benefits on the first hits with attack rolls. | |
| Base | It's an easy way to ensure you land critical hits. | |
| Base | It can help to kill an enemy faster if it is left with a few HP. | |
| Base | A great way to weaponize your reaction before obtaining |
|
| Base | Decreases enemy ability score. | |
| Base | Excellent option for bonus temporary HP. It can also apply |
|
| Elite | It can be used to maximize the effectiveness of charisma-based skills, especially those relevant to the main character. | |
| Elite | Potent spell that can be used to pull enemies together. You can then follow up with area-of-effect spells or attacks. In general, it is a very effective action in the hands of any character. | |
| Elite | It can be used to save yourself from a deadly spell. |
Equipment Recommendations
Now I would like to go through some gear recommendations to maximize the Rogue Swashbuckler Build. Items are especially important as they take the build to the next level thanks to their unique effects.
Act 1
For the start of the game 2-handed setup is my go-to recommendation. Be sure to grab ![]() Great Weapon Master: All In if you are up for it.
Great Weapon Master: All In if you are up for it.
| Slot | Item | Description |
|---|---|---|
 Melee (One-Handed) Melee (One-Handed) |
The weapon is my go-to choice until Act 3. It is Finesse one, meaning it works with |
|
| The second option, which has finesse property, and a great action attack - |
||
| Any +1 weapon | Get any finesse weapon with a +1 enchantment, like |
|
 Ranged Ranged |
Gives bonus initiative, allowing one to go earlier in combat. | |
| Gives easy |
||
 Head Head |
Excellent headwear that gives |
|
| Improves movement speed, allowing one to reach important targets easily, early in the game. | ||
 Cloak Cloak |
Accessible if you are Dark Urge. | |
 Armor Armor |
I think this is the best Act 1 armour, as it gives +2 Dexterity, which translates into multiple benefits. Make sure to cast |
|
| With the hexblade dip, you are able to wear medium armor. They alleviate any Armour Class problems for Act 1 and simplify progression. | ||
 Gloves Gloves |
These gloves are the two best options. The |
|
| Gives additional armour class for survivability. | ||
| Defensive gloves against ranged attacks. | ||
 Boots Boots |
One of the best boots in the game with all the bonuses and easy use of |
|
| The boots can easily apply |
||
| Allows movement without limits on |
||
 Amulet Amulet |
If you can acquire it, this can be the best amulet option for most of the game. | |
| Excellent amulet that gives an easy vulnerability source, for the mid-game. | ||
| Gives a free |
||
 Rings Rings |
Use this ring or |
|
| Bonus armour for survivability. | ||
| Movement speed boost, which is especially important in some big area fights in Act 1. | ||
| Improves damage on each hit. |
Act 2 - mid-game
| Slot | Item | Description |
|---|---|---|
| Melee (One-Handed) |
- | Use the Act 1 weapons, as they are still the best picks. |
| Ranged |
The bonus initiative still plays a major role | |
| Allows casting |
||
| Head |
Still serves as the best headwear in terms of damage boost. If another character is using it, an alternative is |
|
| It can give a marginal boost to damage with a decrease in critical hit rolls. | ||
| A distant option to improve Spell Save DC and initiative. I would say this is a low priority and would rather use this on a dedicated caster. But the dirty tricks like |
||
| Cloak |
Improves survivability and Saving Throw success. You want to equip this cloak to maintain that good Armour Class. | |
| Armor |
One of the best-looking armors in the game. You can wear them, and they provide useful bonuses like an |
|
| The best medium armor in this stage, with a decent Armour Class boost, and not limited by +2 Dexterity modifier. | ||
| It can be obtained late in Act 2, once you reach level 9. Solid armor, the main draw is its decent 15 Armour Class. | ||
| The advantage of saving throws is usually overlooked. Still, this is an excellent bonus, enabling better spell and various effects resistance. | ||
| Gloves |
All of these gauntlets are great options as they give a permanent damage rider. Just choose which damage you prefer - fire or necrotic. | |
| This can be an alternative to |
||
| Boots |
Gives +1 Armour Class, which is a significant survivability boost. | |
| - | Boots from Act 1 are still perfect. | |
| Amulet |
Continues to be the best amulet in terms of damage boost. | |
| Excellent pick with |
||
| Excellent amulet that can help in tight situations when you are |
||
| Rings |
A very good ring that inherits damage from your weapon and works especially well in Act 2. | |
| Can be easily activated thanks to |
||
| I would wear this together with |
||
| This ring is an option, as having a high hit chance makes it easier to land your dirty tricks and debuff enemies. | ||
| Still good options from Act 1 that prove useful, especially in the first hours. | ||
| Provides +1 Armour Class to avoid hits. |
Act 3 - Final Build setup
I think you can do two setups. They depend on what items are available to you. My preferred one is the Piercing Duelist.
Piercing Setup
This is my go-to recommendation for the best damage. You will need ![]() Bhaalist Armour to utilize all the effects. This does require respec at Withers and take
Bhaalist Armour to utilize all the effects. This does require respec at Withers and take ![]() Savage Attacker feat instead of
Savage Attacker feat instead of ![]() Great Weapon Master: All In.
Great Weapon Master: All In.
| Slot | Item | Description |
|---|---|---|
| Melee (One-Handed) |
The best fitting weapon in terms of look for the Swashbuckler. Of course, it is also very good, with additional reaction and bonus action attack. Make sure you are not wearing anything else in the offhand. | |
| Alternative option, which should be dual-wielded with one of the off-hand weapon options that I suggest below. | ||
| Only used to buff your main weapon with |
||
| Melee (Off-Hand) |
If you will use |
|
| Alternative option, which is especially powerful if you will land critical hits, thanks to paralyzing effects like |
||
| Armor |
The only recommended armor for this setup. The |
2-Handed Setup
This setup is aimed at those who did not get ![]() Bhaalist Armour and continue using
Bhaalist Armour and continue using ![]() Great Weapon Master: All In feat, to maximize damage and obtain an additional bonus action attack.
Great Weapon Master: All In feat, to maximize damage and obtain an additional bonus action attack.
| Slot | Item | Description |
|---|---|---|
| Melee (One-Handed) |
The best choice to go here is |
|
| Only used to buff your main weapon with |
||
| Armor |
This armor is relevant especially if you decided to go with 16 Dexterity, as it will compensate well for the Armour Class. | |
| The best medium armor with a full dexterity bonus to armour class. | ||
| Gives access to the |
Other Items
| Slot | Item | Description |
|---|---|---|
| Ranged |
The ultimate bow for a stat stick. It gives a special effect, which inflicts additional critical damage with any weapon hit. You can easily guarantee critical hits with |
|
| The bonus initiative is an excellent boost to go early in combat. If it is not a surprise round, it is almost guaranteed. I would only use this if you are concentrating on melee attacks and spell casting. | ||
| The +1 initiative is still good. | ||
| Head |
This helmet gives an additional bonus action when you have less than 50% HP. For this reason, I urge you to get the |
|
| Cloak |
It provides an increased chance of avoiding enemy attacks with attack rolls. | |
| If you have a Cleric in the party with Revorb setup, or you use |
||
| Gloves |
Any of these gloves will prove useful in my opinion. |
|
| These gloves can be ridiculously overpowered if you can guarantee critical hits. | ||
| Boots |
There are plenty of boot options, and all of them are good. The main outlier might be |
|
| - | Boots from previous acts. | |
| Amulet |
I would say this is a key item for the build. Pair it with |
|
| In terms of offensive power, it is the best option. | ||
| The amulet is a great option for a boost in spell resistance via Saving Throws. | ||
| - | Options from previous acts | |
| Rings |
The best option to wear, as the helmet slot will be taken by |
|
| Deals additional damage that is inherited from your weapon. This does require the target to be |
||
| The +1 Armour Class is still a relevant boost for survivability. |
Build Mechanics
In this section, I would like to dive deep into how to play the Swashbuckler Build. This will help you utilize it to the fullest and correctly use various actions and spells throughout the game.
Important Mechanics and Combos
Let's go through key mechanics and tips on how to use the build effectively.
Utilizing Dirty Tricks
So the main mechanic that you will want the Swashbuckler for is its Dirty Tricks. These give an excellent bonus action use, and help to apply some level of control. I would use this priority with the tricks:
- Dirty Trick: Flick o' the Wrist - the most important trick, in my opinion. The foe gets Disarmed, which can leave them helpless, especially if they are a melee martial. However, sometimes I allow them to pick their weapon, as this forces them to use up their action, while otherwise they would cast a spell. This trick also activates Rakish Sneak Attack (Melee), which I will cover a bit later.
- If the enemy is unarmed, then the next priority would be Dirty Trick: Sand Toss, which makes them Blinded and provides an easy Advantage for your whole group.
- The last one, which should be used if you cannot reach them, is Dirty Trick: Vicious Mockery.
However, for numbers 2 and 3, if you have an option to use ![]() Great Weapon Master: Bonus Attack,
Great Weapon Master: Bonus Attack, ![]() Perfectly Balanced Strike, etc., go for these in most cases, especially if the enemy is close to dying. As the dead enemy is better than a live one.
Perfectly Balanced Strike, etc., go for these in most cases, especially if the enemy is close to dying. As the dead enemy is better than a live one.
2 Handed Weapons and Great Weapon Master
Swashbuckler in the early game can use two very good two-handers and gain all rogue benefits - ![]() Phalar Aluve,
Phalar Aluve, ![]() Larethian's Wrath. To further empower them, I recommended taking
Larethian's Wrath. To further empower them, I recommended taking ![]() Great Weapon Master: All In, which comes with a few problems, especially early in the game, mainly -5 to attack rolls.
Great Weapon Master: All In, which comes with a few problems, especially early in the game, mainly -5 to attack rolls.
However, if you can effectively use it at level 4, you will be able to easily kill most of the enemies you encounter, especially as it is easy to die in Act 1. So if you are up for putting in additional effort the benefits are immense. Here are the main ways to increase your attack rolls:
 Bless from Cleric or Paladin, for a 1d4 bonus.
- Spells like
 Faerie Fire, and
  Blindness give an Advantage to attackers.
  Oil of Accuracy or
  Diluted Oil of Sharpness, for a 1 and 2 attack roll bonus.
 Gloves of the Growling Underdog - can be obtained in Goblin Camp, and give an Advantage for attack rolls.
 Phalar Aluve: Sing gives 1d4 to attack rolls.
Now, if you want more in-depth information, I have a guide covering how to increase attack rolls, which lists a lot of options and combinations. You can then pick the bonuses based on your party setup.
Bind the Weapon
Once you get Hexblade dip, remember to activate ![]() Bind Hexed Weapon. This will force the weapon to use the Charisma modifier instead of Dexterity or Strength. Of course, if you opt out of using
Bind Hexed Weapon. This will force the weapon to use the Charisma modifier instead of Dexterity or Strength. Of course, if you opt out of using ![]() Elixir of Hill Giant Strength for the early game, continue to do that.
Elixir of Hill Giant Strength for the early game, continue to do that.
Once you have 20 Charisma or start using other elixirs, specifically ![]() Elixir of Bloodlust,
Elixir of Bloodlust, ![]() Bind Hexed Weapon becomes essential.
Bind Hexed Weapon becomes essential.
If wearing Bhaalist Armor, utilize piercing damage
In Act 3, the best setup in terms of damage becomes ![]() Bhaalist Armour + piercing weapon. The
Bhaalist Armour + piercing weapon. The ![]() Aura Of Murder is crazy powerful, enabling you to deal double weapon damage. This is a good and significant boost for a single character, but it can get crazier...
Aura Of Murder is crazy powerful, enabling you to deal double weapon damage. This is a good and significant boost for a single character, but it can get crazier...
If you have archer builds, they too will benefit from ![]() Aura Of Murder and knowing how much damage they can deal... this can skyrocket.
Aura Of Murder and knowing how much damage they can deal... this can skyrocket.
Another step is melee piercing builds like Paladins, Bardadin, Battle Master, etc., who use weapons like ![]() Nyrulna or
Nyrulna or ![]() Shar's Spear of Evening, they too will benefit from the effect and get their piercing damage doubled.
Shar's Spear of Evening, they too will benefit from the effect and get their piercing damage doubled.
So, Swashbuckler can act as a stepping stone in Act 3, for your party to become extremely powerful and breeze through the hardest game encounters.
Maximize the number of attacks
The Swashbuckler rogue comes with the major problem - a limited number of attacks. This stems from the lack of ![]() Extra Attack, which other melee combatants get. Still, we can try to circumvent this and maximize the possible bonuses:
Extra Attack, which other melee combatants get. Still, we can try to circumvent this and maximize the possible bonuses:
- Base attack
- Bonus action attack with Dirty Tricks
 Helmet of Grit bonus action, for another dirty trick or feat-based bonus action attacks -
  Great Weapon Master: Bonus Attack
 Haste or
  Potion of Speed for an additional action point.
 Elixir of Bloodlust - one more action point if an enemy dies.
Value of being the main character
I do think this build is an excellent main character, albeit as a build, it is mediocre. Here are the main benefits of this:
- High Sleight of Hand allows you to unlock all the chests and disarm traps, always putting you in the lead.
- Very high Charisma and multiple proficiencies + Expertise make your dialogues easily reach +8 bonus rolls.
- Although quite late, you get Panache, which gives an easy Advantage in dialogues.
This is, of course, not a major problem, as many Charisma-based characters can do dialogues well, but for roleplay purposes, I think Swashbuckler is perfect.
Being a pickpocket
One thing that a rogue can do well throughout the game is pickpocket. I do have a dedicated pickpocket build, which picks optimal race, levels, etc. However, the main feature - escaping being ![]() Invisible can be replicated with
Invisible can be replicated with ![]() Potion of Invisibility, which is abundant once you reach Act 2.
Potion of Invisibility, which is abundant once you reach Act 2.
This way, you can safely pickpocket with this char and take it to the next level once you get ![]() Reliable Talent.
Reliable Talent.
Correctly using Rakish Sneak Attack
So the main feature of Rogue is ![]() Sneak Attack (Ranged), which is enabled from the first level. It acts as an
Sneak Attack (Ranged), which is enabled from the first level. It acts as an ![]() Extra Attack feature, which the rogue doesn't get. As a Swashbuckler, you get an upgraded version -
Extra Attack feature, which the rogue doesn't get. As a Swashbuckler, you get an upgraded version - ![]() Rakish Sneak Attack (Melee), which is easier to activate, on straggler foes, without allies around.
Rakish Sneak Attack (Melee), which is easier to activate, on straggler foes, without allies around.
One problem with this attack is that it automatically activates when you attack, and in some cases, you don't want to use it. For example, the enemy may have left a few hitpoints, and wasting 20+ damage would be reckless. To best address it, is to enable the "Ask" reaction in the reactions window:
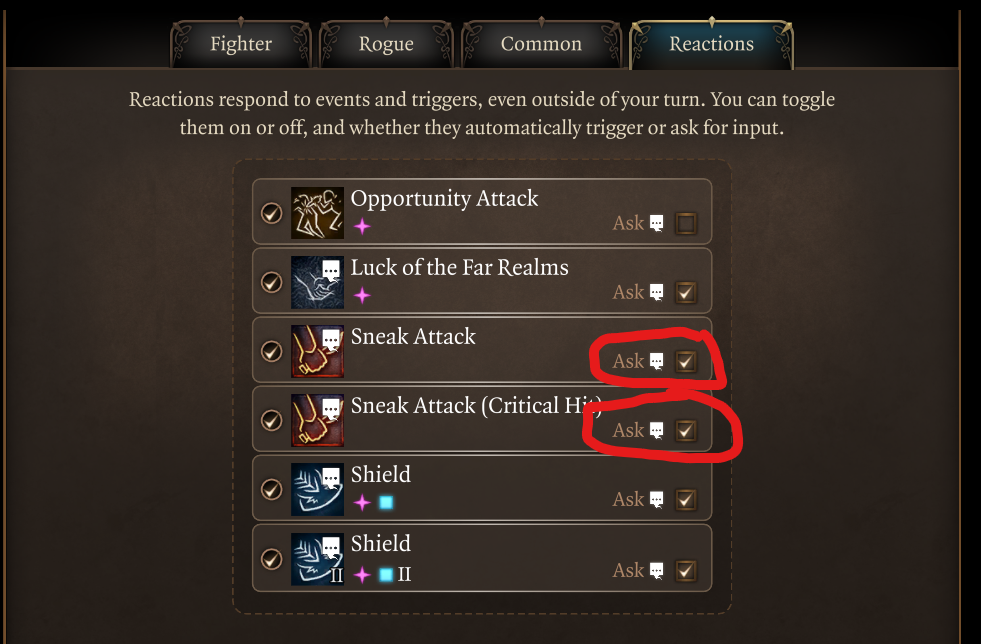
So with this, you will be asked if you want the additional sneak attack damage when using normal attacks or ![]() Dirty Trick: Flick o' the Wrist. Of course, you will still have the Base attack +
Dirty Trick: Flick o' the Wrist. Of course, you will still have the Base attack + ![]() Rakish Sneak Attack (Melee) action in your hotbar, if you wish to unleash both of these at the same time.
Rakish Sneak Attack (Melee) action in your hotbar, if you wish to unleash both of these at the same time.
I also recommend checking if the Sneak Attack is possible, as the notification may not appear if one of the conditions required for it is not met. Just select the action and hover over the enemy to confirm:
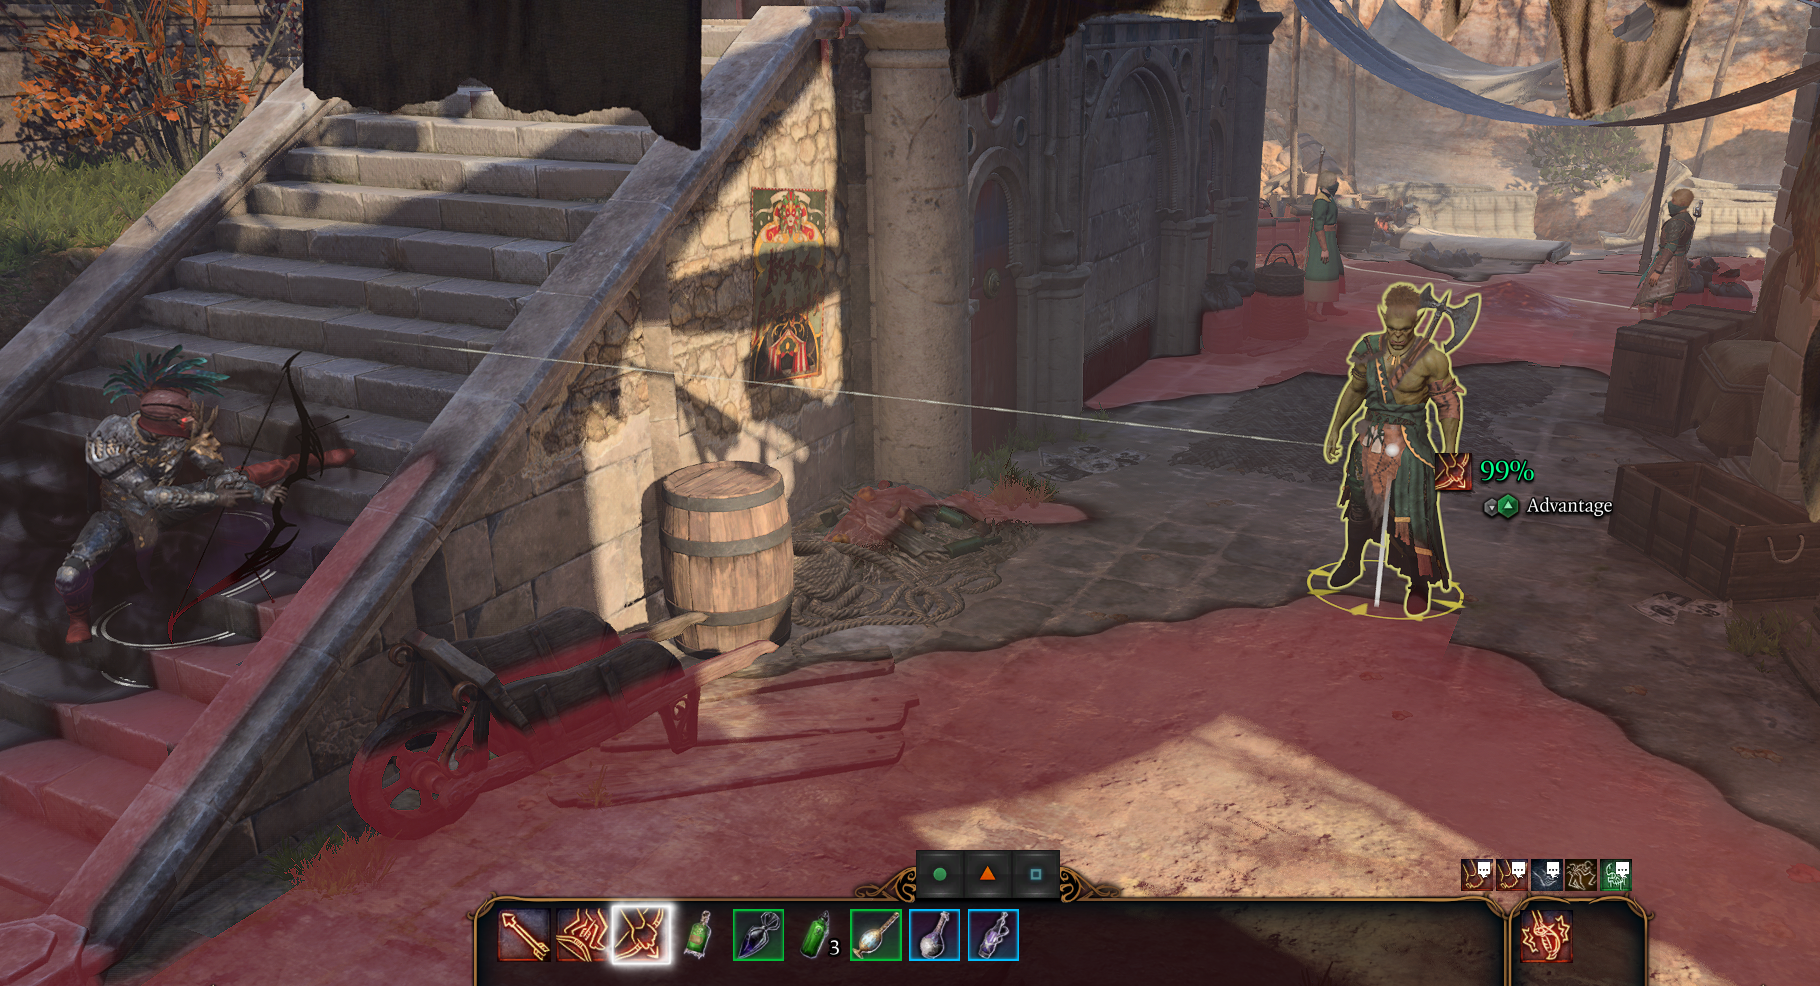
This opens up for some neat combos, like 2x sneak attacks on the initial combat turn, if you hit an unprepared enemy. Just land the first attack, and then you can confirm the reaction popup for another sneak attack:
Early Game Combat
Let's cover how you should progress through combat levels 1-6.
- For the first few levels, play a standard rogue, use Ranged attacks +
 Sneak Attack (Ranged) to maximize the survivability.
 - With Rakish Sneak Attack (Melee), it will be easier to enable sneak attack, for a decent damage boost.
- At level 4, you can start using dirty tricks. Dirty Trick: Flick o' the Wrist is the main one, followed by Dirty Trick: Sand Toss. These should be used in most combat encounters as they allow you to apply control and weaken foes.
- Get
 Phalar Aluve by level 4, the main action should be used on
  Phalar Aluve: Melody, and the bonus action on tricks. I found this to be the best setup to buff allies and effectively use your action economy.
Mid to Late Game Combat
The mid and late-game setup looks more or less the same until Act 3.
- Once you decide whether you go for a piercing or a Two-handed setup, you can commit to the playstyle. With
 Bhaalist Armour, you no longer care about supporting and only worry about engaging enemies head-on with your tricks.
 - Panache has limited uses in combat, as it's costly to use and consumes a whole action. The out-of-combat use is better.
- Remember to rely on Rakish Sneak Attack (Melee) for better damage and compensate for the lack of
 Extra Attack.
 - The rest is more or less the same
Build Variations
Here are some variations that work similarly and utilize the same classes at their core.
| Setup | Description |
|---|---|
| 12 Rogue Swashbuckler | Gives access to 4th feat, but this would lose you Hexblade. Meaning you would have to go more into Dexterity and leave Charisma at 16. |
|
A more warlockish setup that obtains |
Conclusion
Thank you for reading the Swashbuckler Build for Baldur's Gate 3. The build offers excellent main character vibes and interesting early game features. It does leave the late game wanting more, as many of the classes get something neat. Still, for flavour and roleplay, this is one of the best picks.
Cheers!
Like, Dislike, comment, or share!
Join the Discussion
0 commentsNo comments yet.
Be the first one to leave a comment!