
Oath of Crown Paladin Build - Royal Protector - Baldur's Gate 3 (BG3)
Contents
Oath of Crown Paladin Build - Royal Protector
This subclass offers interesting mechanics and blends two classes - Paladin with Cleric. The main feature is the ![]() Spirit Guardians spell, which allows you to become a light-covered melee tank. The tank part is possible thanks to the
Spirit Guardians spell, which allows you to become a light-covered melee tank. The tank part is possible thanks to the ![]() Champion Challenge, which applies penalties to those who attack other targets.
Champion Challenge, which applies penalties to those who attack other targets.
At the core, it is still Paladin, offering powerful ![]() Divine Smite to destroy foes outright if built correctly. Other Paladin features still play a role, like the
Divine Smite to destroy foes outright if built correctly. Other Paladin features still play a role, like the ![]() Aura of Protection, prepared spells, healing, etc.
Aura of Protection, prepared spells, healing, etc.
However, I do want to make the subclass stand out, even if it costs its power. The late game opens up ![]() Spirit Guardians, which in a sense allows you to fully replace Cleric, and debuff enemies with
Spirit Guardians, which in a sense allows you to fully replace Cleric, and debuff enemies with ![]() Radiating Orb and
Radiating Orb and ![]() Reverberation. On top of that, you can support allies using items like
Reverberation. On top of that, you can support allies using items like ![]() The Whispering Promise +
The Whispering Promise + ![]() Turn the Tide, for buffs.
Turn the Tide, for buffs.
This build is a good alternative to the Loredin Build, but in a sense, gets some of its features earlier. I think both of these are good choices, and it depends on what you want. The major caveat might be the ![]() Oath of the Crown Tenets, making it easy to break the oath.
Oath of the Crown Tenets, making it easy to break the oath.
So let's jump into the build!
Class Contribution
The build does have variations, whether it is a pure or multiclass build. I do see merit in some variations to ensure that you can freely use all of the capabilities.
11 Oath of the Crown Paladin
 Divine Sense - an easy
  Advantage in case you fight these specific enemies.
 Lay on Hands - a healing action, which I found is best used outside of combat for curing diseases.
 Righteous Clarity - improves hit chance on allies or yourself and costs only a bonus action. Great for negating the
  Great Weapon Master: All In penalty.
- The iconic Paladin action -
 Divine Smite. With optimizations and some preparations, this can land very powerful strikes and obliterate enemies.
 - Fighting Style choice, for a small stat boost
 Divine Health helps resist diseases.
- Channel oath abilities -
 Champion Challenge and
  Turn the Tide. Both of these can provide good support in terms of healing and battlefield control in controlling the enemy's attention.
  Extra Attack for an additional weapon attack from level 5 onward.
- Oath spells, like
 Command,
  Warding Bond, and
  Spirit Guardians. The latter will prove extremely powerful in the late game, allowing it to debilitate and weaken enemies.
  Aura of Protection - one of the best paladin features, giving an easy way to maintain spell
  Concentration.
- A support-themed action -
 Divine Allegiance, albeit I rarely used it.
 - Enables you to resist
 Frightened with
  Aura of Courage.
 - Additional radiant damage with all melee weapon hits thanks to
 Improved Divine Smite.
1 Warlock Hexblade:
 Bind Hexed Weapon - the main level 1 highlight from Hexblade, which makes the weapon use Charisma as the main modifier.
- Warlock Spellslots that reset on short rest.
 Hex Warrior with bonus proficiencies in Medium Armor and Shield. This also lets you use Bind Hexed Weapon to use Charisma as the main weapon stat.
 Hexblade's Curse - not that important for the build, as it already has plenty of good uses for bonus action.
 Shield spell for little survivability after each short rest.
 Booming Blade cantrip, which will greatly improve your weapon damage and give some other bonuses.
Synergy with other builds
So the Crown Paladin, as you can expect, takes the role of a "protector". This overlaps with one class, particularly Cleric. So I do not recommend running them together, as you will be strapped for items - both of them want ![]() Radiating Orb and
Radiating Orb and ![]() Reverberation gear.
Reverberation gear.
Besides this limitation, you should not be limited to the standard melee martial gear.
Controllers
Almost any party can benefit from good controllers that use ![]() Hold Person,
Hold Person, ![]() Glyph of Warding: Sleep, or
Glyph of Warding: Sleep, or ![]() Hold Monster. They guarantee a 100% critical chance and allow you to maximize the whole group's damage. As the build uses
Hold Monster. They guarantee a 100% critical chance and allow you to maximize the whole group's damage. As the build uses ![]() Divine Smite, this can exacerbate damage more than one expects. It is especially easy to utilize for melee builds:
Divine Smite, this can exacerbate damage more than one expects. It is especially easy to utilize for melee builds:
- Fire Sorcerer - one of the most reliable builds for this type of setup with
 Hat of Fire Acuity +
  Scorching Ray
 - Lorecerer - similar to Fire Sorcerer, can use the same combo and can easily apply total control. Sadly, it is just limited to
 Hold Person and
  Glyph of Warding.
 - Spellsword build - Sorcadin, Bardadin, Swords Bard Archer, other caster related builds- Lore Bard or even Arcane Trickster with access to unlimited scrolls.
Piercing party
If the group has a member which wears ![]() Bhaalist Armour, this enables the Crown Paladin to wear piercing weapons like
Bhaalist Armour, this enables the Crown Paladin to wear piercing weapons like ![]() Nyrulna, for double damage via
Nyrulna, for double damage via ![]() Aura Of Murder.
Aura Of Murder.
- For Archers - Arcane Archer, Swords Bard Archer
- Thrower builds - Eldritch Knigh Thrower, Berserker Thrower
- Melee martials with piercing weapons - Bardadin, Battle Master, Sorcadin, Bladelock
Just having one of these will take your group to the next level and make the late game a breeze.
Melee Builds
Any kind of melee build can also benefit a lot from Crown Paladin, as it applies ![]() Reverberation. Multiple stacks can result in enemies being
Reverberation. Multiple stacks can result in enemies being ![]() Prone, making them easy targets for those who can come close.
Prone, making them easy targets for those who can come close.
So any kind of build that uses melee weapons will benefit from this. Archers can also work, it's just that they will need to come close enough to not get ![]() Threatened, but still have the
Threatened, but still have the ![]() Advantage bonus.
Advantage bonus.
Leveling Overview
Here is a concise table with all the main picks during your leveling progression. For more detailed reasoning, I go further in the article. Also, do not forget to check the recommended gear, as it is crucial.
| Level | Class | Selection |
|---|---|---|
| 1 | Paladin 1 | Subclass: Oath of the Crown |
| Abilities: STR - 8, DEX - 16 (15+1), CON - 14, INT - 8, WIS - 10, CHA - 17 (15+2) | ||
| Skills: Intimidation, Persuasion, Athletics | ||
| 2 | Paladin 2 | Fighting Style: |
| 3 | Paladin 3 | - |
| 4 | Paladin 4 | Feat: |
| 5 | Paladin 5 | - |
| 6 | Paladin 6 | - |
| 7 | Paladin 7 | - |
| 8 | Paladin 8 | Feat: Ability Improvement - +2 Charisma |
| 9 | Paladin 9 | - |
| 10 | Warlock 1 | Cantrips: |
| Subclass: The Hexblade | ||
| Spells: |
||
| 11 | Paladin 11 | - |
| 12 | Paladin 12 | - |
Starting the Game - Level 1
This section covers the creation screen and what would go into the best Races, Abilities, and Skills for the Oath of Crown Paladin build. If you have already started playing, feel free to do a respec at Withers and follow along. This will make it easy to follow the build step by step.
Races
Picking a race provides various benefits - abilities, dialogue options, looks, etc.
| Race | Features | Description |
|---|---|---|
 Wood Half-Elf Wood Half-Elf |
|
The build benefits from increased movement speed immensely. This becomes especially true once you get |
 Wood Elf Wood Elf |
|
|
 Half-Orc Half-Orc |
|
The half-orc features are a good addition for this kind of build, where you will engage in frontline combat. The instant resurrection and bonus critical damage will help immensely. |
 Zariel Tiefling Zariel Tiefling |
|
Great race that offers unique looks and a few great features. I recommend |
| High Half-Elf |
|
These picks are relevant mainly for the |
 High Elf High Elf |
|
|
 Gold Dwarf Gold Dwarf |
|
Gains an additional hit point each level up |
Class
| Overview | |
|---|---|
 Paladin Paladin |
|
| Features | |
| Use your blessed touch to heal a creature or cure it of all diseases and poisons. | |
| Gain |
|
 Channel Oath Charges Channel Oath Charges |
You gain the ability to channel the power contained in your Paladin Oath, which you can use to fuel certain actions. |
Subclass
| Overview | |
|---|---|
| Features | |
| Excellent action to help land hits via increased attack rolls, especially early in the game. | |
| Requirements that you need to meet to uphold the oath. | |
Background
Backgrounds are mostly for role-playing, and you can pick whatever you prefer. If you want to optimize, then it would be good to pick backgrounds that are based on your ability points of Charisma, Dexterity, or Strength.
| Background | Skills | Description |
|---|---|---|
| Soldier | Athletics Intimidation |
The most relevant background as it gives a skill using both strength and charisma abilities. |
| Entertainer | Acrobatics Performance |
Uses both dexterity and charisma modifiers that you will have a good investment. |
| Guild Artisan | Insight Persuasion |
Persuasion proficiency is the main aspect of this background. |
| Noble | History Persuasion |
Similar to the above, but gives History skills. |
Abilities
Now, let's take a look at the abilities of the Crown Paladin build. Correct allocation will allow you to maximize the early gameplay and get good modifier bonuses.
The core mechanic to understand for ability points is that they give "ability modifiers" that apply to various skill checks. For example, Charisma works on Intimidation and persuasion checks. Wisdom on Survival or Animal Handling, and so on.
You get a higher ability modifier on even values - 10, 12, 14, etc. So keeping it on odd may be useless. However, there are various +1/2 modifiers in the game, specifically ![]() Auntie Ethel's Hair or Feats that help round this up.
Auntie Ethel's Hair or Feats that help round this up.
| Ability | Value | Description |
|---|---|---|
 Strength Strength |
8 | Not that relevant, you can either increase it with |
 |
16 (15+1) | One of the core abilities gives Armour Class, Initiative. This will be the main weapon stat if you don't use |
 Constitution Constitution |
14 | The Constitution will help with maintaining spell |
 Intelligence Intelligence |
8 | This will not be relevant for the build |
 Wisdom Wisdom |
10 | Just enough to remove the negative modifier for Wisdom. |
 Charisma Charisma |
17 (15+2) | The main spellcasting modifier will play a major role in weapon, actions, and aura effectiveness. |
Skills and Expertise
Overall, the skills should be impacted by your roleplaying and background decisions. However, you would still want those that will give you the best benefits. My recommendations are to pick those at which you have a high ability modifier or are useful in general:
- Intimidation
- Persuasion
- Athletics
Leveling Progression - Levels 2-12
Here is the detailed progression for the Crown Paladin build to get you started. You can use it as a guideline because early games can be daunting and overwhelming. Later on, once you get a feel for the class, you can start picking your options.
Level 2
By this time, you should have landed on the ![]() Ravaged beach already. The Paladin gives good features from the very start:
Ravaged beach already. The Paladin gives good features from the very start:
| Action | Description |
|---|---|
| A very powerful action unique to Paladins. It will allow you to empower weapon attacks at the cost of spell slots. Use it when you need high damage to take out a foe as fast as possible or land a critical hit. Using higher-level spell slots will improve |
Fighting Style
| Style | Description |
|---|---|
| Gives +1 Armour Class, which results in a decent increase in survivability. I would say this is the only pick that has a significant impact on the build performance. |
Prepared Spells
| Spell | Description |
|---|---|
| Deals decent damage and gives use for Bonus Action early in the game, when you might not have a use yet. Also making an enemy Prone will make it easier to hit them next time. | |
| Gives +2 Armour Class as long as you can maintain |
|
| Can command the creature to drop a weapon, run away, come close, etc. It can be useful in some encounters, especially against low Wisdom enemies. |
Optional - Elixir of Hill Giant Strength
Well, there is a trick early in Act 1, after you reach the first settlement - ![]() Druid's Grove. There, you can stock up on some powerful potions for Acts 1 and 2 -
Druid's Grove. There, you can stock up on some powerful potions for Acts 1 and 2 - ![]() Elixir of Hill Giant Strength.
Elixir of Hill Giant Strength.
What do they do? They increase the Strength to 21 until a Long rest. More or less, this negates any need to have an investment in Strength if you plan to use it till the late game. This enables using various two-handed weapons, not just Finesse ones, and maximizes combat potential in the early game.
This is somewhat gimmicky, however, if you are interested, here is a guide on how to farm Elixir of Hill Giant Strength.
Level 3
We continue leveling Paladin. Level 3, brings some great things both for class and subclass. First, the class benefits:
| Feature | Description |
|---|---|
| Prevents diseases from affecting the Paladin. |
In addition, you get subclass actions:
| Action | Description |
|---|---|
| This can be a powerful buff action. Use it together with |
|
| This action has been receiving a lot of attention, as it allows for control "aggro" as in standard Tank type of build from other games. However, I found it to be somewhat lackluster, once you get the hang of the mechanics, and having everyone in the party buffed up with |
Level 4
Level 4 brings a new feat, slightly improving the build capabilities
Feat
| Feat | Description |
|---|---|
| This is an important feat as it gives a big damage boost to two-handed weapons. You also have various ways to increase attack rolls and counteract the negative rolls. |
Level 5
Finally, level 2 spells are unlocked, new Oath spells, and you get a new and powerful class feature:
| Feature | Description |
|---|---|
| Can make an additional free attack after making an unarmed or weapon attack. |
Always ready spells:
| Spell | Description |
|---|---|
| This spell will play a significant role until you obtain |
|
| Unfortunately, I do not recommend this, although it has its uses. Paladin is already limited with spell slots, so I would only use this on rare occasions. |
Level 2 Spells for Prepared list
As level 2 spells are unlocked, here are some considerations to include in your build:
| Spell | Description |
|---|---|
| It can heal disease, poison, paralysis, and some other negative effects. Not mandatory, but good to have if the situation arises. | |
| This spell can empower your weapons with bonus damage rolls and attack rolls. The higher the spell slot you use, the bigger the bonus. Another thing is that the bonus may seem low, but it will boost your success on hitting while having |
|
| This can be a useful spell if you don't have another source of it. Still, Paladin is limited with spell slots, so I would use this sparingly or rely on Cleric for this. |
Level 6
Another important level for the build as you will get access to an Aura.
| Feature | Description |
|---|---|
| Gives a bonus to saving throws, making Paladin an excellent option for resisting spells and maintaining concentration with spells. |
Level 7
A new subclass feature is unlocked:
| Feature | Description |
|---|---|
| On paper, this sounds like an awesome ability. In reality, it comes with multiple shortcomings - the targeted ally still takes full damage from the enemy, the range is only 1.5 meters, various item effects are still passed onto you (if you wear |
Level 8
A second feat becomes available
Feat
| Feat | Description |
|---|---|
| Ability Improvement - +2 Charisma | My go-to suggestion. In 2 levels, you will gain Hexblade, which will make Charisma the main stat for all the Paladin features, from spellcasting to weapon damage. |
Level 9
This level is a major upgrade for Oath of Crown Paladin, you can now become a full Revorb build.
| Spell | Description |
|---|---|
| This spell is a game-changer as the Paladin can now cover the battlefield with radiant damage. The main selling point is that with a few gear updates, you can easily debuff enemies with |
|
| A niche spell that enables bonus action healing through multiple turns. |
Level 3 Spells for Prepared list
To be fair, as a Paladin, you are very limited by spell slots, so I would avoid using these and save them for ![]() Spirit Guardians or
Spirit Guardians or ![]() Divine Smite. Still, here is a recommendation:
Divine Smite. Still, here is a recommendation:
| Spell | Description |
|---|---|
| Deals good 3d8 radiant damage and applies |
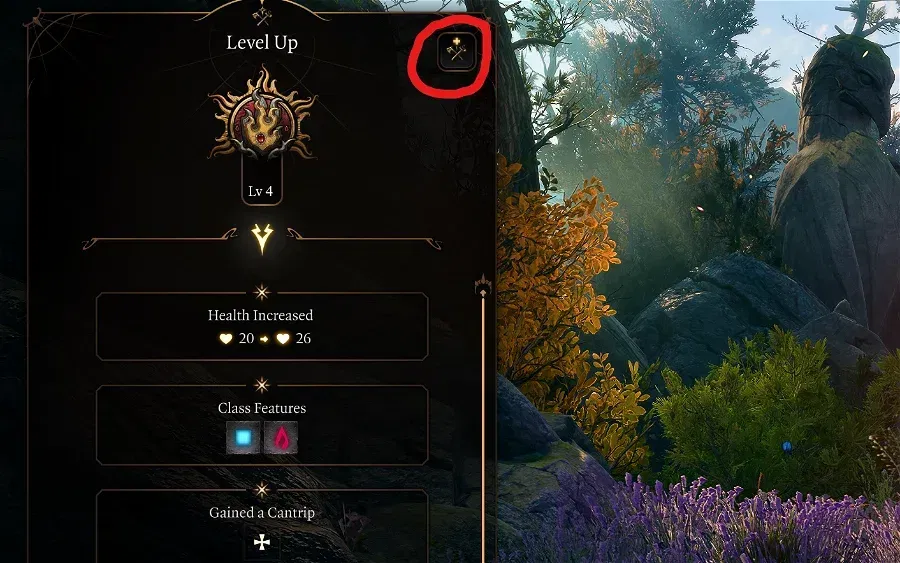
Level 10 - Warlock Lv 1
Now you should multiclass into Warlock and get the Hexblade subclass. The multiclass functionality is avilable in the level up screen:
Class
| Overview | |
|---|---|
 Warlock Warlock |
|
| Features | |
 Warlock Spell Slots Warlock Spell Slots |
These spell slots can be used to cast spells and refill each Short Rest. |
Cantrips
| Cantrip | Description |
|---|---|
| The new cantrip can be used with a normal attack without any cost. When enemies move while under its effect, they receive thunder damage. In later levels, it gives a direct damage boost. So no reason not to use it every turn. | |
| Any | Feel free to take any of the cantrips that you find relevant. |
Subclass
| Overview | |
|---|---|
| Features | |
| This action allows you to bind any melee weapon and makes you proficient in it. This also results in using Charisma modifier instead of Strength or Dexterity. It also has a 20% chance to apply |
|
| Using the bonus action, you can improve your damage and increase your crit chance. This is a great alternative to |
|
| This passive is responsible for the multiple bonuses you get, specifically armor and shield proficiencies. | |
Spells
| Spell | Description |
|---|---|
| Extremely valuable spell early in the game. Albeit with limited warlock spell slots, this becomes expensive to use in later levels. So I would only use it for the early game, or if you are in a pinch. | |
| Any | Using other spells would be a waste of spell slots, as their effects are minimal. Just take anything. |
Level 11 - Paladin Lv 10
Back to the Paladin, which gives additional aura:
| Feature | Description |
|---|---|
| The aura is nothing spectacular, but as it's free and applies to nearby allies, no reason not to use it. |
Level 12 - Paladin Lv 11
| Feature | Description |
|---|---|
| Free 1d8 damage boost! |
That's it, the build is done!
Maximizing Ability Scores
Now, as the build progression is covered, there are a few aspects and important decisions you will have to make throughout the game. These will decide your final score for abilities.
Charisma
This is the most important ability, because the build uses ![]() Bind Hexed Weapon from hexblade, and it improves spellcasting capabilities:
Bind Hexed Weapon from hexblade, and it improves spellcasting capabilities:
- 17 Charisma - the base from character creation.
- Act 1 -
 Auntie Ethel's Hair - you will want to get +1 Charisma if you pick this choice.
 - Feat 1 - Ability Improvement - +2 Charisma.
- Act 3 - Mirror of Loss - pick +2 Charisma.
- Act 3 - Mirror of Loss - Patriar's Memory - +1 Charisma if did not take Auntie Ethel's Hair.
This results in 22 Charisma, so it is a good modifier of +6.
Potions, Elixirs, and Consumables
Let's take a look at what consumables you can use to further empower the build.
Potions
| Consumable | Description |
|---|---|
| This is a very powerful potion. It gives an additional action point which can be used to cast a spell or attack. The activation is generally by drinking using a bonus action. However, you can stack together with party members and make one member |
|
| The attack roll bonus is pretty good, which improves your chances of hitting. | |
| Helps with attack and damage rolls. | |
| Grants resistance to all damage; this is a particularly good pick for effective use of |
|
| An easy way to restore level 1-2 spell slots. These are mainly used for |
|
| Fully restores all spell slots, but probably best saved for casters. | |
| It can be used in two ways - the first one is to enter combat with a |
|
| Gives |
Elixirs
Unfortunately, only one Elixir can be active at a time. However, the good thing is that they last until a long rest, making them very useful and economical.
Be sure to activate them before combat, as otherwise, you will need to use Bonus Action.
| Consumable | Description |
|---|---|
| The elixir gives an easy option to get an additional action point - just kill a foe. This can then be used to attack one more time or cast a full spell. | |
| For the early game, until you get |
|
| Gives an additional level 3 spell slot, especially useful when you see that none of them are available for one more encounter before a long rest. | |
| For some encounters, you will want to go first. This elixir will ensure that it overcomes even |
|
| Gives an |
|
| Provides bonus damage of 1d4 and some other good bonuses. | |
| Boosts attack rolls by 1d4; this is a good boost to increase the likelihood of landing attacks. | |
| The elixir has a very niche use for |
Illithid Powers
This special mechanic in Baldur's Gate 3 allows you to consume tadpoles and unlock special Illithid Powers.
At first, you can only use the base powers. As you move to Act 3, you will be able to unlock the outer ring powers, also called Elite.
| Illithid Power | Type | Description |
|---|---|---|
| Base | Beneficial power to take as it does not have any costs, and provides only benefits on the first hits with attack rolls. | |
| Base | It's an easy way to ensure you land critical hits, especially good with |
|
| Base | It can help to kill an enemy faster if it is left with a few HP. | |
| Base | Excellent way to deal additional damage with reaction, early and mid game. | |
| Base | Decreases enemy ability score. | |
| Base | Excellent option for bonus temporary HP. It can also apply |
|
| Elite | It can be used to maximize the effectiveness of charisma-based skills, especially those relevant to the main character. | |
| Elite | Potent spell that can be used to pull enemies together. You can then follow up with area-of-effect spells or attacks. In general, it is a very effective action in the hands of any character. | |
| Elite | It can be used to save yourself from a deadly spell. | |
| Elite | Gives a free use of spells and works on Channel Oath actions. |
Equipment Recommendations
Now I would like to go through some gear recommendations to maximize the Oath of the Crown Build. Items are especially important as they take the build to the next level thanks to their unique effects.
Act 1
| Slot | Item | Description |
|---|---|---|
 Melee (Two-Handed) Melee (Two-Handed) |
This is a perfect weapon from the early game up to the late game. If you want a more "optimized" setup, I would go with it. You can also take |
|
| Similar to |
||
| Very special weapon, that works well to better sustain |
||
| These weapons are go-to picks if you want other options, especially for more damage. You would need to use |
||
 Ranged Ranged |
Gives bonus initiative, allowing one to go earlier in combat. | |
| Gives easy |
||
 Head Head |
One of the best headwear for pure weapon damage increase. | |
| Get this helmet, as it will be useful later on. | ||
| Works well with |
||
| Improves movement speed, allowing one to reach important targets easily, early in the game. | ||
 Cloak Cloak |
Accessible if you are Dark Urge. | |
 Armor Armor |
My go-to pick if you decide to utilize the Oath of Crown Paladin spell - |
|
| Make sure to get this armor as it will prove valuable later on. It can be used now, as you will apply |
||
 Gloves Gloves |
Best gloves if you are using |
|
| Make sure to get these gloves. For now, I would say they are not as important, but will become so later. | ||
| Gives easy |
||
 Boots Boots |
The best boots in the game for walking on |
|
| Be sure to get these, as they will play a major role later on. | ||
| Excellent boots to help move through |
||
 Amulet Amulet |
If you can acquire it, this can be the best amulet option for most of the game. | |
| Excellent amulet that gives an easy vulnerability source, for the mid-game. | ||
| Gives a free |
||
 Rings Rings |
Excellent ring to easily apply |
|
| Bonus armour for survivability. | ||
| Helps with making |
||
| Movement speed boost, which is especially important in some big area fights in Act 1. | ||
| Improves damage on each hit. |
Act 2 - mid-game
Pre Level 9
| Slot | Item | Description |
|---|---|---|
| Melee (Two-Handed) |
Continues to be the best sword with its buff until you reach level 9. | |
| A weapon option if you want something new, but it requires using the |
||
| Ranged |
The bonus initiative still plays a major role | |
| Allows casting |
||
| Head |
- | Previous Act headwear |
| Cloak |
Improves survivability and Saving Throw success. You want to equip this cloak to maintain that good Armour Class. | |
| Armor |
If using |
|
| Somewhat inferior armor option if you skipped |
||
| Medium armour options, if you are not using |
||
| Gloves |
Solid gloves for damage boost. | |
| Boots |
Gives +1 Armour Class, which is a significant survivability boost. | |
| - | Boots from Act 1 are still perfect. | |
| Amulet |
Continues to be the best amulet in terms of damage boost. | |
| Excellent pick with |
||
| Excellent amulet that can help in tight situations when you are |
||
| Rings |
Easy radiant damage boost. | |
| An excellent way to gain an easy |
||
| Still a useful ring for buffing allies with |
||
| Improves armour class, making it easier to avoid enemy attacks. |
Now, from level 9, once you get ![]() Spirit Guardians, this is the recommended item setup:
Spirit Guardians, this is the recommended item setup:
| Slot | Item | Description |
|---|---|---|
| Head |
One of the best helmets for revorb setup, when enemies miss, further applying |
|
| Cloak |
Improves survivability and Saving Throw success. You want to equip this cloak to maintain that good Armour Class. | |
| Armor |
Helps apply the |
|
| Gloves |
The best gloves for |
|
| Another option to apply |
||
| Boots |
The best boots for applying |
|
| Amulet |
Use the amulet when you want to restore a level 3 spell slot. It can be removed after use. | |
| Continues to be the best amulet in terms of damage boost. | ||
| Excellent pick with |
||
| Excellent amulet that can help in tight situations when you are |
||
| Rings |
An easy way to apply radiant damage together with |
|
| Still a useful ring for buffing allies with |
||
| Improves armour class, making it easier to avoid enemy attacks. | ||
| An easy way to get a crit hit for |
Act 3 - Final Build setup
There are plenty of gear variations here, and it all depends on how much you want to lean into weapon damage, revorb, and support side.
For example, items like ![]() The Whispering Promise +
The Whispering Promise + ![]() The Reviving Hands are excellent for support, but this might not be needed in Act 3.
The Reviving Hands are excellent for support, but this might not be needed in Act 3. ![]() Gloves of Belligerent Skies +
Gloves of Belligerent Skies + ![]() Ring of Mental Inhibition +
Ring of Mental Inhibition + ![]() Boots of Stormy Clamour +
Boots of Stormy Clamour + ![]() Luminous Armour allows for constant debuffs, weakening foes, and forcing them
Luminous Armour allows for constant debuffs, weakening foes, and forcing them ![]() Prone.
Prone.
Or you can wear items that buff damage like ![]() Legacy of the Masters,
Legacy of the Masters, ![]() Strange Conduit Ring, and improve weapon capabilities.
Strange Conduit Ring, and improve weapon capabilities.
As you can see, there are various choices, so pick the ones that best fit your party and gear availability.
| Slot | Item | Description |
|---|---|---|
| Melee (Two-Handed) |
This continues to be the best weapon in terms of provided buffs. Still, as you have |
|
| It works the same as already mentioned in Act 1 equipment, and gives the build more sturdiness with |
||
| These are the best weapons if you have a way of getting |
||
| Two-handed Finesse weapon that has |
||
| Cool looking greatsword, which comes with a caveat. It requires strength, and this means you should use the |
||
| Ranged |
Easy initiative source, to go early. | |
| Head |
Continues to be my favourite helmet option for enemies that dare to attack you. | |
| Gives |
||
| Gives an easy way to obtain |
||
| This helmet works well with |
||
| Gives immunity to critical hits and heals every turn. | ||
| Cloak |
Improves chances of avoiding attacks from enemies, in turn activating |
|
| As you will be constantly applying |
||
| Armor |
The best armor for applying |
|
| Gloves |
The best gloves for |
|
| Upgraded version of |
||
| Boots |
- | Boots from previous acts. |
| Amulet |
I would say this is the best amulet overall. It makes it easy to maintain Concentration, and makes it reasonable to use |
|
| - | Previous Acts amulets | |
| Rings |
Straightforward damage boost on each hit that you will do. | |
| This ring has a good synergy with |
||
| With |
||
| If you are still using |
||
| A more offensive ring option, as you will be concentrating on |
||
| This ring is perfect with |
||
| An easy way to get a crit hit for |
Build Mechanics
In this section, I would like to dive deep into how to play the Crow Paladin Build. This will help you utilize it to the fullest and correctly use various actions and spells throughout the game.
Important Mechanics and Combos
Let's go through key mechanics and tips on how to use the build effectively.
Managing Great Weapon Master
The most important aspect of most two-handed builds is correctly utilizing ![]() Great Weapon Master: All In and its -5 attack roll penalty. By putting an effort into minimizing the debuff, from level 4, you can get 10 flat damage boosts, making most of the enemies a cakewalk.
Great Weapon Master: All In and its -5 attack roll penalty. By putting an effort into minimizing the debuff, from level 4, you can get 10 flat damage boosts, making most of the enemies a cakewalk.
 Bless from Cleric or Paladin, for a 1d4 bonus.
- Spells like
 Faerie Fire, and
  Blindness give an Advantage to attackers.
  Oil of Accuracy or
  Diluted Oil of Sharpness, for a 1 and 2 attack roll bonus.
 Gloves of the Growling Underdog - can be obtained in Goblin Camp and give an Advantage for attack rolls.
 Phalar Aluve: Sing gives 1d4 to attack rolls.
Now, if you want more in-depth information, I have a guide covering how to increase attack rolls, which lists a lot of options and combinations. You can then pick the bonuses based on your party setup.
Effectively using Divine Smites
The key aspect of any build that involves at least 2 levels of Paladin is ![]() Divine Smite. It is one of the coolest actions, punishing your targets with a ray of light. To use it effectively, there are a few tips that I have.
Divine Smite. It is one of the coolest actions, punishing your targets with a ray of light. To use it effectively, there are a few tips that I have.
First, update your reactions and make sure the ![]() Divine Smite has a reaction on critical hit and asks you to use it:
Divine Smite has a reaction on critical hit and asks you to use it:
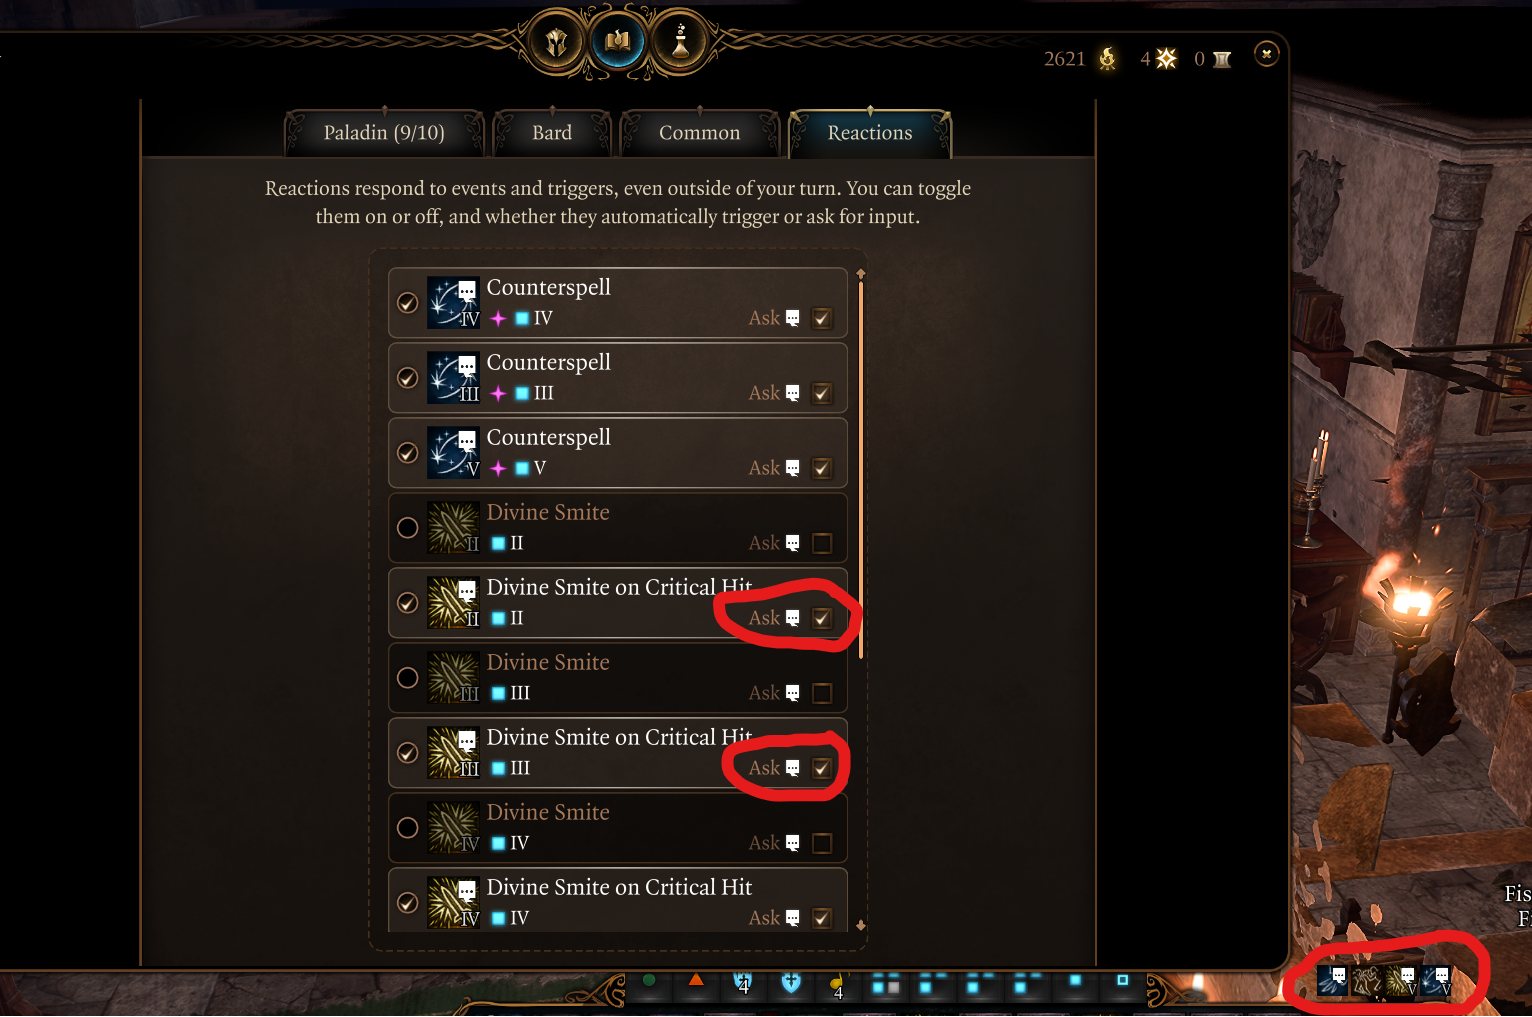
This way, you will not waste your time with unnecessary pop-ups and can use it when needed. For example, using a critical hit ![]() Divine Smite on a weak foe with a few HP will feel like a waste. However, you still might want to use it on the boss even if it has few HP to finish them off.
Divine Smite on a weak foe with a few HP will feel like a waste. However, you still might want to use it on the boss even if it has few HP to finish them off.
If you want to use the normal smite, just activate it from the quick bar by selecting the ![]() Divine Smite action. Or set it also as a reaction "Ask", but it might get irritating with all the popups. Try playing, and decide based on your experience.
Divine Smite action. Or set it also as a reaction "Ask", but it might get irritating with all the popups. Try playing, and decide based on your experience.
Overall, critical hits are extremely important for these attacks as the large number of dice rolls gets doubled and gets rerolled with ![]() Savage Attacker. That is why I recommend
Savage Attacker. That is why I recommend ![]() Killer's Sweetheart,
Killer's Sweetheart, ![]() Luck of the Far Realms, and spells like
Luck of the Far Realms, and spells like ![]() Hold Person.
Hold Person.
Another option, if you want, a big nova damage, is to use one of the special smites - ![]() Blinding Smite,
Blinding Smite, ![]() Thunderous Smite, and use
Thunderous Smite, and use ![]() Divine Smite as a reaction on the same attack. This can deal huge damage, but burns through spell slots very fast. I only recommend this if
Divine Smite as a reaction on the same attack. This can deal huge damage, but burns through spell slots very fast. I only recommend this if ![]() Great Weapon Master: Bonus Attack has not activated.
Great Weapon Master: Bonus Attack has not activated.
As I mentioned, other types of smites - ![]() Thunderous Smite,
Thunderous Smite, ![]() Searing Smite, come with unique effects and can apply various effects like
Searing Smite, come with unique effects and can apply various effects like ![]() Blinded,
Blinded, ![]() Frightened, etc. Generally, I do not recommend using them if you have
Frightened, etc. Generally, I do not recommend using them if you have ![]() Great Weapon Master: All In, as your bonus action is a very valuable source of damage.
Great Weapon Master: All In, as your bonus action is a very valuable source of damage.
Bind the Weapon
Once you get Hexblade dip, remember to activate ![]() Bind Hexed Weapon. This will force the weapon to use the Charisma modifier instead of Dexterity or Strength. Of course, if you opt out of using
Bind Hexed Weapon. This will force the weapon to use the Charisma modifier instead of Dexterity or Strength. Of course, if you opt out of using ![]() Elixir of Hill Giant Strength for the early game, continue to do that.
Elixir of Hill Giant Strength for the early game, continue to do that.
Once you have 20 Charisma or start using other elixirs, specifically ![]() Elixir of Bloodlust,
Elixir of Bloodlust, ![]() Bind Hexed Weapon becomes essential.
Bind Hexed Weapon becomes essential.
Applying Revorb effects
So Revorb stands for items that apply ![]() Reverberation and
Reverberation and ![]() Radiating Orb debuffs on enemies. Some of these items work closely together, while others apply separately. As the build uses radiant damage with
Radiating Orb debuffs on enemies. Some of these items work closely together, while others apply separately. As the build uses radiant damage with ![]() Divine Smite and
Divine Smite and ![]() Spirit Guardians, it is easy to get these effects applied:
Spirit Guardians, it is easy to get these effects applied:
- The main item is
 Luminous Armour that applies
  Radiating Orb each time you deal radiant damage, for example, with Divine Smite,
  Callous Glow Ring, Spirit Guardians, etc.
  Gloves of Belligerent Skies easily apply
  Reverberation with radiant, lightning, or thunder damage.
  Luminous Gloves are an alternative in case you do not have access to other gloves.
- Callous Glow Ring does additional radiant damage, which can proc Gloves of Belligerent Skies and Luminous Armour.
- For boots
 Boots of Stormy Clamour gives an easy way to apply Reverberation with various conditions.
  Holy Lance Helm, when you are missed, procs bonus radiant damage, which activates Gloves of Belligerent Skies.
- With Callous Glow Ring each weapon hit will also apply revorb effects, as it deals radiant damage rider.
- Champion Challenge also procs condition, meaning that you can activate Reverberation.
Proccing all of these effects will greatly reduce enemy hit chance and, with high ![]() Reverberation, can force enemies
Reverberation, can force enemies ![]() Prone, making them waste their movement speed, and giving allies an easy way to obtain
Prone, making them waste their movement speed, and giving allies an easy way to obtain ![]() Advantage. It ends up being total mayhem for enemy positions.
Advantage. It ends up being total mayhem for enemy positions.
Champion's Challenge and its effectiveness
One of the main features of Crown Paladin is ![]() Champion Challenge. I do think it is somewhat overrated, however, in the late game, with
Champion Challenge. I do think it is somewhat overrated, however, in the late game, with ![]() Spirit Guardians, you have an option to lock down foes on yourself. The synergy is quite good.
Spirit Guardians, you have an option to lock down foes on yourself. The synergy is quite good.
First, you make sure to have ![]() Spirit Guardians active with all the mentioned Revorb gear. Then you use
Spirit Guardians active with all the mentioned Revorb gear. Then you use ![]() Champion Challenge, which can proc
Champion Challenge, which can proc ![]() Reverberation and
Reverberation and ![]() Mental Fatigue (if you have
Mental Fatigue (if you have ![]() Ring of Mental Inhibition equipped). If it's successful, enemies will be more inclined to attack you. As they come close,
Ring of Mental Inhibition equipped). If it's successful, enemies will be more inclined to attack you. As they come close, ![]() Spirit Guardians will activate, applying more debuffs.
Spirit Guardians will activate, applying more debuffs.
Now, if enemies decide to attack you with multiple ![]() Radiating Orb stacks, they will miss you, wasting their attacks. All of these debuffs will weaken them, and more
Radiating Orb stacks, they will miss you, wasting their attacks. All of these debuffs will weaken them, and more ![]() Reverberation will be applied on the next turn.
Reverberation will be applied on the next turn.
Making Divine Allegiance work
The most difficult part of the Oath of the Crown is the ![]() Divine Allegiance feature. It does work, but has a few caveats:
Divine Allegiance feature. It does work, but has a few caveats:
- Very short range of 1.5m, which requires you to be very close to an ally.
- The ally still receives full damage from the enemy; you somewhat heal it, but you incur damage yourself.
- The received damage is radiant. This means that you either have to use
 Elixir of Radiant Resistance or
  Elixir of Universal Resistance (which is a potion and works with other elixirs) or Warding Bond to gain resistance, which requires a cleric or someone wearing
  Viconia's Walking Fortress. Without these, the damage will eat away your HP quite fast, especially on higher levels.
 - If you have an item like Callous Glow Ring, it will deal 2 damage to yourself, which sounds ridiculous, but it works like this.
So there are plenty of problems. You could use something like my Life Cleric Build or ![]() Viconia's Walking Fortress to get radiant damage resistance via
Viconia's Walking Fortress to get radiant damage resistance via ![]() Warding Bond. Good thing, it does not overlap with items for the Crown Paladin, but makes it somewhat tedious workaround, to make the
Warding Bond. Good thing, it does not overlap with items for the Crown Paladin, but makes it somewhat tedious workaround, to make the ![]() Divine Allegiance work.
Divine Allegiance work.
Early Game Combat
For this build, I would like to start with the part before you get to level 9:
- The Righteous Clarity is an amazing early game buff to increase your hit chance. More so, when you pick Great Weapon Master: All In.
- Once you obtain
 The Whispering Promise/
 Hellrider's Pride, you can use Turn the Tide to buff allies and yourself with just a bonus action. This will increase hit chance and damage resistance.
 - Command can be used occasionally, if it has like 80% chance to land, otherwise I would not bother.
- Use Divine Smite especially on critical hits to inflict heavy damage. Use it sparingly, as otherwise it will eat through your spell slots.
- Once you get Warding Bond, you can use it together with heavy armor like
 Adamantine Splint Armour to reduce incoming damage and improve allies' survivability.
 - If you don't have a cleric in the group,
 Aid can be used to improve max health. Still, you are limited by spell slots, so evaluate whether it is useful to use it.
 - Champion Challenge is somewhat limited in use for now. You do need a higher Spell Save DC, and being hit with multiple enemies without damage resistances can mean easy death.
- Remember to activate Aura of Protection.
- If you are wearing
 Phalar Aluve, remember to apply
  Phalar Aluve: Melody on boss fights or bigger encounters, to either buff/debuff everyone around.
 - You do get additional smites that use an action + bonus action with special effects. For example,
 Thunderous Smite is great at pushing off enemies or making them
  Prone. This opens up an easy Advantage for yourself or your allies.
Late Game Combat
This part covers how the combat approach should work from level 9, once you get ![]() Spirit Guardians:
Spirit Guardians:
- With Spirit Guardians unlocked, this should be your bread and butter in more difficult encounters. Make sure to equip at least some revorb gear, and you are set.
- Evaluate your hit chance. If you will be using melee weapon attacks and you have a low hit chance, use Righteous Clarity to buff yourself.
- This is where Champion Challenge can be useful, as you debuff enemies with Radiating Orb, they will have a high chance of missing, and it's okay if you are constantly being targeted by them.
- Depending on your setup, Turn the Tide with The Whispering Promise (and The Reviving Hands) can be useful to buff everyone just for the cost of a bonus action, especially if it is a bigger encounter.
- With hexblade dip, make sure to apply Bind Hexed Weapon.
- With Booming Blade, I do recommend using it on any weapon attack that you do, as it is free damage. If it's a crit, add Divine Smite, and you have powerful damage output.
Build Variations
Here are some variations that work similarly and utilize the same classes at their core.
| Setup | Description |
|---|---|
|
This variation gives Constitution Saving Throw proficiency, which enables better spell concentration. Still, you will need to use |
|
Going for this variation enables you to get the third feat, which could be used for |
|
This variation gives very high constitution saving throw rolls, and |
Conclusion
Thank you for reading the Oath of Crown Paladin - Royal Protector Build for Baldur's Gate 3. This is truly a great build with versatile item options, from Finesse weapons to polearms and longswords. It can also replace your cleric in terms of its spells and healing potential.
Cheers!
Like, Dislike, comment, or share!
Join the Discussion
0 commentsNo comments yet.
Be the first one to leave a comment!